
Introduction
ZINFI's Multi-Touch Campaign Management is a ground-breaking addition to ZINFI's Unified Partner Management (UPM) platform, enabling customers and their partners to create multi-touch functionality for marketing campaigns they wish to be executed by their partners. Multi-Touch's canvas user interface with drag-and-drop functionality is essential for creating quick and effective marketing initiatives.
Campaign Setup & Management
Using ZINFI's Multi-Touch Campaign Management, your organization can set up diverse content and a variety of campaign tactics so that your partners can run single-touch or multi-touch co-branded campaigns using a SMART campaign flow. Partners can easily edit and update the campaign components that the Admin has configured.
Multi-Touch allows you to set up new marketing campaigns for your partners, quickly edit existing campaigns, and associate them with marketing tactics like email, microsite, web syndication, search, and social. Setup Validation (utilizing color codes) of drag-and-drop multi-touch Components provides an enhanced UI/UX that speeds up configurations and execution of Multi-Touch Campaigns.
Multi-Touch Engagement Workflow
With Multi-Touch, it is easy to define the flow of a multi-tactic, multi-touch campaign. You can create a multi-touch drip campaign with pre-configured tactics and assets, and then your partners can easily customize the campaign workflow for use in various marketing activities.
Multi-Touch Campaign Management allows you to create multiple flows within a specific campaign using a combination of tactics and assets. Partners can select the tactics and assets that best match their business requirements. You can also define the duration of each flow for the system to ensure campaigns are completed within the specified time frame after the launch of the first tactic.
Campaign Customization & Launch
Using ZINFI's Multi-Touch Campaign Management, partners can choose from the available campaign workflows created and assigned by the vendor to match their unique business approach and requirements. Channel partners can further customize each workflow with their own marketing assets. Drag-and-drop functionality makes customization easy and encourages partner engagement.
Dynamic Forms can be further integrated with marketing tactics — customized Campaign Pages are executed to the end-user. The Dynamic Form helps you reach out to prospects and capture valuable information through the Form directly, syncing the record(s)/information to the specific UPM application.
Campaigns — Manage Campaigns
Accessing and Viewing Campaigns
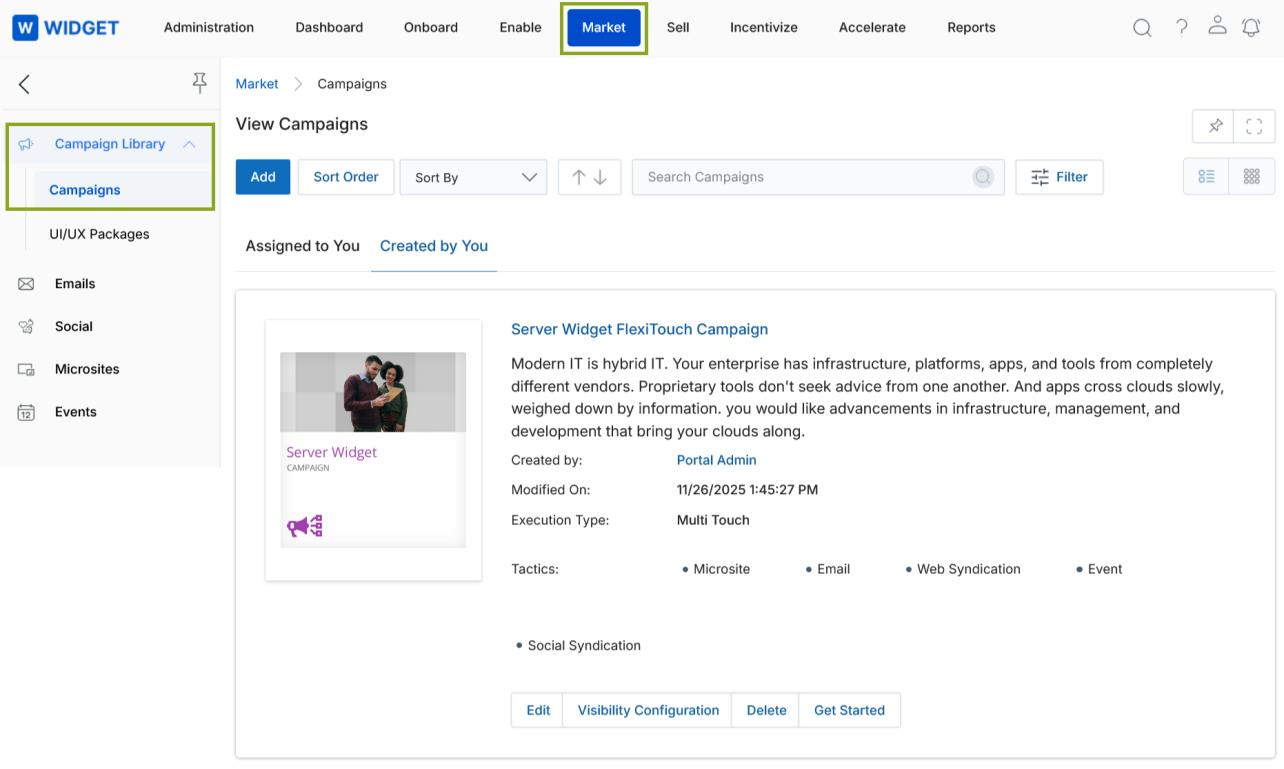
- Click Market on the top menu.
- Click Multi-Touch > Campaigns from the left menu bar.
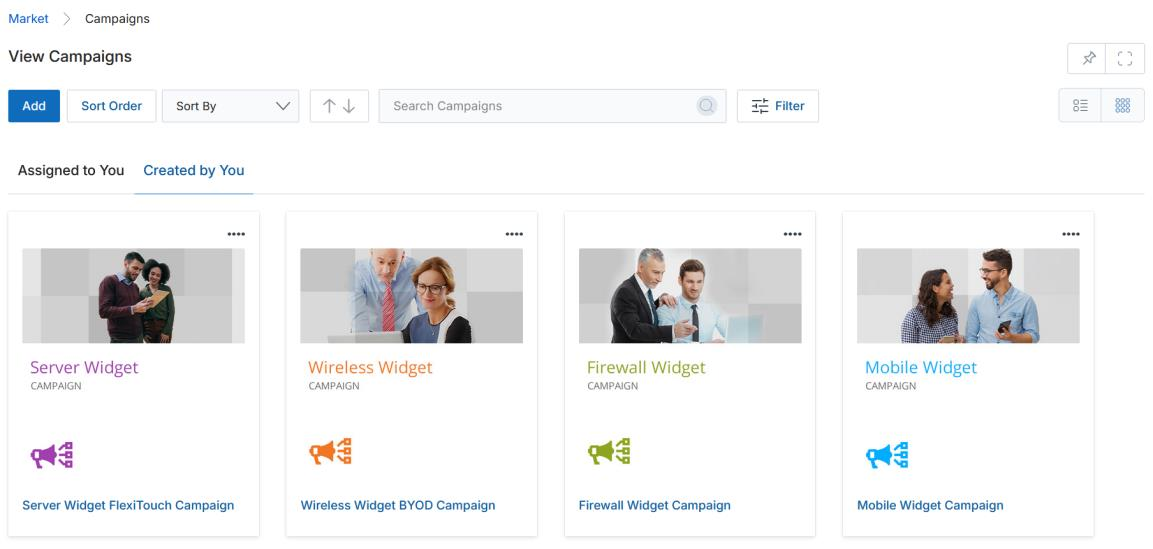
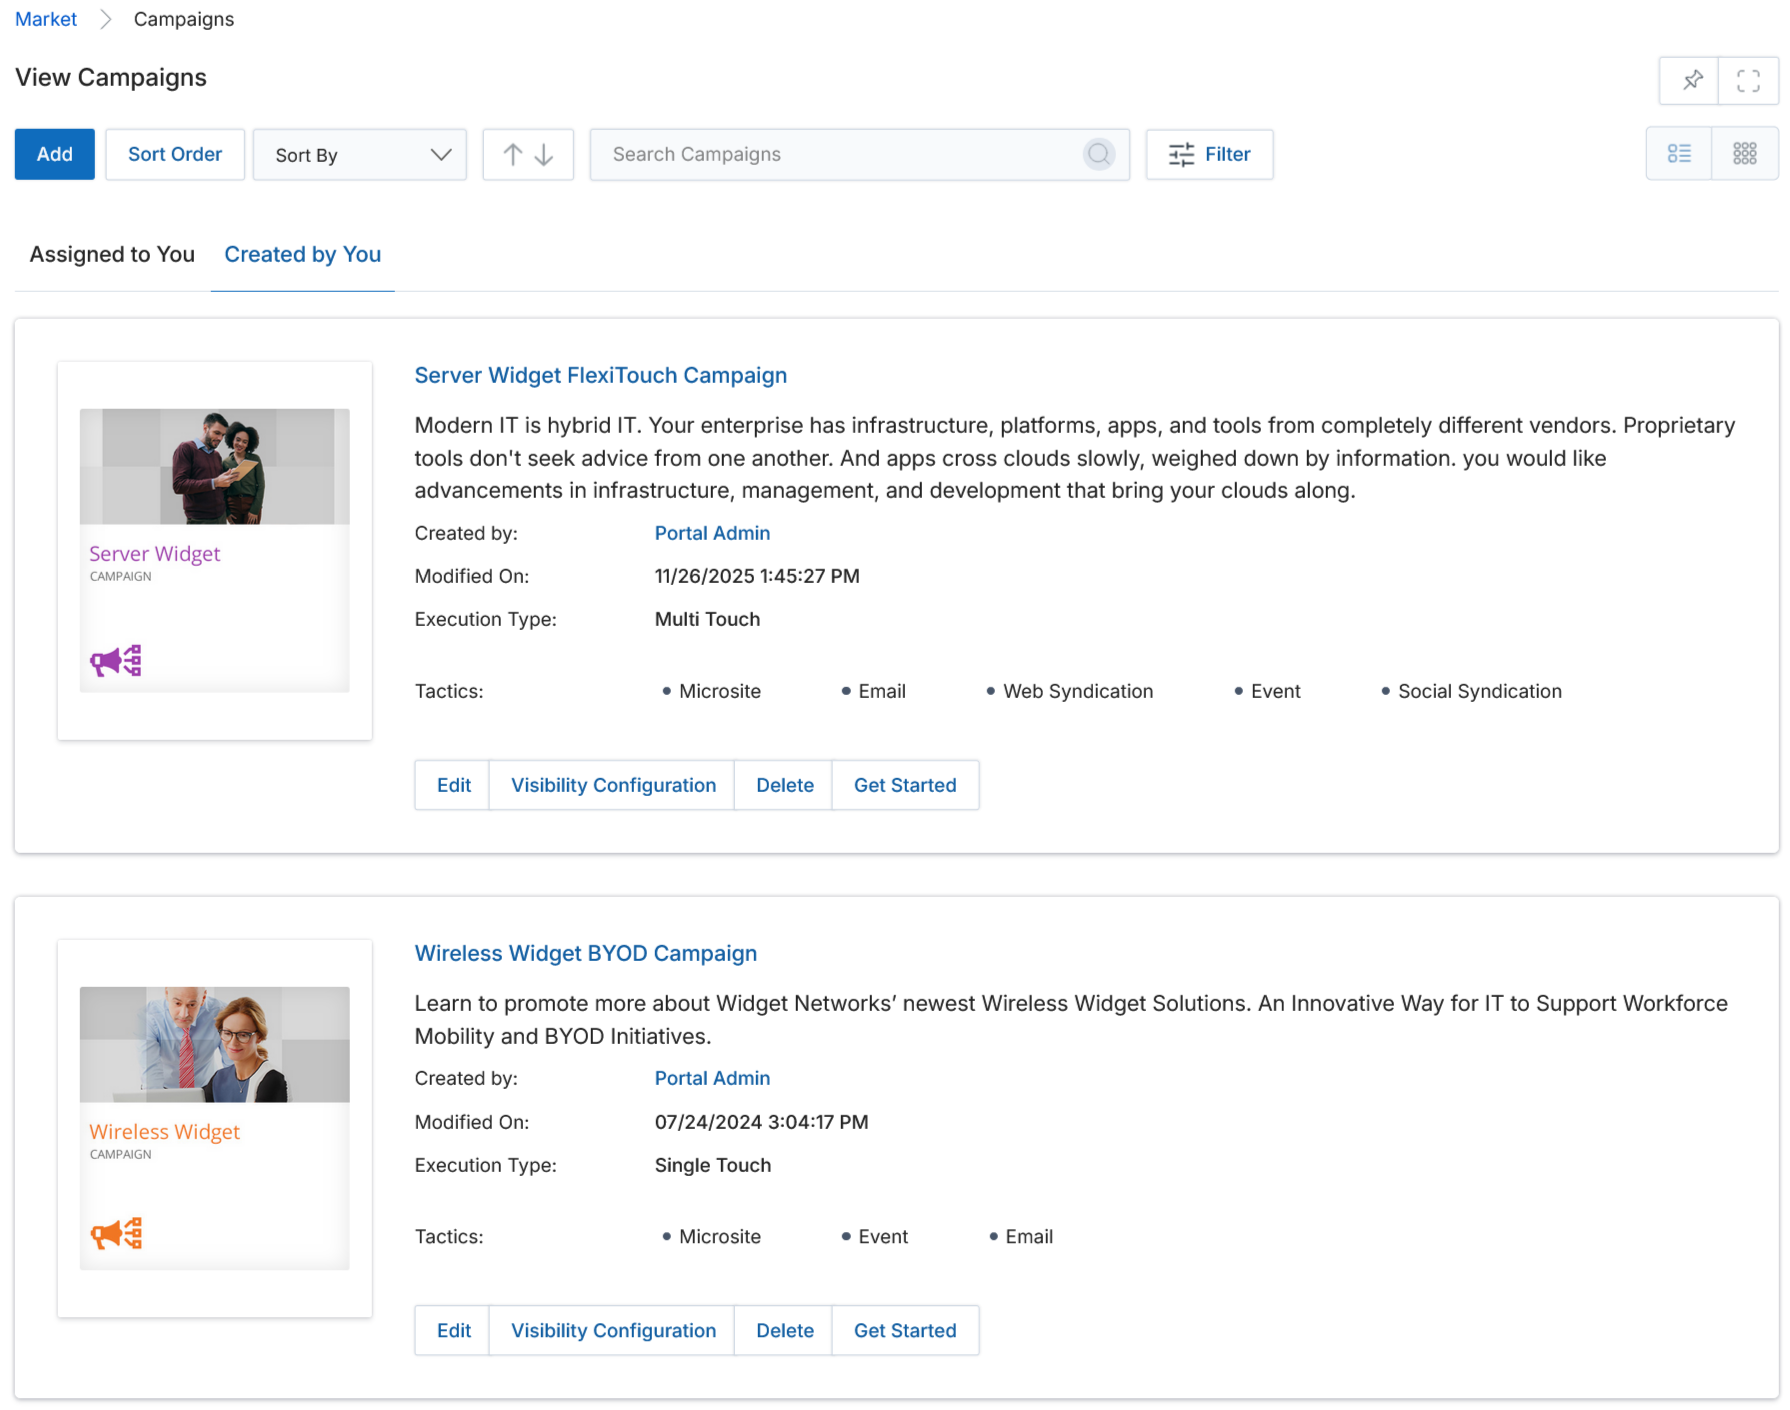
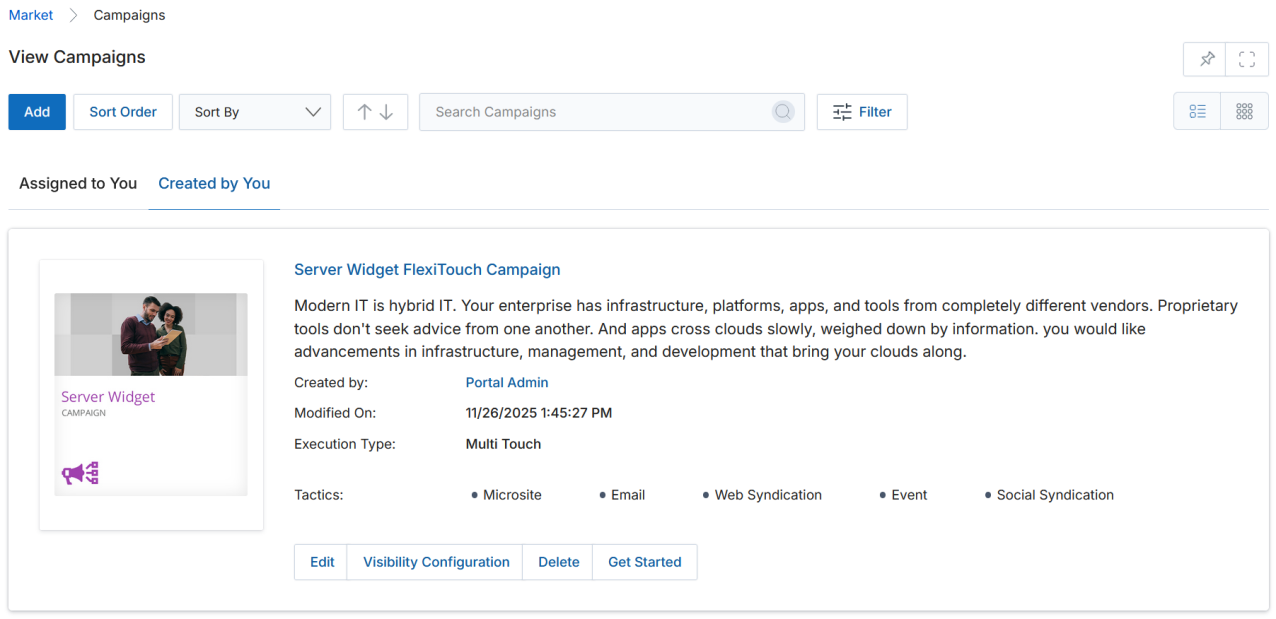
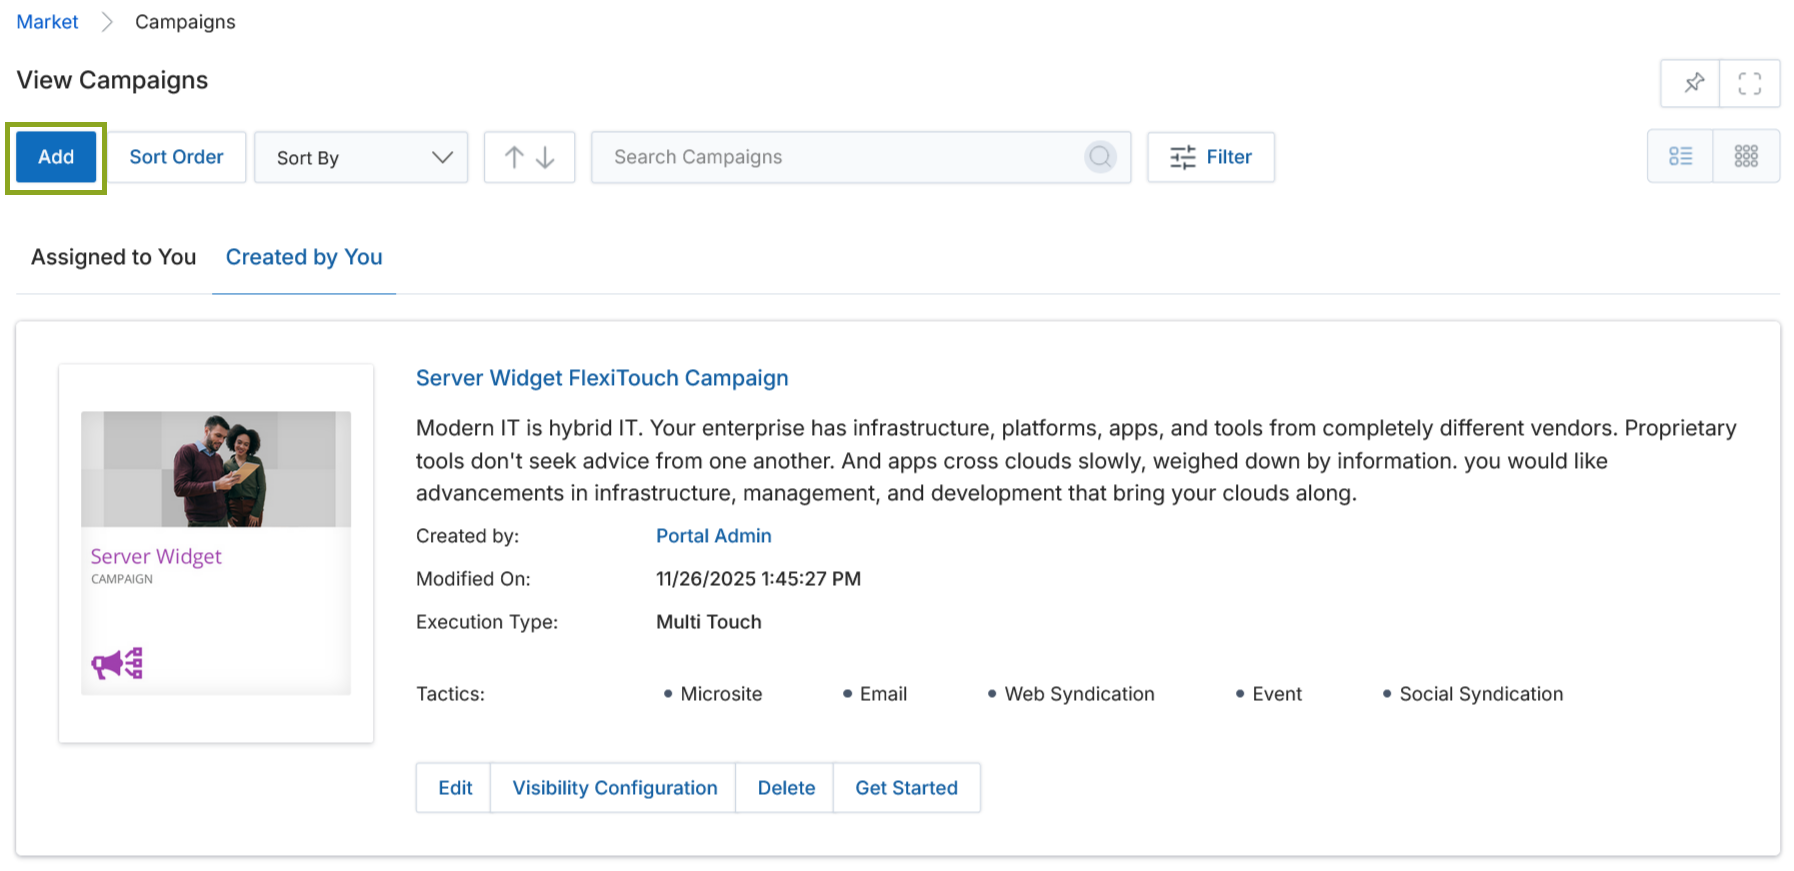
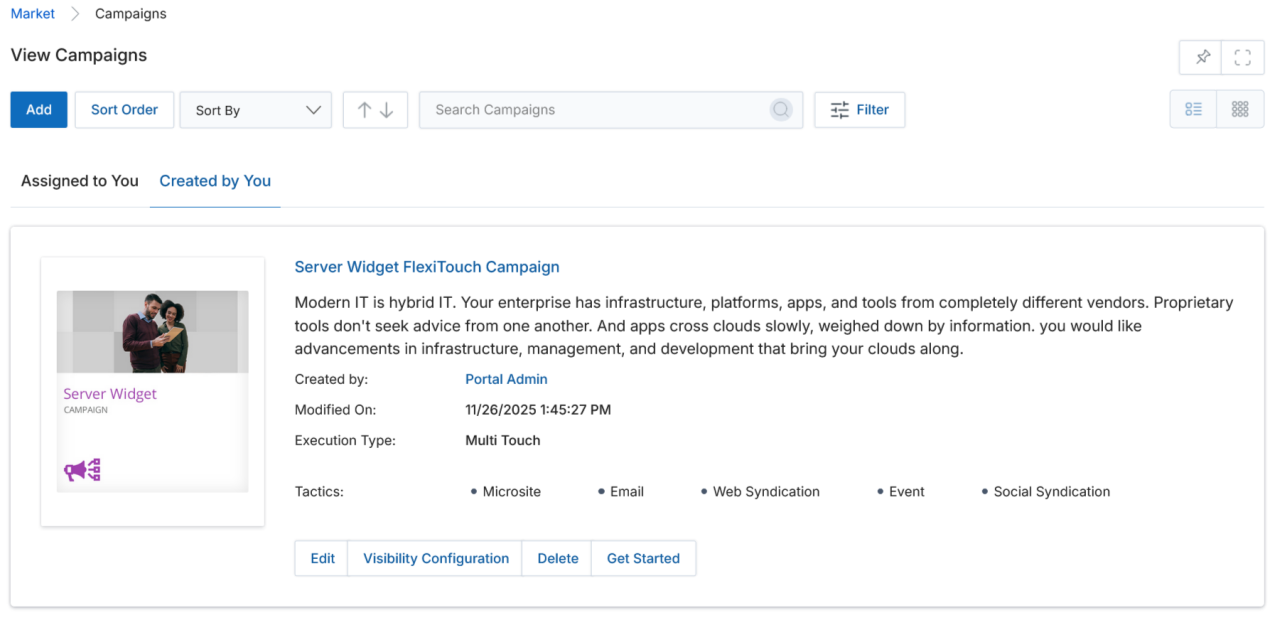
- Clicking Campaigns from the left menu bar takes you to the Campaign Library (View Campaigns page), where all listed campaigns are displayed in either List View or Thumb View format.
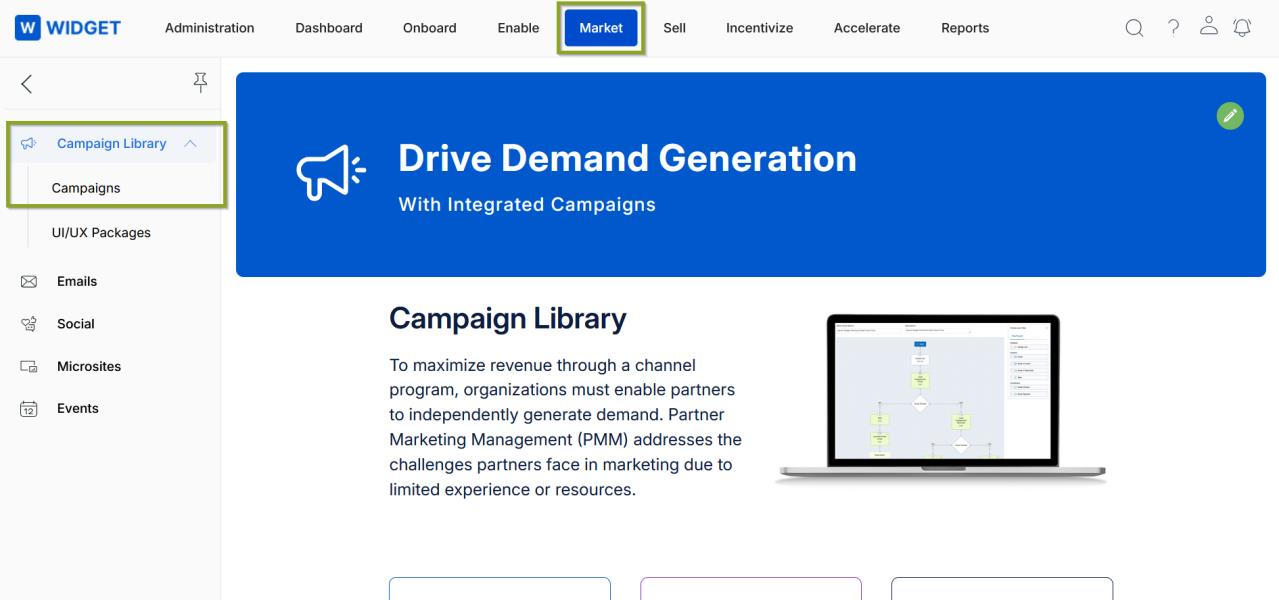
Campaign Library
The Campaign Library allows you to execute campaigns with tools attached to it. The page consists of Campaigns for execution to end-users by OEMs/Partners.
-
Click:
- Add — To create a new campaign.
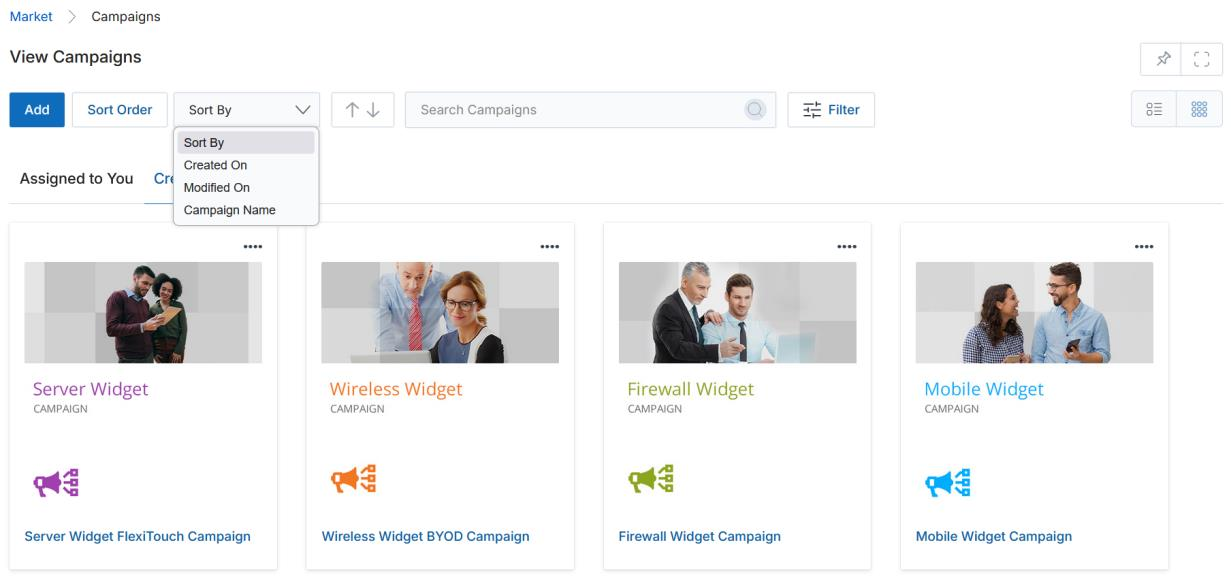
- Sort By (dropdown arrow in the Select box) — To sort campaigns by Campaign Name, Created On, or Modified Date.
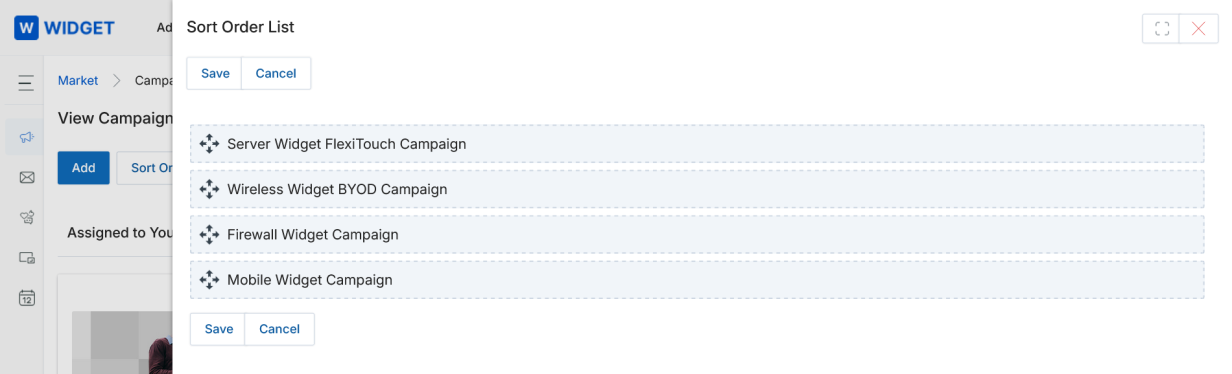
- Sort Order — Clicking Sort Order in the View Campaigns page allows you to arrange campaigns via drag-and-drop. Click Save to save the configured order.
The configured Sort Order view applies to all users in the portal.
-
Click:
- Assigned to You — To see campaigns assigned to you.
- Created by You — To see campaigns created by you.
-
Click either List View or Thumb View to change the visual arrangement of campaigns.
- List View — Displays campaigns in a list format. The Execution Type (Single Touch or Multi Touch) is shown in this view.

- Thumb View — Displays campaigns as thumbnail cards. Click the four-dot menu on the top right of any campaign card to access Edit, Visibility Configuration, Delete, and Get Started options.
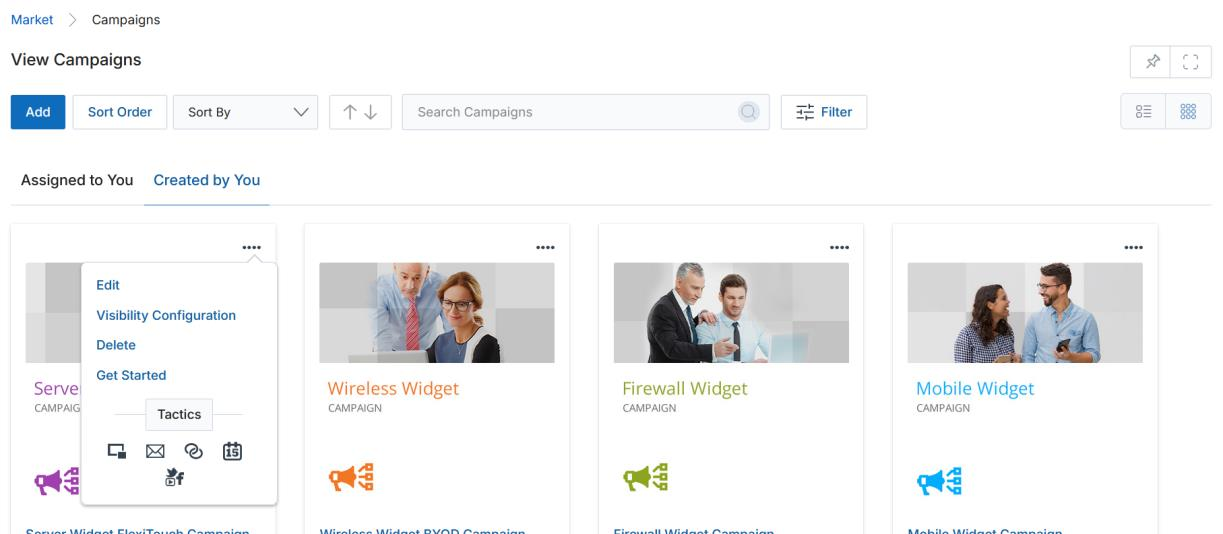
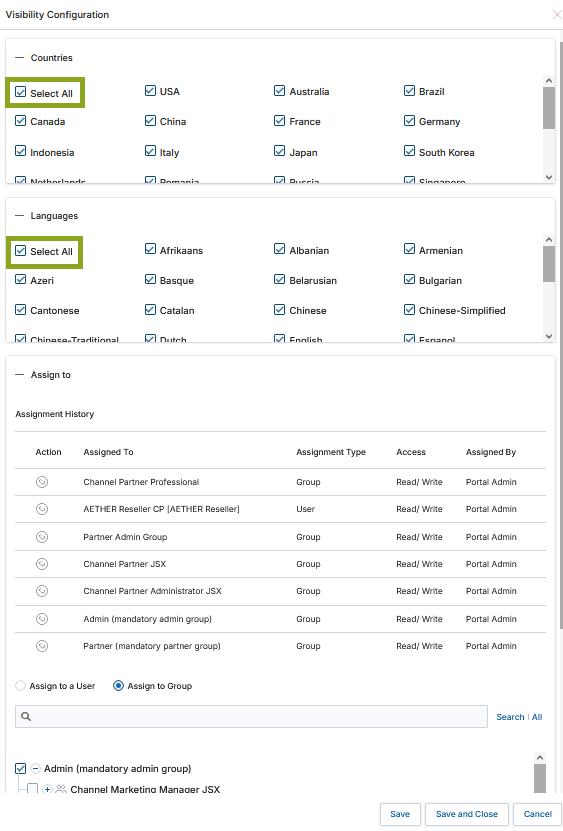
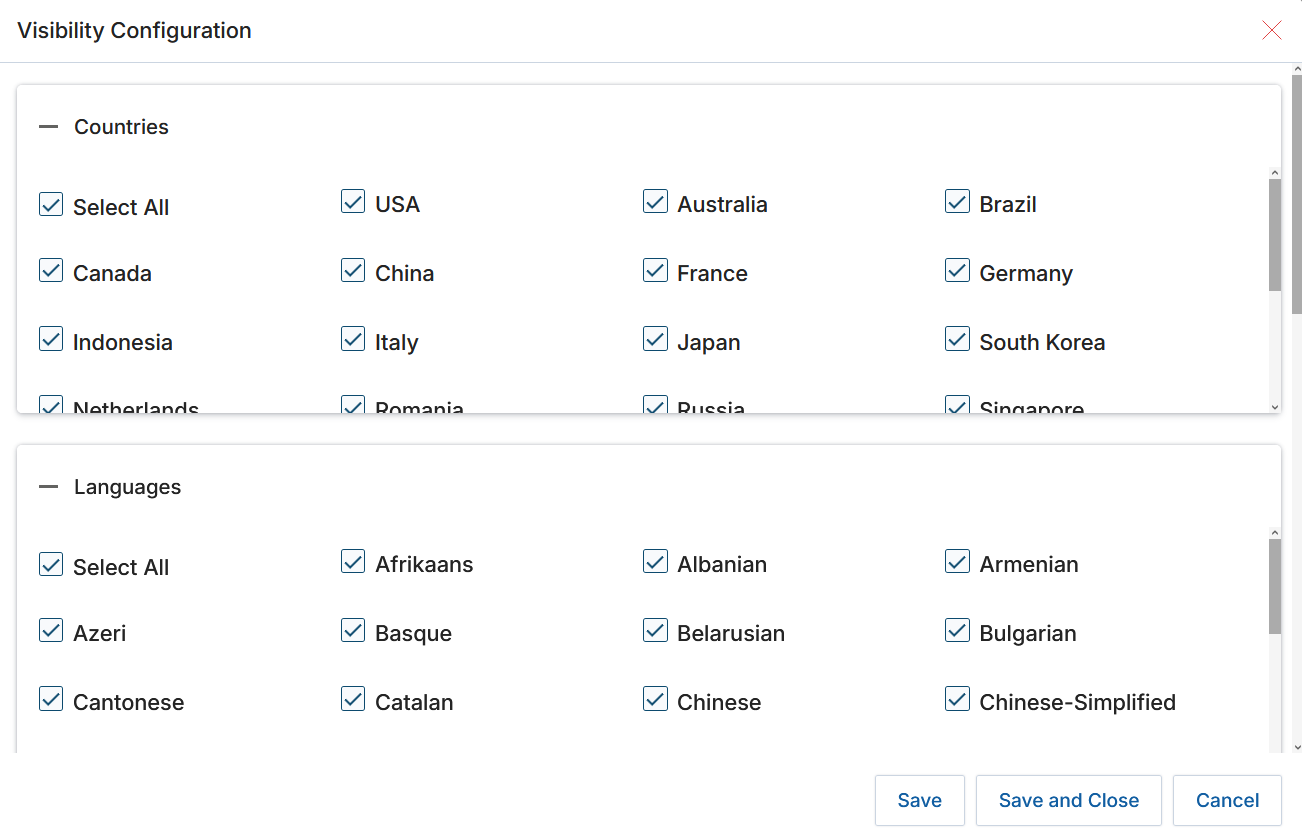
- Click Visibility Configuration — To specify the visibility criteria of the campaign (Country, Language, and Assign to User/Group). Once the popup opens, choose your Countries, Languages, and Assignees, then click Save.
Checking Select All under Countries or Languages auto-selects all options. If any individual item is unchecked, the Select All checkbox becomes unchecked automatically.
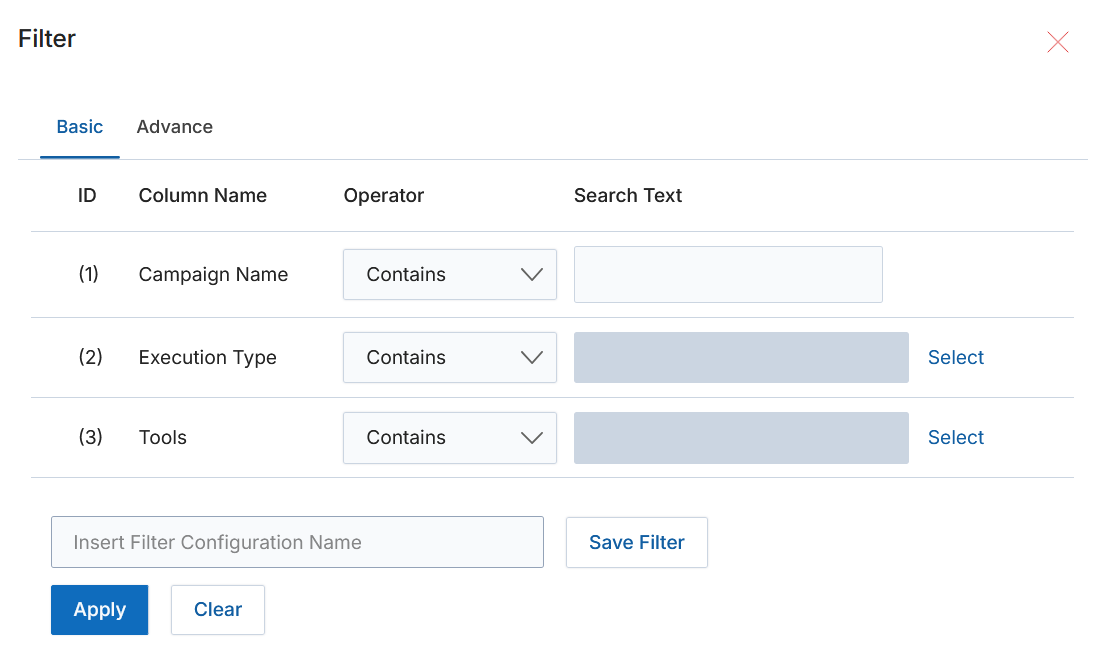
- To search for a specific campaign, use the Filter option. Click the icon with three parallel lines to open the Filter pane. Click the X icon to close it.
-
Campaigns can be filtered by:
- Campaign Name — Enter the name of the desired campaign.
- Execution Type — Choose Single Touch or Multi Touch.
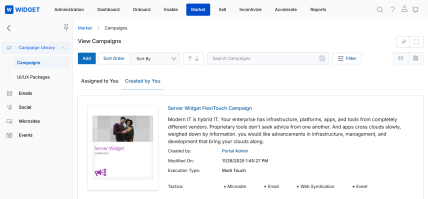
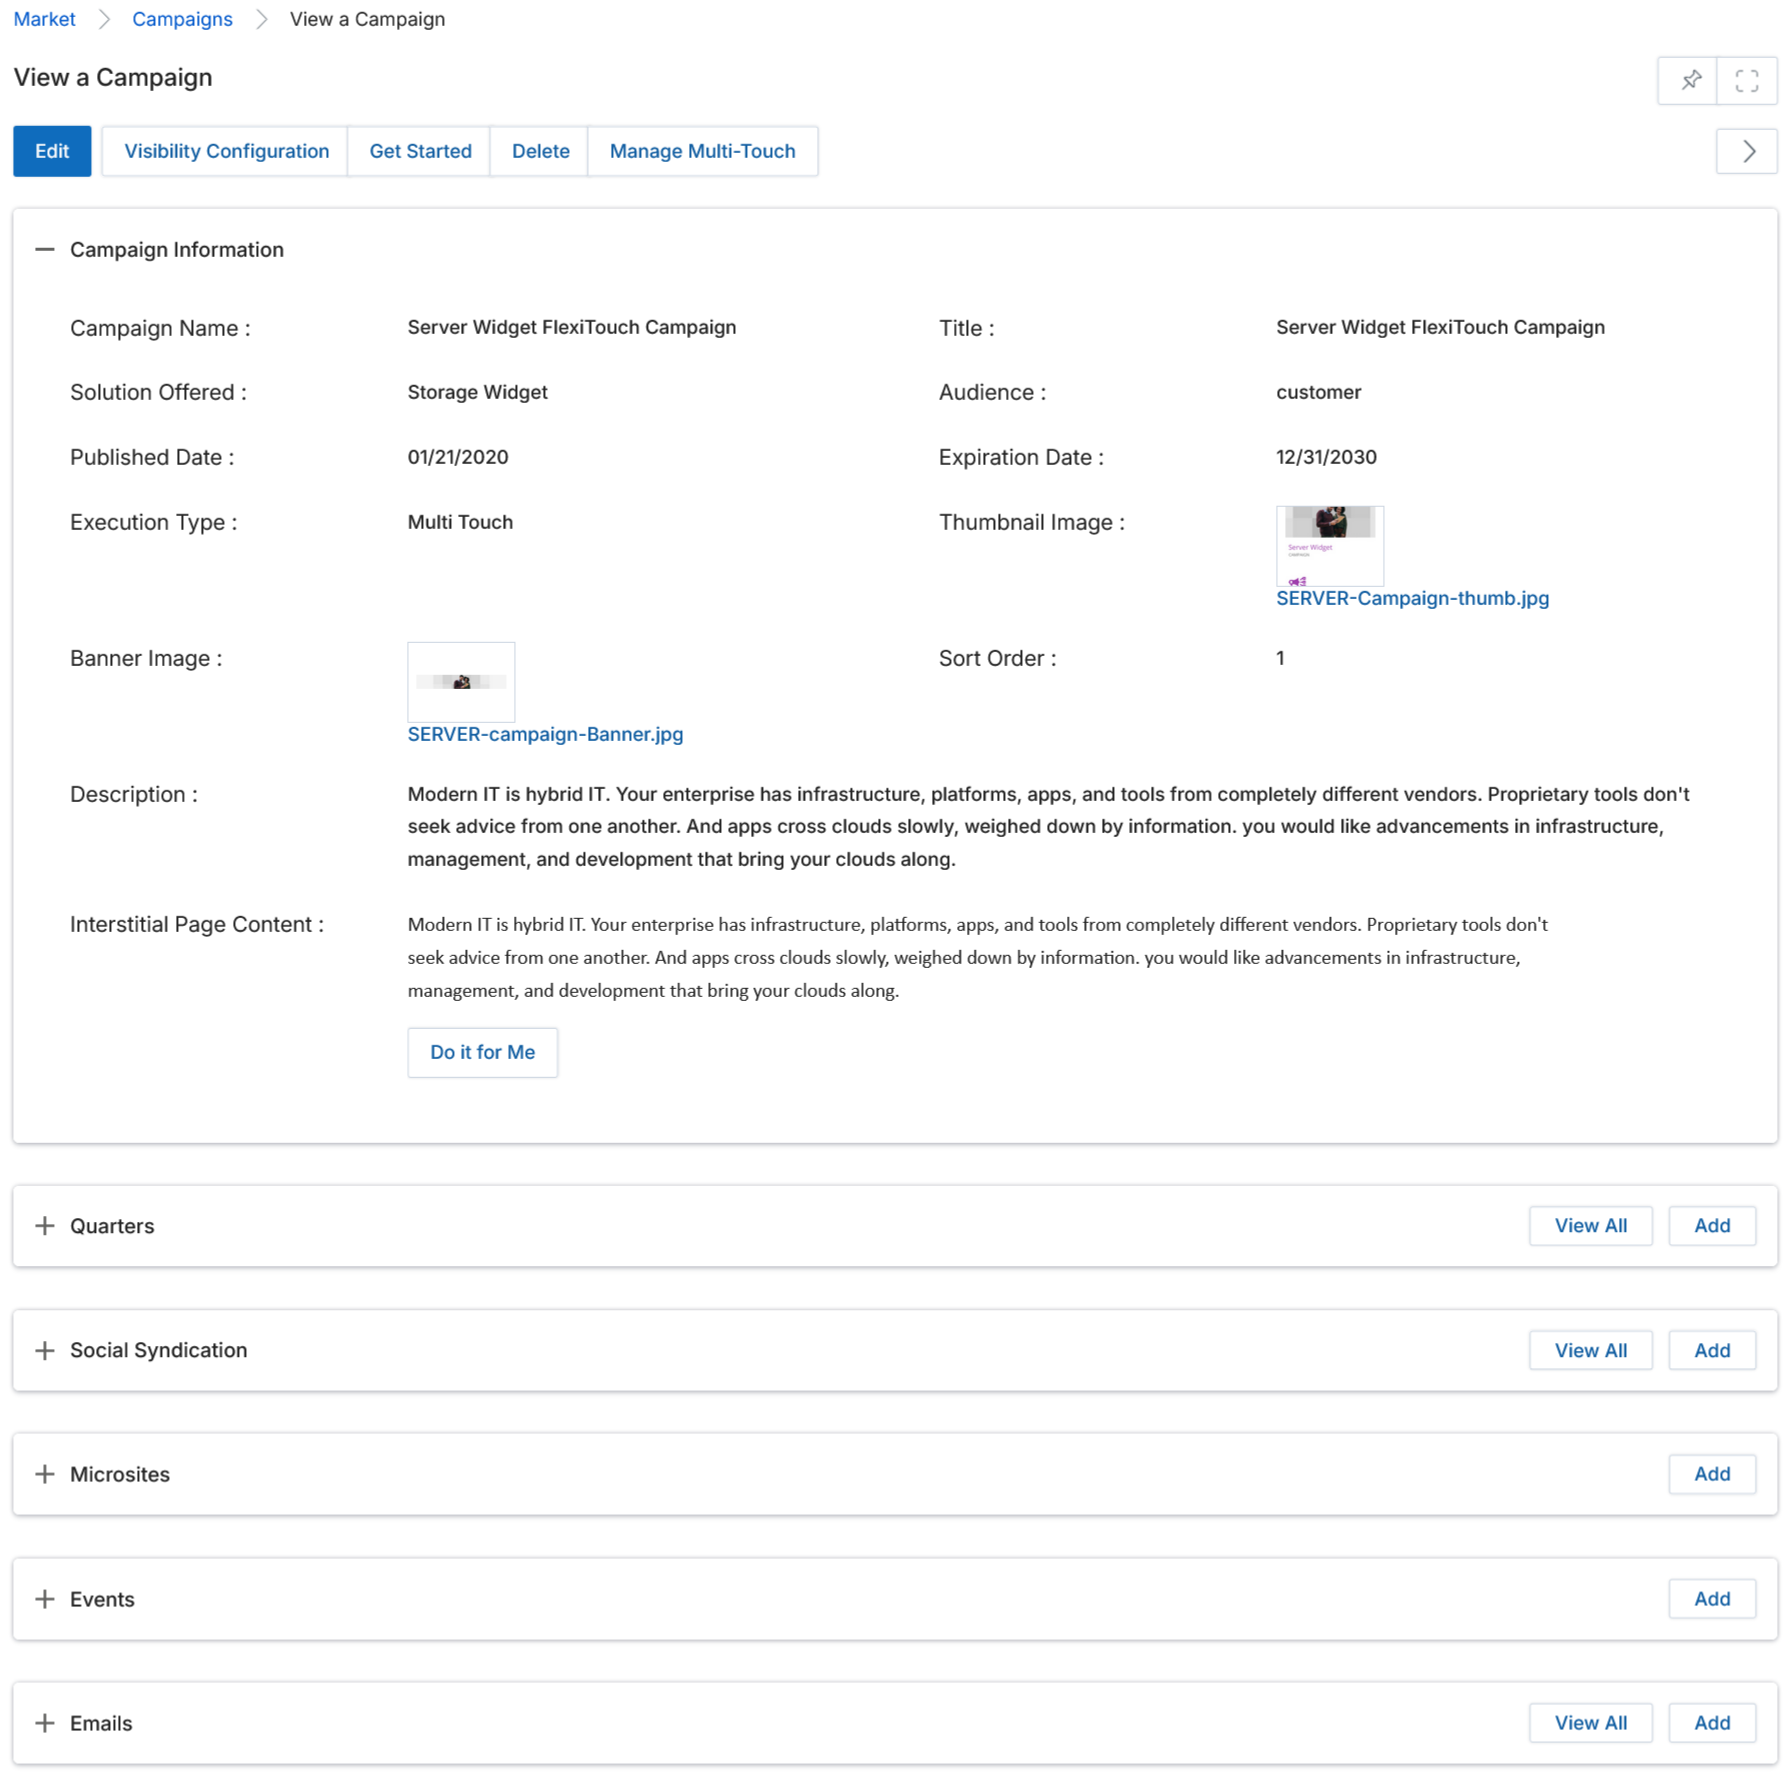
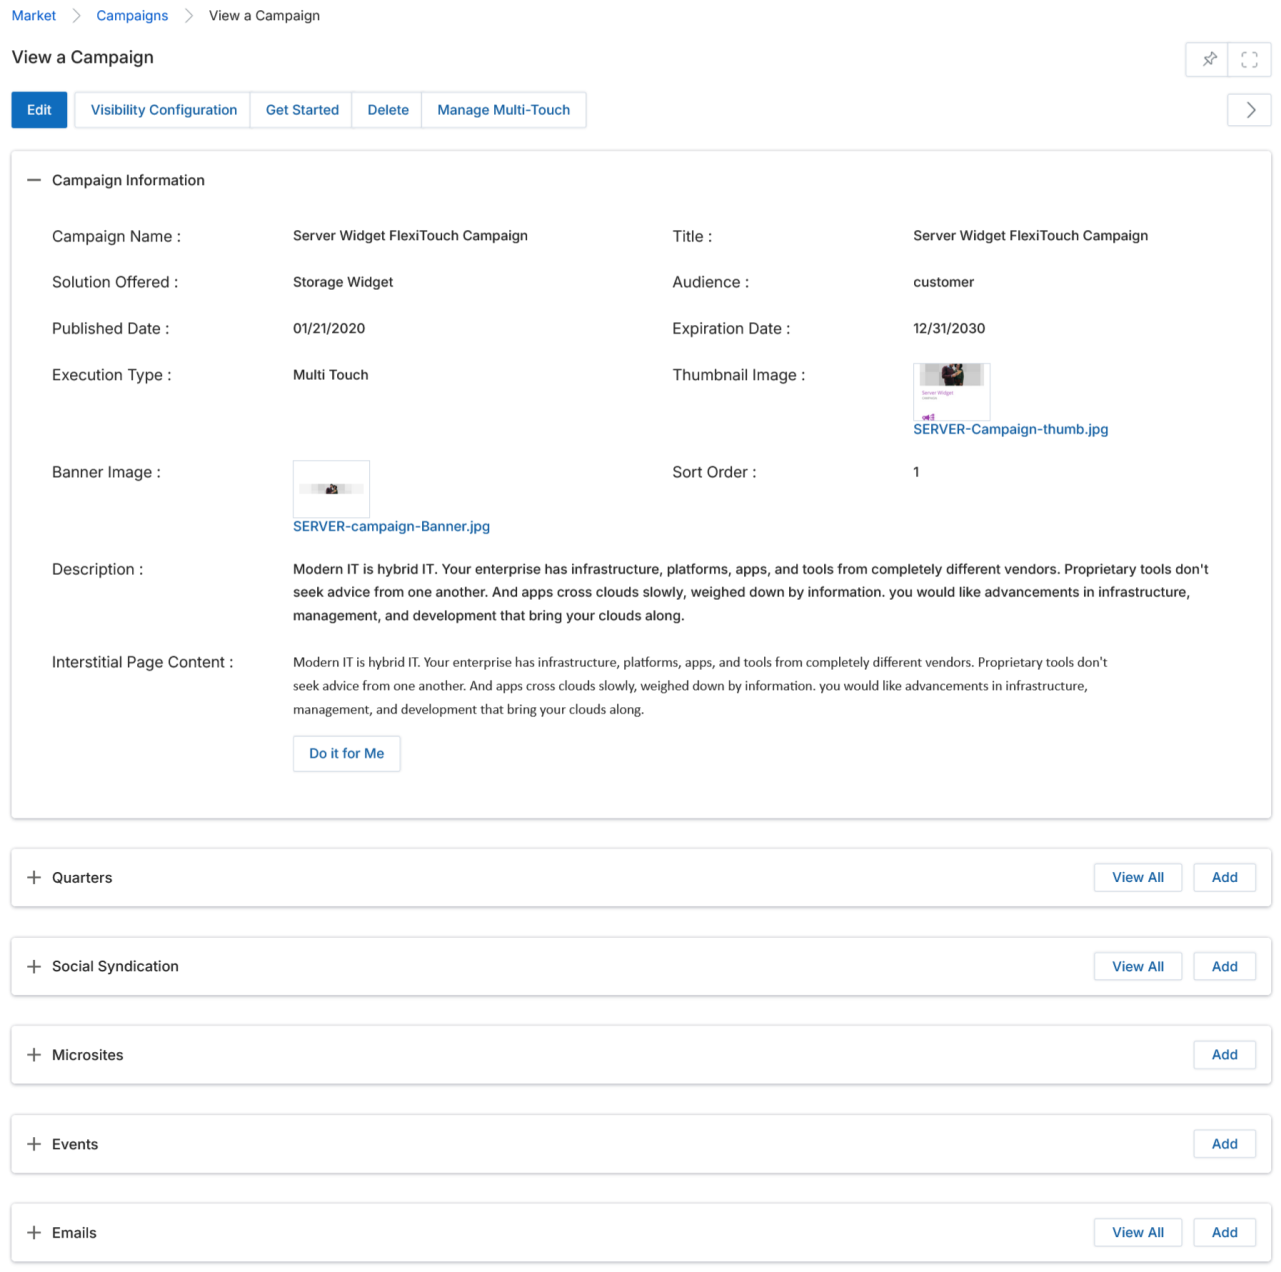
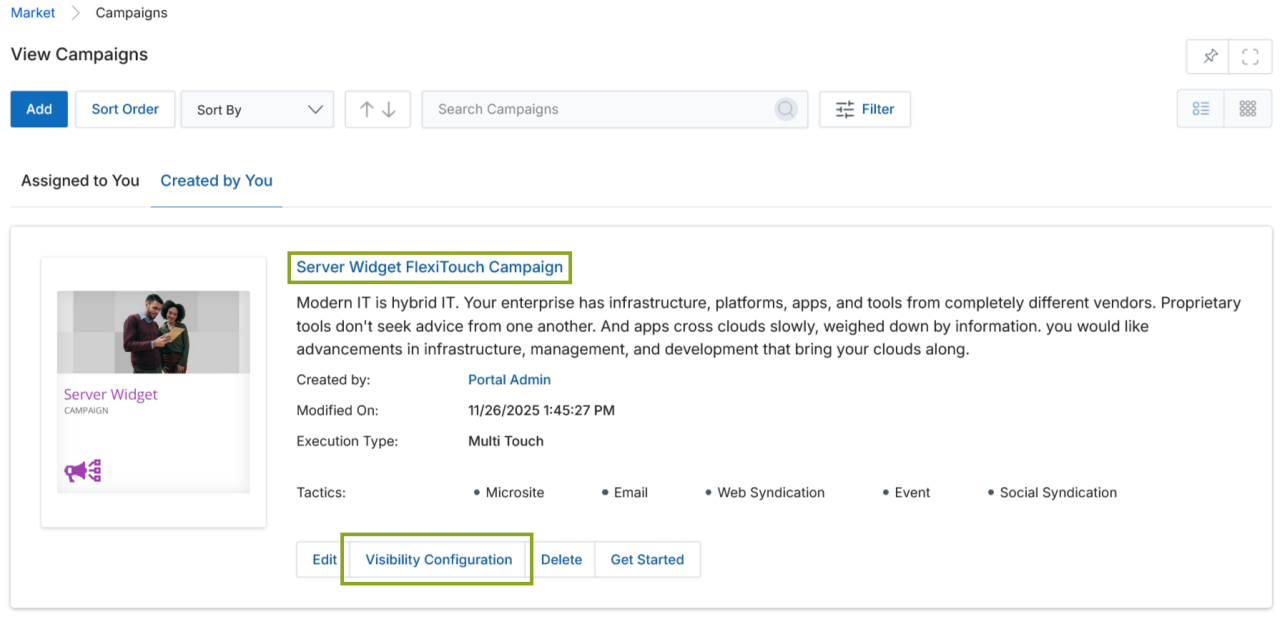
View Campaign Details
- Click the name of any campaign to open its details page.
- The View a Campaign page displays all details of the selected campaign.
-
The action buttons at the top of the page are:
- Edit — Update the existing campaign.
- Delete — Remove the campaign from the Campaign Library.
- Visibility Configuration — Associate countries, languages, and user/group assignments to the campaign.
- Get Started — Open the campaign setup and launch page to choose a tactic, set it up, and launch it.
- Manage Multi-Touch — Manage multiple tactics at the same time within this campaign.
-
The View Campaign page contains the following related sections:
- Quarters — Click Add to create new quarters and associate them with the campaign. Edit with the pencil icon; delete with the trash icon.

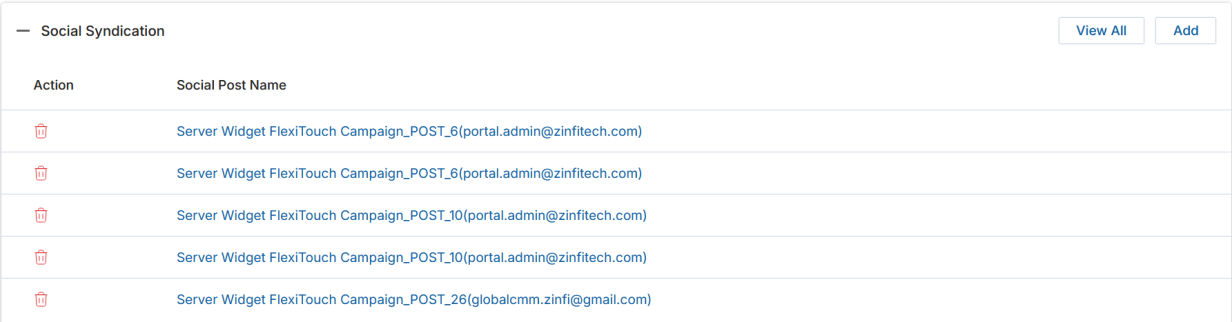
- Social Syndication — Click Add to create a new social syndication page and associate it with the campaign. Connect to Facebook, LinkedIn, and Twitter via UPM and sync data from social accounts. The list shows Social Post Name, Post Type, and Created On date.
- Microsites — Click Add to create new microsites and associate them with the campaign. The list shows Microsite Name, Unique URL Extension, and Participating Partners.

- Events — Click Add to create a new event and associate it with the campaign. Events allow prospects and contacts to register for a campaign. The list shows Event Name, URL Extension, and Event Start Date.
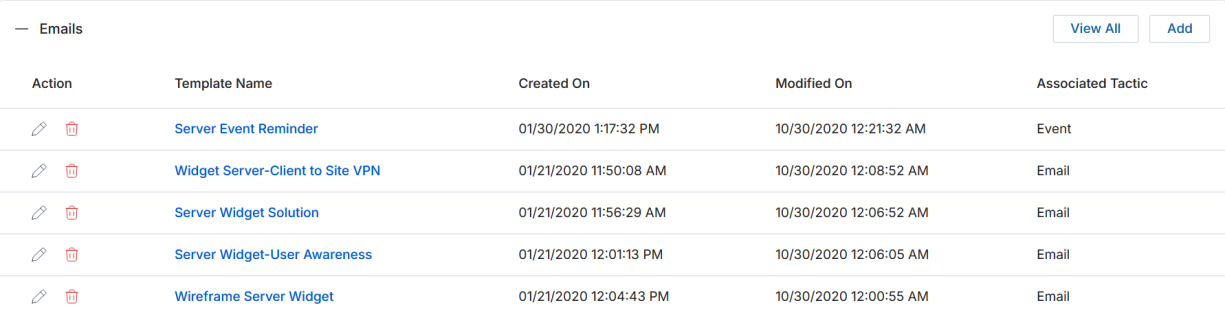
- Emails — Click Add to create new email templates and associate them with the campaign. The list shows Template Name, Created On, Modified On, and Associated Tactic.

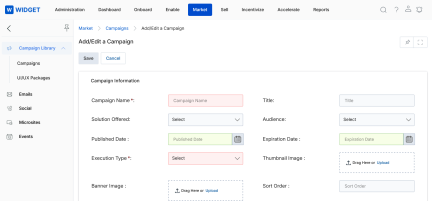
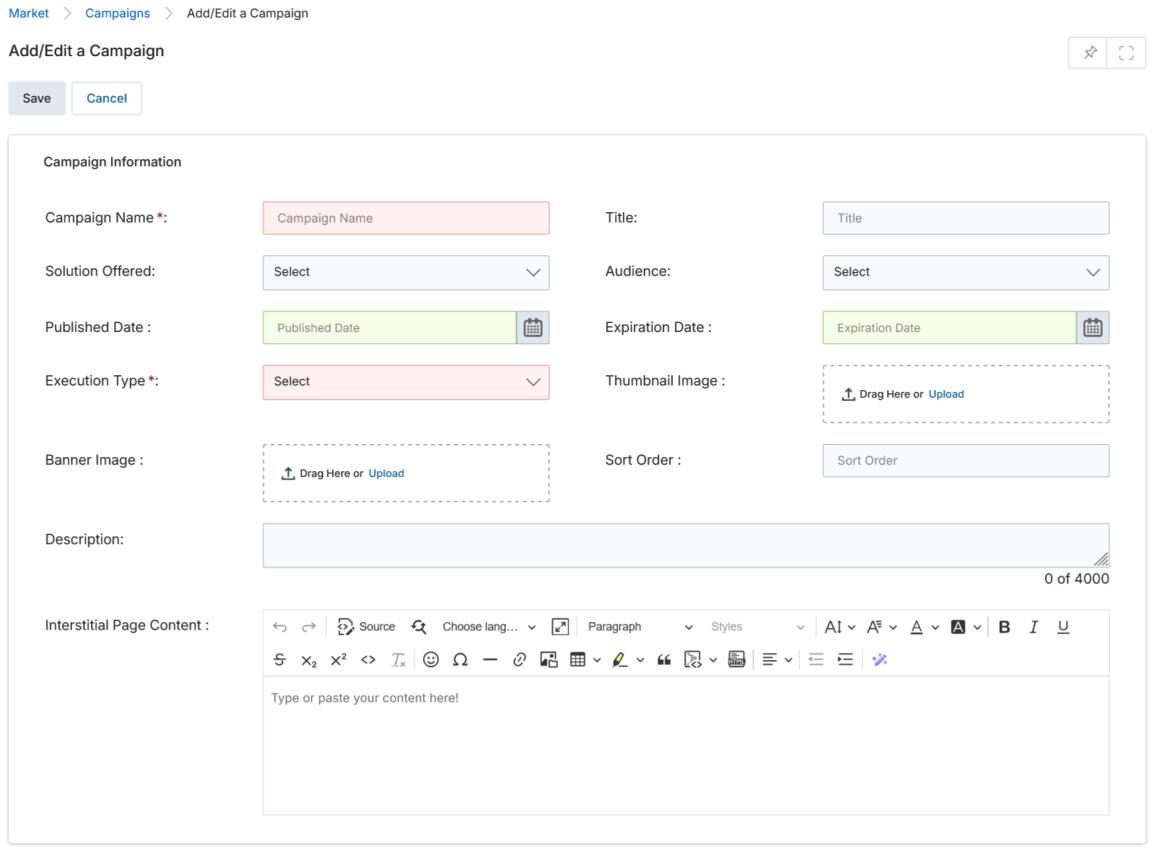
Add / Edit a Campaign
- Click Add to create a new campaign, or Edit on any existing campaign to modify it.
- The Add/Edit a Campaign page opens with the Campaign Information section.

- Complete the following fields in the Campaign Information section:
| Field | Description | Required |
|---|---|---|
| Campaign Name | Provide a user-friendly name for the campaign. | Yes |
| Title | The title associated with the campaign. | No |
| Solution Offered | Tag the campaign with a line of business using the dropdown. | No |
| Audience | Select the campaign recipient/target audience. | No |
| Execution Type | Select Single Touch (execute each tactic individually) or Multi Touch (multi-step drip flow). | Yes |
| Published Date | The date the campaign becomes active/published. | No |
| Expiration Date | The date the campaign expires. | No |
| Thumbnail Image | Upload the campaign identification thumbnail image. | No |
| Banner Image | Upload the campaign banner shown on the interstitial page. | No |
| Sort Order | Numeric value to control listing order in the Campaign Library. | No |
| Description | Brief description shown on the Campaign Library page (max 4000 chars). | No |
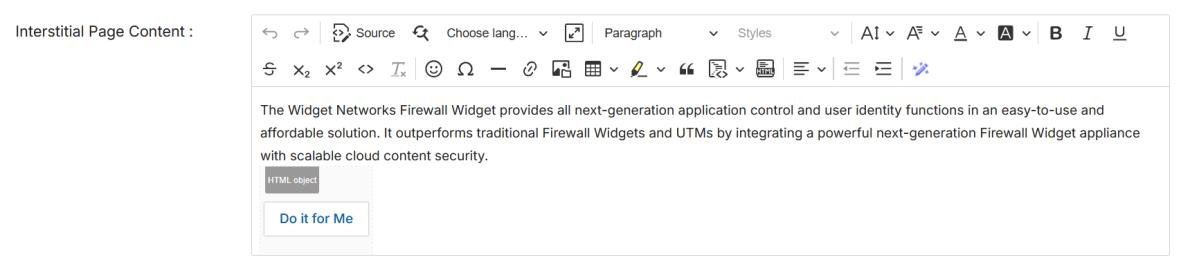
| Interstitial Page Content | Rich-text content shown to partners on the campaign interstitial page, including the "Do It For Me" button. | No |
- When all fields are complete, click Save.
Launch a Campaign
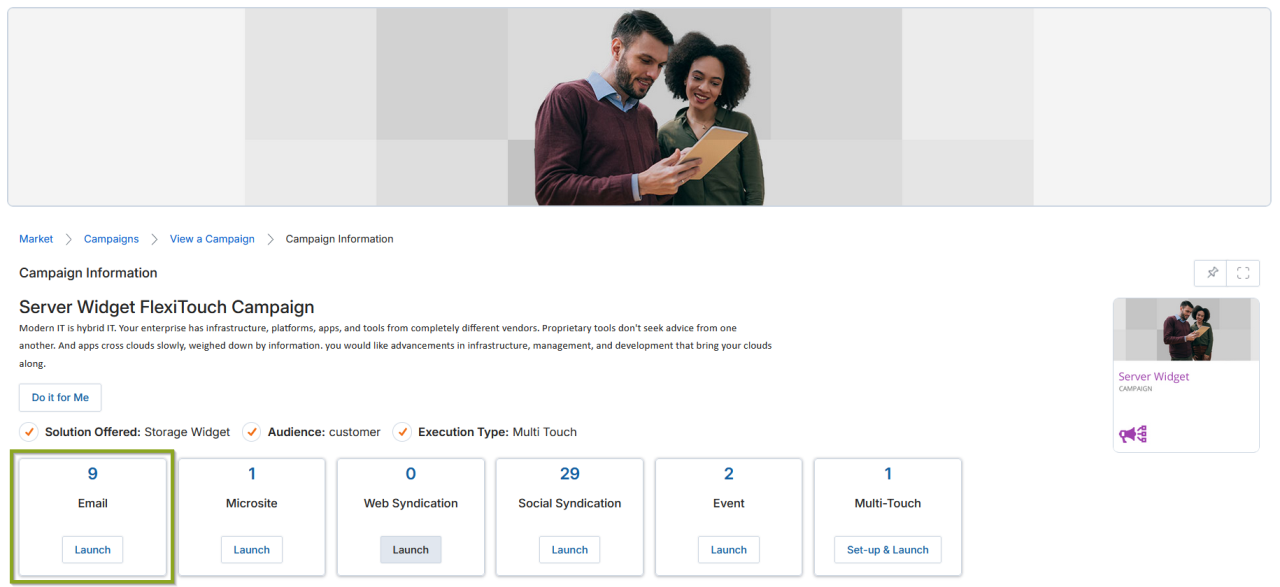
Campaign Interstitial Page
- Select the campaign you wish to launch, then click the Get Started button.
- The Interstitial Page opens, showing campaign information and tactic selection options.
The interstitial page includes:
- Campaign information section — Campaign title and description.
- Do It For Me button — Engage the Concierge team to launch the campaign on your behalf using MDF spend.
- Tactic tiles — Each tactic (Email, Microsite, Web Syndication, Social Syndication, Event, Multi-Touch) shows the number of available content items along with Set Up (co-brand content) and Launch (execute to a mailing list) buttons.
Execute a Campaign
To execute a campaign, click the Launch button of the desired tactic on the Interstitial Page. The following steps describe launching an Email tactic.
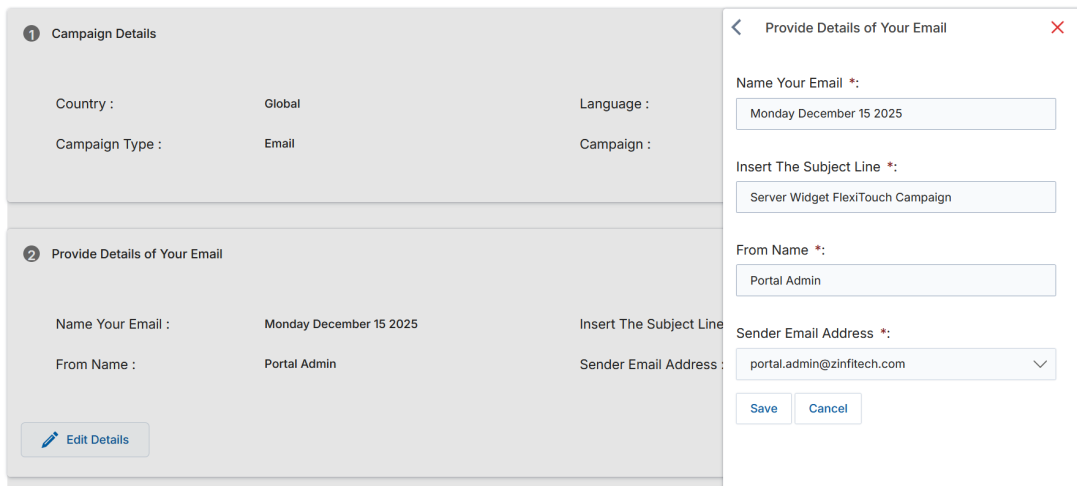
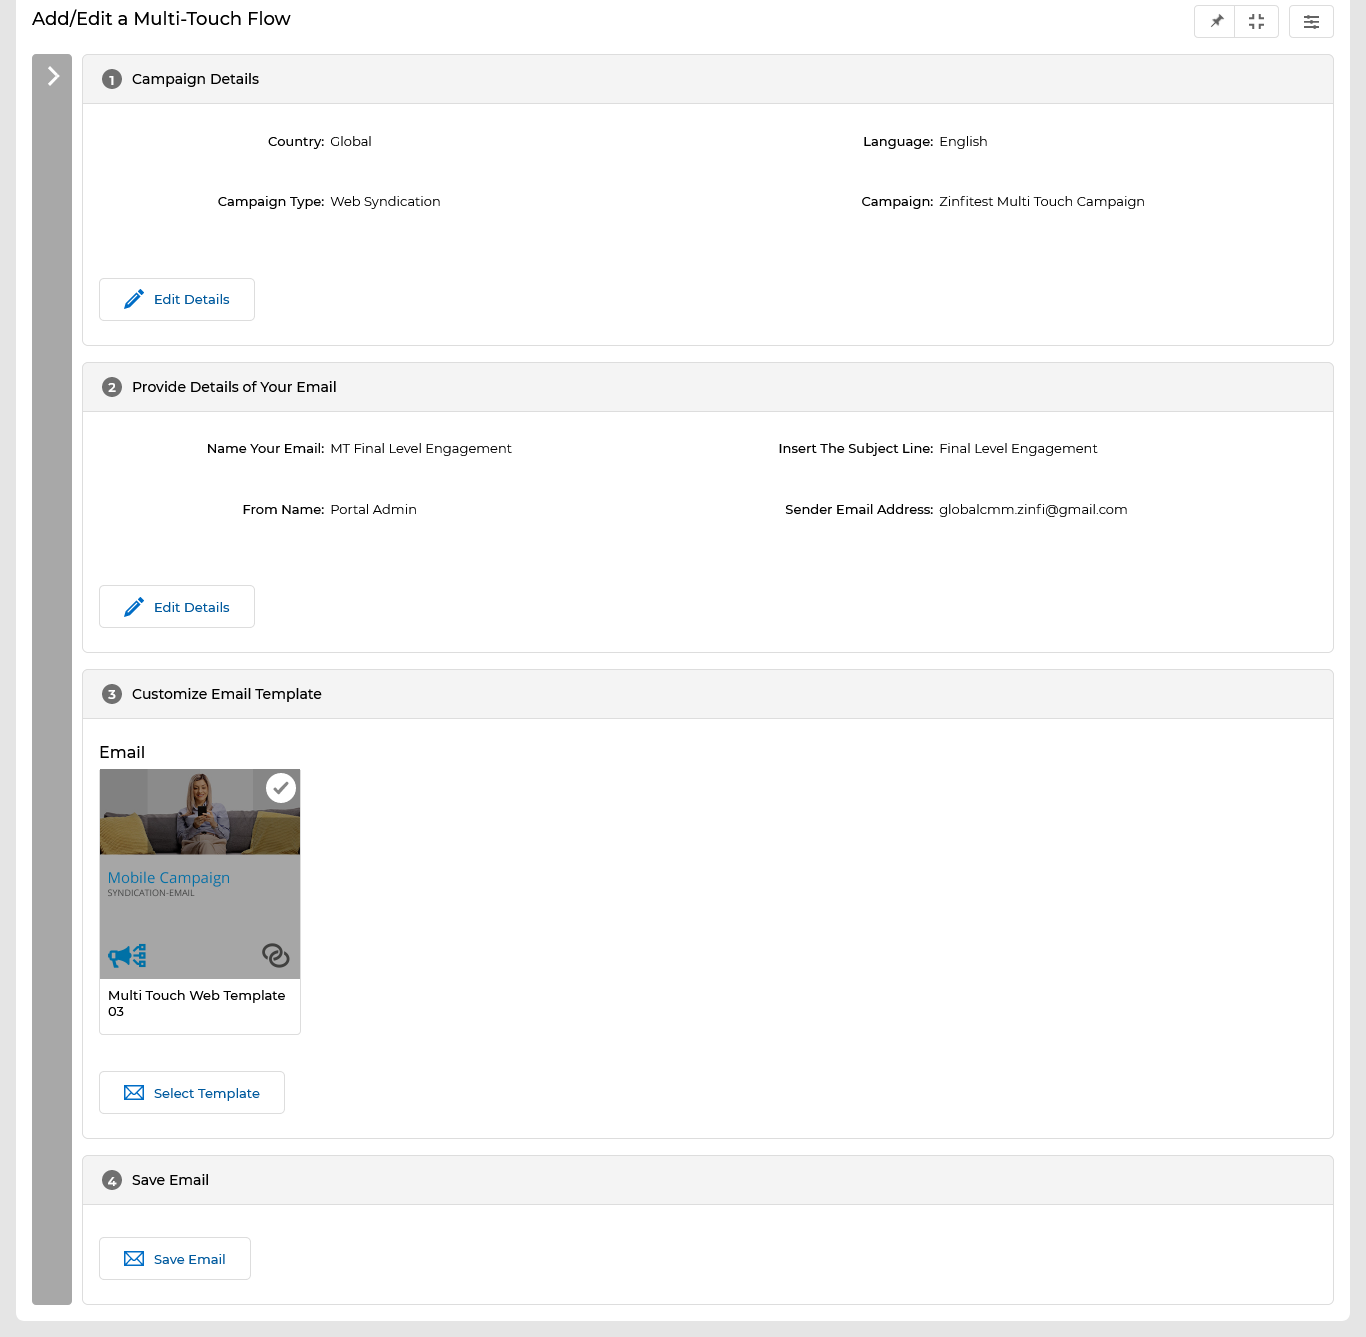
Step 1 — Provide Details of Your Email

- Campaign Details — Non-editable. Shows the campaign language, country, type, and name.
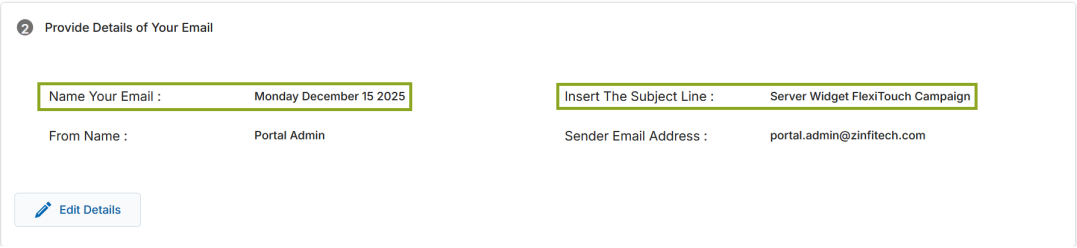
- Name Your Email — Shows the name of the email blast. Click Edit Details to populate.
- Insert the Subject Line — Click Edit Details to add the subject line.
- From Name — The sender name shown to recipients.
- Sender Email Address — The sender email address displayed to recipients.
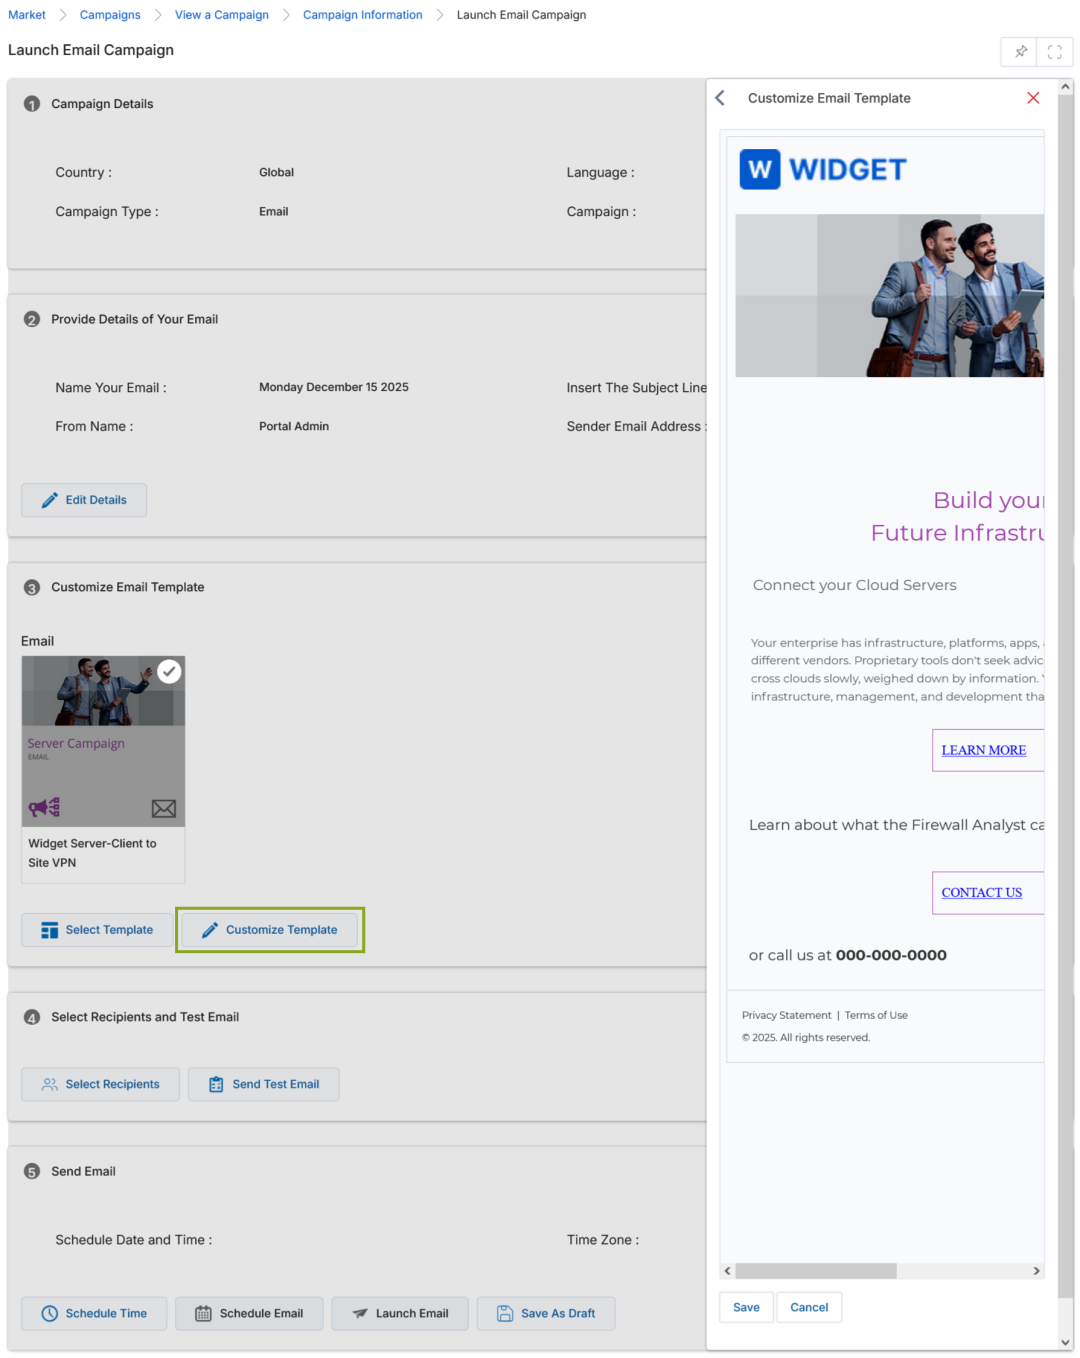
Step 2 — Customize Email Template
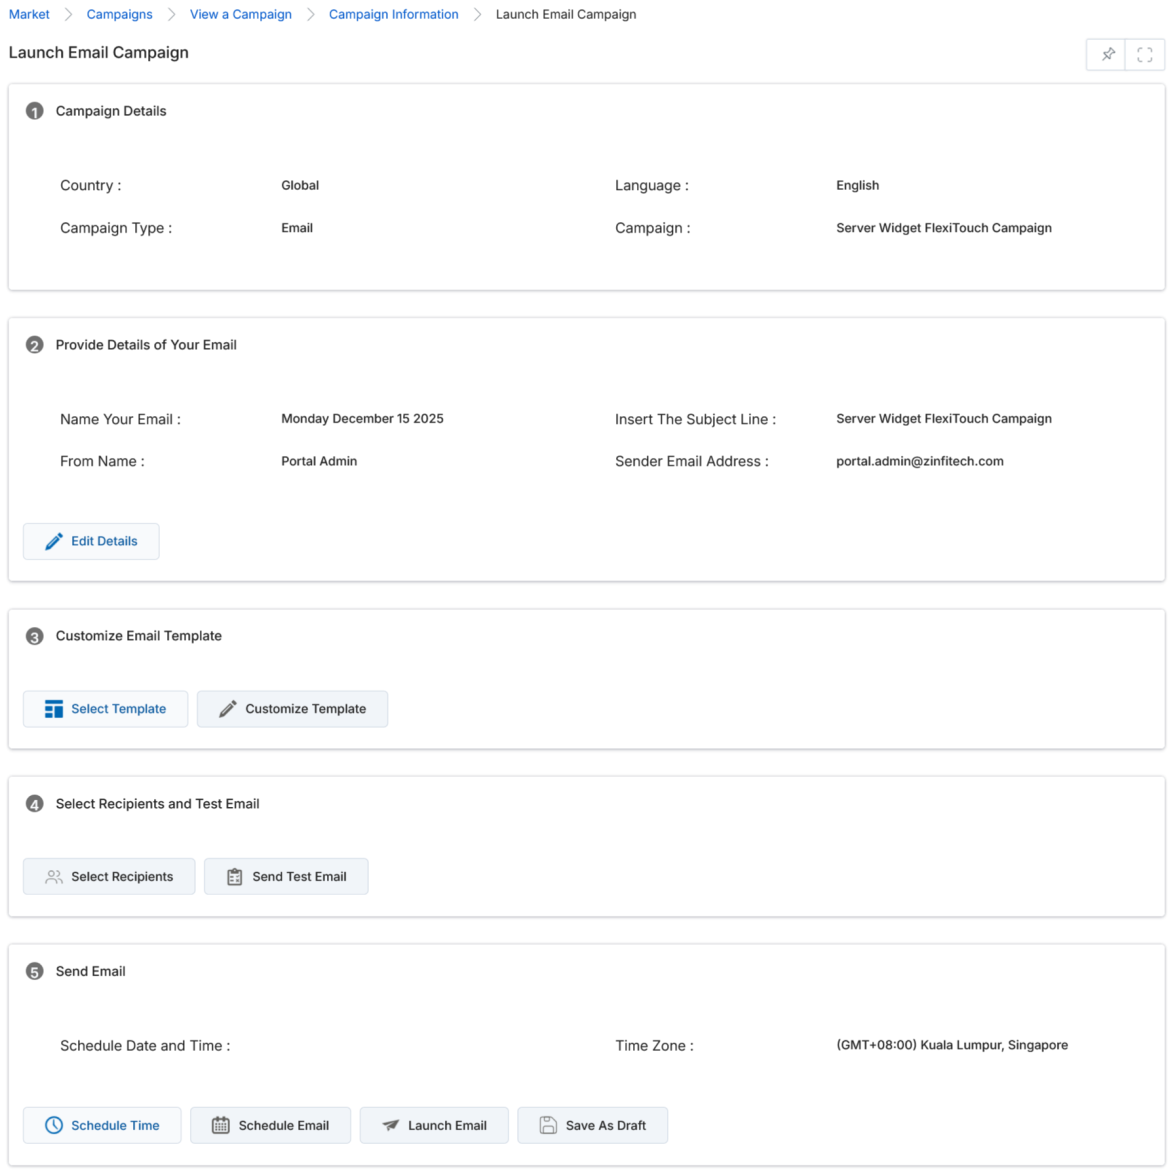
- Click Select Template to pick an existing co-branded template or a master template.
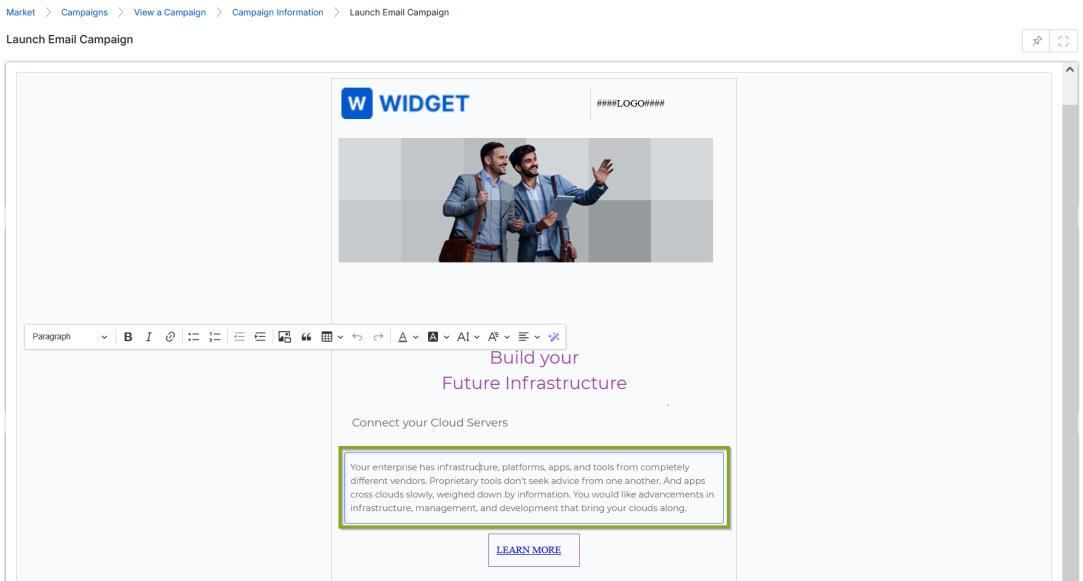
- Click Customize Template to open the template in the right-hand workspace. Editable areas are enclosed in dotted lines; hovering over them turns the background grey to indicate editability.
- Social Connector icons in the footer are also editable — clicking them activates the CK Editor to update the linked social platform URL.
Step 3 — Select Recipients and Test Email
- Click Select Recipients to choose a prepared mailing list, or click Create New List to build one on the spot.
- Click Send Test Email after selecting a mailing list to verify campaign receipt before launch.
Step 4 — Send Email
- Schedule Time — Set a specific date, time, and time zone for the email blast. Click Save to confirm.
- Schedule Email — Queues the email to send at the scheduled time. A confirmation message is displayed on screen.
- Launch Email — Blasts the email immediately. A confirmation message confirms successful launch.
- Save As Draft — Saves the email configuration as a draft for future editing and launch.
Multi-Touch Campaigns
Add a Multi-Touch Campaign
- Navigate to Market > Campaign Library > Campaigns.
- Click Add to open the Add/Edit a Campaign page. Set the Execution Type to Multi-Touch.
- Complete all Campaign Information fields (Campaign Name, Title, Solution Offered, Audience, Execution Type, Published Date, Expiration Date, Thumbnail Image, Banner Image, Interstitial Page Content, Description).
- Click Save. The new Multi-Touch Campaign appears on the View Campaigns page.

Setting Up Tactics
From the campaign's details page (click the campaign name in the View Campaigns list), add various campaign tactics: Emails, Microsites, Web Syndication, Events, and Social Syndication.
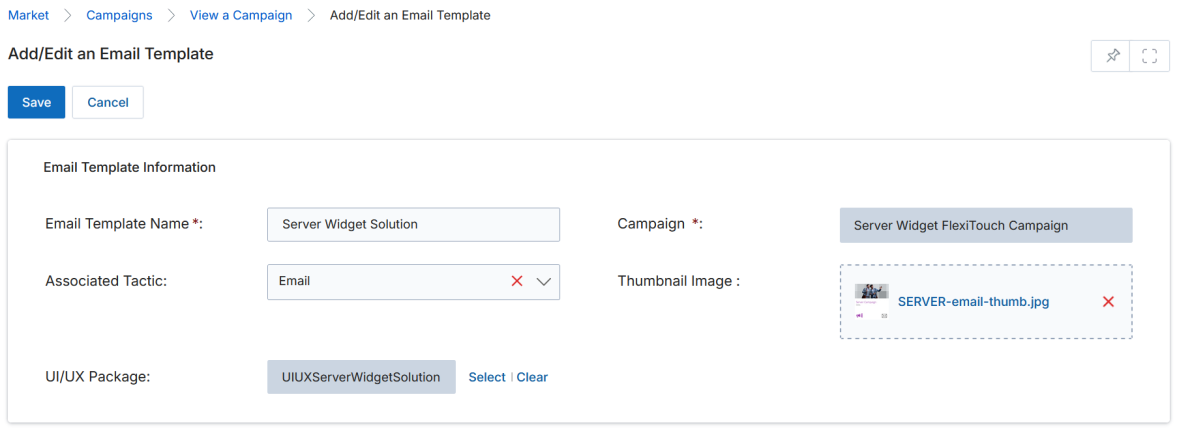
Adding Email Tactics
- In the Emails section, click Add.

- On the Add/Edit an Email Template page, complete the Email Template Information section:
| Field | Description | Required |
|---|---|---|
| Email Template Name | An appropriate name matching the associated tactic. | Yes |
| Campaign | Click Select to choose the parent campaign from the View Campaigns popup. | Yes |
| Associated Tactic | Select the tactic (Email, Event, Microsite, etc.) from the dropdown. | No |
| Thumbnail Image | Upload a thumbnail for this email template using Browse. | No |
| UI/UX Package | Associate a UI/UX Package for custom CSS/JS injection. | No |
- Click Save. The new email template appears in the Emails section.
- Click the name of the email template to open the View an Email Template page, then click Manage Content.

-
The Drag & Drop CMS Editor opens. Use the right sidebar components to insert:
- Template content containers (1-section, 1/2-section, 1/3-section, 3/7-section)
- Buttons, Dividers, Text areas, Text sections, Image areas, Quotes
- Links, Link blocks, Grid items, List items
Hash Code Implementation
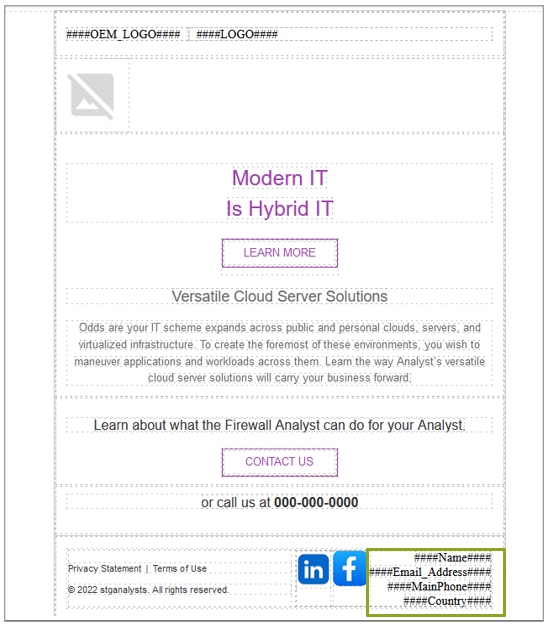
While adding HTML content to email or marketing tactics (Microsite, Event, Web Syndication), if the portal admin wants certain sections to display partner-specific information dynamically when viewed by end-users, they can embed Hash Codes as placeholders. Hash codes are typically used to insert partner contact details into tactic content.

Common hash code examples:
| Hash Code | Replaces With |
|---|---|
####Name#### | Partner's full name |
####Email_Address#### | Partner's email address |
####MainPhone#### | Partner's main phone number |
####Country#### | Partner's country |
####OEM_LOGO#### | Vendor/OEM logo |
####LOGO#### | Partner's logo |
Once the tactic (including HTML template with hash codes) is associated with the campaign and assigned to the designated partner, the partner views the template with hash codes replaced by their actual profile values from the UPM User database. Hash code templates can be used for both Single Touch and Multi-Touch campaigns.

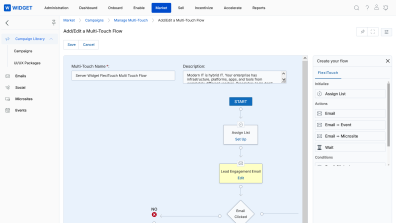
Multi-Touch Flow
Manage Campaigns — Opening the Flow Editor
- Once multiple tactics are added to the campaign, click Manage Multi-Touch at the top of the View a Campaign page.
- The Manage Multi-Touch page lists all existing Multi-Touch Campaign flows. Click Add to create a new flow.
Setting Up the Flow
-
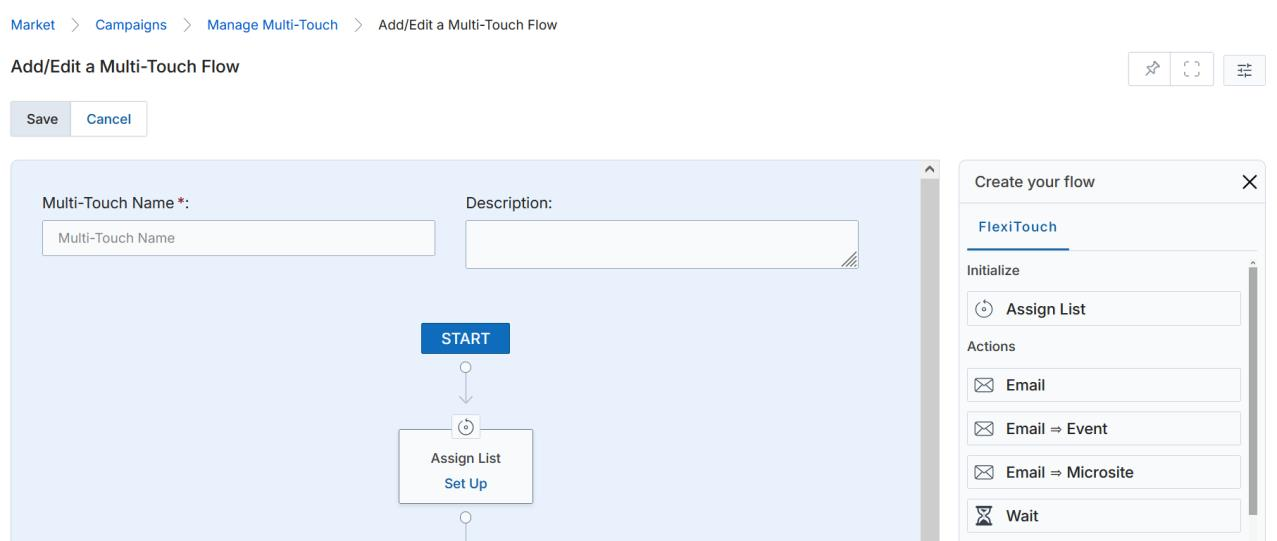
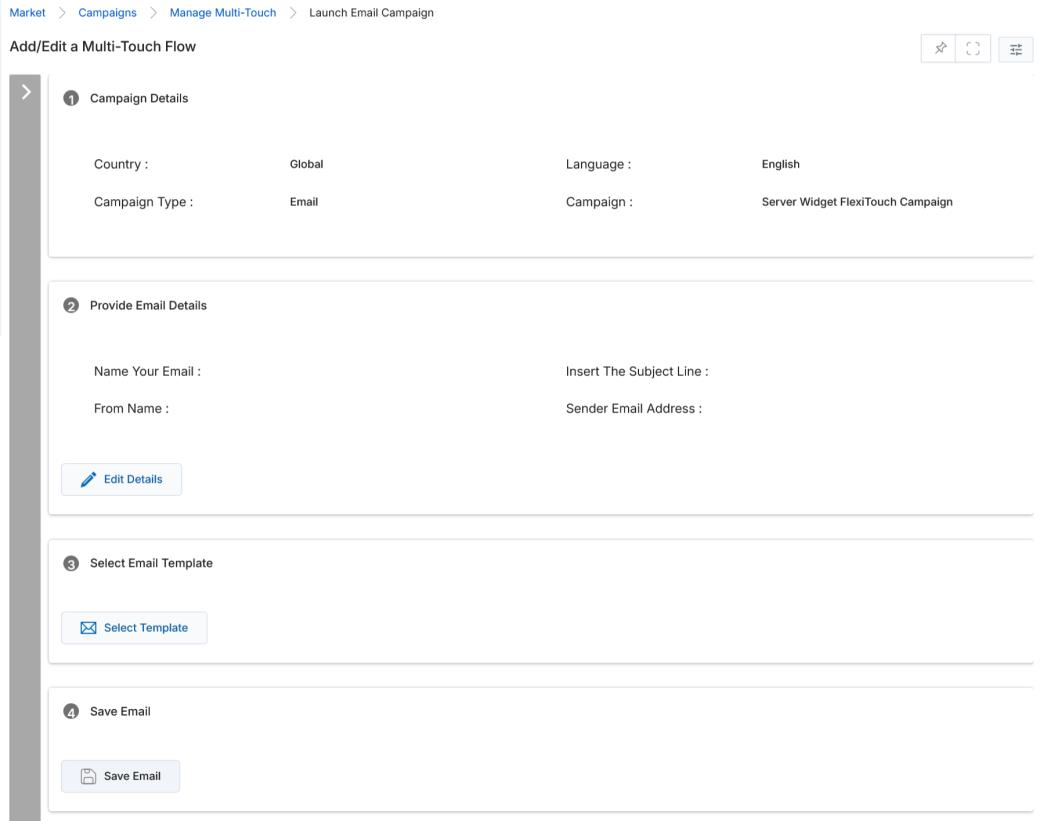
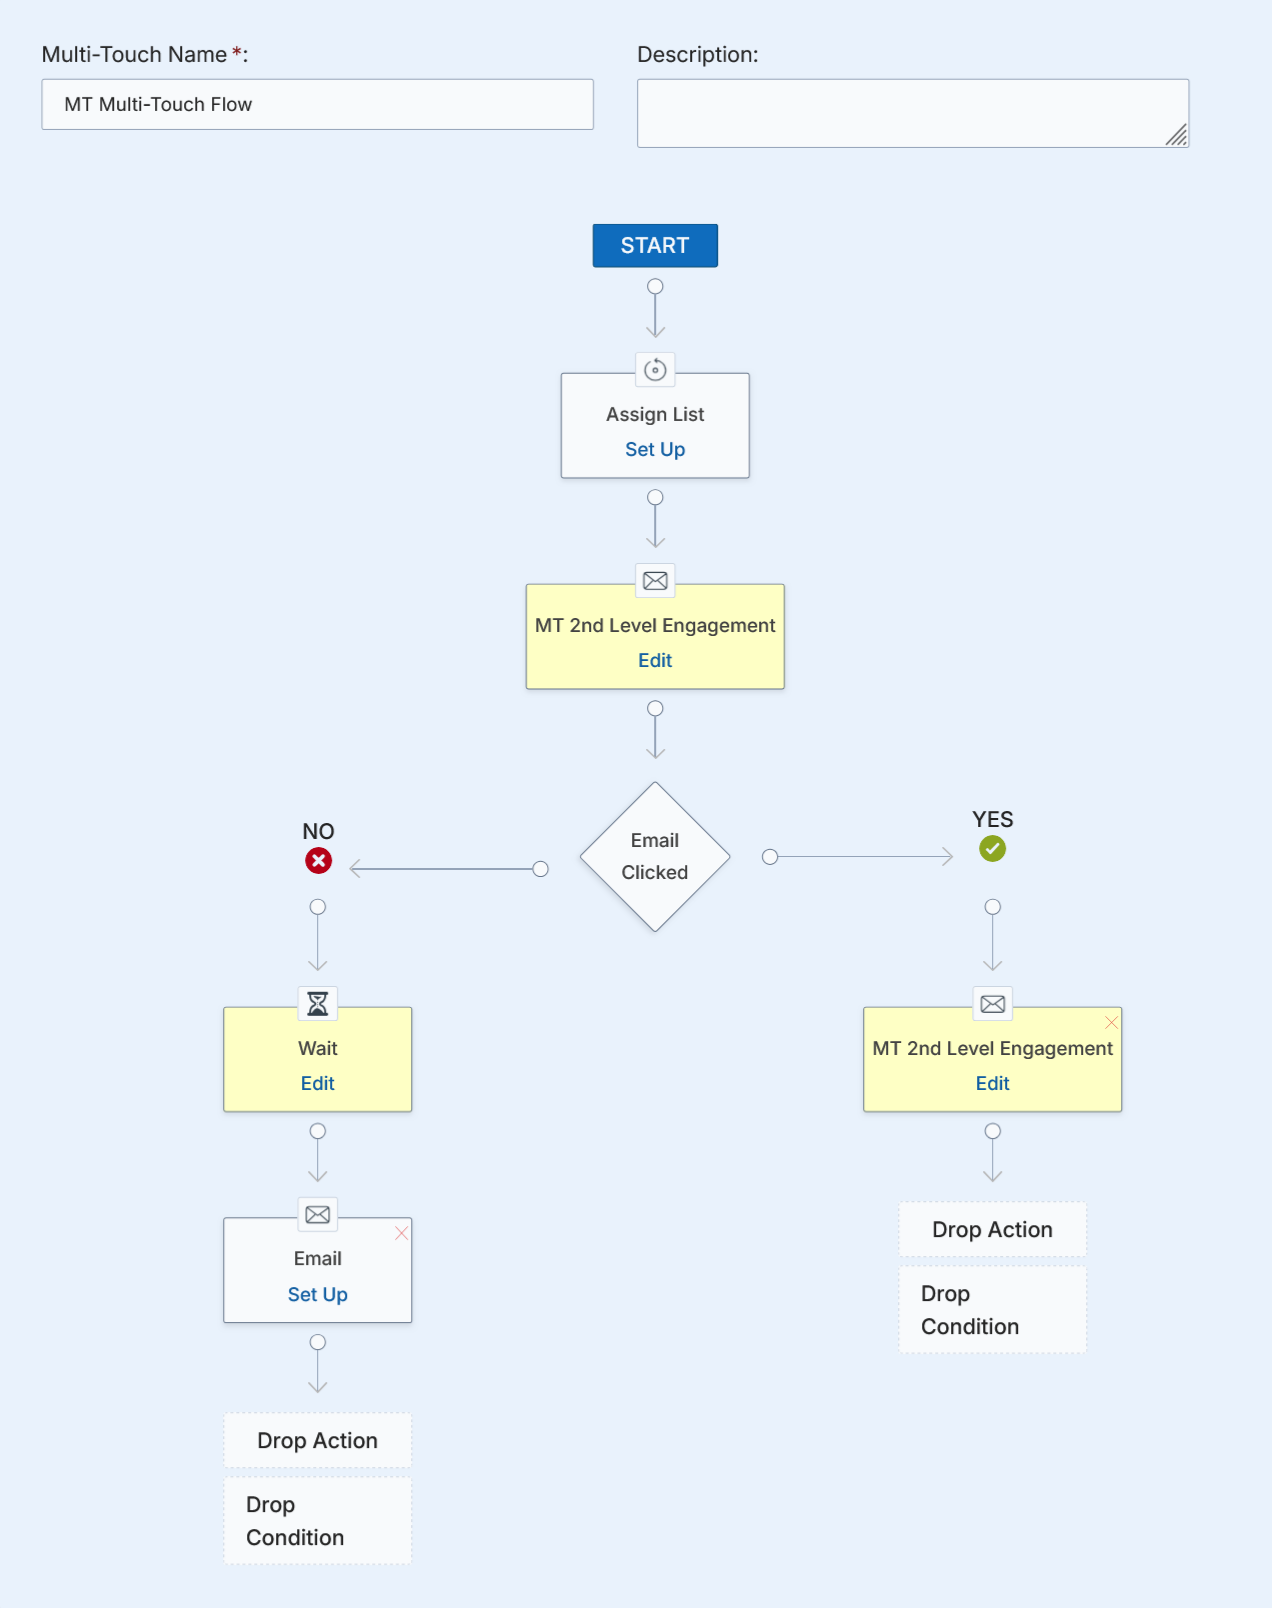
On the Add/Edit a Multi-Touch Flow page:
- Enter a Multi-Touch Name and a short Description.
- The right-hand panel is the Create your flow palette with the FlexiTouch tab active.
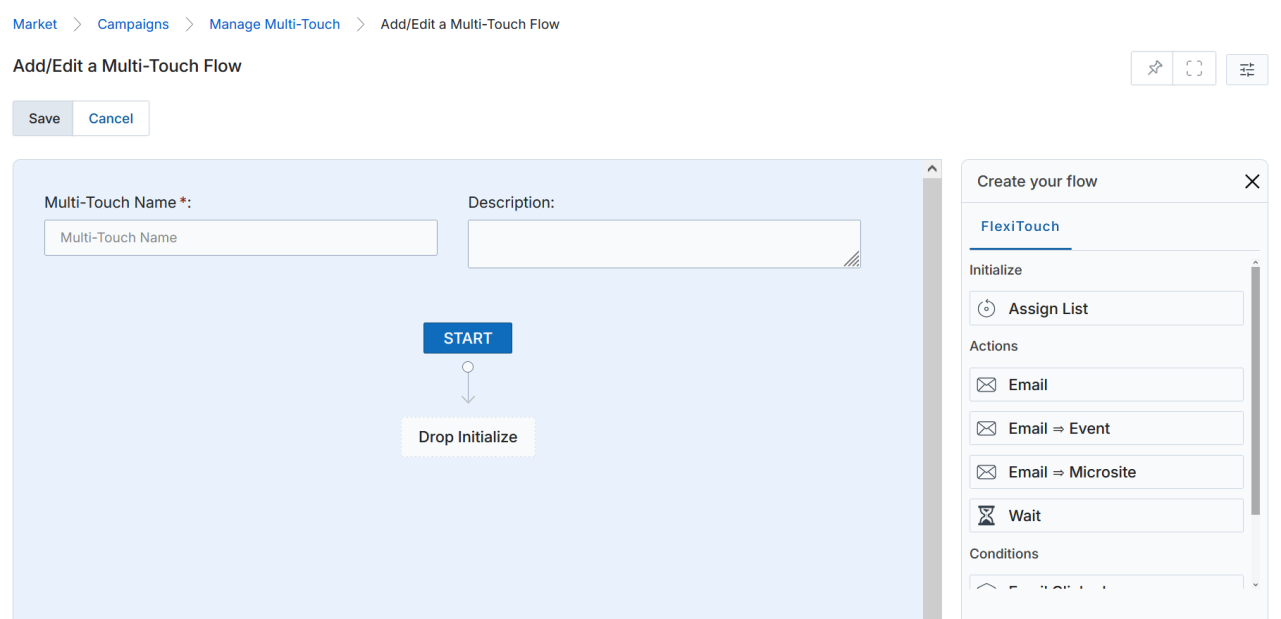
- Drag Assign List from the Initialize section of the palette and drop it on the Drop Initialize placeholder to assign the recipient list.
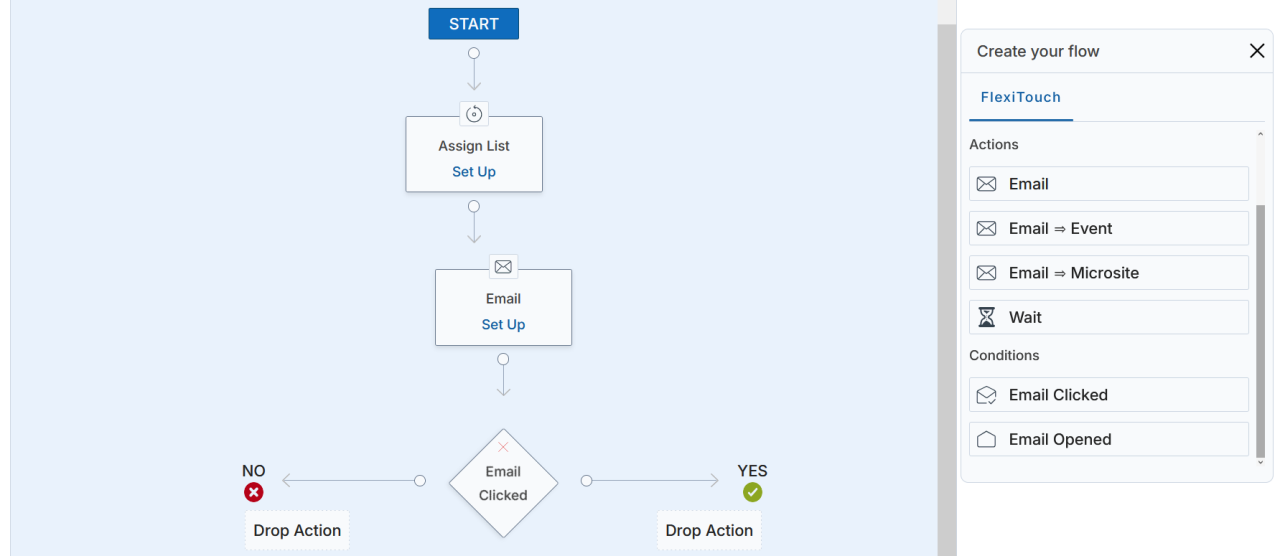
- Drag Email from the Actions section and drop it on the Drop Action placeholder below Assign List to add the initial email blast.
- Add a Condition — for example, drag Email Clicked from the Conditions palette. The canvas branches into a YES path (email was clicked) and a NO path (email was not clicked).
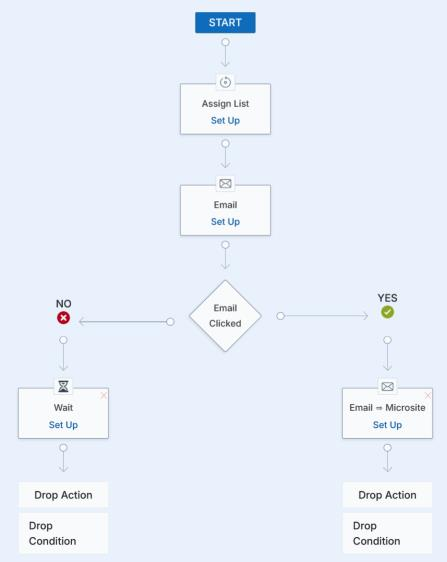
- Under the YES branch, drag Email => Microsite from the Actions palette and drop it on the Drop Action placeholder — recipients who clicked the email will receive a Microsite.
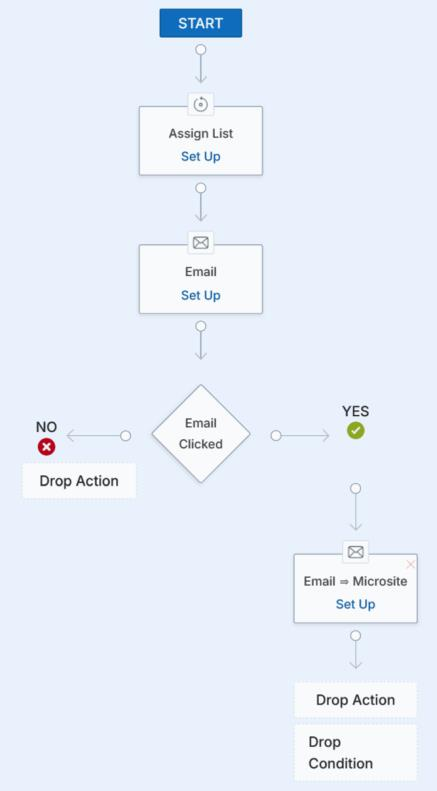
- Under the NO branch, drag Wait and then Email — recipients who did not click will wait and then receive a reminder email.
Setting Up Email Nodes
- Click Set Up on any Email node to configure it.
- The Launch Email Campaign wizard opens inside the flow editor.
-
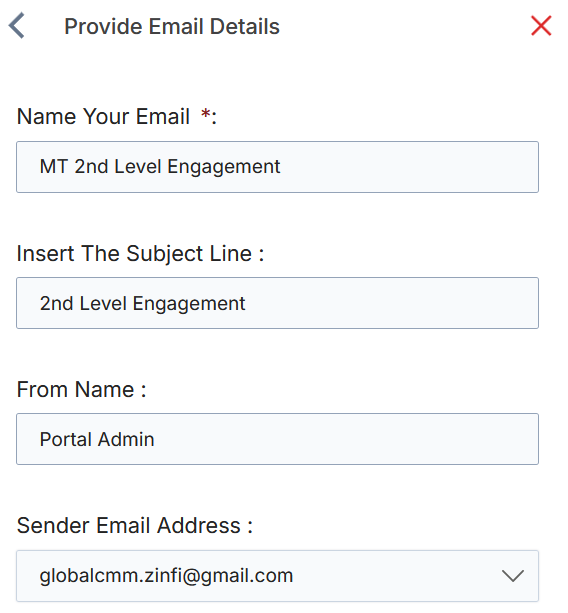
In the Provide Email Details section, click Edit Details to populate:
- Name Your Email
- Insert The Subject Line
- From Name
- Sender Email Address
- In the Select Email Template section, click Select Template. Choose the appropriate template from the right-hand panel. Click Save.
If the selected template contains Hash Codes (e.g., ####Name####, ####Email_Address####),
these will be dynamically replaced with the partner's profile data when the email is delivered.
Hash code templates work for both Single Touch and Multi-Touch campaigns.
- Click Save Email to return to the flow canvas. The email node changes color and shows an Edit button, indicating it is configured.

Setting Up a Wait Node
- Click Set Up on a Wait node to define the delay period.
- In the Wait popup, enter the Days to Wait, Hour, and Minutes. Click Save.
Once saved, the Wait node changes color and shows an Edit button. Continue to set up the downstream Email node for reminder delivery.
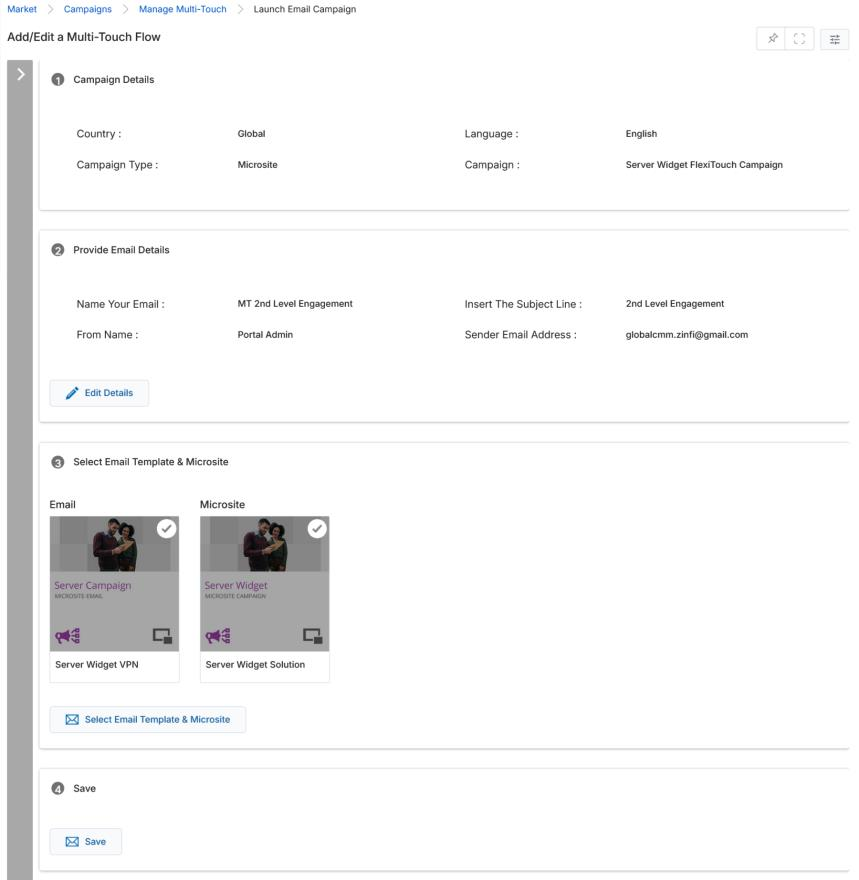
Setting Up Email → Microsite
The Email => Microsite action sends a follow-up email containing a Microsite link. Click Set Up on the Email => Microsite node to configure the email details and select both an Email Template and a Microsite template.
Setting Up Email → Web Syndication
The Email => Web action sends an email with a web syndication link. Click Set Up on the corresponding node, provide email details, select a web syndication template, and click Save Email.
Final Flow & Flow Status
Once all nodes are configured, the completed flow canvas displays the full conditional campaign flow. Click Save to save the flow.
If the workflow is assigned to partner users without any node having a completed Set Up, the campaign Status displayed to partners will be Draft — partners can only preview the flow.
If at least one node has a completed Set Up when the workflow is assigned to partners, the flow Status shown to partners becomes Ready to Copy — partners can customize and launch it.
Assigning the Multi-Touch Campaign to Partners
- Once the flow is saved, it appears in the Manage Multi-Touch page alongside other flows.
- Click Visibility Configuration on the View Campaigns page to define which countries, languages, and user groups can access this campaign.
UI/UX Packages
UI/UX Packages allow portal admins to inject custom CSS, JavaScript, and image/document assets into campaign-related web pages, microsites, and web syndication showcases. Once a package is associated with an email template, microsite, or web asset, its code blocks are automatically applied when that asset is rendered.
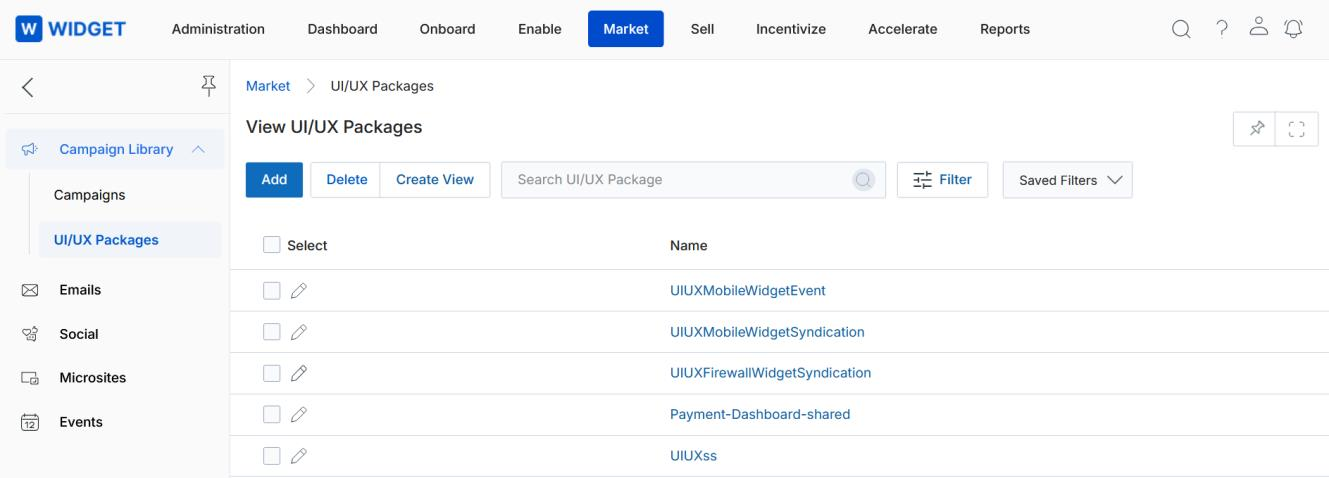
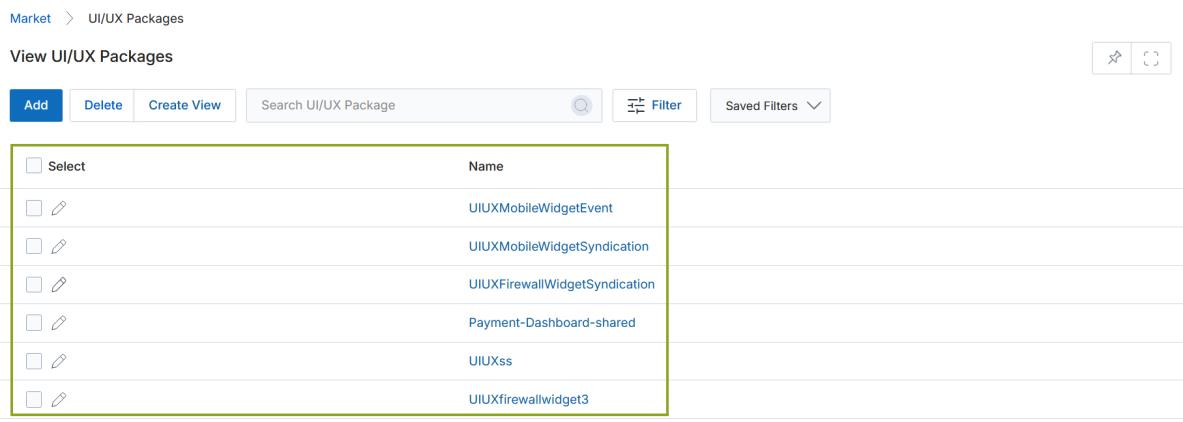
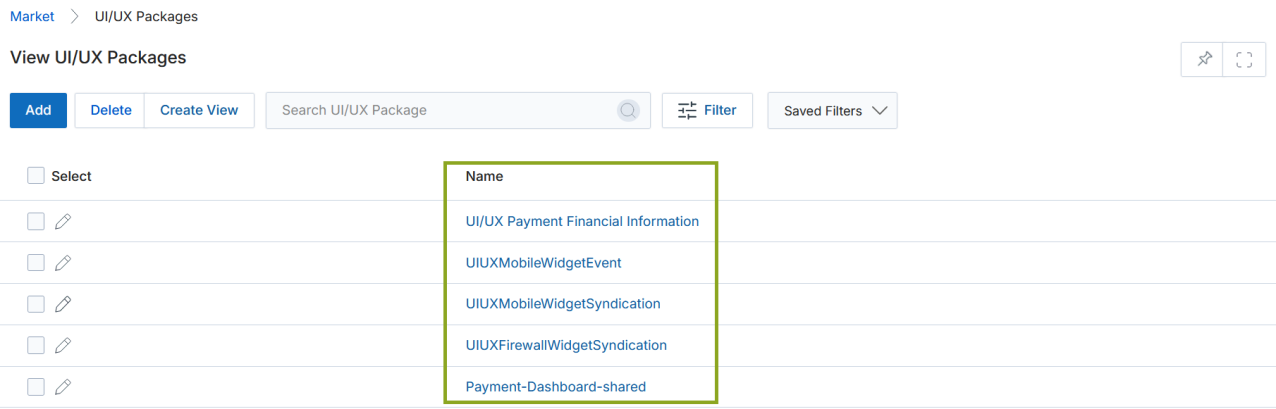
Accessing UI/UX Packages
- Click Market on the top menu.
- Click Campaign Library > UI/UX Packages from the left menu bar.
-
The top action bar provides:
- Add — Create a new UI/UX Package.
- Delete — Delete selected records.
- Create View — Customize which columns are displayed in the grid.
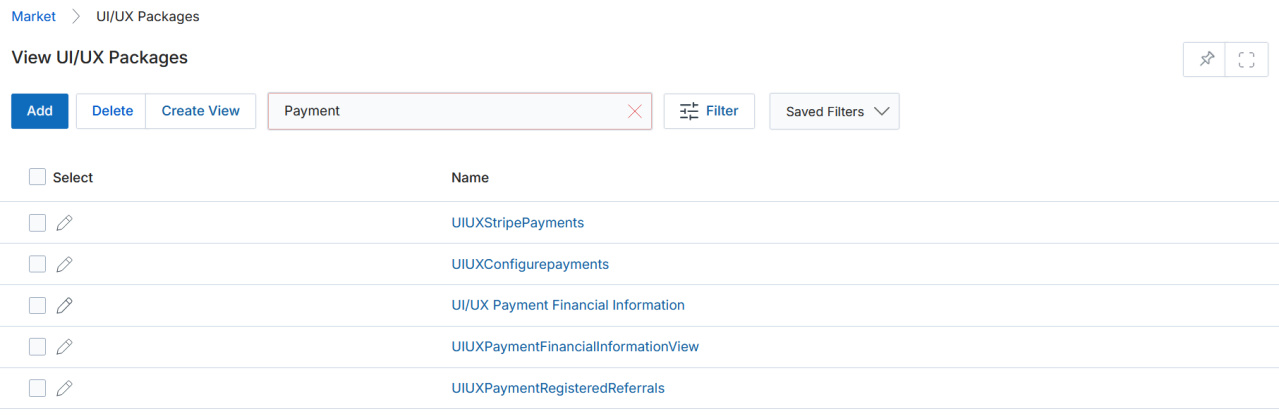
- Filter — Open the filter pane to search for specific packages.
- Saved Filters — Access previously saved filter configurations.
-
For each record in the grid:
- Click the Edit (pen) icon to edit the record inline.
- Click the record name link to open its details page.
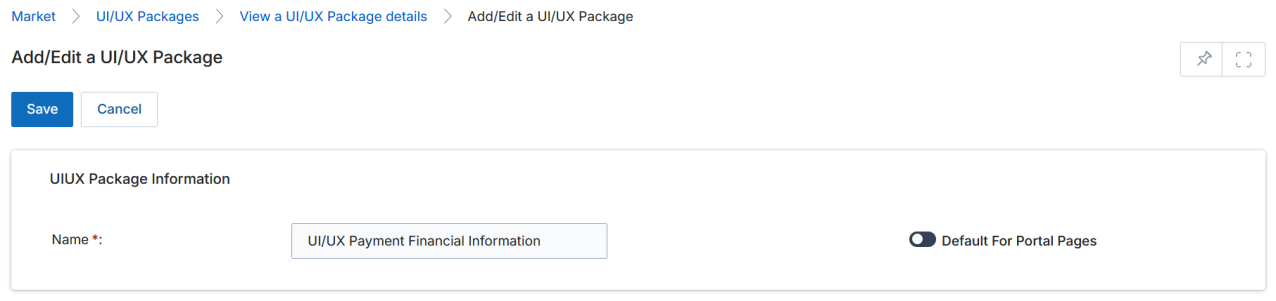
Add / Edit a UI/UX Package Record & Code Entries
- Click Add (or the pen icon to edit an existing record). Enter the Name for the package record and optionally toggle Default For Portal Pages.
- Click Save to save the record, then navigate back to the package to add dynamic code entries.
- On the details page of the package, locate the Styles, Scripts And Images related list and click Add.
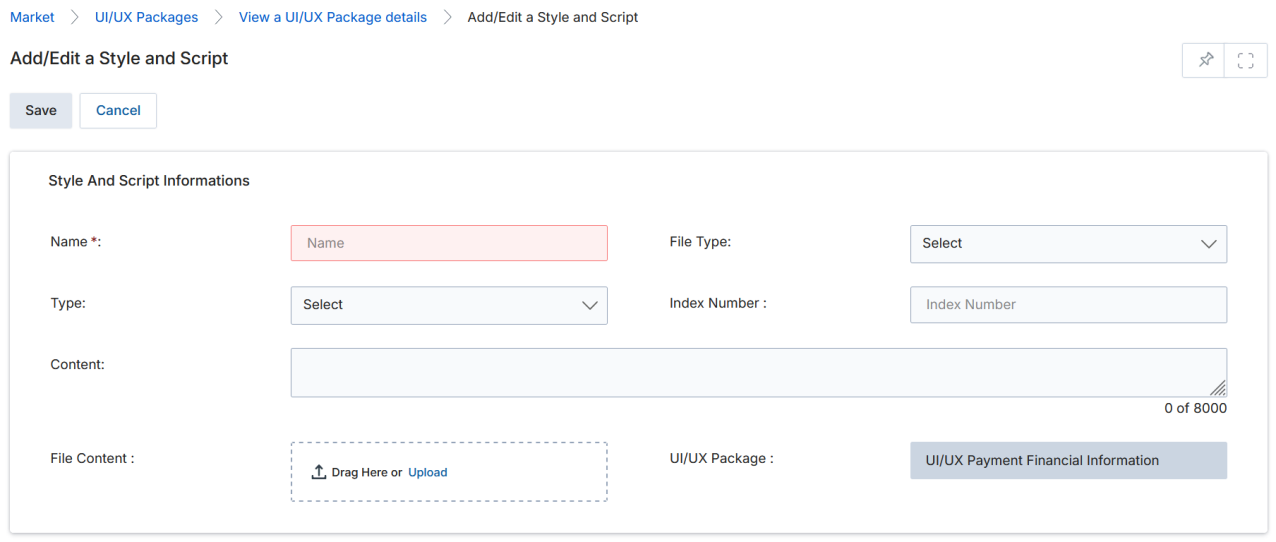
- The Add/Edit a Style and Script page opens. Complete the Style And Script Information fields:
| Field | Description | Required |
|---|---|---|
| Name | Name of this code block entry in the UI/UX Package. | Yes |
| File Type | If Type = File: Style (CSS), Script (JavaScript), or Image/Document. Tells the system how to treat the uploaded file. | Conditional |
| Type | File — code comes from an uploaded file. Content — code is pasted directly into the Content field (no file upload needed). | Yes |
| Index Number | Numeric order (1, 2, …) in which this code entry is applied when multiple entries exist. | No |
| File Content | Upload the actual code file when Type = File. | Conditional |
| UI/UX Package | Pre-populated with the parent package name. | Auto |
| Content | Paste or write code directly when Type = Content. | Conditional |
- Click Save to save the code block. Repeat to add additional CSS, JavaScript, or image entries to the package.
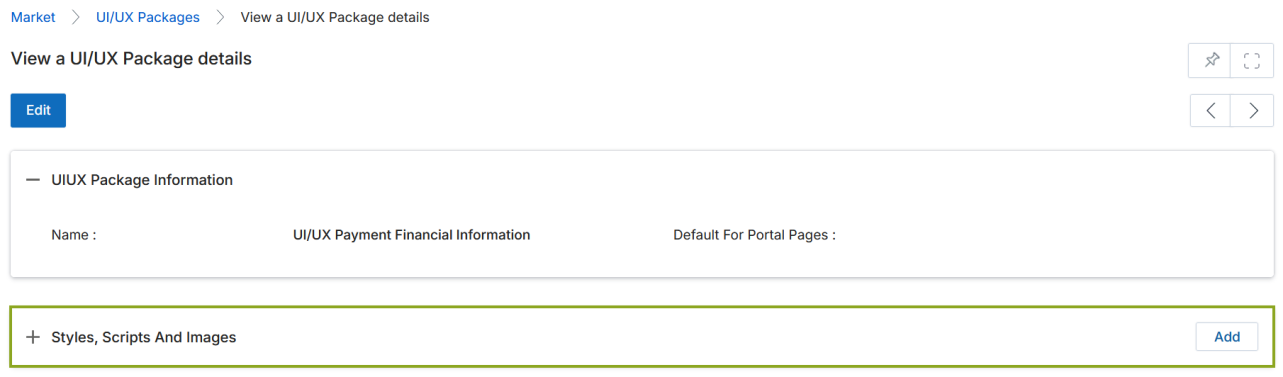
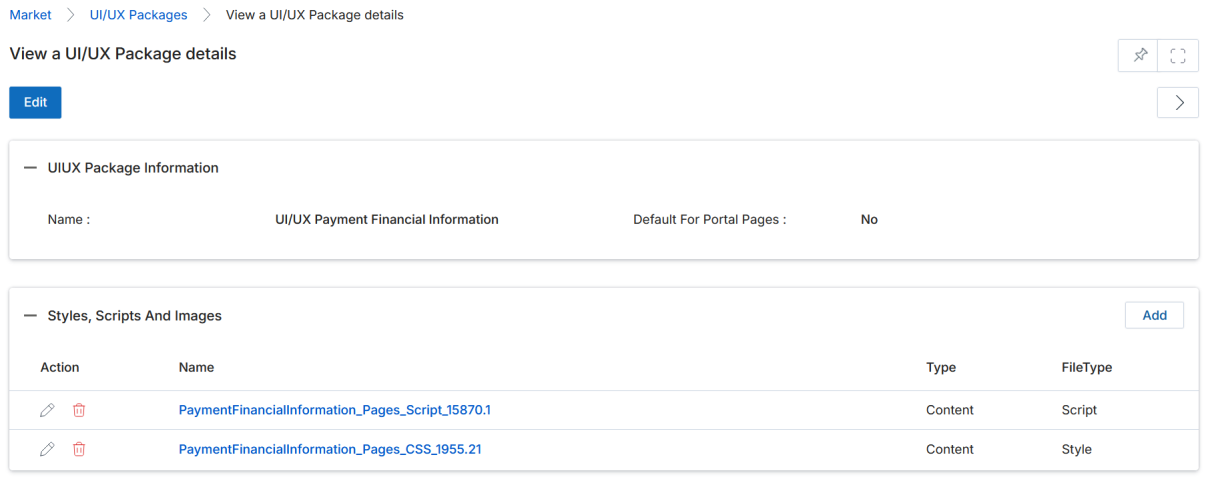
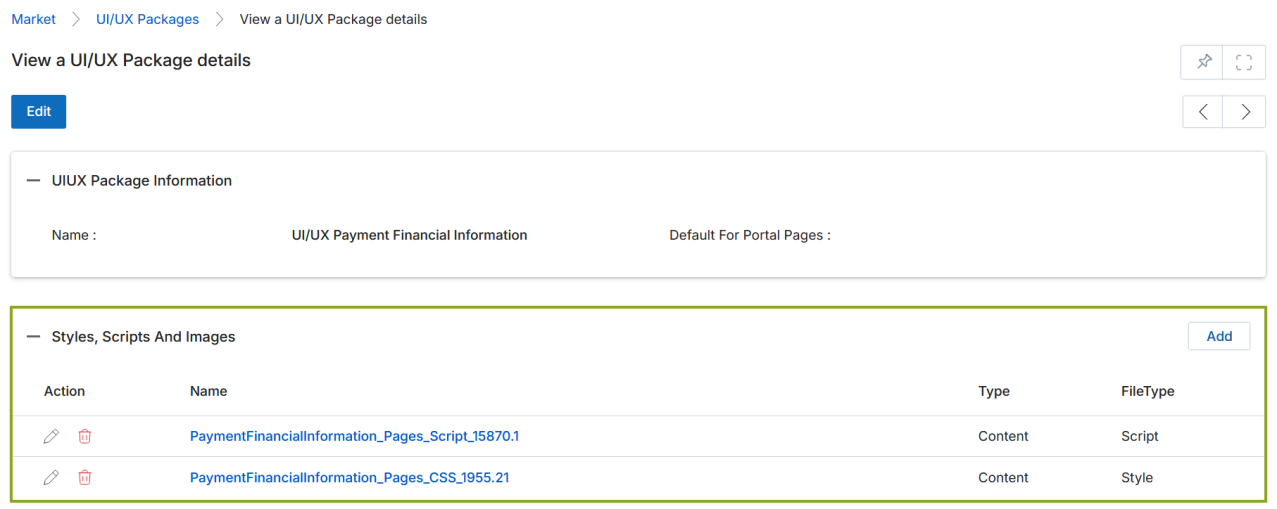
View a UI/UX Package
Click the name of any UI/UX Package record from the grid to open the details page. The page shows:
- Name — The name of the UI/UX Package record.
- Default For Portal Pages — Whether this package is the default for all portal pages.
- Styles, Scripts And Images — All code block entries (Type, FileType) that will be applied when this package is assigned to a web page, microsite, or web syndication showcase.
All code blocks listed in the Styles, Scripts And Images related list are automatically applied in the order defined by their Index Number whenever this UI/UX Package is assigned to a web page, microsite, or web syndication showcase in the UPM platform.