
Introduction
ZINFI's Unified Partner Management (UPM) platform features a robust LMS system to manage training and certifications, updated with an advanced integrated Learning Management Plus (LMS+) application that connects partners to SCORM, AICC, xAPI, and cmi5-compliant e-learning content delivered through browser-agnostic technology.
With ZINFI UPM's LMS/LMS+ application, your organization can train channel sales reps and partner sales reps in "bite-size" increments, providing micro-learning solutions and sales-stage-linked asset delivery. The application supports administering, documenting, tracking, reporting on, and delivering multiple courses and training programs across the entire channel network.
1.1 Certifications Management
The LMS+ application is designed to make it fast and easy to set up a variety of certification programs for channel sales, marketing, and technical teams. You can leverage existing SCORM, xAPI, cmi5, and AICC-compliant courses and assessments or custom-develop your own. The application manages certification program visibility so you can assign programs to specific groups of partners based on competency level, and can be configured to automatically issue certifications upon completion of coursework.
- Certification validity management — Control expiration dates and renewal requirements per certification.
- Browser-independent delivery — All content renders across modern browsers without plugins.
- Client-agnostic certifications — Supports multiple certification types and audiences.
- Multilingual functionality — Upload localized certification programs for non-English-speaking channel teams.
1.2 Courses and Materials Management
Your organization can configure and associate multiple courses with a specific certification program to simplify participation for channel sales, marketing, and technical teams. Custom sections and course materials are managed by uploading single-context materials and tracking assessments. The LMS+ features easy interoperability with all SCORM, xAPI, AICC, and cmi5 learning content libraries, with supported learner tracking and reporting capabilities.
- Complete course setup and management — Create, categorise, assign, clone, and archive courses.
- Comprehensive tracking of behavior and activities — Monitor learner progress across all content.
- Supports both desktop and mobile environments — Responsive delivery for all devices.
- Compliant packaged content — Full support for standards-based course packages.
1.3 Assessments Management
ZINFI's LMS/LMS+ allows your organization to set up a variety of custom assessments with tasks and assignments. Learners are automatically assessed and receive ratings or grades based on performance, which become part of their record and can be shared across multiple learning activities. Assessment management tools include individual progress tracking, password protection, and multilingual support for channel partners across the globe.
- Assessment setup and management — Multiple question types: Single, Multiple, Dropdown, Descriptive.
- Multilingual — Configure assessments in any language your channel partners use.
- Track and learn functionality — Partial scoring, retake controls, score messages.
- Data portability — Bulk upload questions via Excel; export results as CSV.
Learning Program Creation Cadence
Before building your learning program, it is important to understand how the different elements fit together and in what order they must be created:
Materials → Sections → Courses (with Assessments) → Certifications

- Create one or more Sections. Each Section is like a chapter in a book. Within each Section, you load one or more Materials (documents, PPT presentations, videos, etc.) — these are the pages in the chapter, forming the content learners absorb in that section.
- Create a Course and load your Sections. A Course is like a book — you load your chapters (Sections) into it. Any given Course is made up of one or more Sections.
- Create an Assessment for each Course. The Assessment is a test made up of questions covering the content learned in the Course. Learners must take and pass the Assessment before progressing to the next Course within any Certification Track.
- Create a Certification from one or more Courses. A Certification is like a library — you bundle your books (Courses) together as a program that the learner must complete and pass in order to achieve the Certification level and receive the associated certificate or emblem.
Sections
Navigate to Sections via Enable › Learning › Sections in the left menu bar.
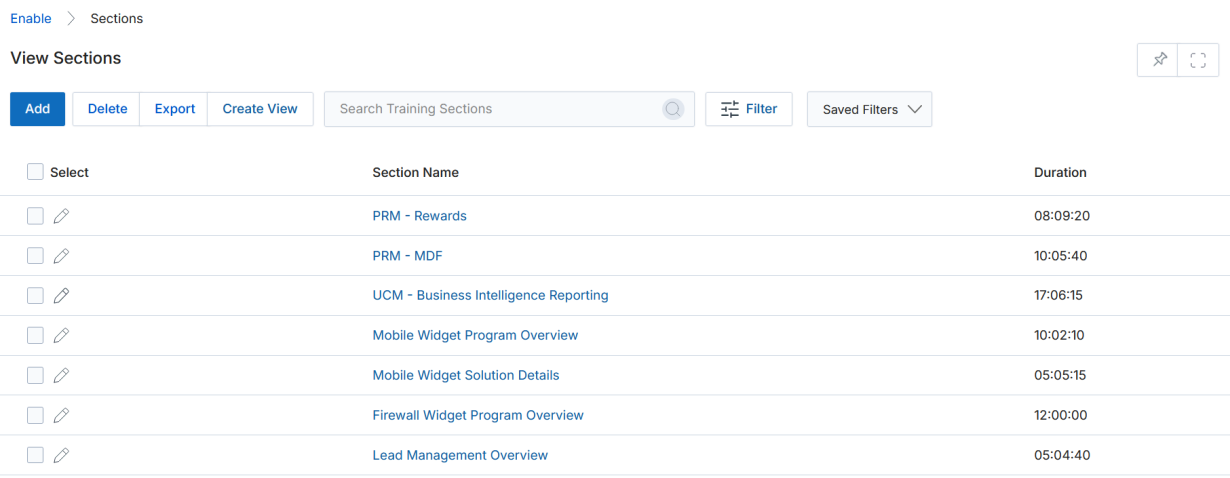
3.1 View Sections
The View Sections listing page displays all existing training sections. The toolbar provides the following actions:
- Add — Creates a new Section.
- Delete — Deletes the selected record(s) from the listing.
- Export — Exports records to Excel CSV format. Choose Export Type (Selected Records or All) and a Record Range, then select which fields to include using the three-dot column picker. Click Export Data when ready.
- Create View — Manages which columns appear in the listing. Use the field dropdown to add columns, click Green Dot items to select fields for display, and the orange X to remove columns. Provide a View Name and click Save.
- Search / Clear Search / Saved Searches — Filter the listing by criteria, clear filters, or recall previously saved searches (with Edit and Delete options per saved search).
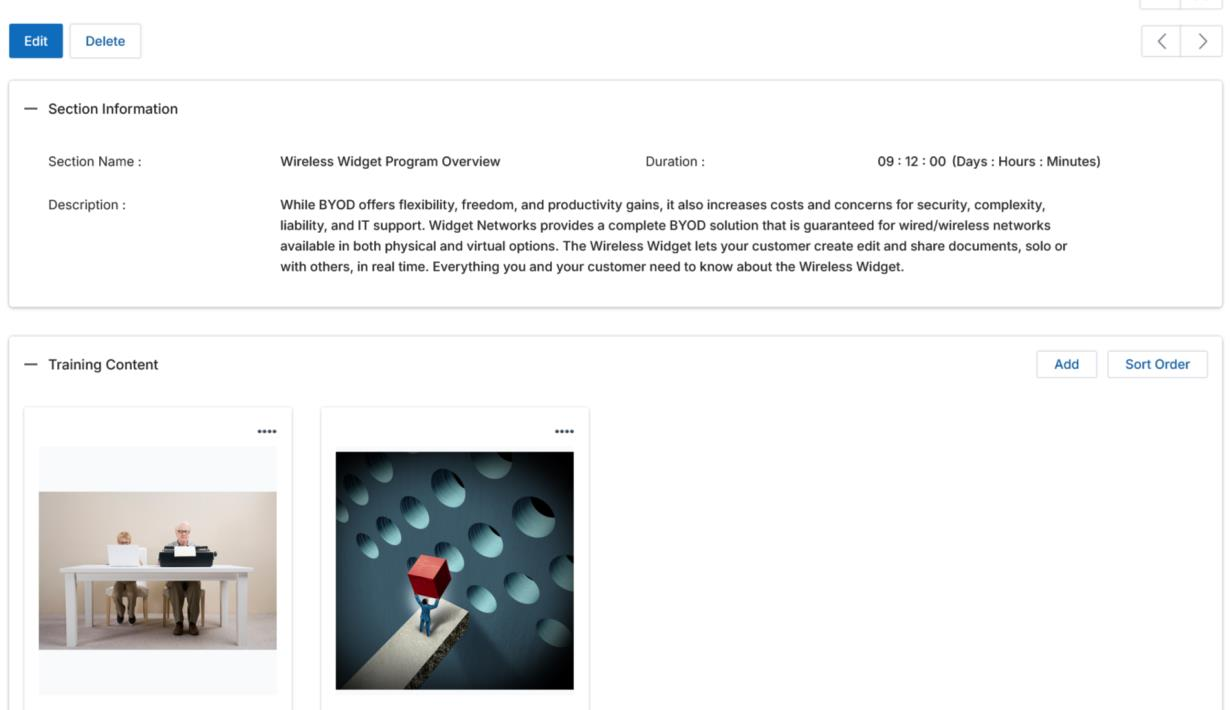
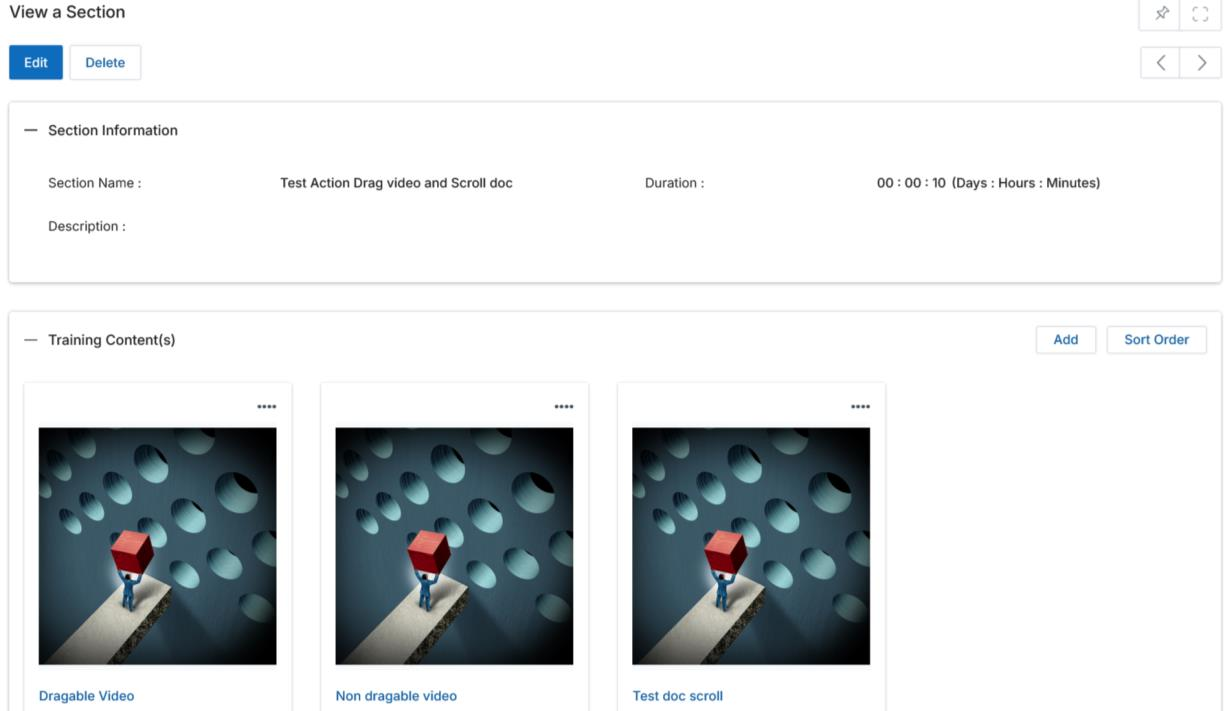
3.2 View Section Details
Click on the Name/Title of any Section in the listing to open its details page. The detail page contains:
- Edit — Opens the Section in edit mode.
- Delete — Permanently removes this Section.
- Section Information — Displays Section Name and Duration (Days : Hours : Minutes).
- Description — Informational text describing what this Section contains and covers.
- Training Content — The related list of materials (videos, documents, etc.) that learners must review to complete this section. Click Add to attach new materials or Sort Order to rearrange the sequence.
3.3 Add / Edit a Section
Click the Add button on the View Sections page to create a new Section, or click the pencil icon next to an existing Section to edit it. Fill in the following fields and click Save:
| Field | Description |
|---|---|
| Section Name * | The display name for this Section record. |
| Duration * | Estimated time to complete the section, entered in Days : Hours : Minutes format. |
| Description | Informational text to explain to learners what this Section covers. |
After saving, click on the Section Name in the listing to return to the Details view and add Training Materials to this Section.
3.4 Adding Training Materials to a Section
Materials are the individual files (videos, PPT decks, PDFs, Word documents, etc.) that make up the content within any given Training Section. From the Section details page, click Add in the Training Content(s) related list to open the Training Material form.
Note: To make a material SCORM-compliant, select Yes from the SCORM Package dropdown. This is only available for LMS+ and requires the material file to be a standards-compliant SCORM package.
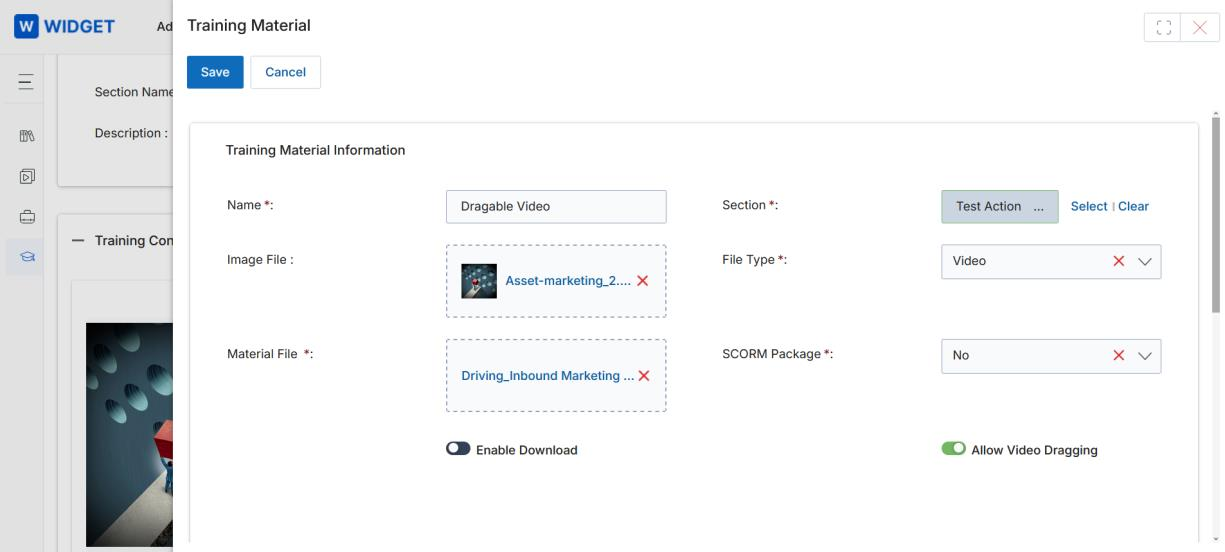
| Field | Description |
|---|---|
| Content Name * | Display name for this piece of content/material. |
| Section * | Which Section this content belongs to (auto-populated from the Section you are creating within; can be changed to assign to a different section). |
| Image File | Thumbnail image to represent this material in the Section listing when learners take this Section. |
| File Type * | Type of content: Document, Video, or URL. |
| Material File * | The actual uploaded file that will be viewable or downloadable by the learner. |
| SCORM Package * | LMS+ only. Set to Yes if the uploaded file is a SCORM-compliant package that must be played in a SCORM player. |
| Enable Download | Toggle whether the attached file can be downloaded. If disabled, learners can only view the content in the browser. |
| Allow Video Dragging | For video files: enable to allow partners to drag the video playback cursor; disable to restrict cursor dragging and enforce sequential viewing. |
| Credit | Number of credits towards course completion awarded for completing this section. |
3.5 View Training Material Order List
From the Section details page, click Sort Order in the Training Content related list to open the Sort Order List modal. Drag and drop material tiles to rearrange the sequence in which materials appear to learners within this Section. Click Save to commit the new order, or Cancel to discard.

Courses
Navigate to Courses via Enable › Learning › Courses in the left menu bar.
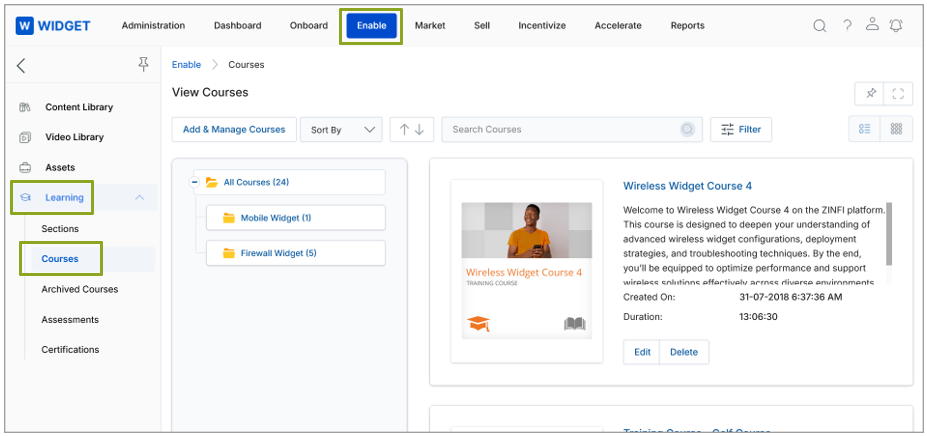
4.1 View Courses
The View Courses page displays all courses in Grid (Thumbnail) or List view. Key toolbar actions:
- Add & Manage Courses — Opens the Manage Category panel to create new courses under categories.
- Grid / List view icons — Toggle between thumbnail grid and detailed list views.
- Sort By / Sort Order — Sort the course listing by chosen criteria.
- Filter / Clear Filter — Open the filter pane with searchable parameters (Category Name, Course Name, Duration); clear to show all courses.
- Tree View (left panel) — Browse courses by Category in an accordion hierarchy. Numbers in parentheses show the count of courses per category.
For each course in the listing, click the Course Name/Title to open the details panel; use Edit to modify details or Delete to remove the course.
4.2 View Course Details
Click on a Course Name/Title to open the View a Course side panel. This panel provides the following actions and information:
- Edit — Opens the course in edit mode.
- Delete — Removes this Course record.
- Assign To — Assigns this course to selected partner users or groups so it appears in their learning portal view.
- Clone — Creates a duplicate of this Course record.
- Archive — Moves this Course to the Archived Courses list (non-active) without deleting it permanently.
- Section Order — Reorders the sections within this course.
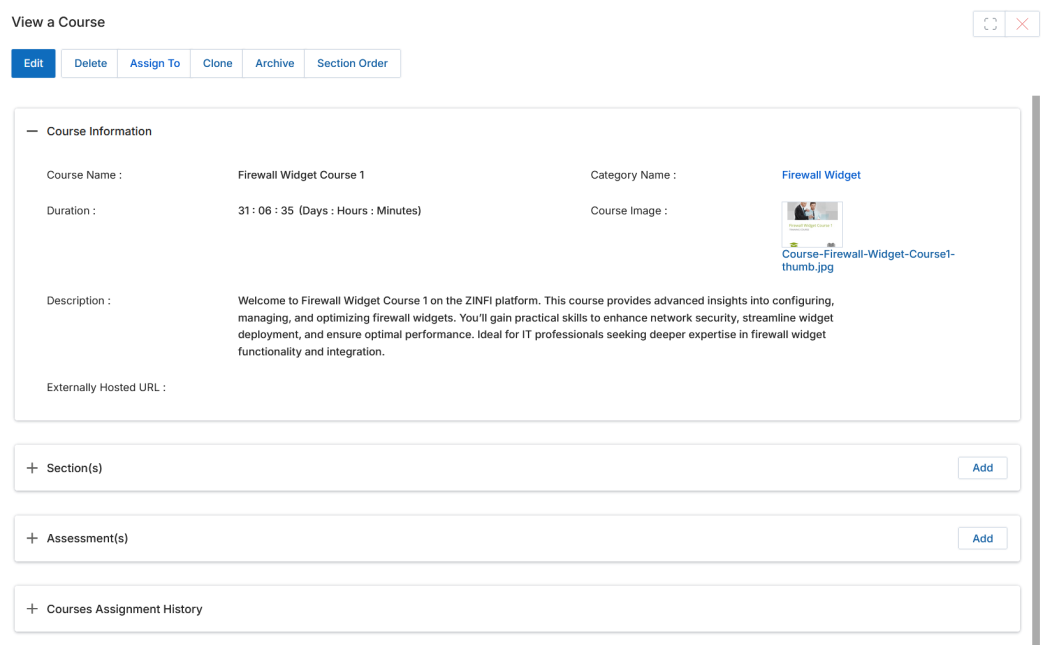
Course Information Fields
| Field | Description |
|---|---|
| Course Name | Name of this Course. |
| Category Name | Name of the Category the Course belongs to. |
| Duration | Estimated duration (Days : Hours : Minutes) to complete the course. |
| Rewards Points | Number of Rewards Points awarded upon course completion. |
| Credit | Number of Credit points accrued upon course completion. |
| Course Image | Thumbnail to represent this Course in the listings page. |
| Description | Description of course deliverables, sections covered, prerequisites, and what learners will gain. |
| Externally Hosted URL | URL if the course content is hosted externally. |
4.3 Add & Manage a Category and Course
Click Add & Manage Courses from the View Courses toolbar. This opens the Manage Category panel where you manage the course category hierarchy and add courses within categories.
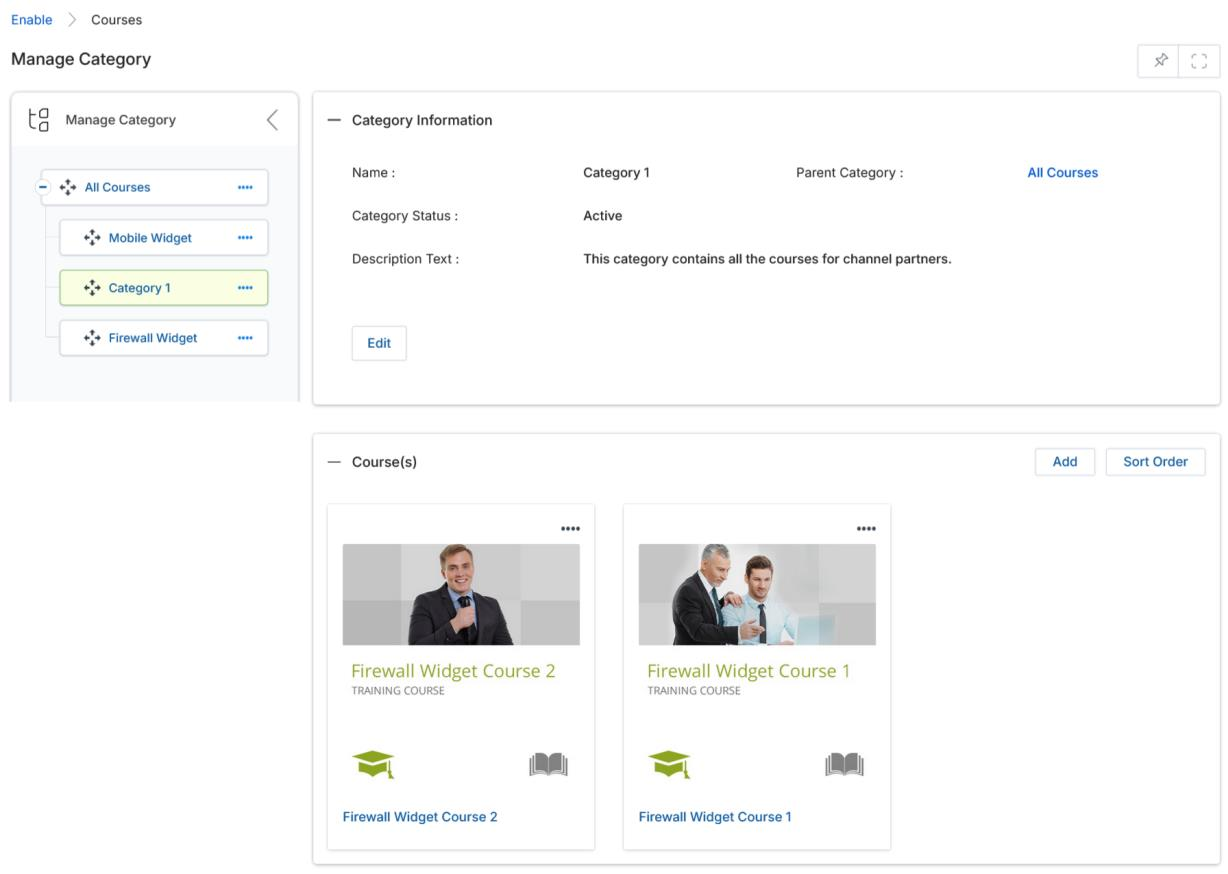
To create a new sub-category, click the (….) button on any tree node and select Sublink (+). Fill in the Category Information fields and click Save:
| Field | Description |
|---|---|
| Name * | Name of the Category. |
| Parent Category * | The parent category this category sits under in the hierarchy. |
| Category Status * | Active or Inactive status of the category. |
| Description Text | Short description of the category's purpose. |
To add a Course, click the Add button in the Course(s) section of the Manage Category page. Fill in the Course Information fields (same fields as described in Section 4.2) and click Save. The new course will appear in the category.
4.4 Adding Sections to a Course
- Click on the Course Name/Title from the View Courses page to open its details panel.
- Expand the Section(s) related list and click Add.
- A pop-up window lists all available sections. Checkmark the Section(s) you want to add and click Save.
- The added Sections will appear in the Section(s) related list. You can also create a new Section directly from this pop-up by clicking Add.
4.5 Adding Assessments to a Course
- Click on the Course Name/Title from the View Courses page to open its details panel.
- Expand the Assessment(s) related list and click Add.
- A pop-up window lists all available Assessments. Checkmark the assessment you want to attach as the final test for this course and click Save.
- The associated Assessment will appear in the Assessment(s) related list. You can also create a new Assessment directly from this pop-up.
4.6 Archive Courses
- Open the course details panel by clicking the Course Name/Title from View Courses.
- Click the Archive button. The course is moved to the View Archived Courses page (accessible via Enable › Learning › Archived Courses) and is no longer active in the main View Courses list.
- To restore an archived course, navigate to View Archived Courses and click the Activate button on the relevant course. The course returns to its parent category in View Courses.
Assessments
Navigate to Assessments via Enable › Learning › Assessments in the left menu bar.
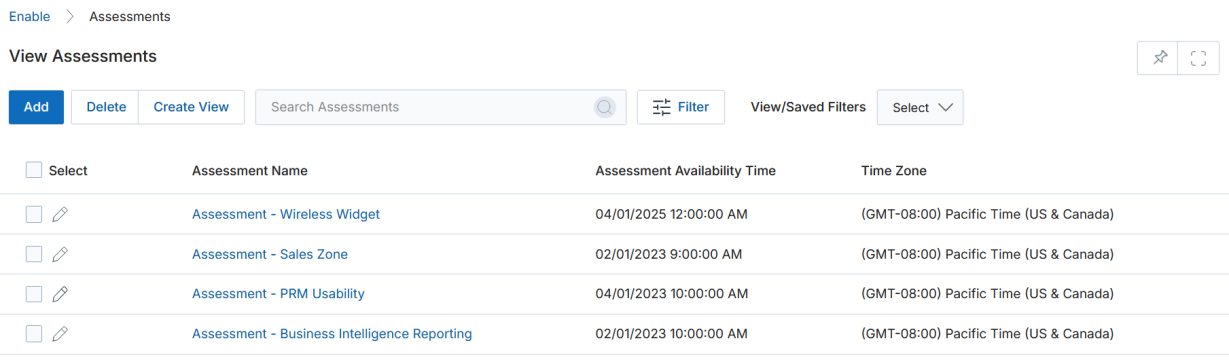
5.1 View Assessments
The View Assessments listing page shows all assessments with their availability time and time zone. Toolbar actions include Add, Delete, Create View (manage visible columns), Filter (search by Assessment Name), and View/Saved Filters.
5.2 View Assessment Details
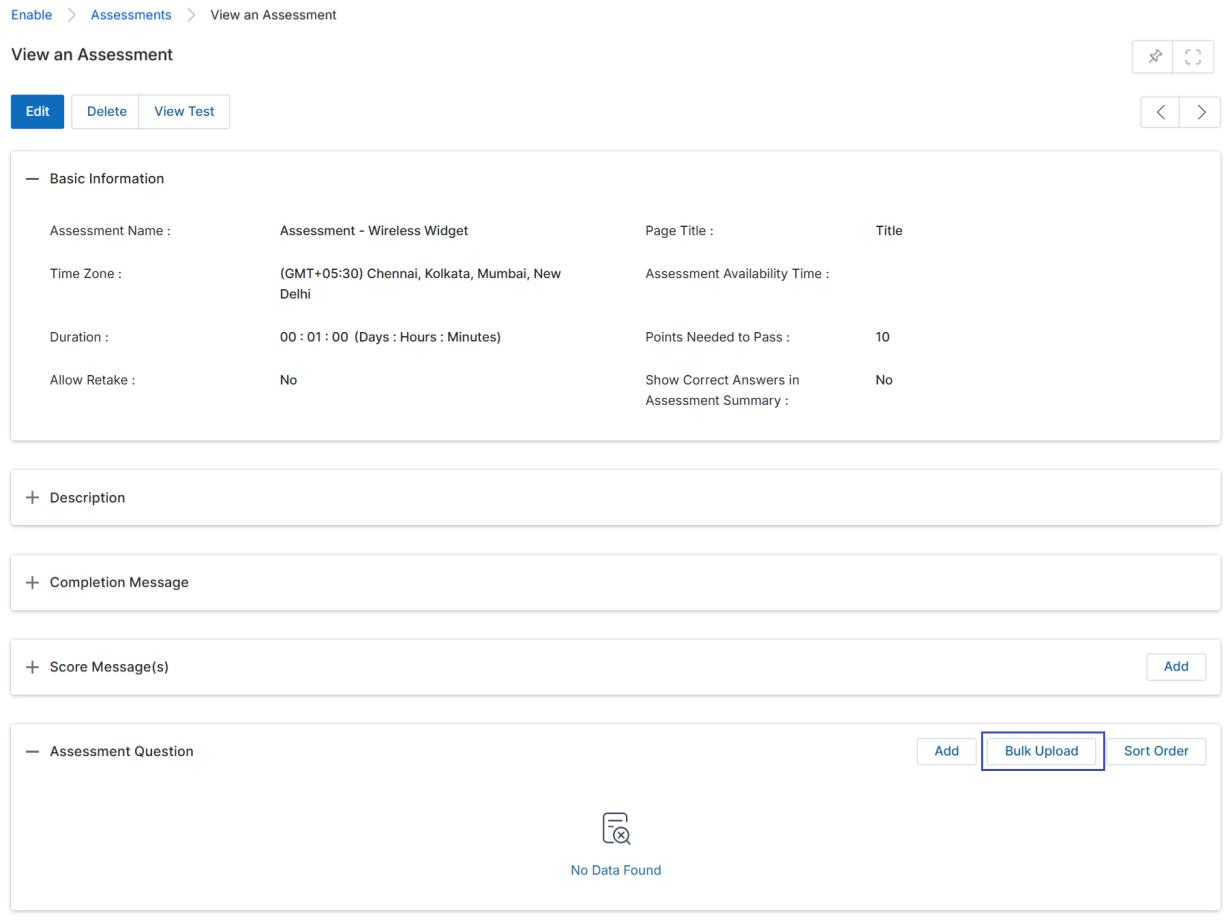
Click on an Assessment Name/Title to open its details page. The page contains:
- Edit — Opens the Assessment in edit mode.
- Delete — Removes this Assessment record.
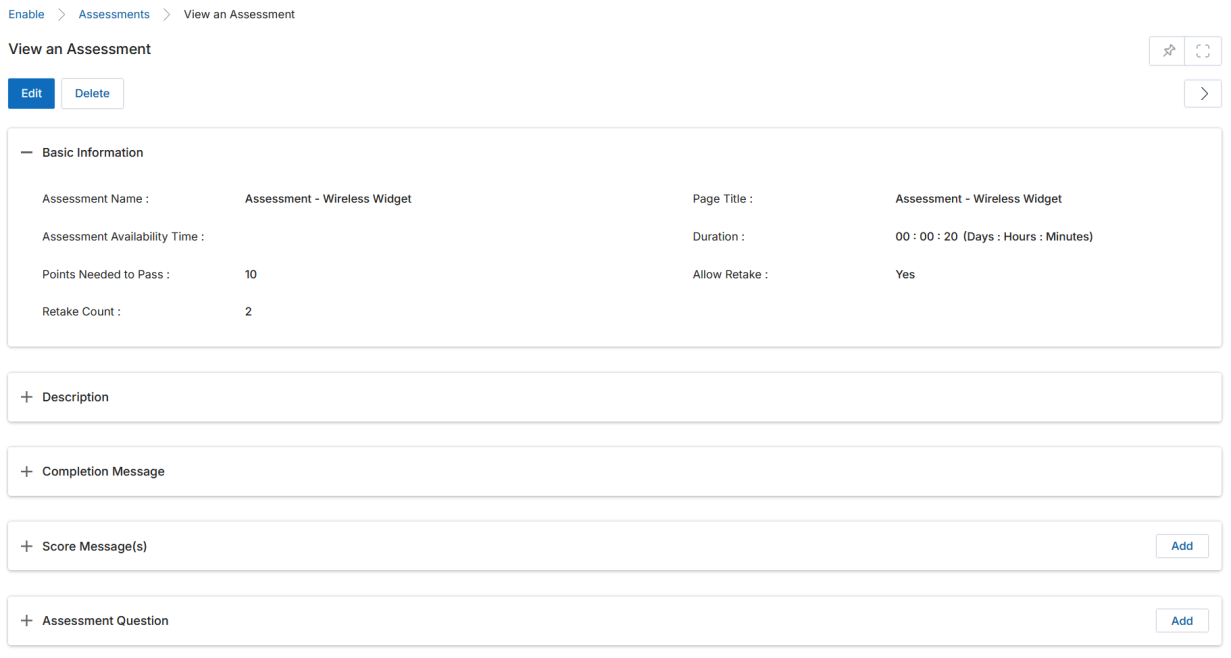
Basic Information Fields
| Field | Description |
|---|---|
| Assessment Name | Name of this Assessment record. |
| Page Title | Title displayed at the top of the assessment page when learners take it. |
| Time Zone | Time zone for the assessment availability window. |
| Show Question Numbering | Yes/No toggle for displaying question numbers during the assessment. |
| Assessment Availability Time | Date and time from when the assessment becomes available. |
| Language | Language in which the assessment is administered. |
| Duration (HH:MM:SS) | Estimated time for learners to complete the assessment. |
| Points Needed To Pass | Minimum points required to pass the assessment. |
| Allow Retake | Whether the partner is allowed to retake the assessment. |
| Retake Count | Maximum number of times a partner can retake the assessment within a course. |
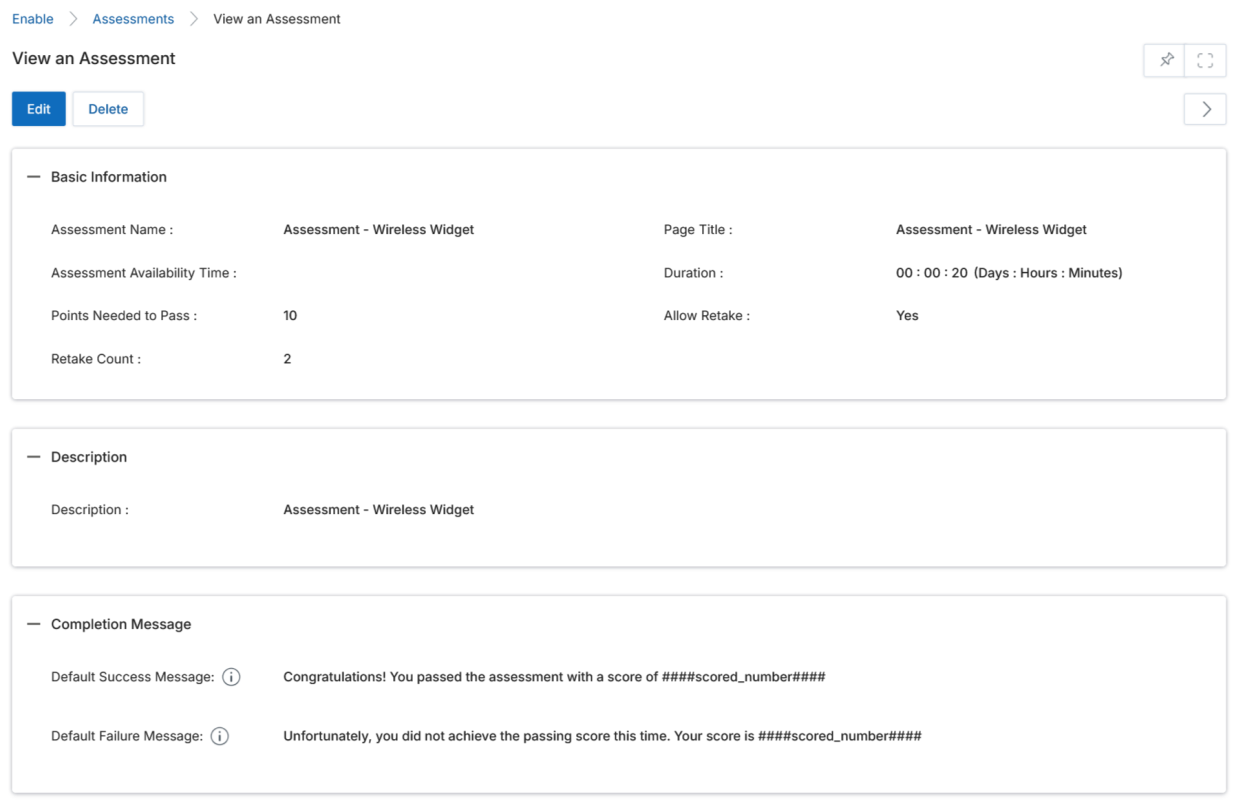
Other Sections
- Description — Short description displayed at the top of the Assessment page for learners.
- Completion Message — Message shown when learners complete the assessment. Includes a Default Success Message and Default Failure Message with the
####scored_number####placeholder for the actual score. Their Score Message (based on point range) also appears here. - Score Messages — Point-range-based messages shown to learners based on their final score.
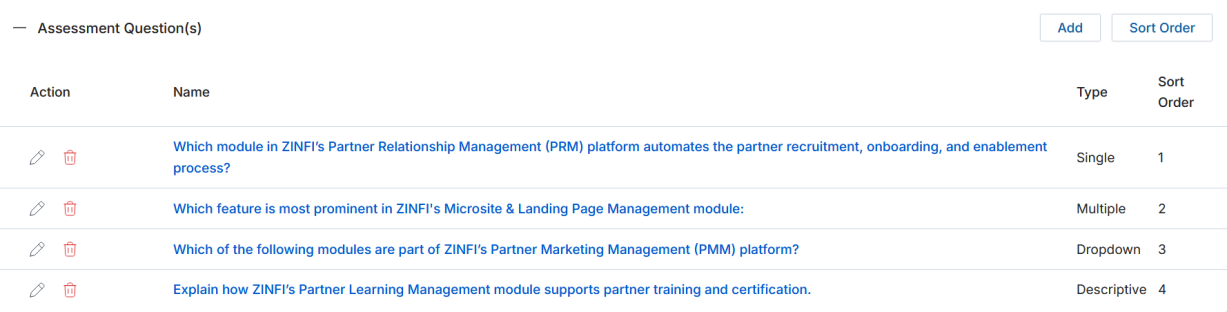
- Assessment Questions — The list of questions configured for this assessment.
5.3 Add / Edit an Assessment
Click Add on the View Assessments page or the pencil icon on an existing assessment to open the Add/Edit Assessment form. Fill in all the Basic Information, Description, and Completion Message fields described in Section 5.2 and click Save. After saving, click the Assessment Name to return to its Details view where you can add Questions and Score Messages.
5.4 Adding Questions
From the View Assessment details page, expand the Assessment Question(s) related list and click Add to create a new question. Fill in the following fields:
| Field | Description |
|---|---|
| Assessment | Auto-populated with the Assessment this question belongs to. |
| Question * | The full text of the question (up to 4000 characters). |
| Type * | Question format:
|
| Sort Order | Numeric value determining the order in which this question appears. |
| Required | Toggle to make the question mandatory. |
| Validation Message | Message shown if the learner does not answer in the correct format. |
| Partial Scoring | For Multiple-type questions: when enabled, partners earn points for each correct answer selected; when disabled, all correct answers must be selected and no incorrect ones for full credit. |
After saving the question, click its name to open the question record and add Answers. Click Add in the Answers related list and fill in:
- Answer * — The answer text.
- Correct Answer — Toggle to mark this as a correct answer (controls whether partners can see correct/incorrect answers after submission).
- Points * — Points this answer is worth (full points for correct, partial points for partially-right, zero for wrong).
- Sort Order — Order in which this answer appears.
5.5 Bulk Upload of Assessment Questions and Answers
- Create or open an existing assessment.
- Download the sample Excel file from Data Import under My Accounts. Populate it with question text, question type, required flag, partial scoring flag, question points, and answer options with correctness and points.
- From the View an Assessment page, scroll to the Assessment Question section and click Bulk Upload.
- In the Assessment Bulk Upload Information screen, enter a Name for the bulk upload record, click Select to associate it with the correct Assessment Name, and upload the completed Excel file.
- Click Save and verify all questions and answers are created successfully in the assessment.
5.6 Display Correct and Incorrect Answers
When configuring an assessment in Add/Edit mode, the Show Correct Answers in Assessment Summary toggle and Show Correct Answer dropdown control when learners can see correct and incorrect answers:
- After Every Submission — Correct/incorrect answers shown after each attempt.
- After Final Submission — Correct/incorrect answers shown only after the final allowed attempt (when multiple retakes are configured).
5.7 Manage Score Messages
From the View Assessment details page, expand the Score Message(s) related list and click Add. Configure each score message with:
- Min Points * — Minimum score that triggers this message.
- Max Points * — Maximum score that triggers this message.
- Message * — Message displayed when the learner's total points fall within this range.
Create multiple score messages to cover all possible score ranges (e.g., 1–40 points: encourage to retry; 41–69: almost there; 70–100: congratulations). Click Save after each entry.
Certifications
Navigate to Certifications via Enable › Learning › Certifications in the left menu bar.
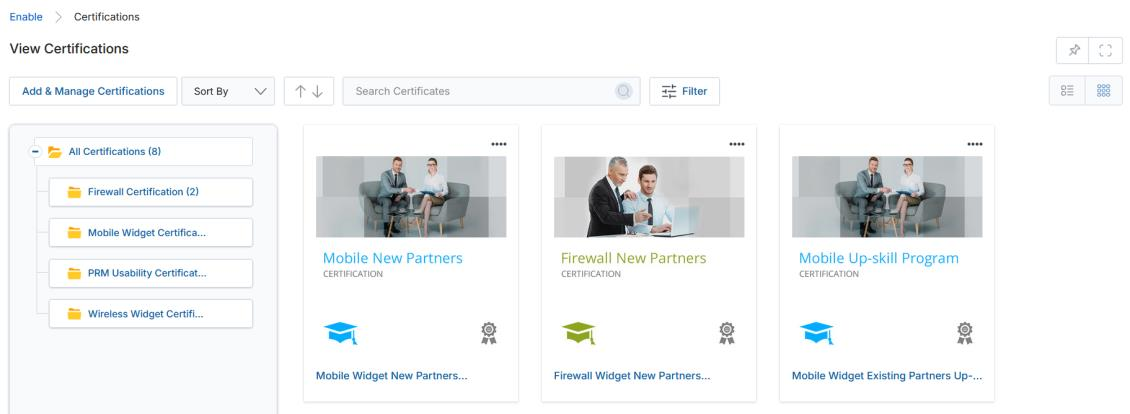
6.1 View Certifications
The View Certifications page displays all certifications in Grid (Thumbnail) or List view, with a Category tree on the left and certification cards on the right. Toolbar actions include Add & Manage Certifications, Sort By, Filter/Clear, and Tree View navigation.
For each certification listing: click the Name/Title to open its details panel; use Edit to modify or Delete to remove it.
6.2 View Certification Details
Click on a Certification Name/Title to open the View a Certification panel. Actions and sections available:
- Edit — Opens the Certification in edit mode.
- Delete — Removes this Certification.
- Assign To — Assigns this Certification to partner users or groups so they can take it.
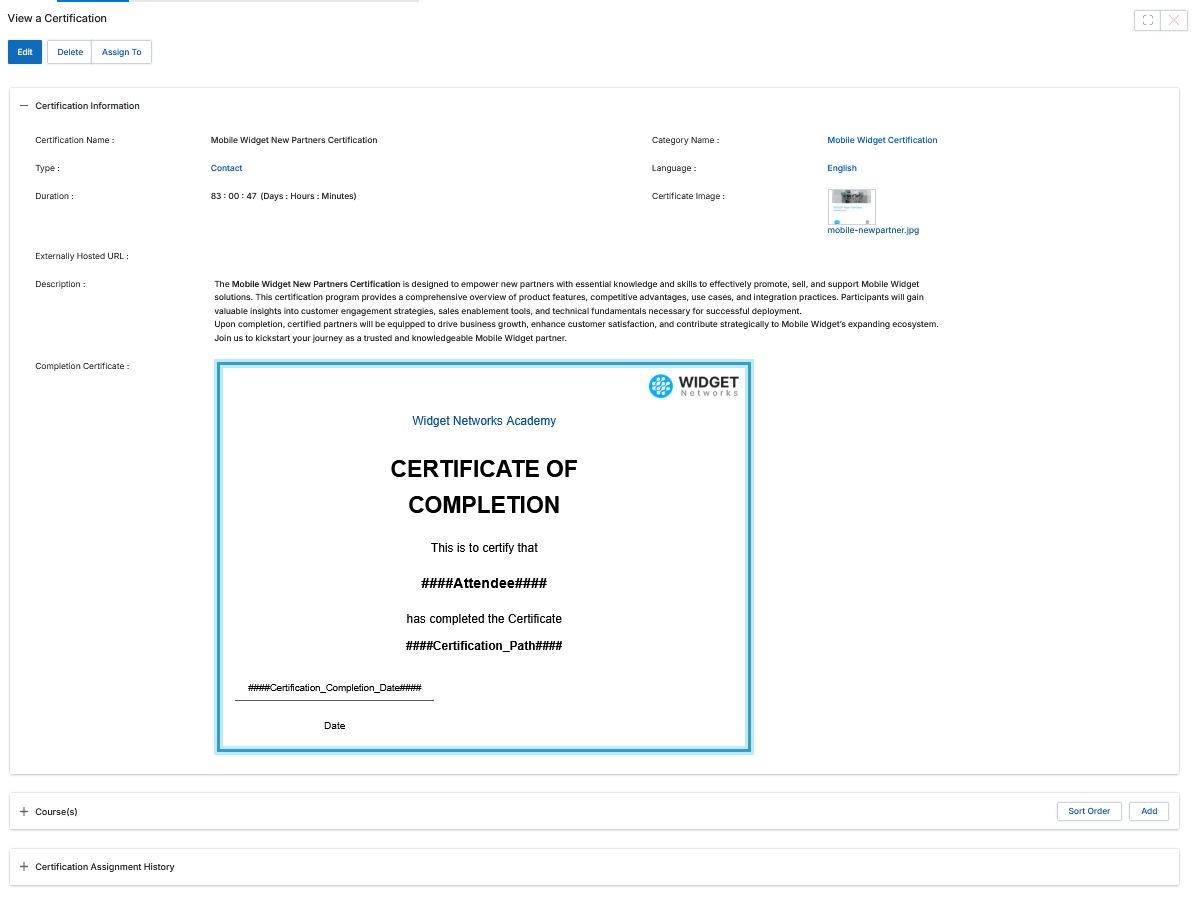
Certification Information Fields
| Field | Description |
|---|---|
| Certification Name | Name of this Certification. |
| Category Name | Name of the Category this Certification belongs to. |
| Type | Type of Certification (e.g., Contact, Account). |
| Duration | Estimated duration (Days : Hours : Minutes) to complete this Certification. |
| Language | Language this Certification and its courses are in. |
| Expiration Date | Date this Certification expires. Use the No Expiration checkbox to set it as perpetually valid. |
| Time Zone | Time zone the certificate belongs to. |
| Medallion Image | Certificate medallion image that appears on the learner's profile/account upon completion. |
| Certificate Type | Type of certificate issued. |
| Credits | Number of credits accrued by completing this certification. |
| Certificate Image | Thumbnail representing what the final certificate looks like. |
| Trainer Name / Trainee Name | Names of the trainer and trainee associated with the certification. |
| Audience | Target audience: New Hiring (new users/partners) or Existing (existing users/partners). |
| Description | Description of this certification/certificate program. |
| Completion Certificate | The actual certificate document — drag-and-drop or upload the certificate template here. |
Related Lists
- Course(s) — Lists the courses that make up this Certification. Use Add to attach courses and Sort Order to sequence them.
- Certification Assignment History — Historical log of assignment status to users/groups. Click the globe icon next to a record to withdraw an assignment (only the user who made the assignment can withdraw it).
6.3 Add & Manage a Category and Certification
Click Add & Manage Certifications from the View Certifications toolbar. This opens the Manage Category panel — the same structure used for Courses — where you manage certification categories and add certificates within them.
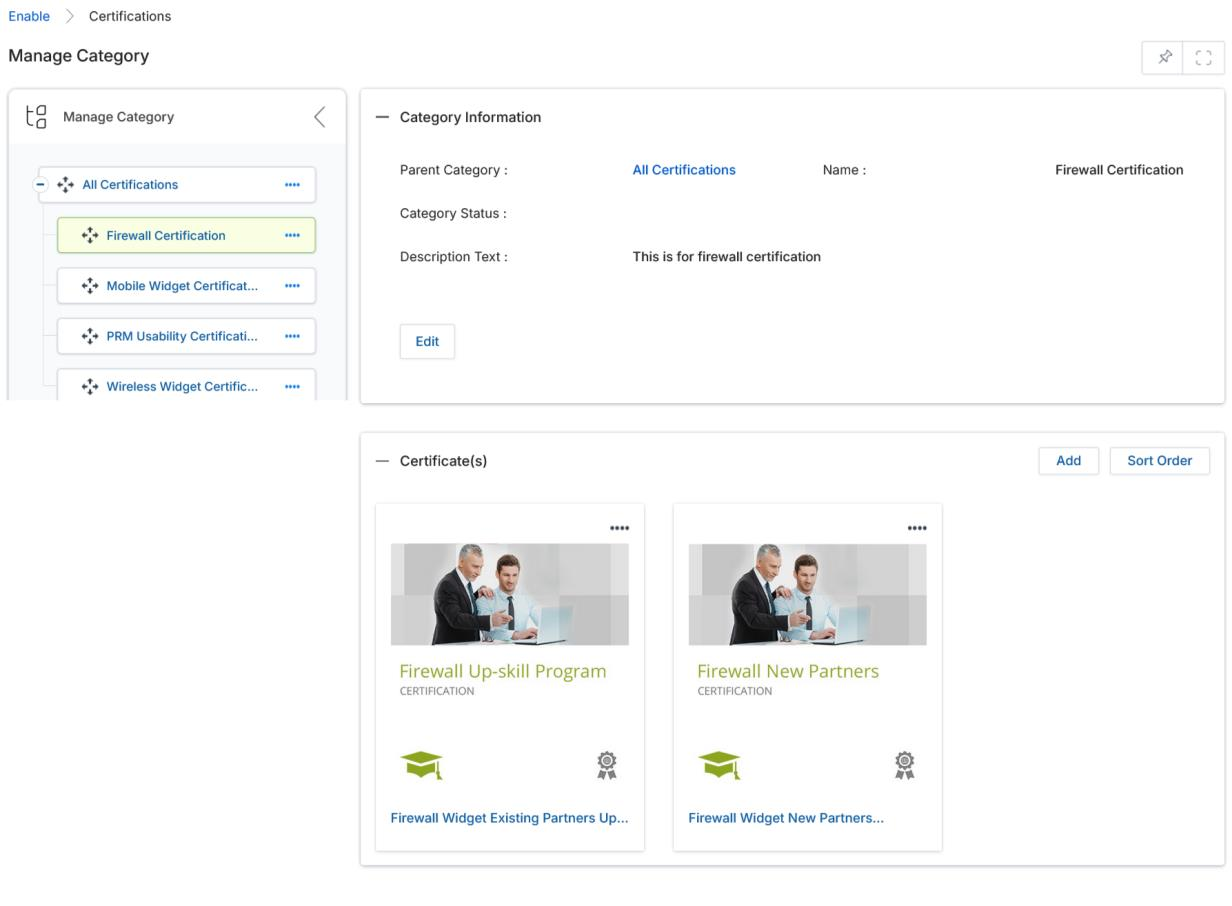
To add a new Certification, click the Add button in the Certificate(s) section of the Manage Category page. The Add/Edit a Certification form opens from the right. Complete all Certification Information fields (as described in Section 6.2), including the Description and Completion Certificate sections, then click Save.

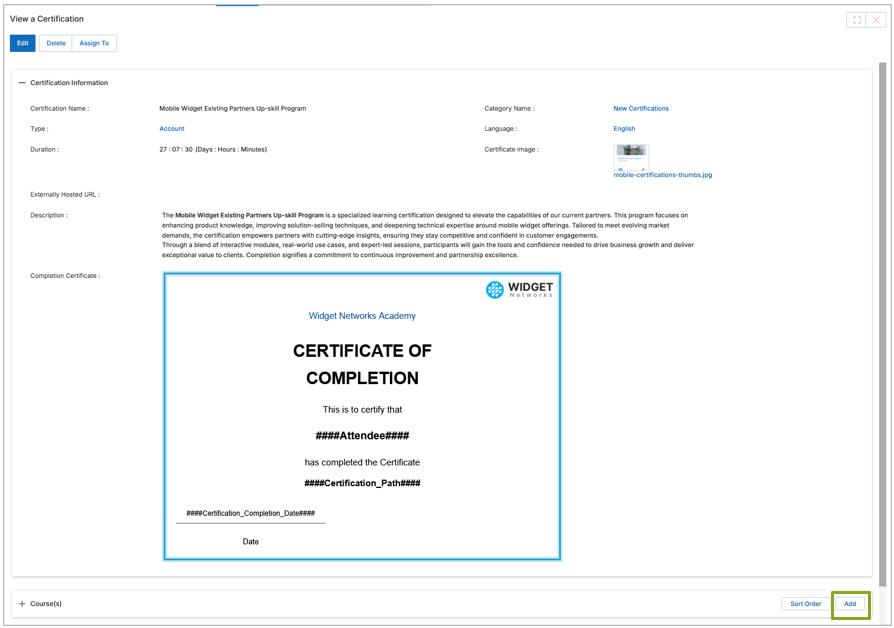
6.4 Adding Courses to a Certification
- Click on the Certification Name/Title from the View Certifications page to open its details panel.
- Under the Course(s) related list, click Add.
- A course selection window opens. Checkmark the courses you wish to include in this Certification and click Save.
- The selected courses will appear in the Course(s) related list. Use Sort Order to arrange the sequence in which learners must complete the courses.
Tip: After saving the Certification and returning to the View Certifications page, use Assign To in the certification details to assign the completed Certification program to partner users or groups, making it visible and accessible in their learning portal.