
Introduction
UCM's Products module helps you manage product and services information essential for sales, marketing, services, and the knowledge base of the enterprise in a single interface. Having current information about product weights and sizes, production chronologies, and product version data helps your business leadership and global partners learn more about your products at a glance.
Manage Product Categories
UCM's product categories allow you to categorize products or services by type. Product categories are typically created to organize products in a logical way. This can include a hierarchy of categories that resemble a tree structure. Alternatively, product categories can be organized via a flat structure such as a list of product types.
Common types of product categories include:
- Industry — e.g., technology or hospitality.
- Functionality — e.g., accounting software or running shoes.
- Customer needs — e.g., summer versus winter tires.
Manage Products & Solutions
Products in UCM can be either goods or services which are sold or distributed to your partners by your organization. Using UCM's Products module, you can manage your company-wide products that are sold to customers as well as distributed to partners.
Sales departments can also use the Products module along with other UCM modules for managing leads, accounts, deals, quotes, sales orders, and invoices.
Solutions Offered
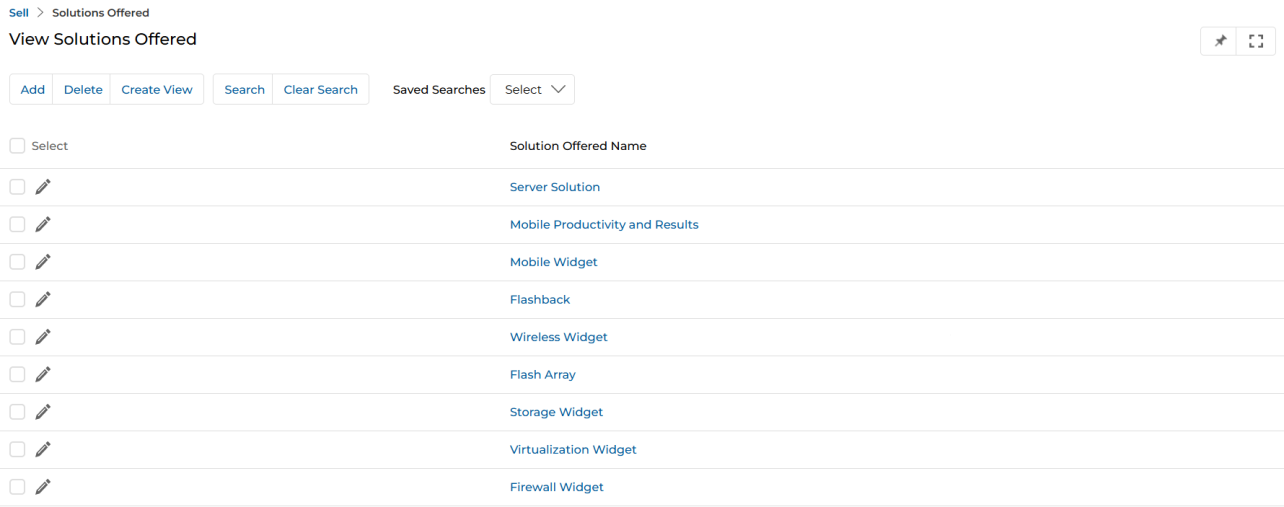
View Solutions Offered
Navigate to Sell → Solutions Offered to access the solutions listing page.
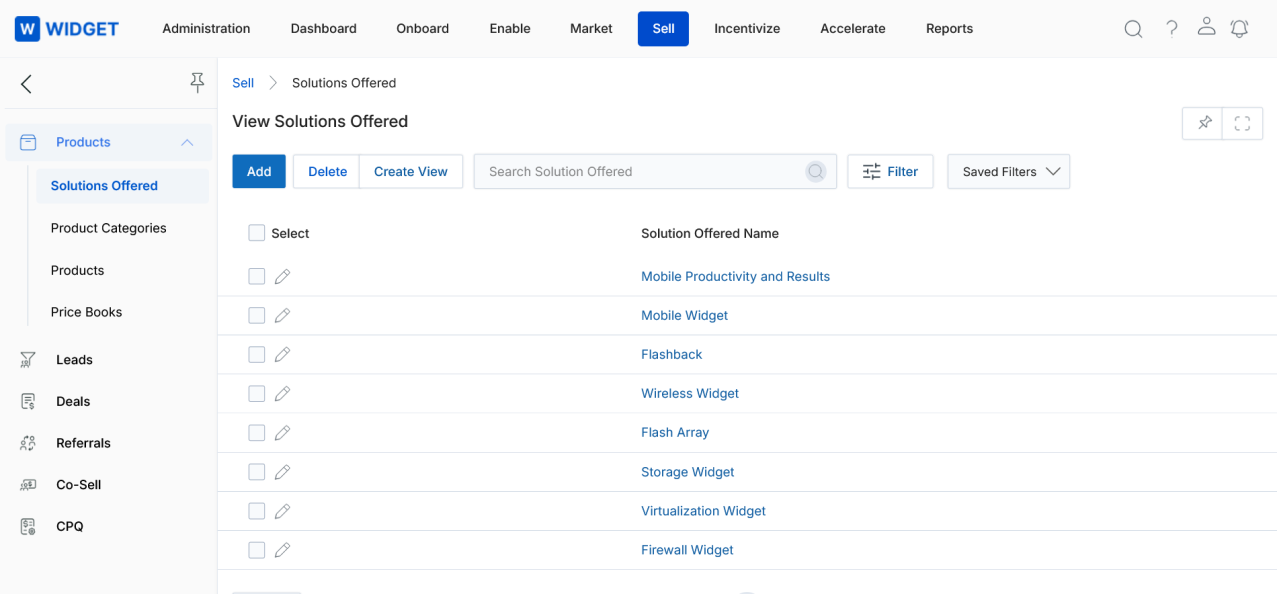
The top part of the page provides the following actions:
- Add — Opens a new page to add a new record.
- Delete — Deletes selected record(s) from the listing page.
- Create View — Lets you create your own view with a set of columns as needed.
- Search — Opens a pop-up window where you can enter search criteria to find desired records.
- Clear Search — Clears the current search.
- Saved Searches — Shows a list of saved searches in the search dropdown. When selected, two additional options appear:
- Edit — Provides the option to update the selected search name.
- Delete — Deletes the selected search name from the dropdown.
For each record in the grid:
- Edit (Pen icon) — Lets you edit the selected record.
- Any linkable item — Takes you to its details page.
Create New View
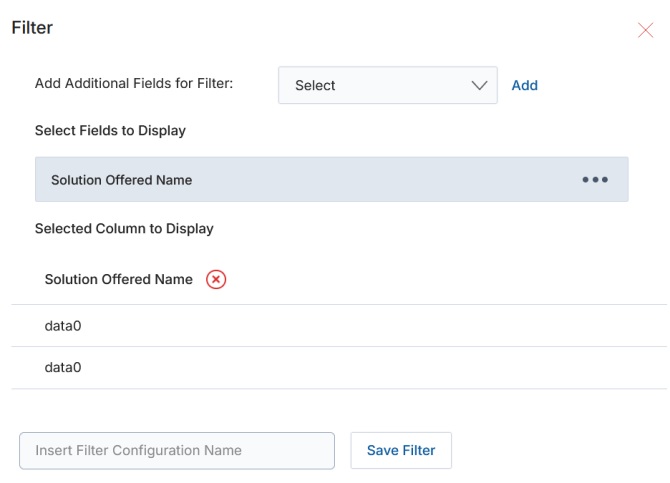
- Choose an additional field and then click Add.
- Click on the Green Dots to select the fields to display.
- Selected columns are shown in the table. To remove a selected column from the display list, click the cross button next to it.
- Provide a View Name and then click Save Filter to create the new view.
View Solution Details
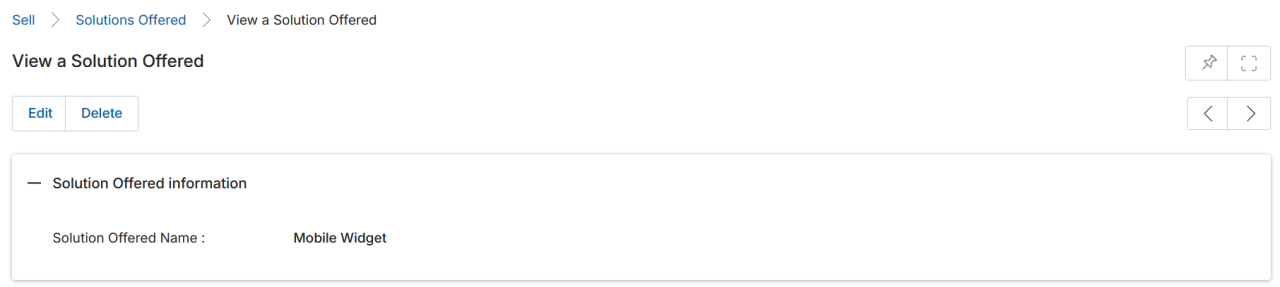
- Click on the Name/Title of the solution listing to view the details page.
- Once on the details page, you will see the Solution Offered Name field. An Edit button allows you to update the name, and a Delete button removes the entry.
Add/Edit a Solution
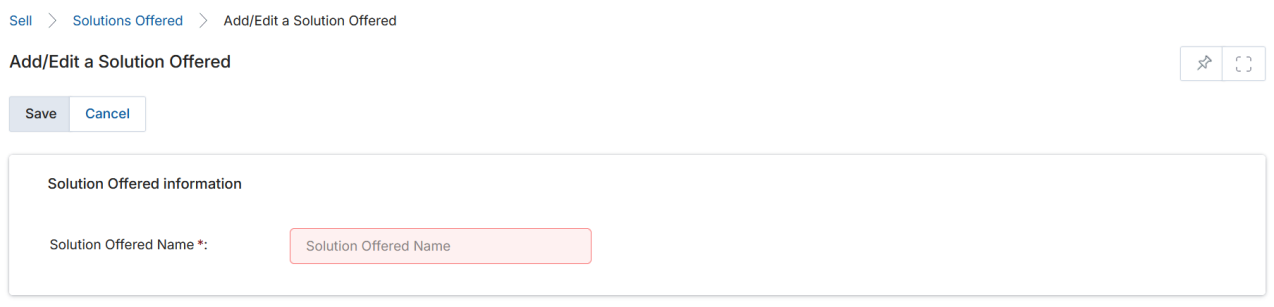
- To Edit a solution, click the small pencil icon on the listing row. To Add a new solution, click the Add button.
- On the Add/Edit page, enter the Name of the solution and click Save.
Product Categories
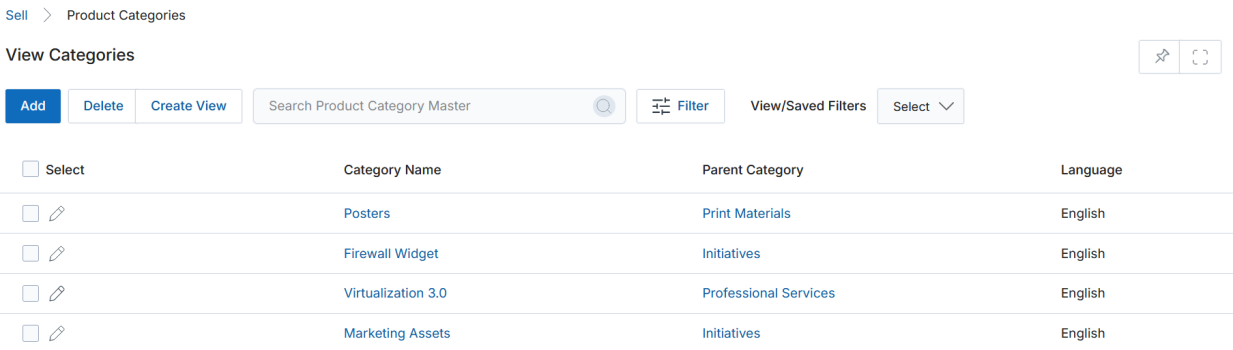
View Categories
Navigate to Sell → Product Categories to access the categories listing.
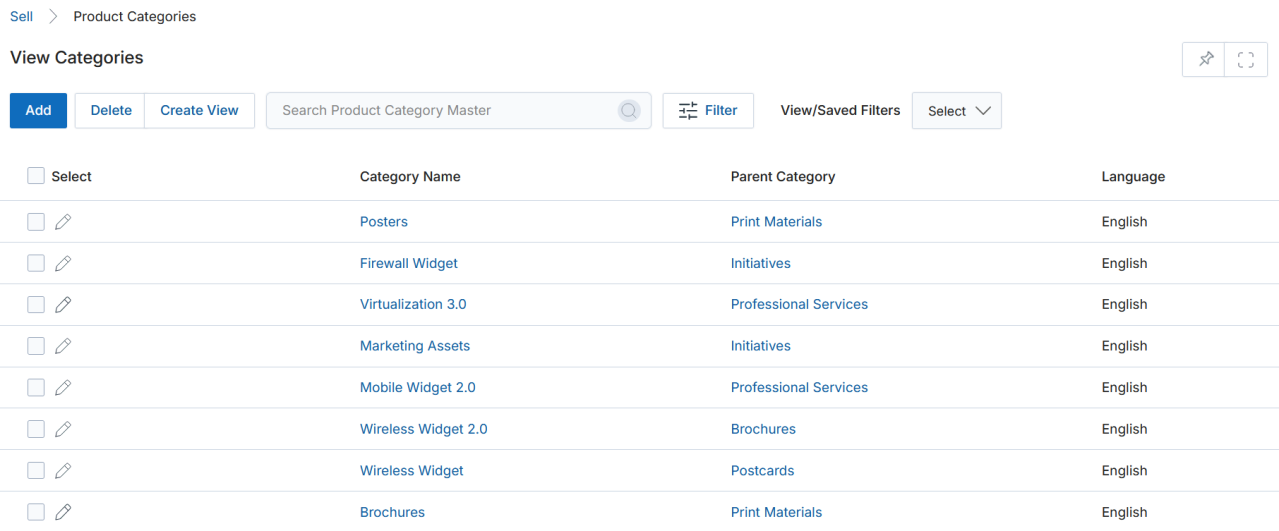
The toolbar provides the following actions:
- Add — Add a new category.
- Delete — Delete the selected category.
- Preview — Preview the folder tree structure.
- Create View — Create a new page view.
- Search — Search for specific records.
- Clear Search — Clear any saved search.
- Click on Category Name to view its details page.
- Click on Parent Category to view the parent's details page.
- Click Edit (pencil icon) to edit a category.
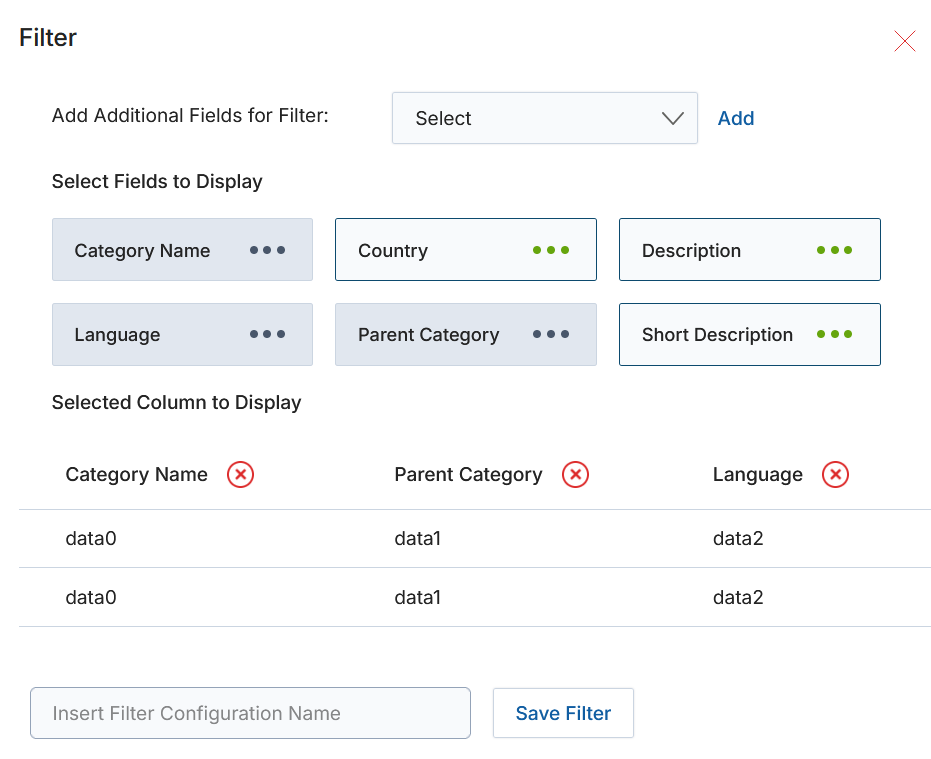
Create New View
- Choose an additional field and then click Add.
- Click on the Green Dots to select the fields to display.
- Selected columns appear in the preview table. To remove a column, click its cross button.
- Provide a View Name and click Save Filter to create the new view.
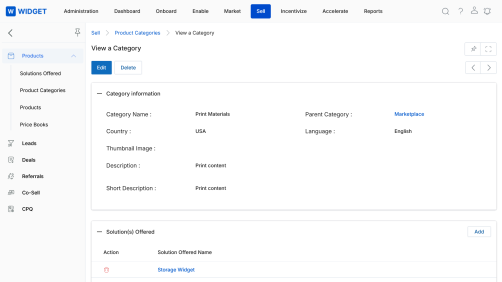
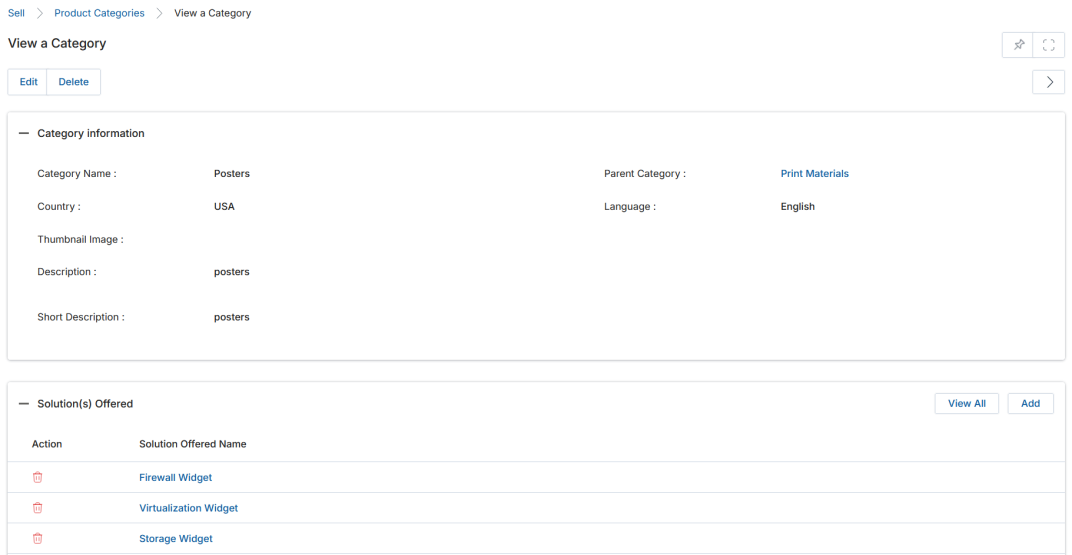
View Category Details
- Click on the Name/Title of the category listing to view the details page.
- The details page contains the following:
a. Buttons
- Edit — Opens the page in edit mode to update field values in the Category Information section.
- Delete — Deletes the category.
b. Category Information
| Field | Description |
|---|---|
| Category Name | Name of the category. |
| Parent Category | Name of the parent category under which this category is placed. |
| Country | Applicable country. |
| Language | Applicable language. |
| Thumbnail Image | Iconic image depicting the category. |
| Description | Full category description. |
| Short Description | Brief description of the category. |
c. Solution(s) Offered — Lists all lines of business that fall under this category.
- Click Add to associate a solution to this category.
- Click View All or Click To View More to see all solutions associated under this category. A maximum of 5 items are visible in the related list by default.
- Click the trash icon to dissociate a solution from this category.
- Solution Offered Name — Name of the solution.
Add/Edit a Category
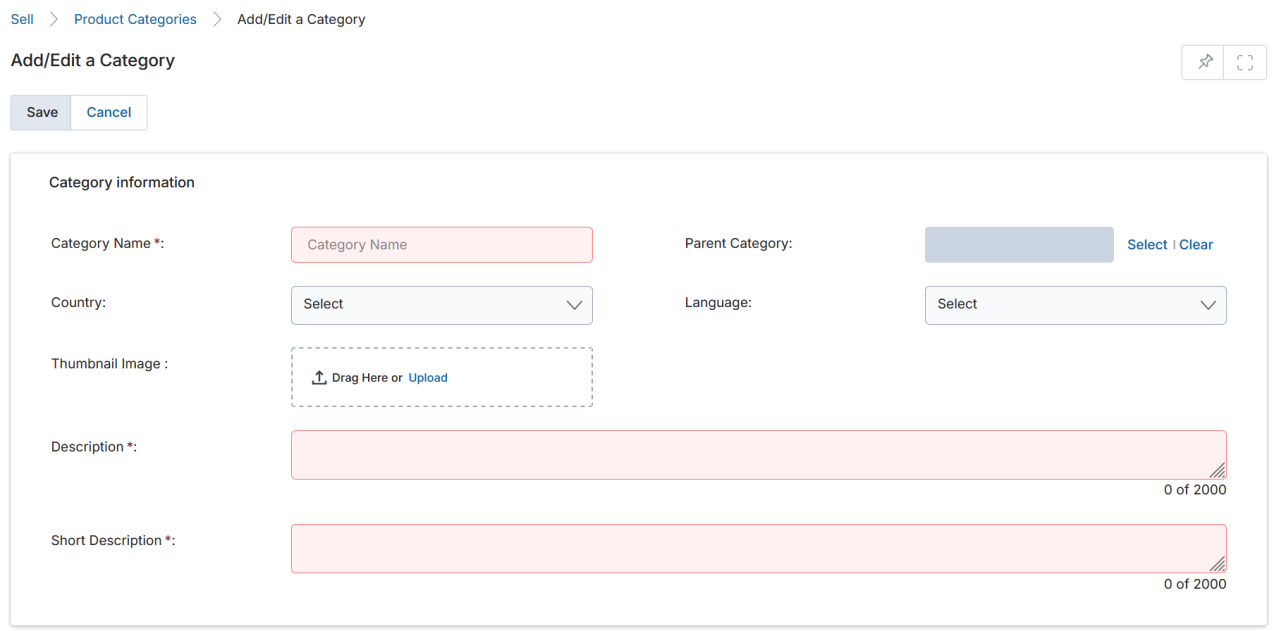
- To Edit a category, click the pencil icon. To Add a new category, click the Add button.
- On the Add/Edit page, fill in the following fields:
| Field | Description | Required |
|---|---|---|
| Category Name | Name of the category. | Yes |
| Parent Category | Parent category under which this category will be placed. | No |
| Country | Applicable country. | No |
| Language | Applicable language. | No |
| Thumbnail Image | Iconic image depicting the category (drag & drop or upload). | No |
| Description | Full category description (up to 2000 characters). | Yes |
| Short Description | Brief description (up to 2000 characters). | Yes |
- Click Save. You will return to the View Categories page, where you can click the category name to add Solutions or Products to it.
Adding Solutions or Products to a Category


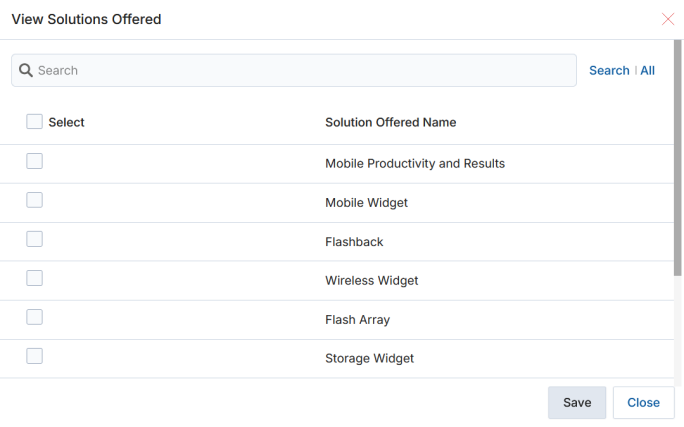
- Click on the Name/Title of the category listing to view the details page.
- At the bottom of the details page, locate the Solution Offered related list and click Add. A popup window will appear.
- Check the solutions you want to associate and click Save.
- To view all associated solutions, click View All or Click To View More. A maximum of 5 items are visible by default.
- To dissociate a solution, click the trash icon next to it.
Products
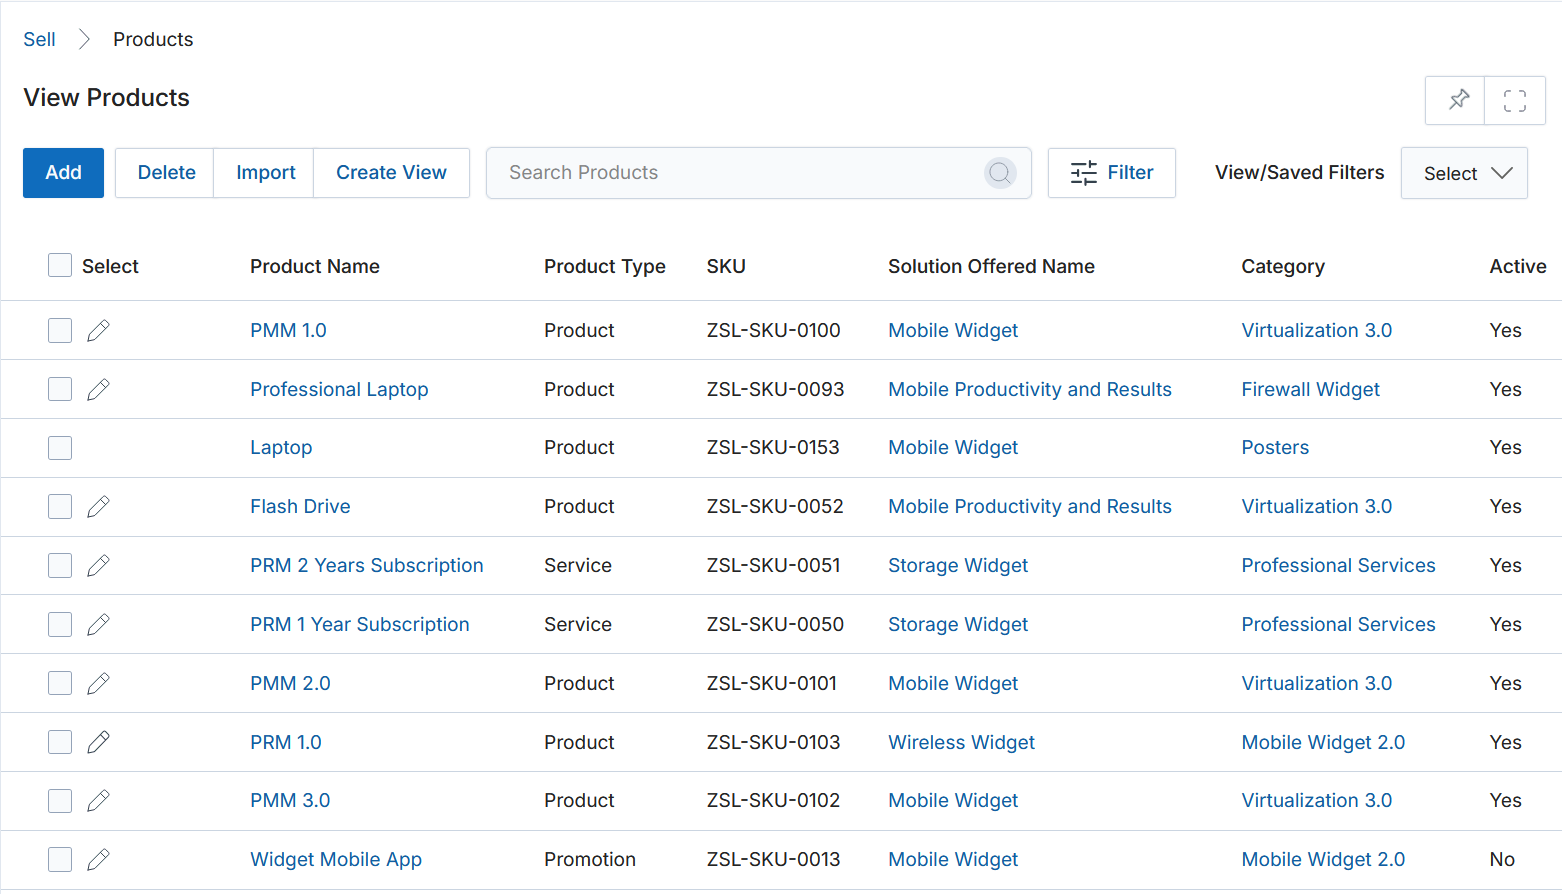
View Products
Navigate to Sell → Products to access the products listing.
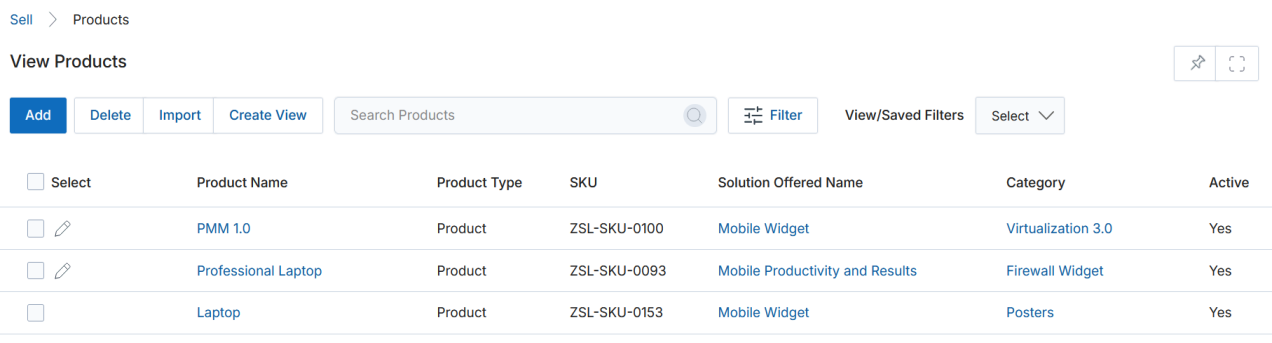
The toolbar provides the following actions:
- Add — Opens a new page to add a new record.
- Delete — Deletes selected record(s) from the listing page.
- Import — Opens the Bulk Import workflow.
- Create View — Creates a custom view with selected columns.
- Search — Opens a search popup to find specific records.
- Clear Search — Clears the active search.
- Saved Searches — Lists saved searches. Each saved search can be edited or deleted.
- Edit (Pen icon) — Lets you edit the selected record inline.
- Any linkable item — Takes you to its details page.
Create New View

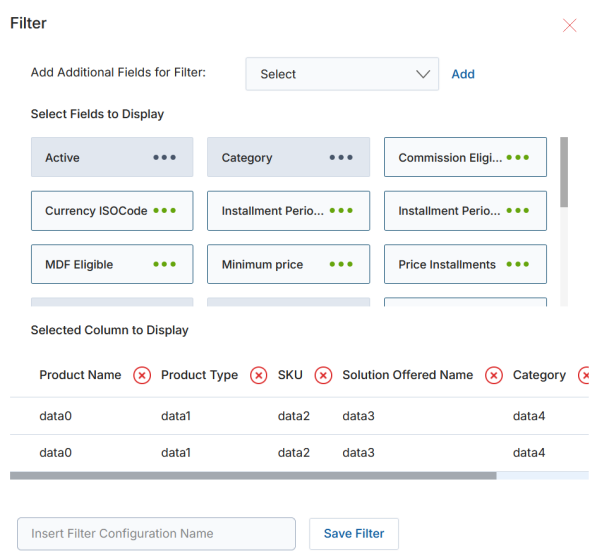
- Choose an additional field and click Add.
- Click on Green Dots to select the fields to display.
- Selected columns appear in the preview table. Click the cross button to remove a column.
- Provide a View Name and click Save Filter to create the new view.
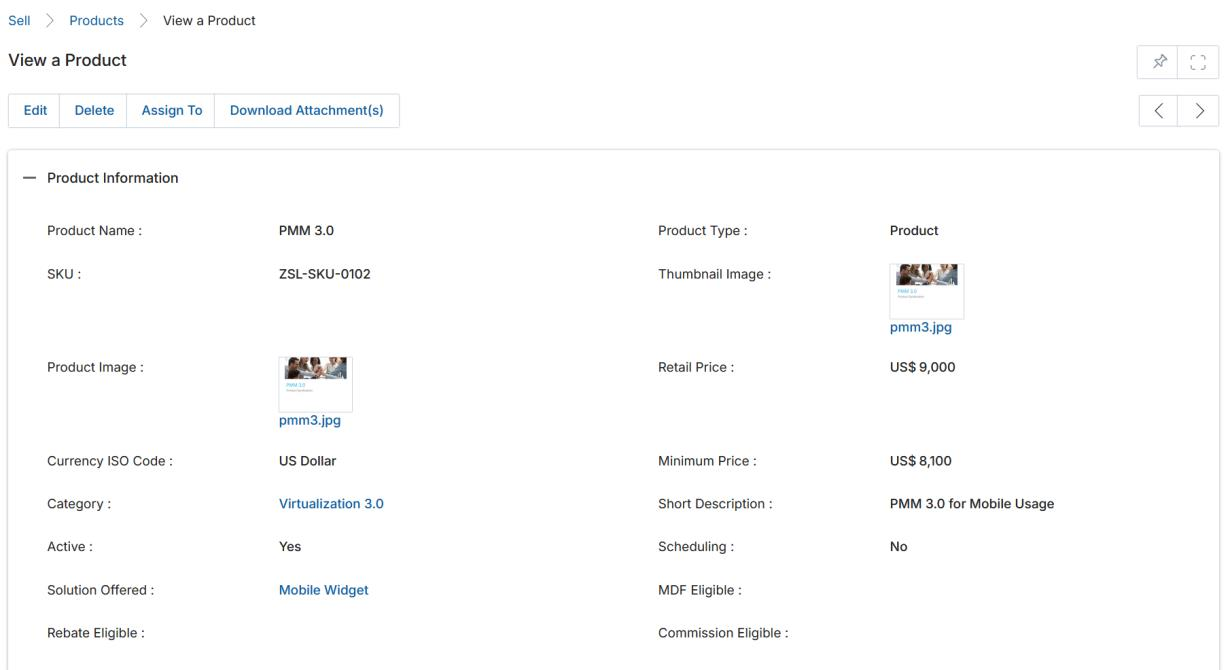
View Product Details
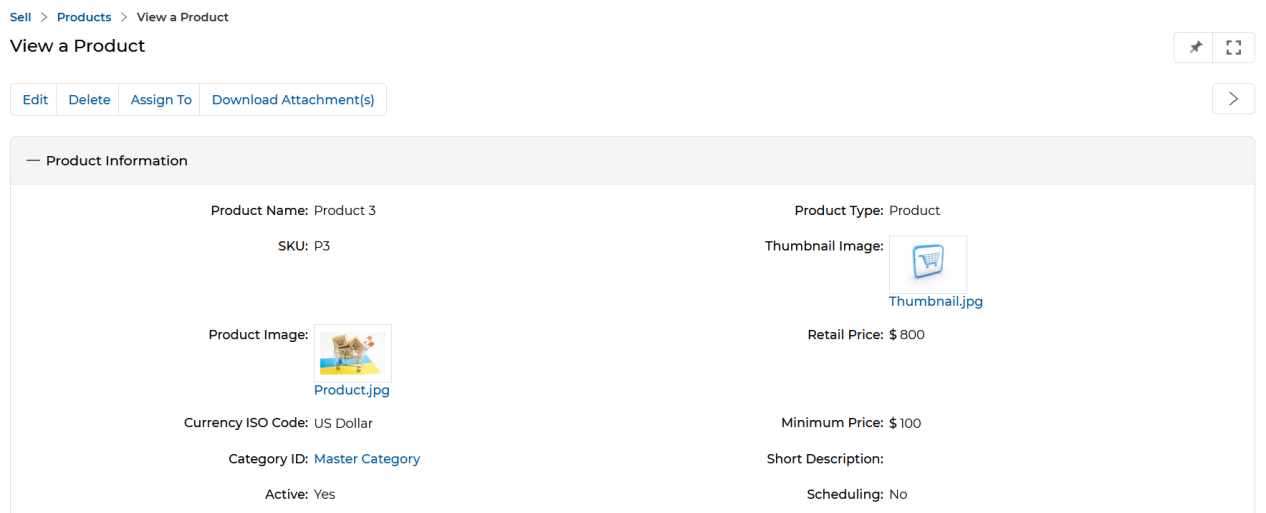
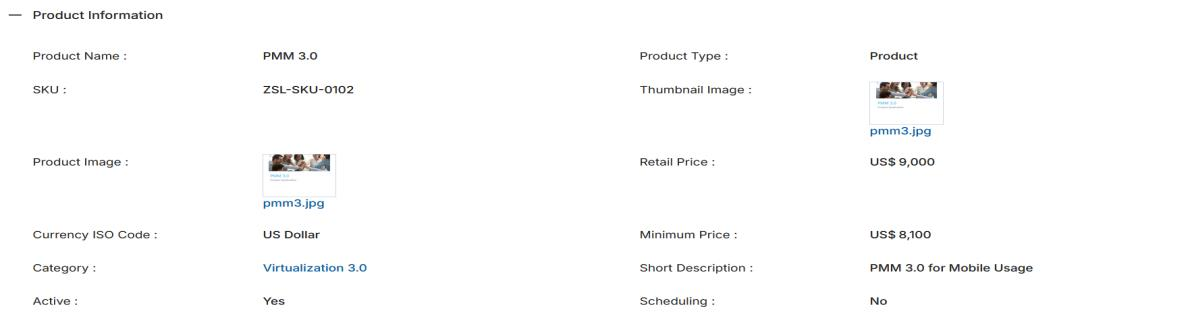
- Click on the Name/Title of the product listing to view the details page.
- The details page contains the following buttons and sections:
a. Buttons
- Edit — Opens the page in edit mode to update field values.
- Delete — Deletes the product.
- Assign To — Assigns the specific product to selected group(s) or user(s).
- Download Attachment(s) — Downloads all attached files linked to the product record as a single ZIP folder. Extract the ZIP to view all attached files.
b. Product Information
| Field | Description |
|---|---|
| Product Name | Name of the product. |
| Product Type | One of three types: Product, Promotion, or Service. |
| SKU | Product Stock Keeping Unit code. |
| Thumbnail Image | Small iconic image for the product. |
| Product Image | Full product image. |
| Retail Price | Standard retail price of the product. |
| Currency ISO Code | Currency for the product amount. Supported currencies: Australian Dollars, Indian Rupees, Pounds Sterling, US Dollars. |
| Minimum Price | Minimum allowed price for the product. |
| Category | Product category assignment. |
| Short Description | Brief description of the product. |
| Active | Yes = product is currently available; No = not available. |
| Scheduling | Yes = product is pre-scheduled for availability; No = not pre-scheduled. |
| Solution Offered | Name of the solution that offers this product. |
| MDF Eligible | Defines eligibility of the product for MDF-based incentives. |
| Rebate Eligible | Indicates whether the Rebate incentive type is aligned with this product. |
| Commission Eligible | Indicates whether the Commission incentive type is aligned with this product. |
c. Default Quantity Schedule
| Field | Description |
|---|---|
| Schedule Type (Quantity) | Type of scheduling for product availability: Divide Quantity or Repeat Quantity. |
| Quantity Installments | Count of products required per installment phase. |
| Installment Period (Quantity) | Delivery installment period: Daily, Weekly, Monthly, Quarterly, or Yearly. |
d. Default Price Schedule
| Field | Description |
|---|---|
| Schedule Type (Price) | Type of scheduling for product price payments: Divide Quantity or Repeat Quantity. |
| Price Installments | Product payment installment count. |
| Installment Period (Price) | Payment installment period: Daily, Weekly, Monthly, Quarterly, or Yearly. |
Add/Edit a Product

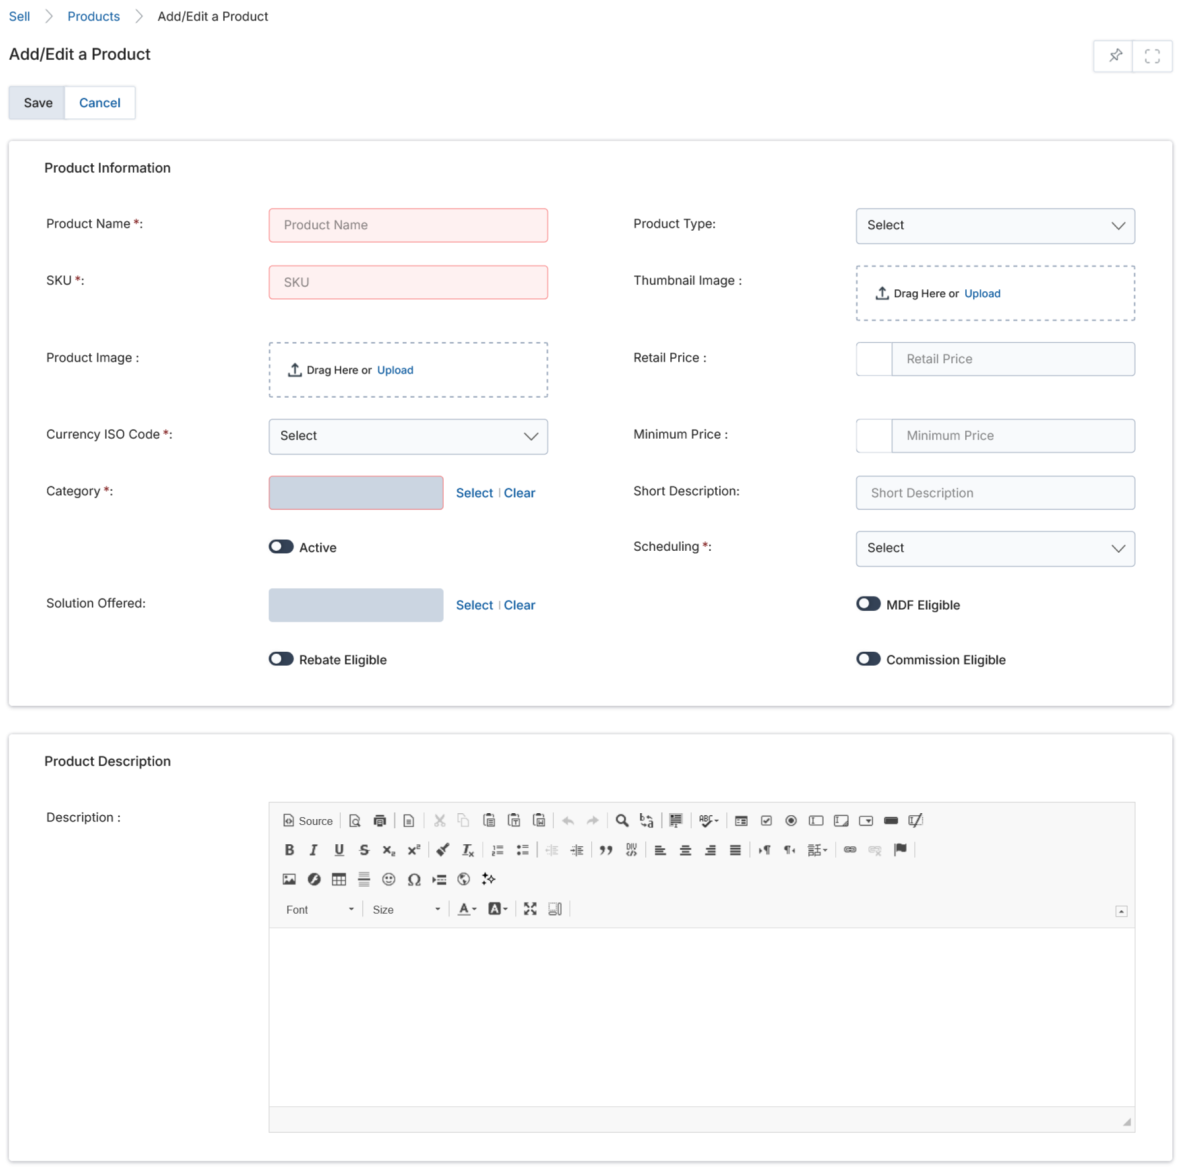
- To Edit a product, click the pencil icon on the listing row. To Add a new product, click the Add button.
- On the Add/Edit page, fill in the Product Information fields. Refer to the field table in the View Product Details section above for descriptions of each field.
- In the Product Description section, enter a rich-text description of the product using the editor toolbar.
- Click Save. You will return to the View Products page, where you can click the product name to add Pricing, Default Quantity Schedule, and Default Price Schedule.
The MDF Eligible, Rebate Eligible, and Commission Eligible toggles must each be explicitly enabled to link those incentive types with this product.
Bulk Import
The Leads Application, integrated with the UPM Import Engine, allows bulk import of Product details, Product Categories, Product Price Books, and associated metadata through a few simple steps. The import engine supports standard .xlsx format for product records and a .zip archive for product images.
View Bulk Uploads

- Navigate to Sell → Products and click Import (or Bulk Import) to reach the View Product Bulk Uploads page.
- All existing bulk import jobs are listed with their Name and Status (Pending / Completed).
- Click on a bulk upload name to inspect the XLSX file and ZIP archive uploaded, along with the current upload status.
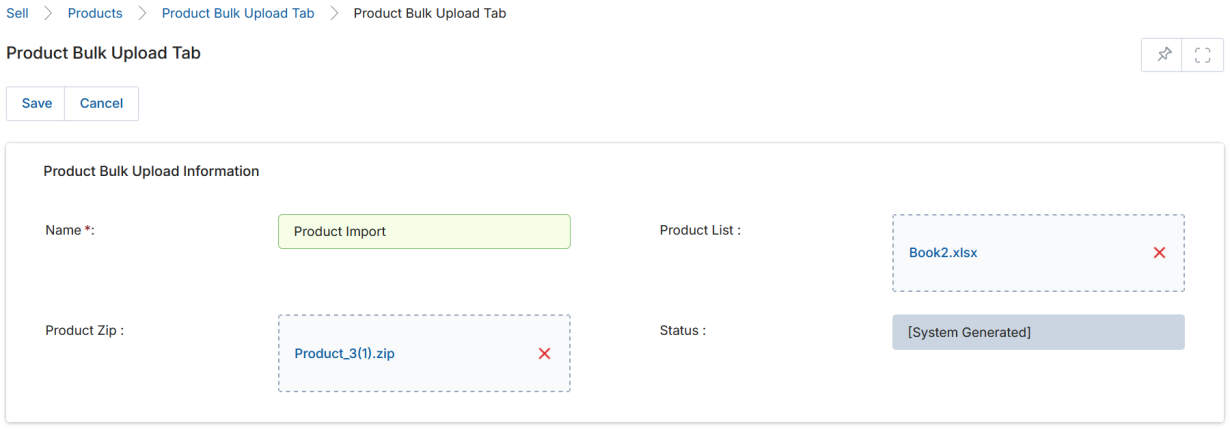
Add a Bulk Upload
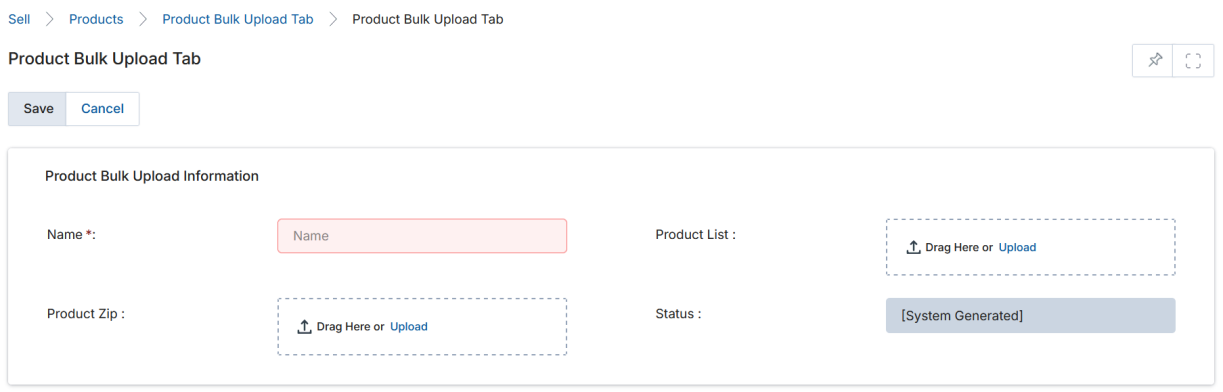

- Click Add to create a new bulk upload job.
- Fill in the Bulk Upload Information form:
| Field | Description | Required |
|---|---|---|
| Name | Descriptive name for this bulk upload job. | Yes |
| Product List | The XLSX file (prescribed format) containing product, category, and price book data. | Yes |
| Product Zip | ZIP archive containing the thumbnail images for the products. | No |
| Status | System-generated; shows Pending initially and Completed once processing finishes. | — |
- Click Save. The status will show Pending during processing and Completed when done.
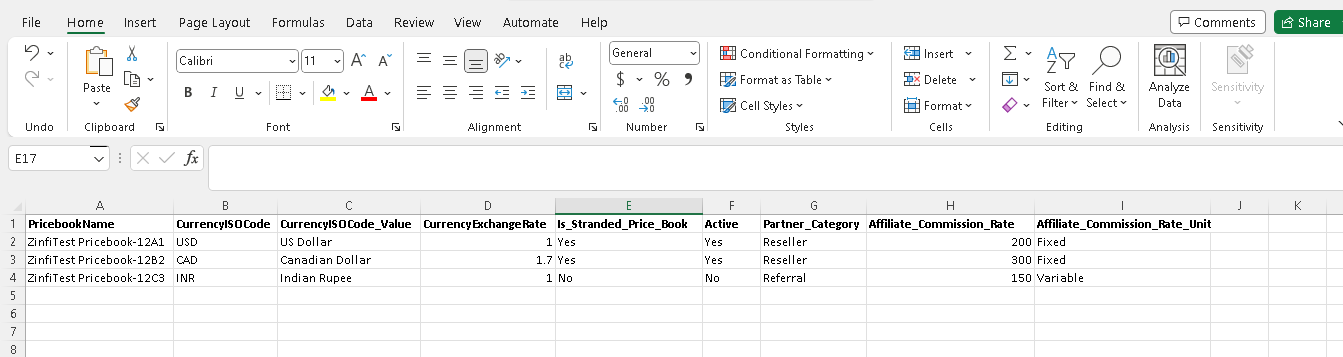
Bulk Import of Products — XLSX Format
The prescribed XLSX file uses three sheets:
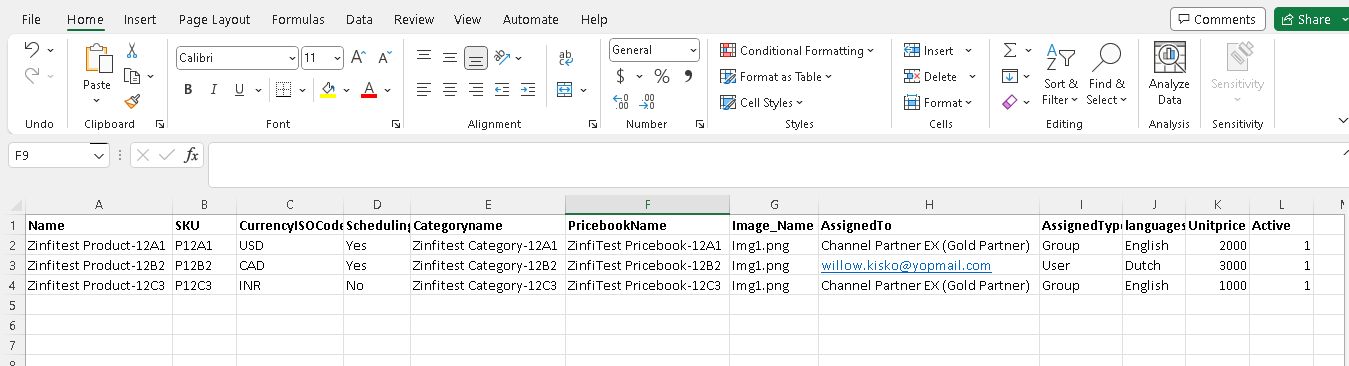
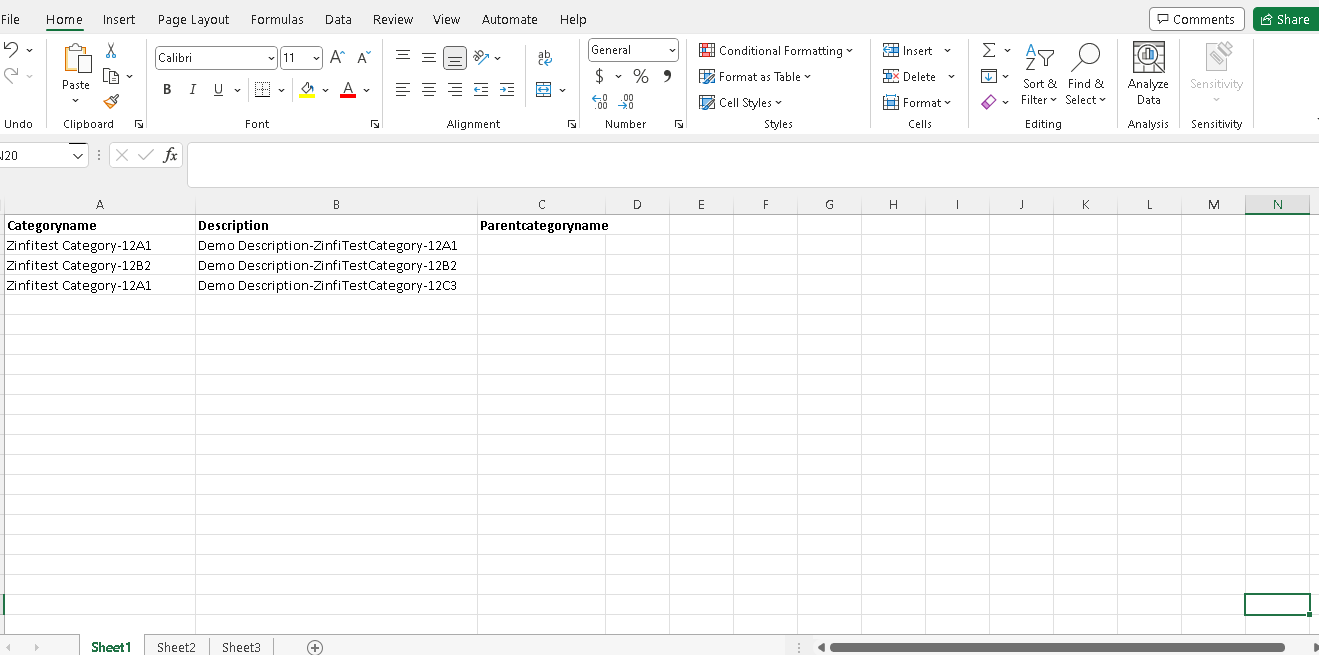
- Sheet 1 — Product Categories: Contains Category Name, Description, and Parent Category Name. If Parent Category Name is NULL, the category will be created as a top-level (parent) category.
- Sheet 2 — Products: Contains Product Name, SKU, Currency ISO Code, Scheduling, Category Name, Pricebook Name, Image Name, Assigned To, Assigned Type, Language, List Price, and Active (1 = Yes, 0 = No). Category Name and Pricebook Name auto-associate with the product on upload.
- Sheet 3 — Price Books: Contains Pricebook Name, Currency ISO Code, Exchange Rate, Standard Price Book flag, Active flag, Partner Category, Affiliate Commission Rate, and Commission Rate Unit. Auto-associates with products via Sheet 2.
After preparing the XLSX and ZIP, upload them in the Add a Bulk Upload form and click Save.
Once processing completes:
- Navigate to Products to see the imported products. Each product will have its Product Category and associated thumbnail auto-tagged.
- Navigate to Price Books to see the imported price books. Clicking any price book shows the associated products.
- Navigate to Product Categories to see the imported categories.
Manage Standard & Affiliate Commissions-Based Price Books
UPM standard price books are the master lists of all your products and their default standard prices. Custom price books for Resellers/Affiliates can be configured with Commission Rates along with custom list prices, enabling different pricing for different partner categories. Using the upgraded feature, you can create Affiliate Partner/Reseller category-based price books inclusive of Referral Commissions.
Based on the Commission Setup for the Price Books and a Referral Registration inclusive of Products/Solutions/Services using those commission-based price books, the Total Commission Payout Amount is auto-calculated for the Affiliate Partner when a Referral is Approved by the Admin.
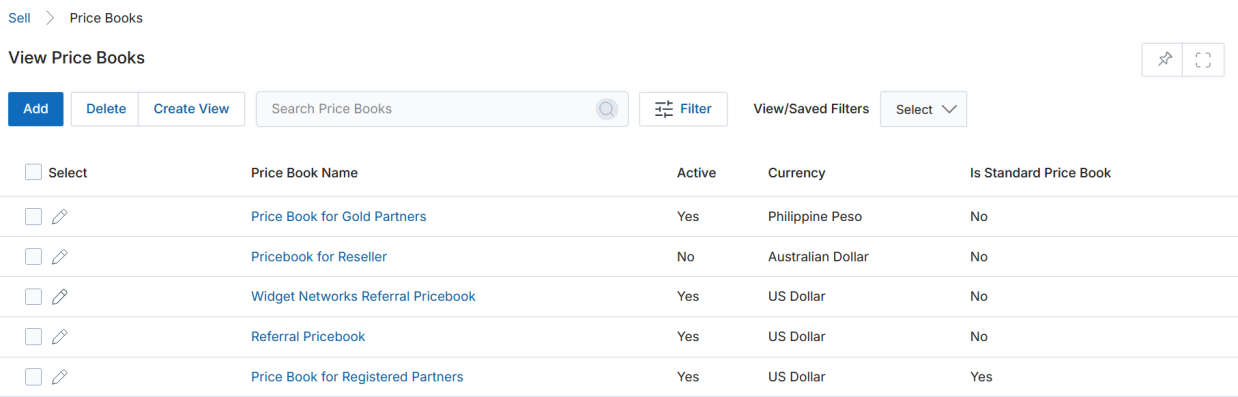
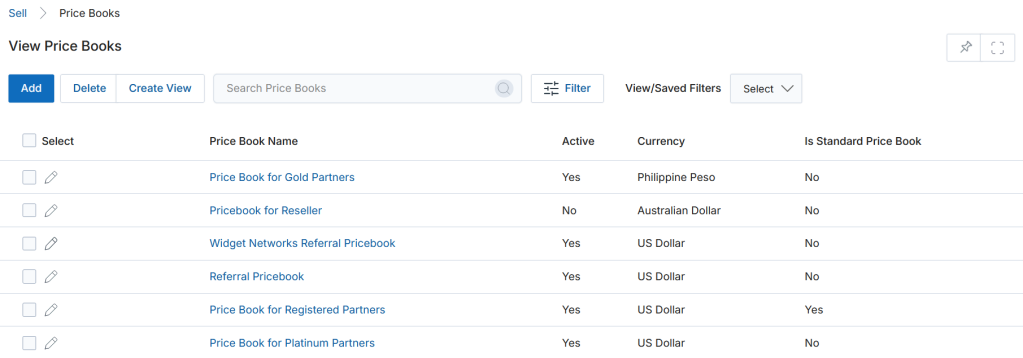
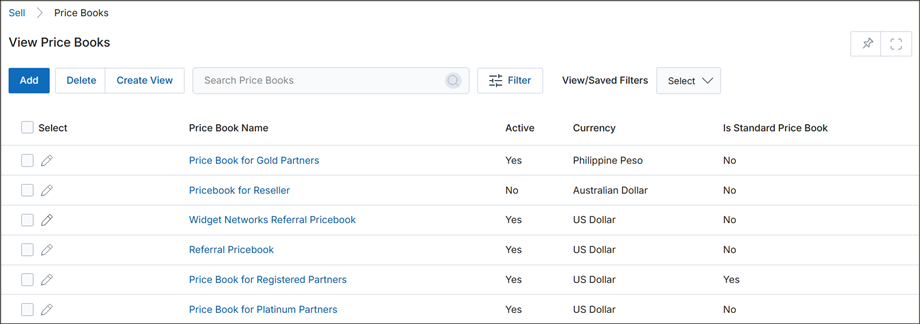
View Price Books
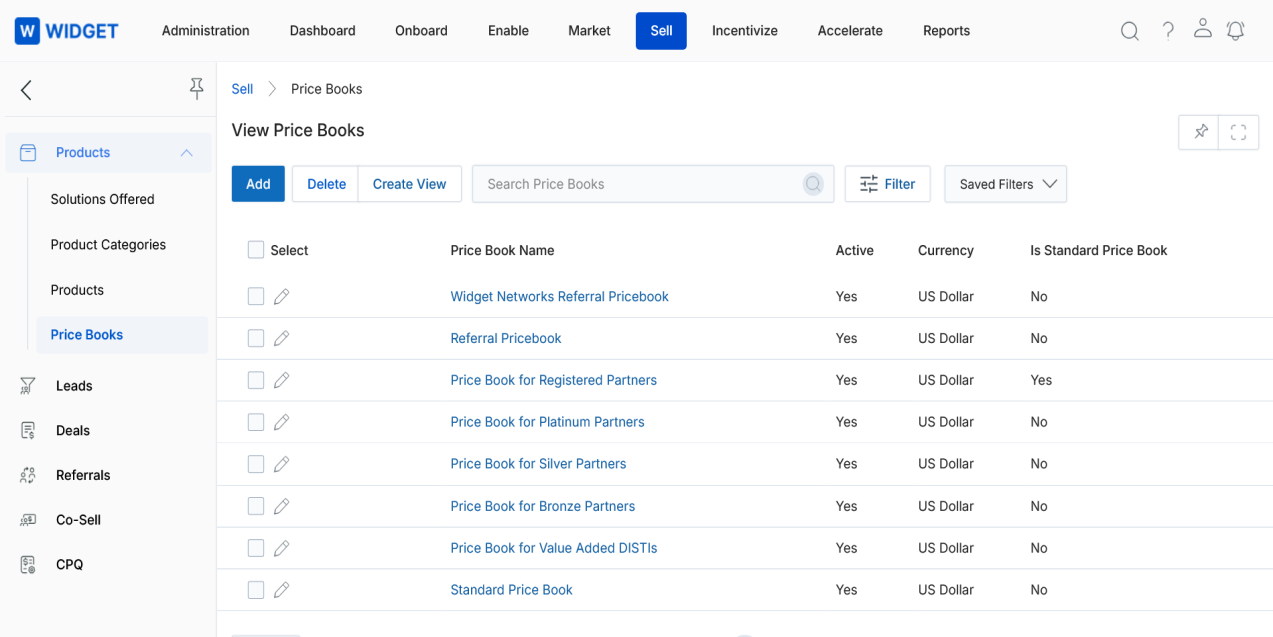
- Navigate to the Sell Zone.
- Click on Price Books in the left-hand menu.
Create New View
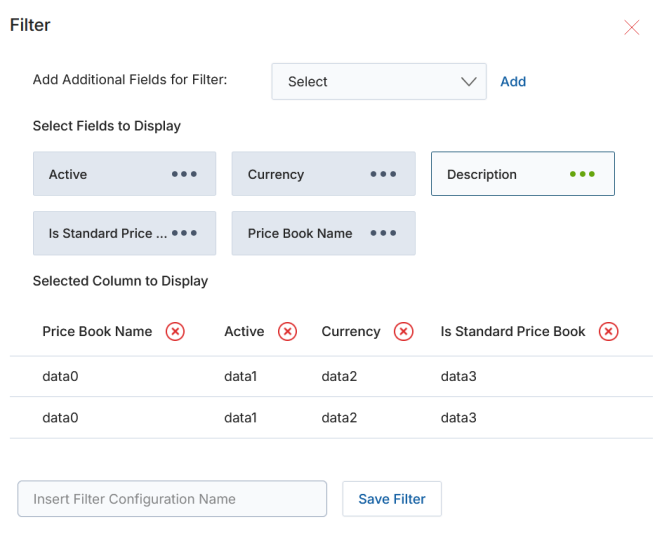
- Choose an additional field and click Add.
- Click on Green Dots to select the fields to display.
- Remove unwanted columns using the cross button.
- Provide a View Name and click Save Filter.
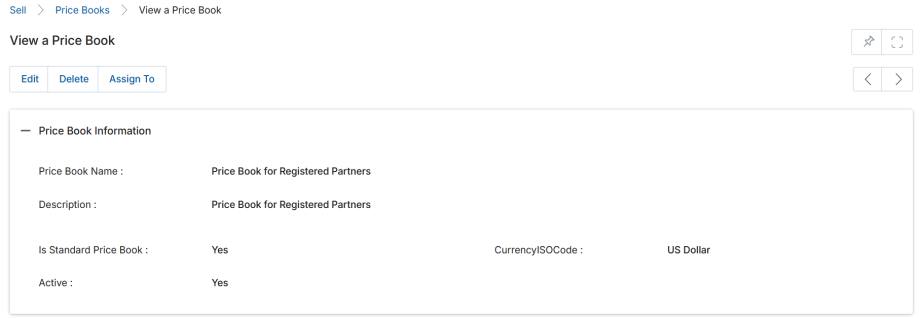
View Price Book Details
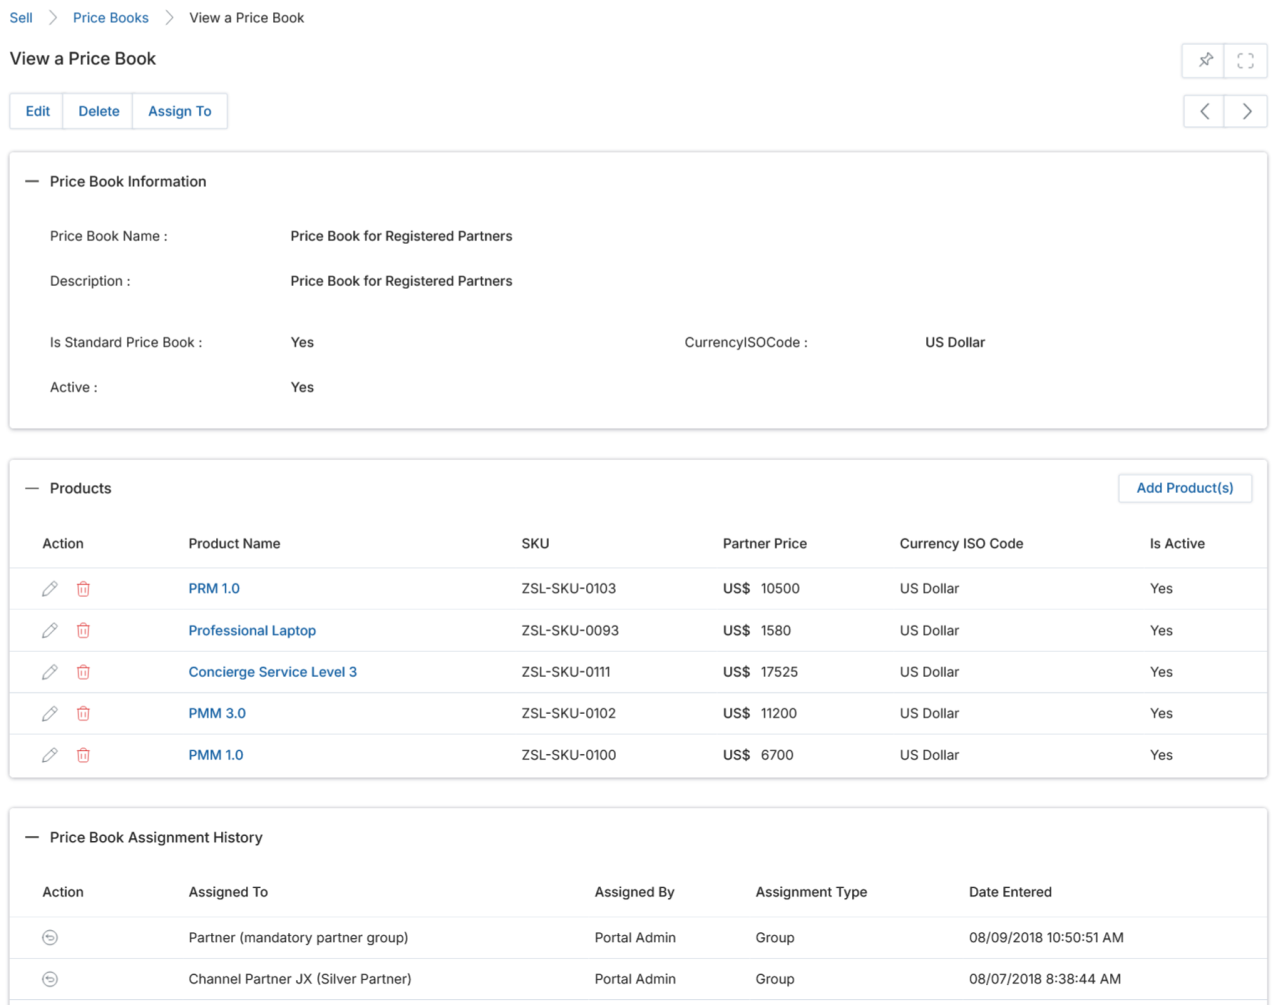
- Click on the Name/Title of the price book listing to view the details page.
- The details page contains the following:
a. Buttons
- Edit — Opens the record in edit mode.
- Delete — Deletes the record.
- Assign To — Assigns the record to user(s) or group(s).
b. Price Book Information
| Field | Description |
|---|---|
| Price Book Name | Name of the price book. |
| Description | Short description of the price book. |
| Currency | Currency used in the price book. |
| Is Standard Price Book | Indicates whether this is the industry-standard price book for products. |
| Active | Present status of the price book. |
| Assign Commission Rate By Product Solution | Indicates whether the Affiliate Commission rate has been assigned at the Product/Solution cluster level. |
| Affiliate Commission Rate Unit | Whether the commission is a Fixed Value or Percentage (%). |
| Affiliate Commission Rate | Commission rate allocated to Resellers/Affiliate Partners (based on the Commission Rate Unit). |
| Partner Category | Shows whether the partner is a Referral or Reseller. |
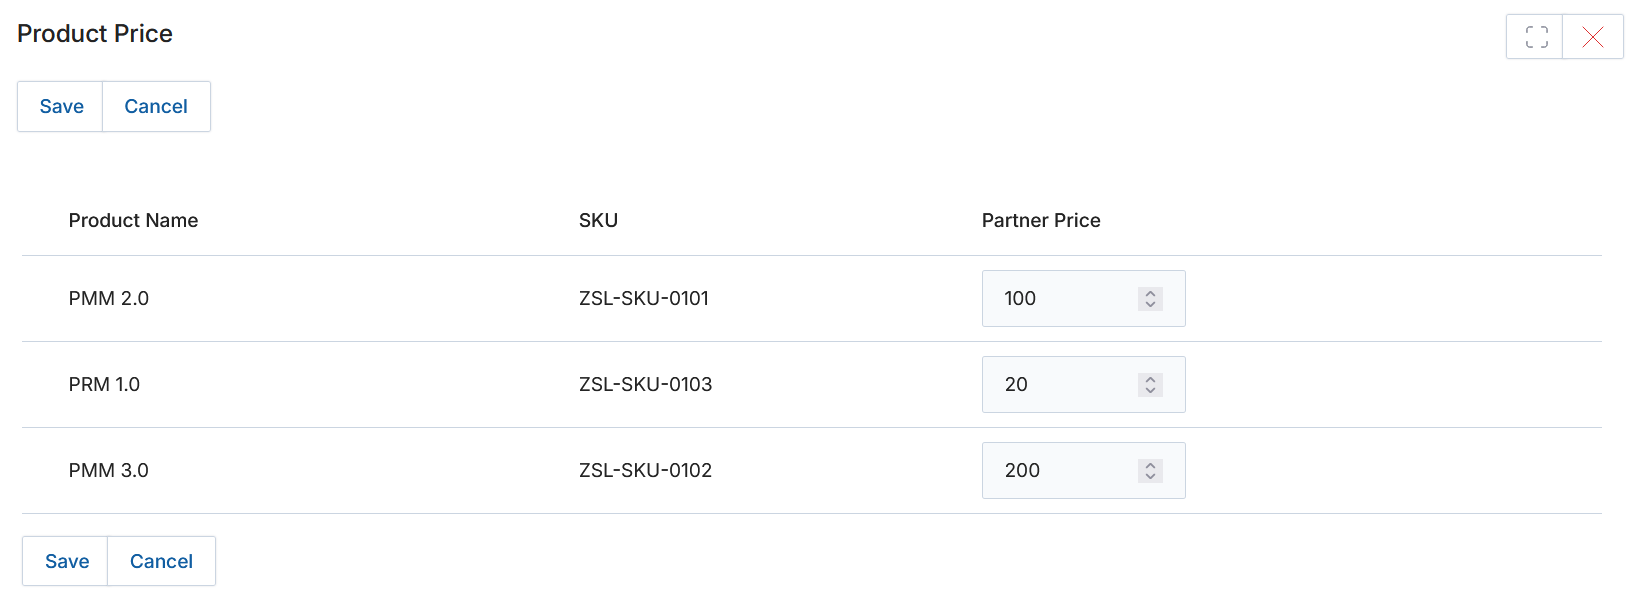
c. Products — Lists all products under this price book.
| Column | Description |
|---|---|
| Product Name | Name of the product. |
| SKU | Product SKU. |
| Partner Price | Amount set for the partner for this product. |
| Currency ISO Code | Currency used for the product amount. |
| Is Active | Current status of the product. |
| Commission Unit | Fixed value or Percentage (%) on which commission is calculated. |
| Product Commission Rate | Fixed commission value or percentage, as determined by Commission Unit. |
- Click the pen icon to edit product values within the price book.
- Click the trash icon to dissociate a product from this price book.
d. Price Book Assignment History
| Column | Description |
|---|---|
| Action | Click the globe icon to withdraw an assignment. Only the user who made the assignment can withdraw it. |
| Assign To | Assignee — user(s) or group(s). |
| Assigned By | The user who made the assignment. |
| Assignment Type | Type of assignment: User or Group. |
| Date Entered | Date of assignment. |
Add/Edit a Price Book
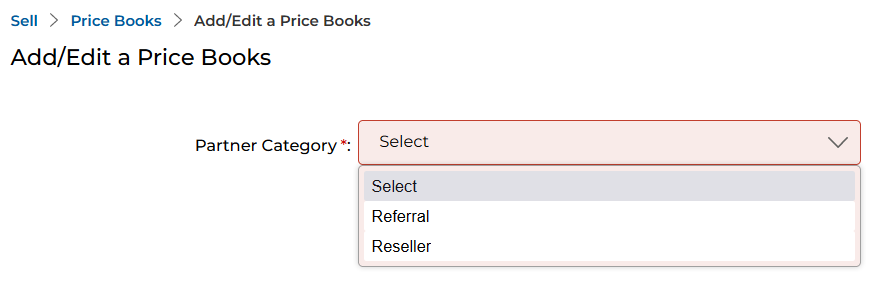
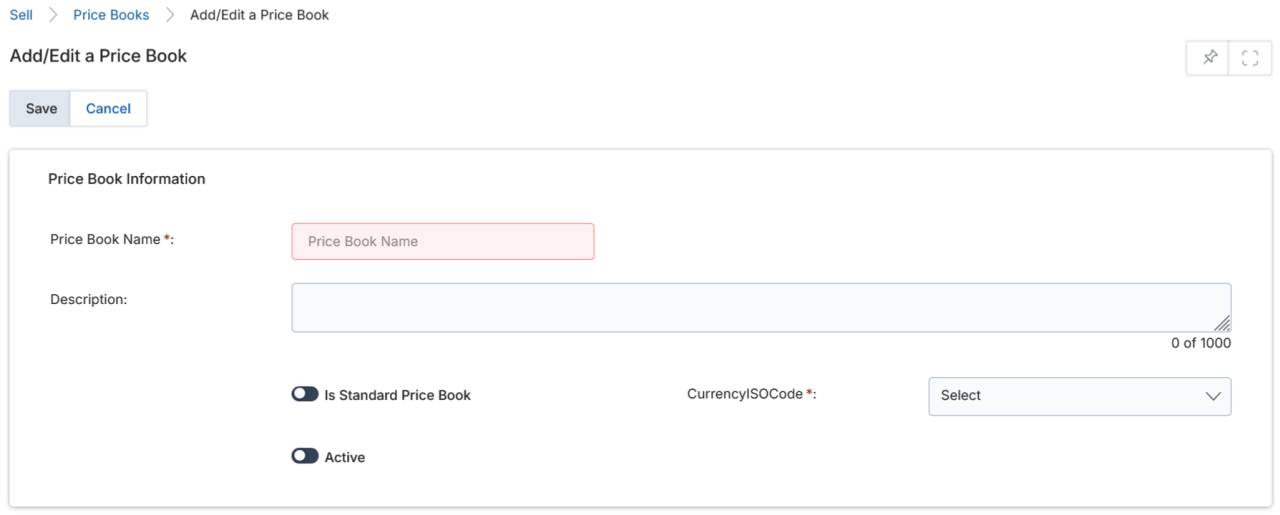
- To Edit, click the pencil icon. To Add a new price book, click the Add button.
- Select the Partner Category (Referral or Reseller) for whom this price book is being created.
- Fill in the Price Book Information fields:
| Field | Description | Required |
|---|---|---|
| Price Book Name | Name of the price book. | Yes |
| Description | Short description. | No |
| Currency | Currency to be used. | Yes |
| Is Standard Price Book | Enable toggle to make this the industry-standard price book. | No |
| Active | Enable toggle to activate this price book. | No |
| Assign Commission Rate By Product Solution | Yes: Commission Rate and Rate Unit fields are disabled (set at product level). No: These fields are enabled and apply as defaults to all added products, though they can be overridden per product. | No |
| Affiliate Commission Rate Unit | Fixed or Percentage basis for commission calculation. | Conditional |
| Affiliate Commission Rate | Numerical commission rate value allocated to Affiliate Partners. | Conditional |
| Partner Category | System-generated; reflects the partner category selected earlier. | — |
- Click Save. You will return to the View Price Books page, where you can open the price book to add products.
Adding/Editing Products to Price Books

- Click on the Name/Title of the price book to open its details page.
- In the Products section, click Add Product(s).
- Check the product(s) you want to associate with this price book and click Add.
- On the Product Price page that appears, set the following for each selected product:

| Field | Description |
|---|---|
| Value (Partner Price) | Numerical value determining the fixed commission value or commission percentage, as determined by the Unit. |
| Unit | Fixed Value or Percentage on which the commission is calculated. |
If no value is provided for a product, the system will apply the Affiliate Commission Rate from the Price Book Information section as the default.
- Click Save. The added products will appear in the Products related list.
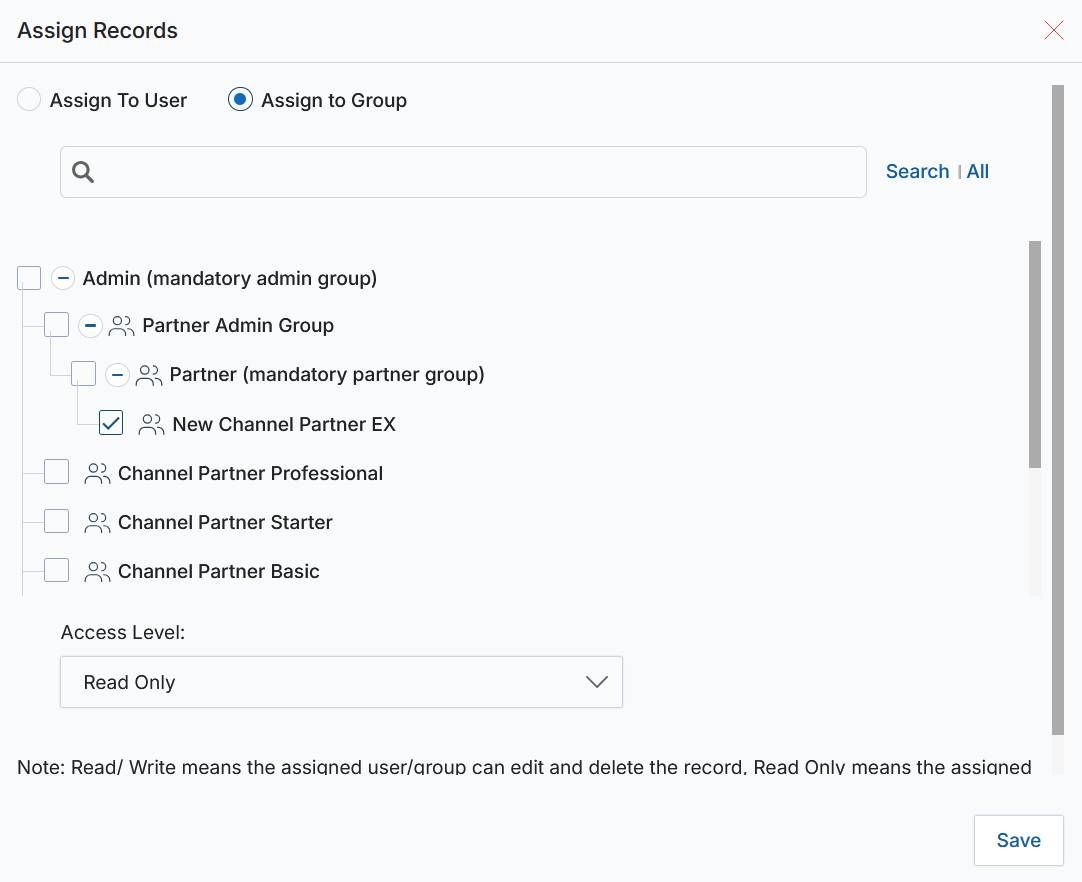
- To assign the price book to partners, click the Assign To button.
- Using the tree structure in the popup, select the Reseller User/Partner or Group and set the desired Access Level (Read Only or Read/Write), then click Save.
Lead Aging
Lead Aging allows administrators to configure rules that govern when leads are automatically revoked from partner groups. Rules can be time-bounded by country, validity dates, and partner group, with color-coded aging indicators.
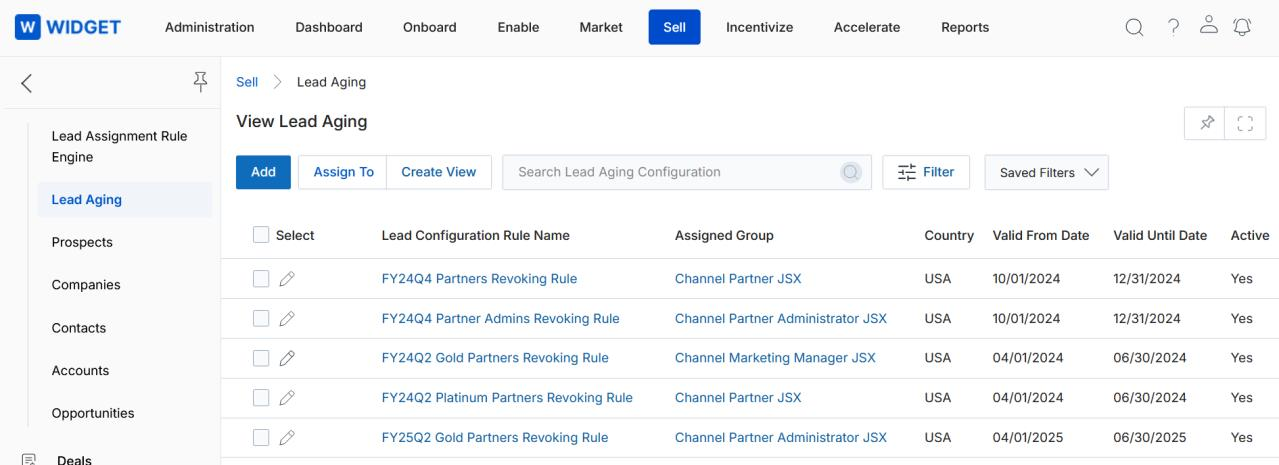
View Lead Aging

- Click on Sell at the top zone.
- Click on Lead Aging in the left menu bar under Leads.
The View Lead Aging page lists all lead configuration rules. The toolbar provides:
- Add — Create a new Lead configuration rule.
- Assign To — Assign a rule to a group or user.
- Delete — Delete the selected rule.
- Search — Search for specific records.
- Clear Search — Clear the active search.
- Saved Searches — Access previously saved searches.
For each record in the grid:
- Any linkable item — Takes you to its details page.
- Edit (pencil icon) — Opens the record for editing.
View Lead Configuration Details
- Click on the Name/Title of a Lead Configuration Rule to view its details page.
- The details page contains the following:
a. Lead Configuration Details
| Field | Description |
|---|---|
| Lead Configuration Rule Name | Name of the rule. |
| Assigned Group | Name of the assigned partner group. |
| Valid From Date | Starting validity date of the rule. |
| Valid Until Date | Ending validity date of the rule. |
| Country | Country to which the rule applies. |
| Active | Whether the rule is currently active. |
| Yellow | Color code threshold (if any) for yellow aging alert. |
| Green | Color code threshold (if any) for green aging indicator. |
b. Action Buttons
- Edit — Opens the rule for editing.
- Delete — Deletes the rule.
- Assign To — Assigns the rule to a Group or User.
c. Lead Revoke Rule(s) — The related list at the bottom of the page.

- Click Add to create a new Lead Revoke Rule. Each rule defines a Name, Operator (e.g., Greater Than), and number of Days after which the lead is revoked from the assigned group.