
Introduction
The Social Syndication Management application of ZINFI's UPM platform makes it easy for vendors to distribute social media content for Facebook, Twitter, LinkedIn, and other platforms via their channel partner network. Channel partners can either auto-stream or manually customize each feed available for instant or scheduled posting on their profile or company pages.
Manage Accounts
The Manage Accounts section allows administrators to view all linked social accounts, add new accounts across Facebook, X (Twitter), and LinkedIn, link company pages to specific accounts, and remove accounts that are no longer needed.
Looking Up Existing Social Accounts
- Click on Market in the top navigation bar.
- Click on Accounts in the left menu bar under Social.
- View the list of social accounts connected with the platform.
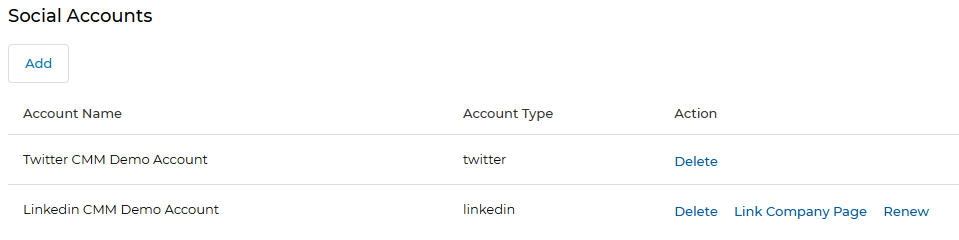
- To remove a specific social account, click Delete.
- To link a company page to an existing social account, click Link Company Page.
- To connect a new social account, click Add.
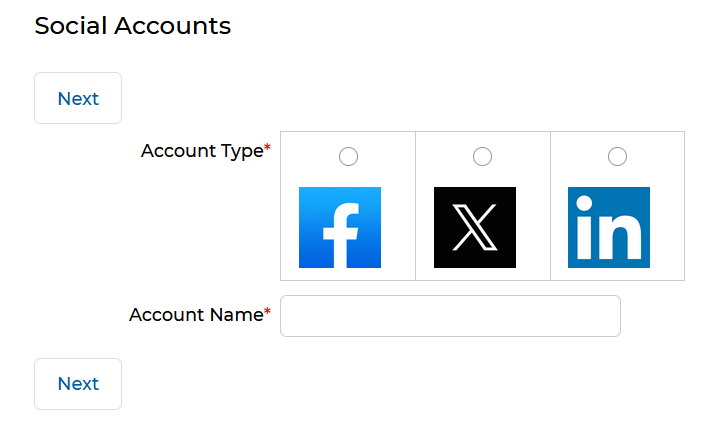
Add a Social Account
- Navigate to Market > Social > Accounts. Any previously linked social accounts appear here.
- To link a new account, click the Add button.

New Account Set Up
- Select the social media platform in the Account Type section you wish to link to (Facebook, X, or LinkedIn).
- Provide a screen name for the account in the Account Name field.
- Select the Corporate Account checkbox if applicable, or leave it unchecked.
- Click Next to be directed to the login screen of the selected social media platform, where you can input your credentials and complete the connection.
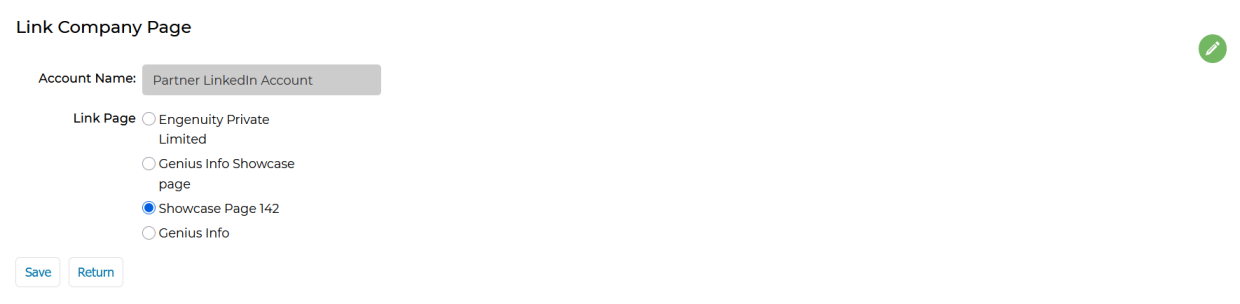
Linking Company Pages
Once an account has been linked, the company pages associated with that account will be pulled in from the social account and displayed for selection. Only one page can be linked to an account at a time.
- Click the Link Company Page action next to the account you want to link.

- Choose the Link Page you are interested in from the list of pages associated with that account.
- Click Save to link that page with the selected social account, or click Return to cancel the operation.
Manage Posts
The Manage Posts page is the central hub for creating, distributing, searching, and tracking social media content. It is divided into three panels: Available Post(s) for posts ready to deploy, Scheduled Post(s) for queued content, and Track Posted Content for monitoring engagement on published posts.
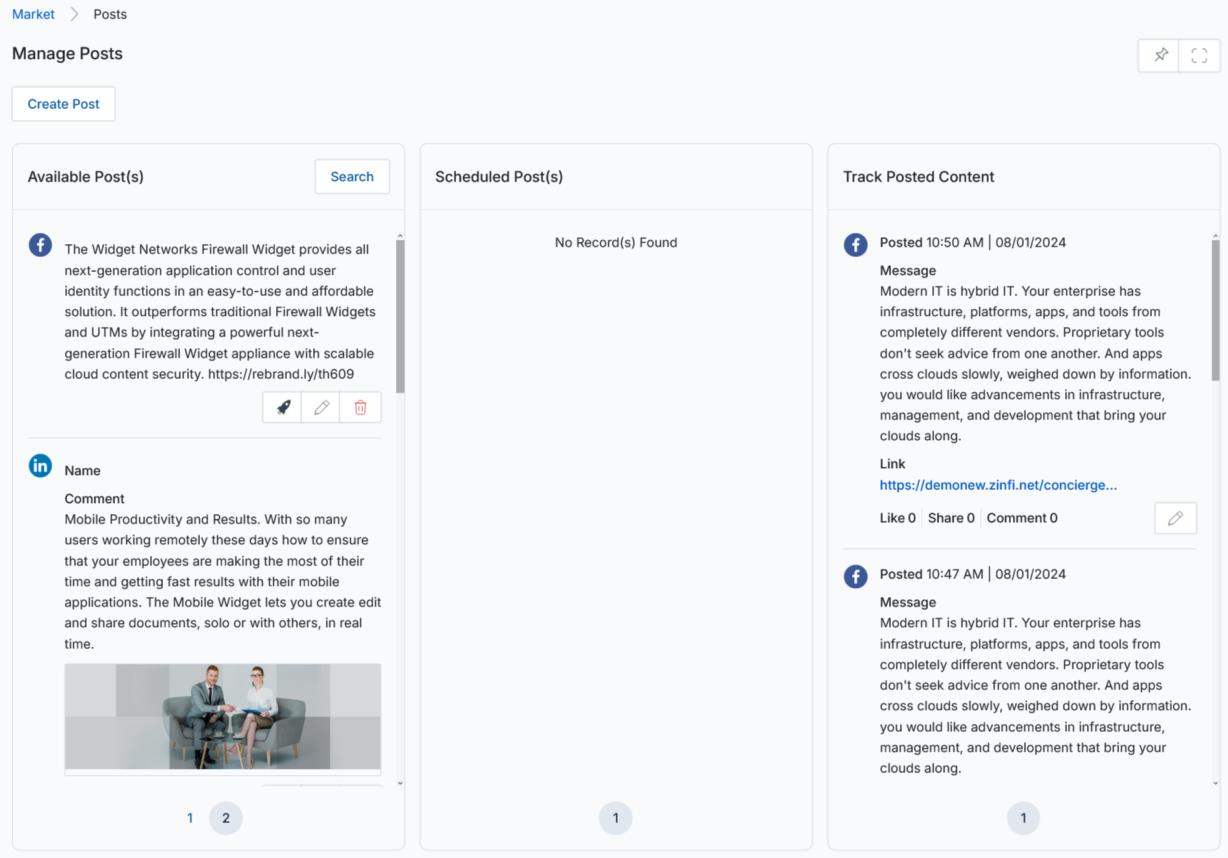
- To create a new post for distribution to your partners, click Create Post (see the Create a New Post section below).
- To search for a specific post in the existing list, use the filtration option and click Search.
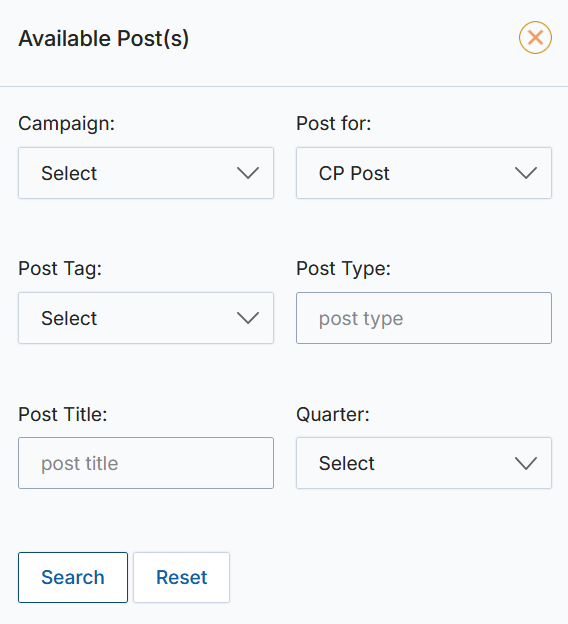
- You can search using any of the following parameters:
- Campaign — Select the campaign name.
- Post For — Filter by audience: CP Post = available for partner syndication; Own Post = used internally; Both = available for self-use and partner syndication.
- Post Tag — Search for posts by the tag associated with the post.
- Post Type — Filter by platform: Facebook, Twitter, or LinkedIn.
- Post Title — Search for keywords in the post title.
- Quarter — Filter by the post creation quarter.
- You may perform the following actions on each listed post:
- Quick Post — Post the content as-is on the social platform without any changes. Two sub-options are available:
- Post to Account — Automatically posts to the Social Media Account synced with the UPM Account.
- Post to Page — Automatically posts to the Social Media Page linked to the synced account.
- Edit & Post — Post the content after making changes (see Create a New Post for field descriptions).
- Delete — Permanently removes the post from the list.
- Quick Post — Post the content as-is on the social platform without any changes. Two sub-options are available:
If a Social Media Account is not integrated with the post, a Quick Post attempt will trigger an error message asking you to add a Social Media Account to UPM before proceeding.
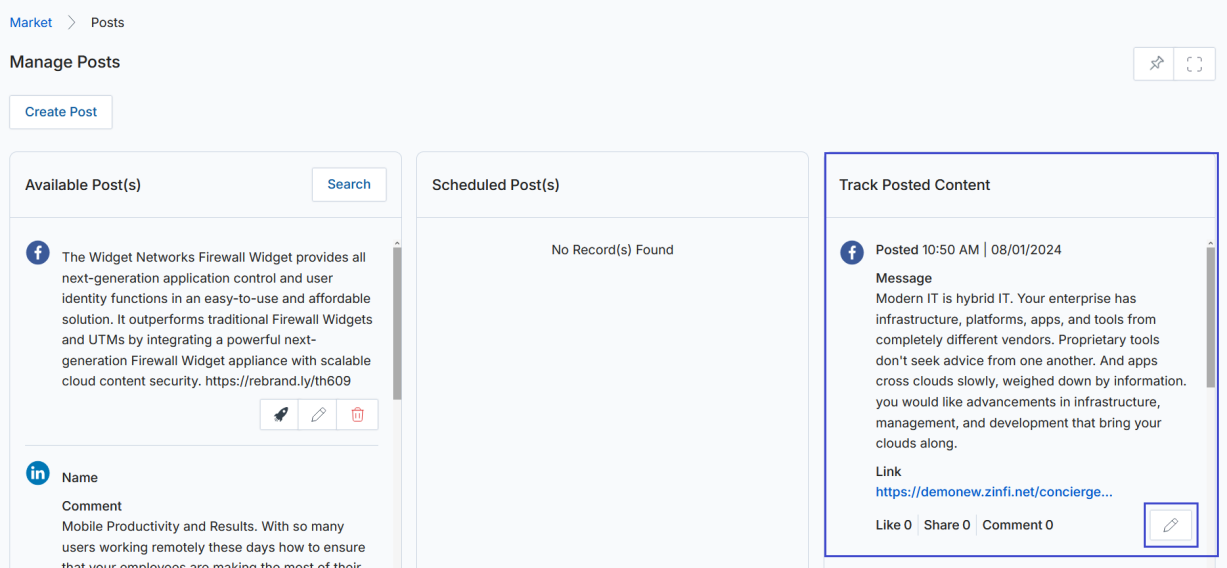
- To track the progress of posted content on various social platforms, review the Track Posted Content section.
- You may repost used content after making required changes by clicking the Edit & Repost (pencil icon) in the Track Posted Content panel.
Create a New Post
- Click Create Post from the Manage Posts page.
- The Manage Post form will open with the following fields:

| Field | Description | Required |
|---|---|---|
| Campaign | Select the campaign name to associate with this post. | Yes |
| Post For |
Determines who can see and use this post in the Available Post(s) section:
|
No |
| Post Title | Provide a descriptive title for the post. | Yes |
| Long URL | Provide the URL of the landing page to direct end users to. Click Generate URL to create a shortened version that appears in the Generated Short URL field. | No |
| Quarter | Select the campaign quarter this post will be associated with, if applicable. | No |
| Post Type | Select the social platform for which this post is being created: Facebook, X (Twitter), or LinkedIn. | Yes |
| Format Type |
Select the post style from the dropdown. Available options vary by platform:
|
Yes |
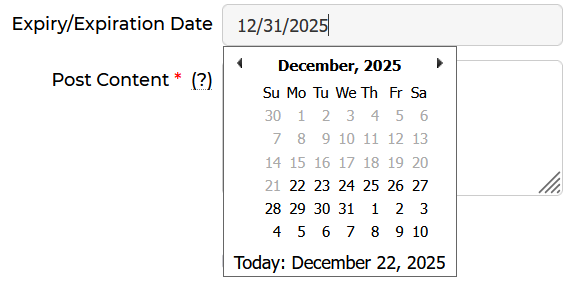
| Expiry/Expiration Date | On the specified date the post will be deactivated and moved from Manage Posts to the Manage Archived Posts section, where it can be reactivated. | No |
| Post Content | Enter the text content for the post. The character counter below this field adjusts based on the selected Post Type platform limits. | Yes |
| Published | Check this box to make the post visible and available in the Available Post(s) section. | No |
The following screenshots illustrate the Format Type options available for each platform:


- Once complete, click Save to see your post appear in the main page's Available Post(s) section.
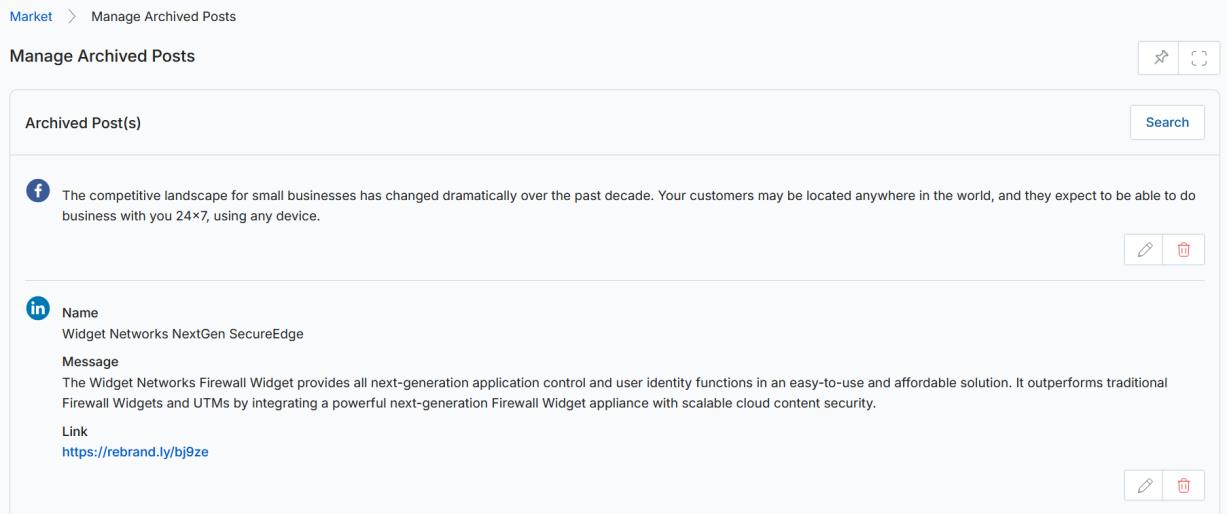
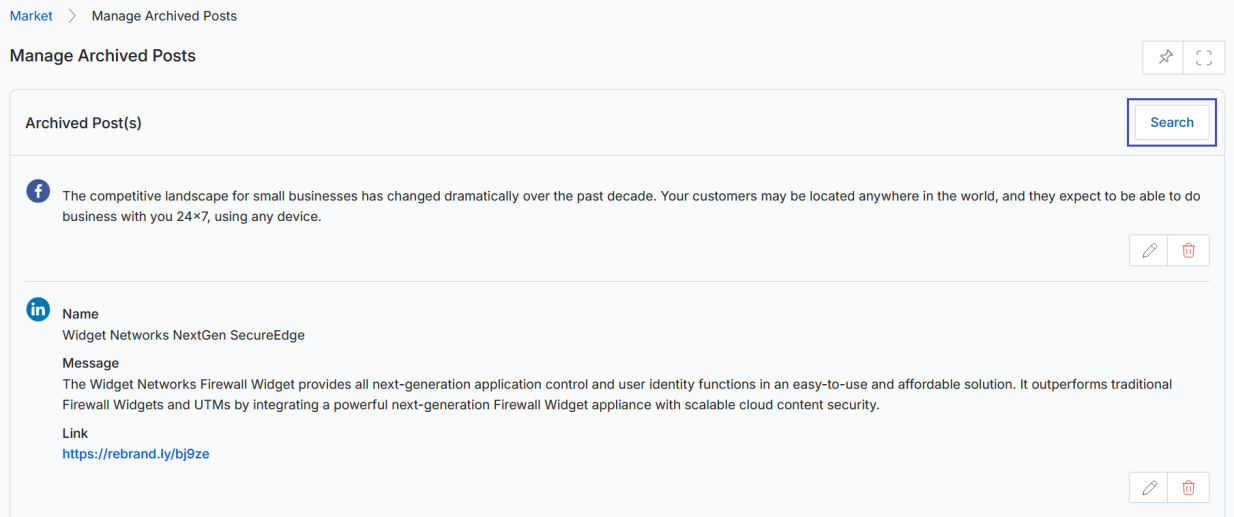
Manage Archived Posts
The Manage Archived Posts section stores posts whose expiry date has passed. Posts can be searched, reactivated with a new expiry date, or permanently deleted from this section.
Navigating to Archived Posts
- Click on Market in the top navigation bar.
- Click on Manage Archived Posts in the left menu bar under Social.
Searching Archived Posts
- On the Manage Archived Posts page, click the Search button to reveal the filter panel.

- Once expanded, the following parameters are available:
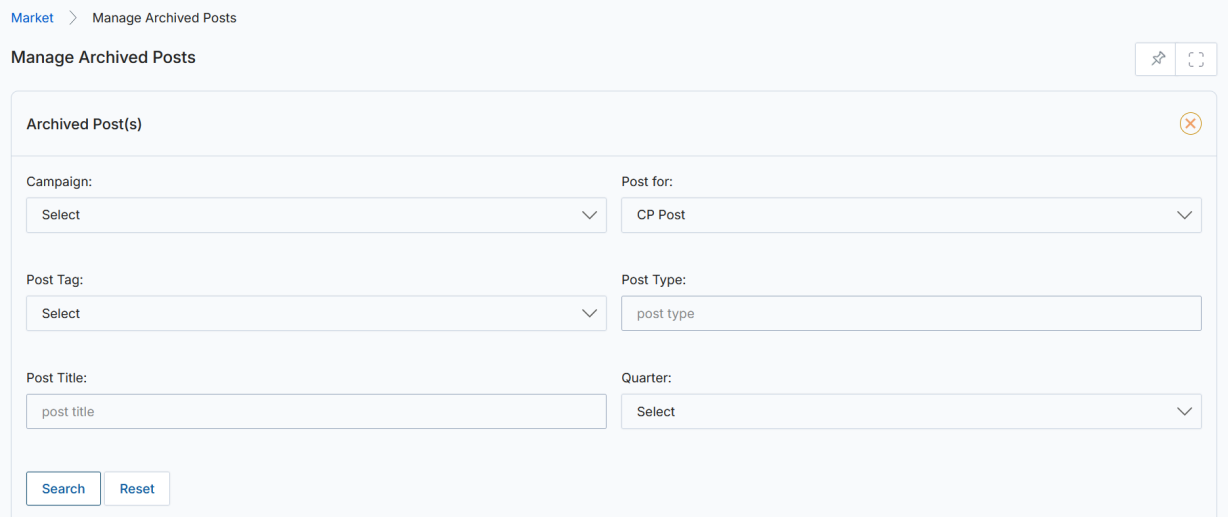
- Campaign — Select the campaign name.
- Post For — Filter by audience: CP Post = partner syndication; Own Post = internal use; Both = internal and partner.
- Post Tag — Search by the tag associated with the post.
- Post Type — Filter by platform: Facebook, Twitter, or LinkedIn.
- Post Title — Search by keywords in the post title.
- Quarter — Filter by post creation quarter.
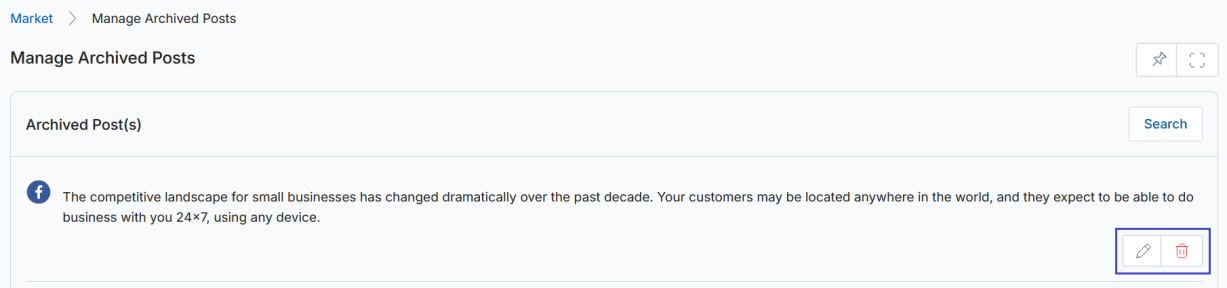
Editing an Archived Post
- To re-activate an archived post, click the Edit & Post (pencil) icon. To permanently remove the post, click the Delete Post (bin) icon.
- Clicking the Edit & Post icon opens the Manage Post page where you can make the necessary changes.
- Set a new Expiry/Expiration Date and save the changes. Saving will move the post back to the Available Post(s) section and remove it from the Archived Posts section.
Once the changes are saved with a future or blank expiry date, the post will reappear in the Available Post(s) section and will no longer appear in the Archived Posts section.
Social Post Management
The Social Syndication Management application makes it straightforward to quickly set up dynamic content for social media platforms for your partners' use, helping you increase content reach with less effort.
The application includes in-depth analytics, which you and your partners can use to measure the effectiveness of specific distributed content. Vendors and channel partners can save hours by automating complex distribution processes using the content distribution scheduler.
Social Account Setup Management
Vendors and their channel partners can use the Social Syndication Management application to connect social accounts like Twitter, Facebook, and LinkedIn. Integrating different platforms via a direct connector allows data to flow smoothly across diverse platforms, providing instant, detailed insights into campaign results for each instance of shared content — without visiting individual channel partners' social profiles.
Post Scheduling Management
Use the Social Syndication Management application to immediately make marketing content available to channel partners. Partners can then choose a specific date and time to post the content on their corporate social accounts to generate leads. As people interact with the content, channel partners can direct prospects to their own customized, co-branded microsites embedded in the content.