ZINFI UPM GuideMulti-Touch Campaign Management for Channel Partners

01

Introduction

ZINFI's Multi-Touch Application allows partners to create tactics or integrated campaigns as part of their marketing efforts. Using the multi-touch approach enables an organization to set up diverse content and a variety of campaign tactics so that channel partners can run single-touch co-branded campaigns using a SMART campaign flow.
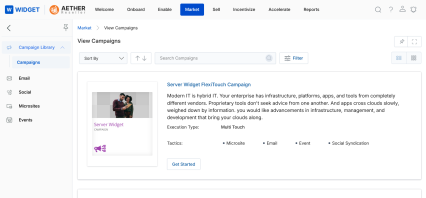
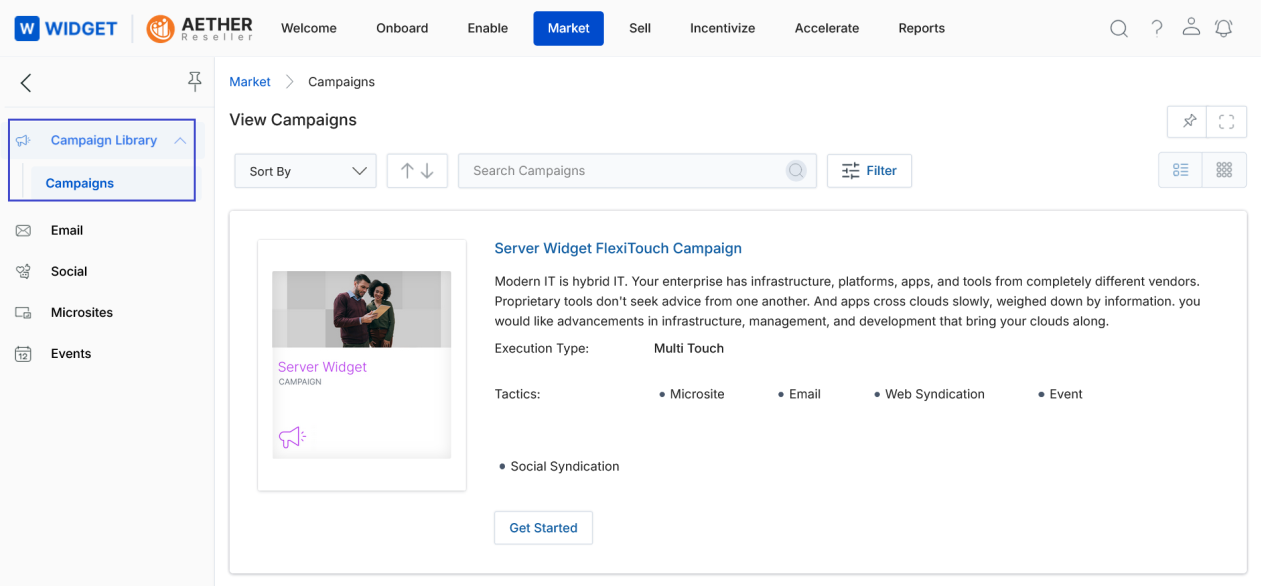
Campaign setup and management
Visibility configuration
Association of various tactics (Email, Microsite, Web Syndication, Event, Social Syndication)
Single-touch and multi-touch campaign execution
Co-branded email templates with WYSIWYG editing
SMART campaign flow with automated drip sequencing
UPM portal showing View Campaigns page under Market with a Server Widget FlexiTouch Campaign listed with Multi Touch execution type and Get Started button
Figure 1 — Campaign Library overview showing a Multi-Touch campaign with available tactics.
02

Campaign Library

The Campaign Library is the central hub where partners discover and initiate campaigns shared by the OEM. It displays all available campaigns with their associated tactics and execution type.

2.1 Access Campaign Library

To navigate to the Campaign Library:

  1. Click Market on the top navigation menu.
  2. Click Campaign Library > Campaigns from the left menu bar.
UPM portal showing Market tab selected, Campaign Library expanded in the left nav with Campaigns highlighted, and a Server Widget FlexiTouch Campaign shown in list view with Multi Touch execution type and Get Started button
Figure 2 — Campaign Library navigation showing a Multi-Touch campaign in list view.

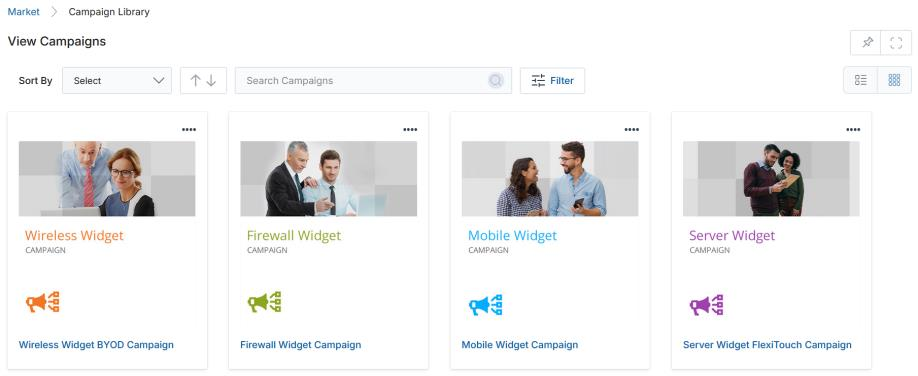
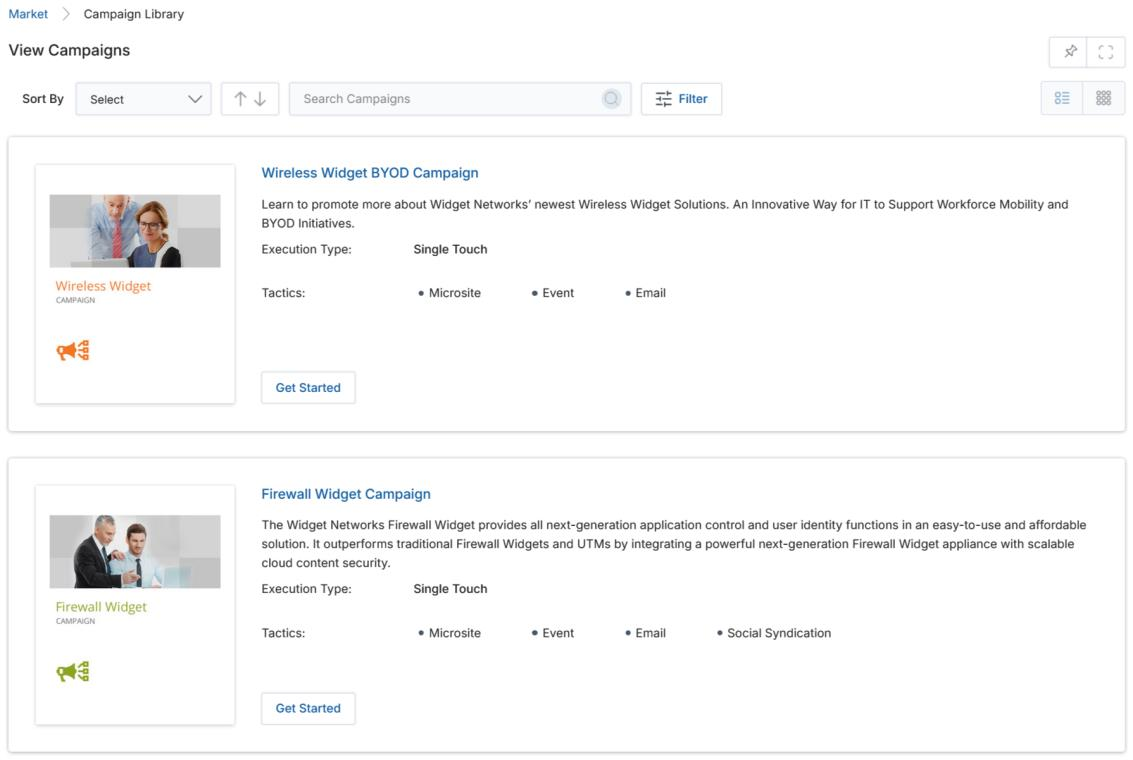
The Campaign Library page supports two display options and sorting controls:

  • Sort By — Sort campaigns by Campaign Name, Modified On, or Created On.
  • Thumb View — Displays campaigns as cards. Click the four dots () on any card to access available tactics and the Get Started button.
  • List View — Displays campaigns in a linear list. The Execution Type (Single Touch or Multi Touch) and available tactics are visible inline. The Get Started button is already visible.
View Campaigns page in Thumb View showing four campaign cards: Wireless Widget, Firewall Widget, Mobile Widget, and Server Widget with campaign name labels beneath
Figure 3 — Campaign Library in Thumb View showing campaign cards.
View Campaigns page in List View showing Wireless Widget BYOD Campaign (Single Touch) and Firewall Widget Campaign (Single Touch), each with Tactics listed and a Get Started button
Figure 4 — Campaign Library in List View showing Execution Type and tactics inline.

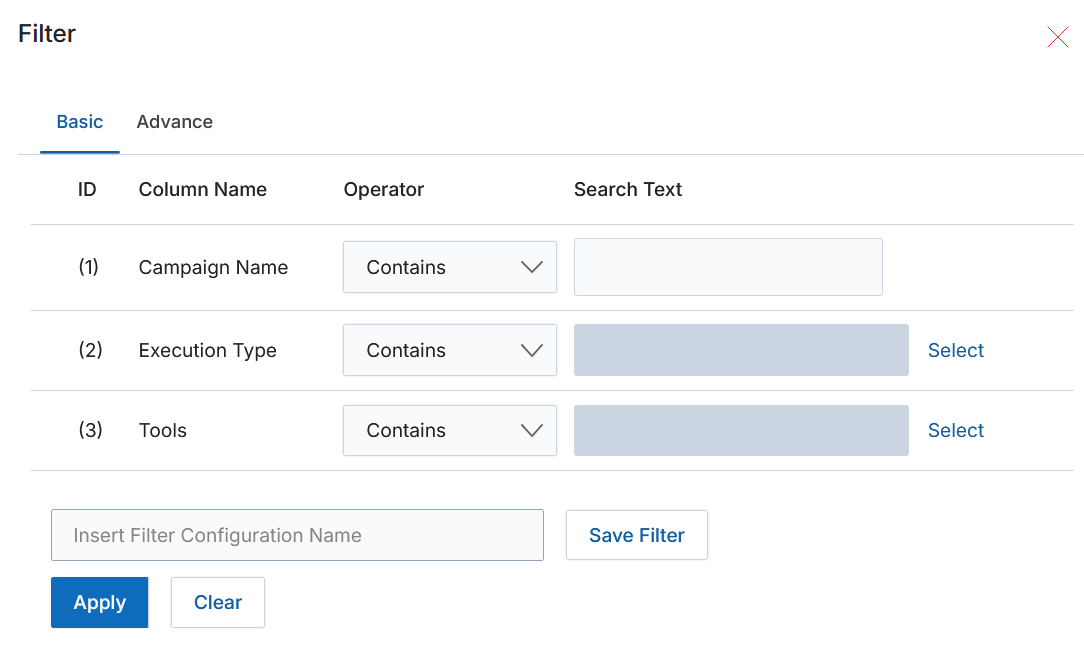
To filter the campaign list, click the Filter button. The filter pane supports the following parameters:

FilterDescription
Campaign NameSearch by a keyword in the campaign name.
Execution TypeFilter by Single Touch, Multiple Touch, or both. Click Select to pick from the dropdown.
ToolsFilter by one or more campaign tool types. Click Select to choose from the available tool list.

Click Apply after setting filter attributes to display filtered results. A saved filter configuration can be named and stored using Save Filter.

Filter dialog showing Basic tab with three rows: (1) Campaign Name with Contains operator, (2) Execution Type with Select button, (3) Tools with Select button, and Apply and Clear buttons at the bottom
Figure 5 — Campaign Library filter dialog with Campaign Name, Execution Type, and Tools filters.
03

Launch a Campaign

Launching a campaign from the Campaign Library follows a two-step process: selecting the campaign and then choosing the specific tactic to execute.

3.1 Campaign Interstitial Page

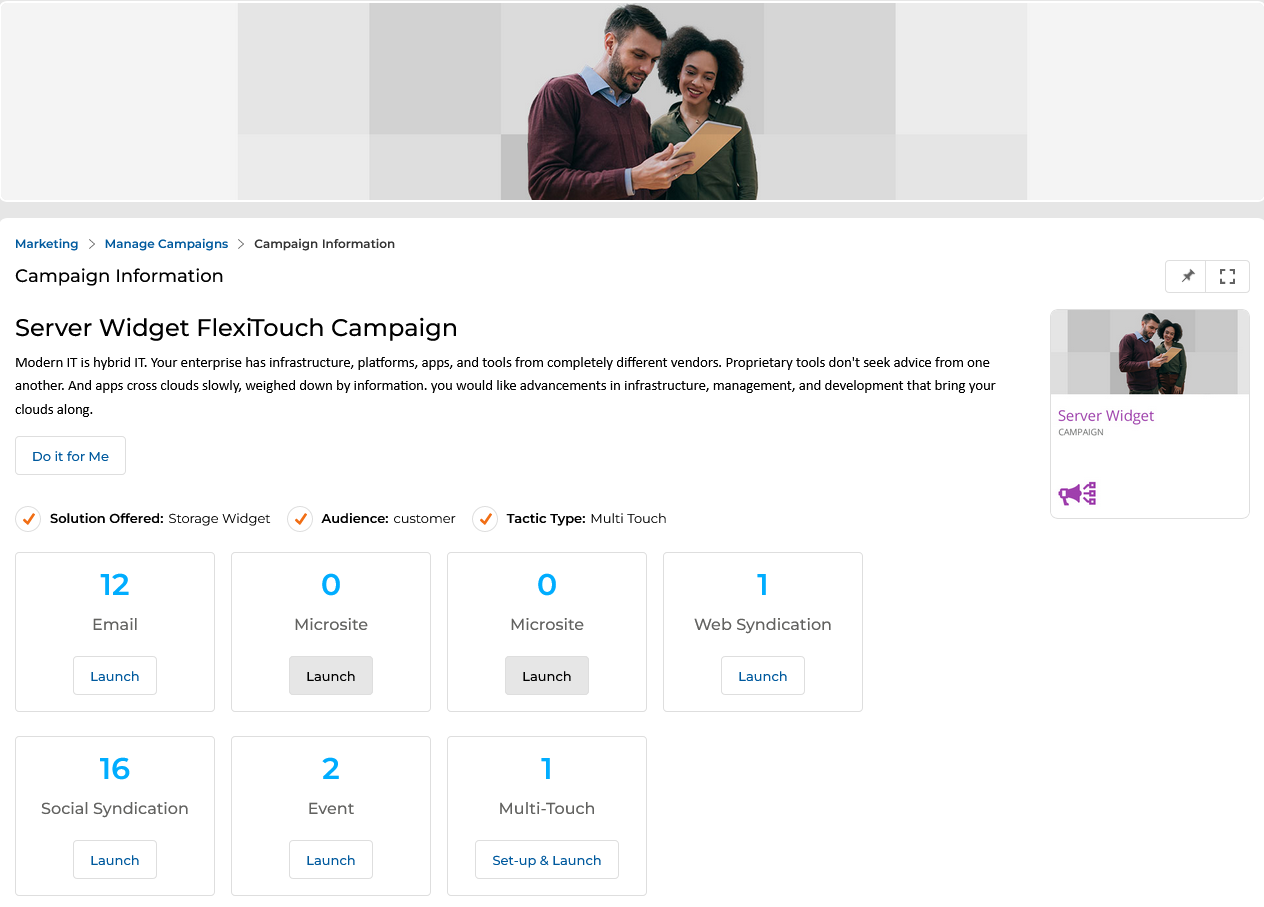
  1. From the Campaign Library, select a campaign and click the Get Started button.
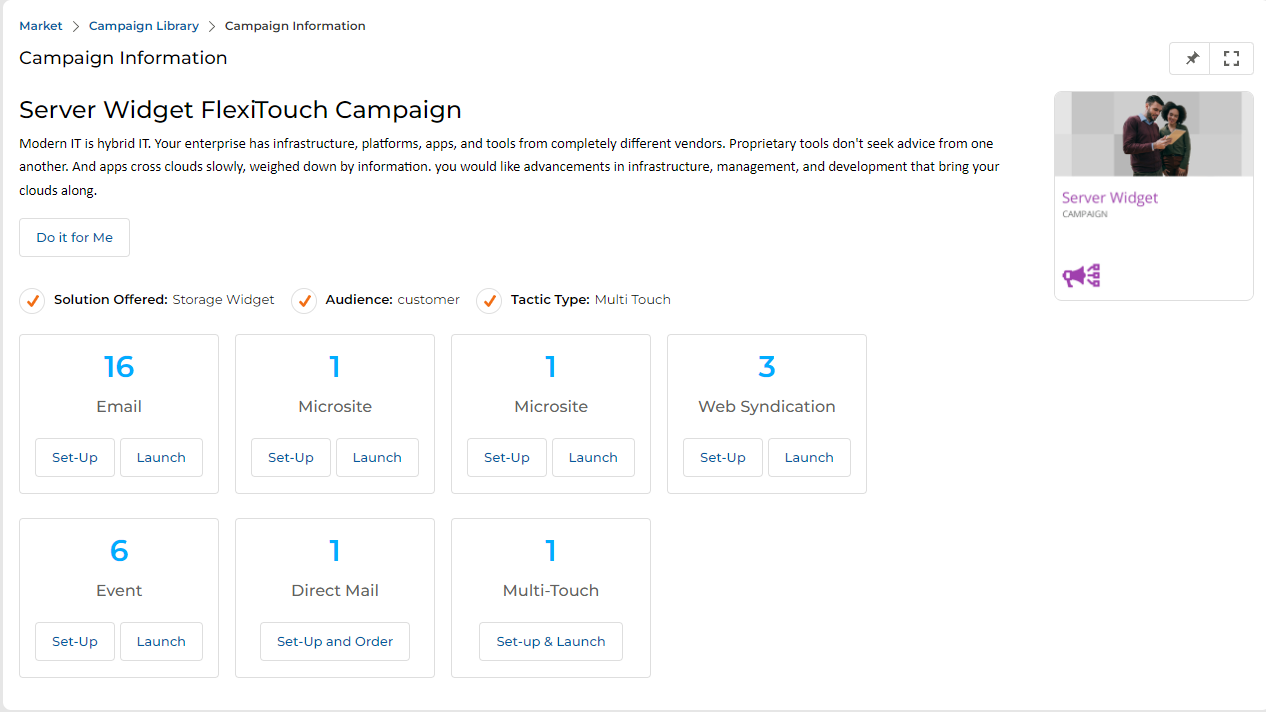
  2. You land on the Campaign Information (Interstitial) page, which shows:
    • The campaign title and its brief description.
    • Campaign metadata: Solution Offered, Audience, and Tactic Type.
    • Tactic tiles showing how many items are available for each tool (Email, Microsite, Web Syndication, Event, Multi-Touch, etc.) with Set-Up and Launch buttons for each.
Campaign Information page for Firewall Widget Campaign showing tactic tiles: 14 Email, 3 Microsite, 5 Web Syndication, 8 Event, 1 Multi-Touch — each with Set-Up and Launch buttons
Figure 6 — Campaign Interstitial page showing all available tactic tiles with content counts and action buttons.
NOTE

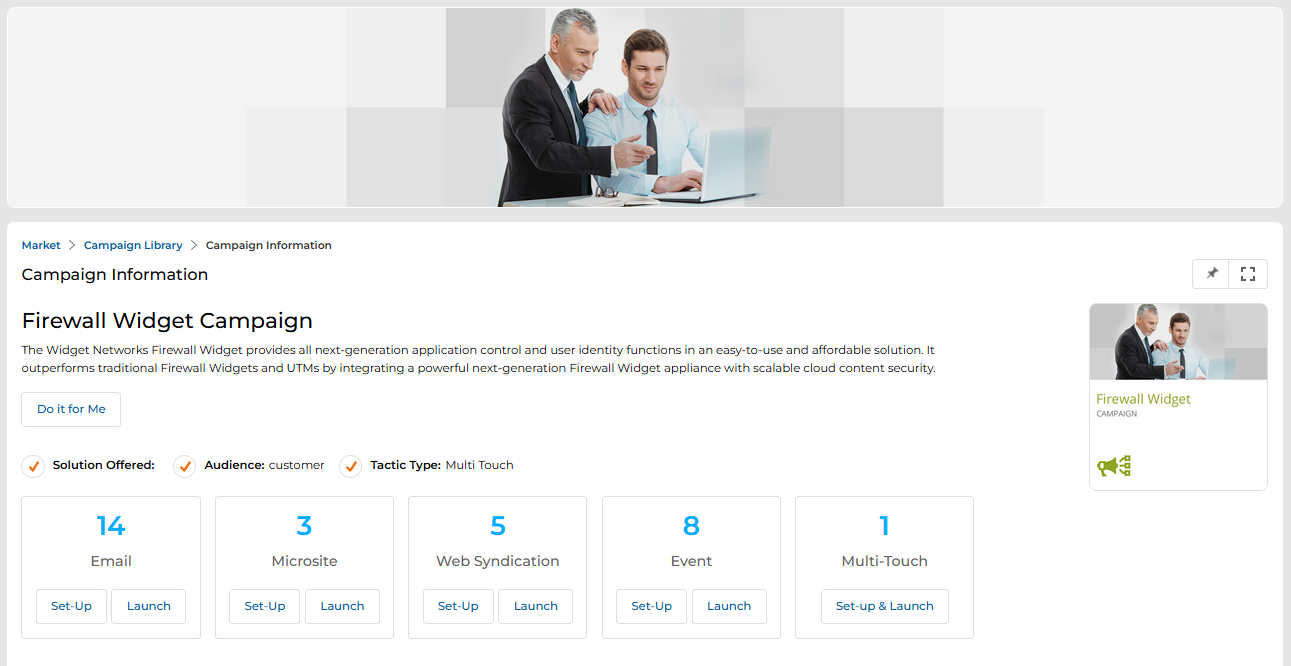
The Set-Up button is used to co-brand the content for a tactic before launching. The Launch button proceeds directly to the campaign execution page for that tactic. For Multi-Touch specifically, the button label is Set-up & Launch.

Campaign Information page for Server Widget FlexiTouch Campaign showing tactic tiles: 12 Email, 0 Microsite, 0 Microsite, 1 Web Syndication with Launch highlighted, 16 Social Syndication, 2 Event, 1 Multi-Touch with Set-up and Launch
Figure 7 — Interstitial page with Web Syndication Launch button selected (highlighted).

3.2 Execute a Campaign

Clicking the Launch button for any tactic (for example, Web Syndication or Email) opens the campaign execution page. The page is divided into five numbered sections:
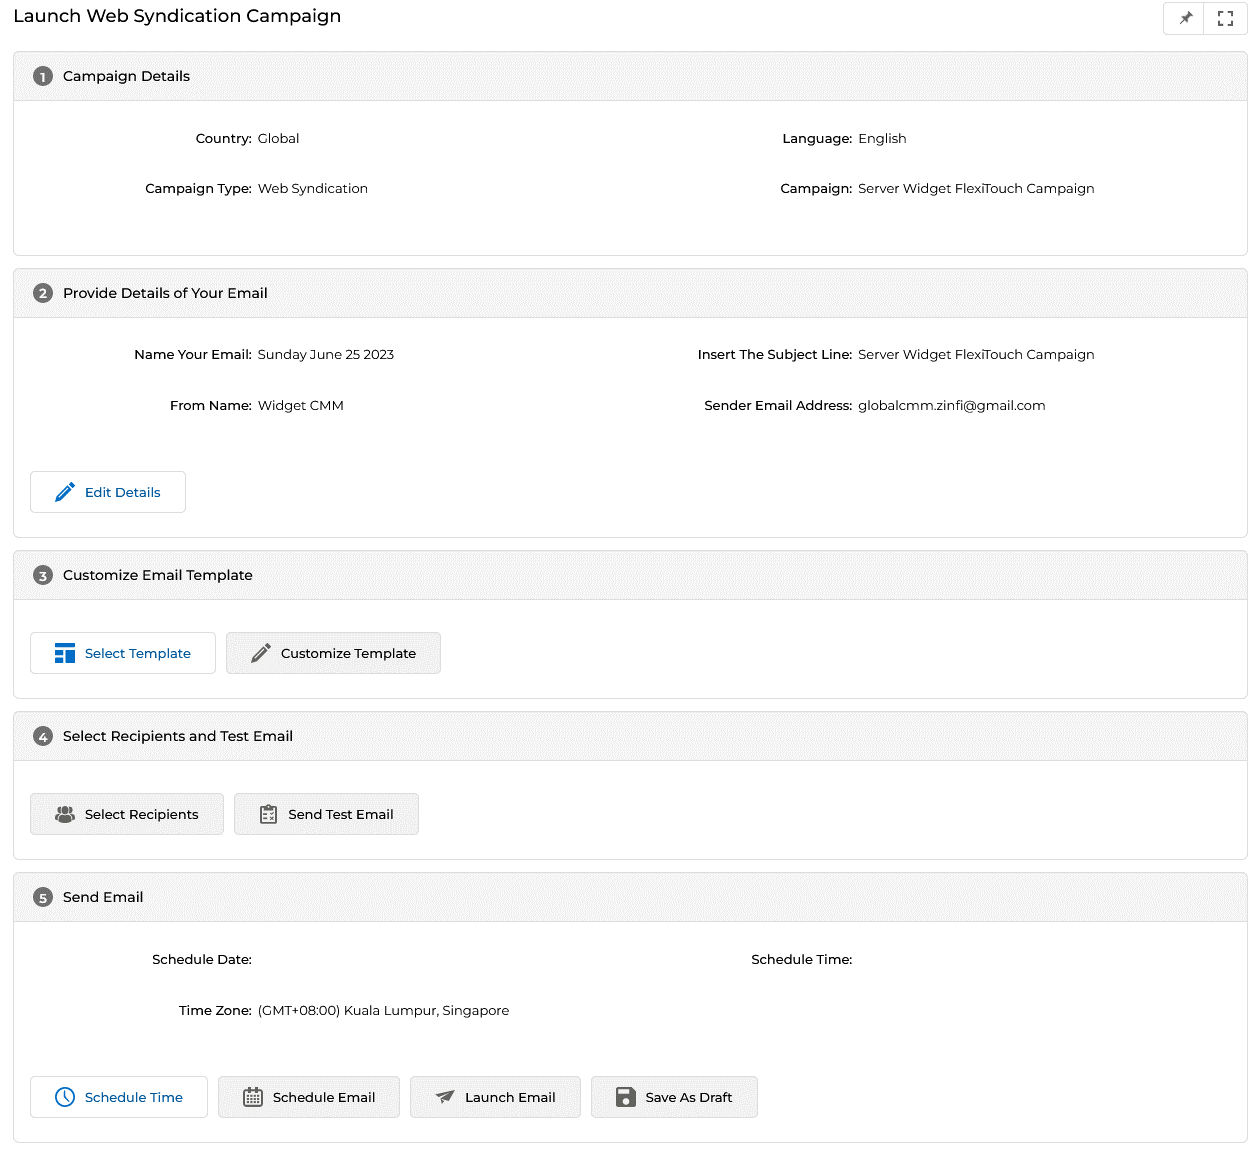
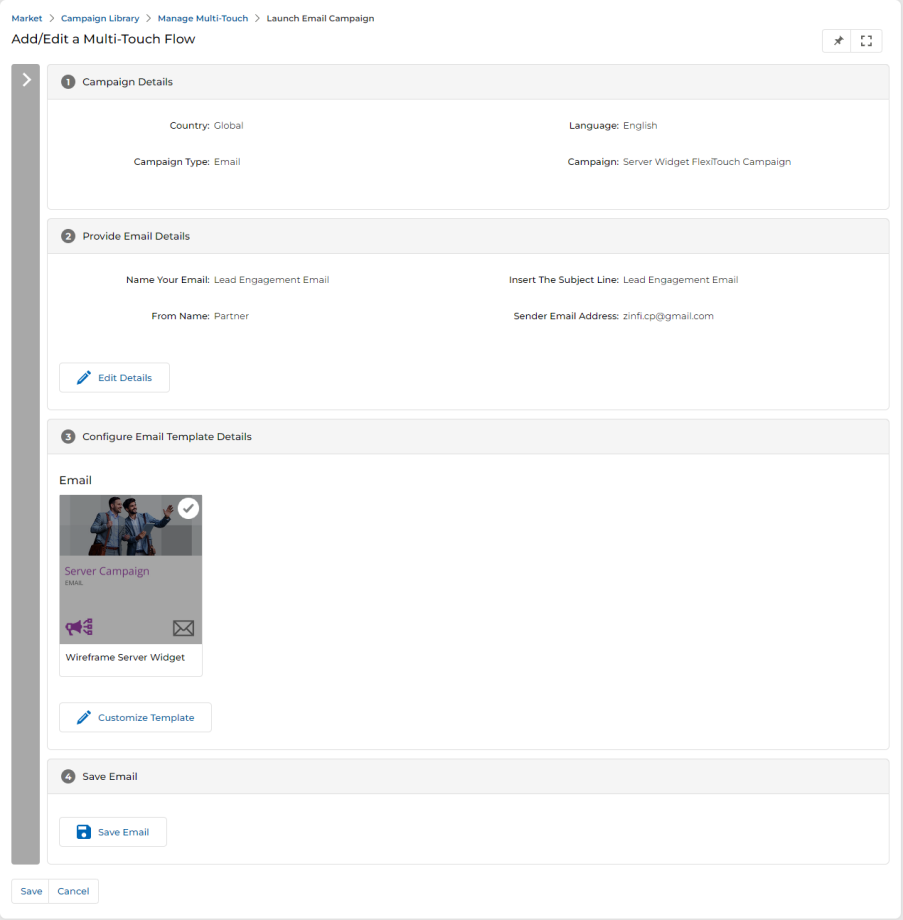
Launch Web Syndication Campaign page with five sections: 1 Campaign Details, 2 Provide Details of Your Email, 3 Customize Email Template, 4 Select Recipients and Test Email, 5 Send Email with Schedule Time, Schedule Email, Launch Email, and Save As Draft buttons
Figure 8 — Campaign execution page showing all five configuration sections.

a. Campaign Details

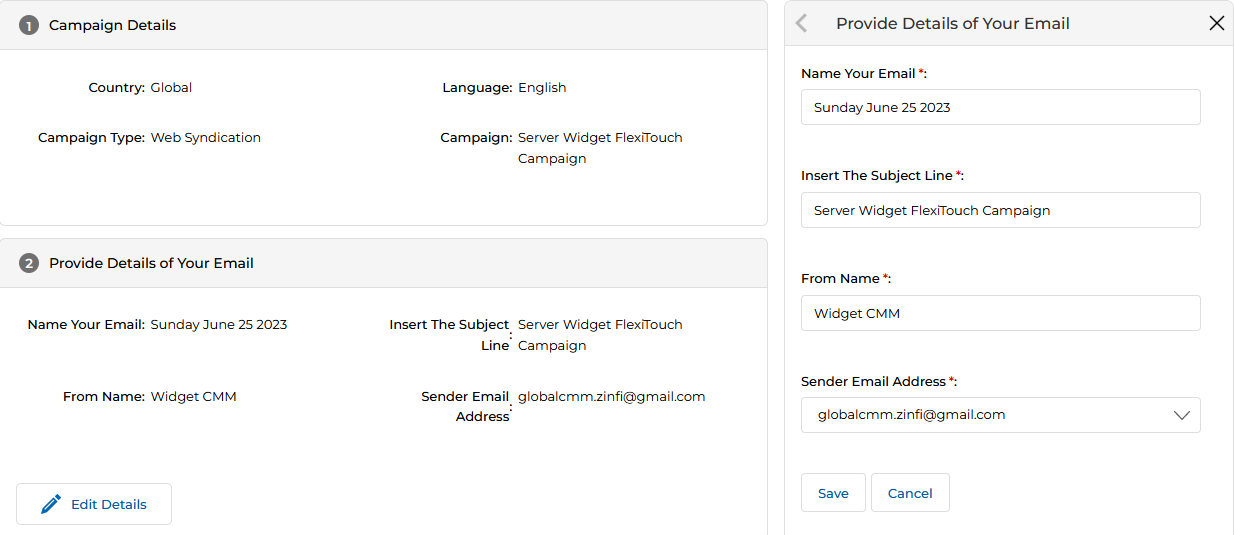
This section is non-editable. It displays the campaign context: Country, Language, Campaign Type, and Campaign Name.

b. Provide Details of Your Email

Configure the outgoing email blast details. Click Edit Details to open the right-hand edit panel and fill in:

FieldDescription
Name Your EmailInternal name for the email blast. Blank by default — must be populated.
Insert the Subject LineSubject line the recipient will see. Blank by default — must be populated.
From NameThe sender name displayed in the recipient's inbox.
Sender Email AddressThe reply-to or from email address shown to recipients.
Provide Details of Your Email section with panel open on the right showing Name Your Email, Insert The Subject Line, From Name, and Sender Email Address fields with Save and Cancel buttons
Figure 9 — Email details section with the Edit Details panel open on the right.

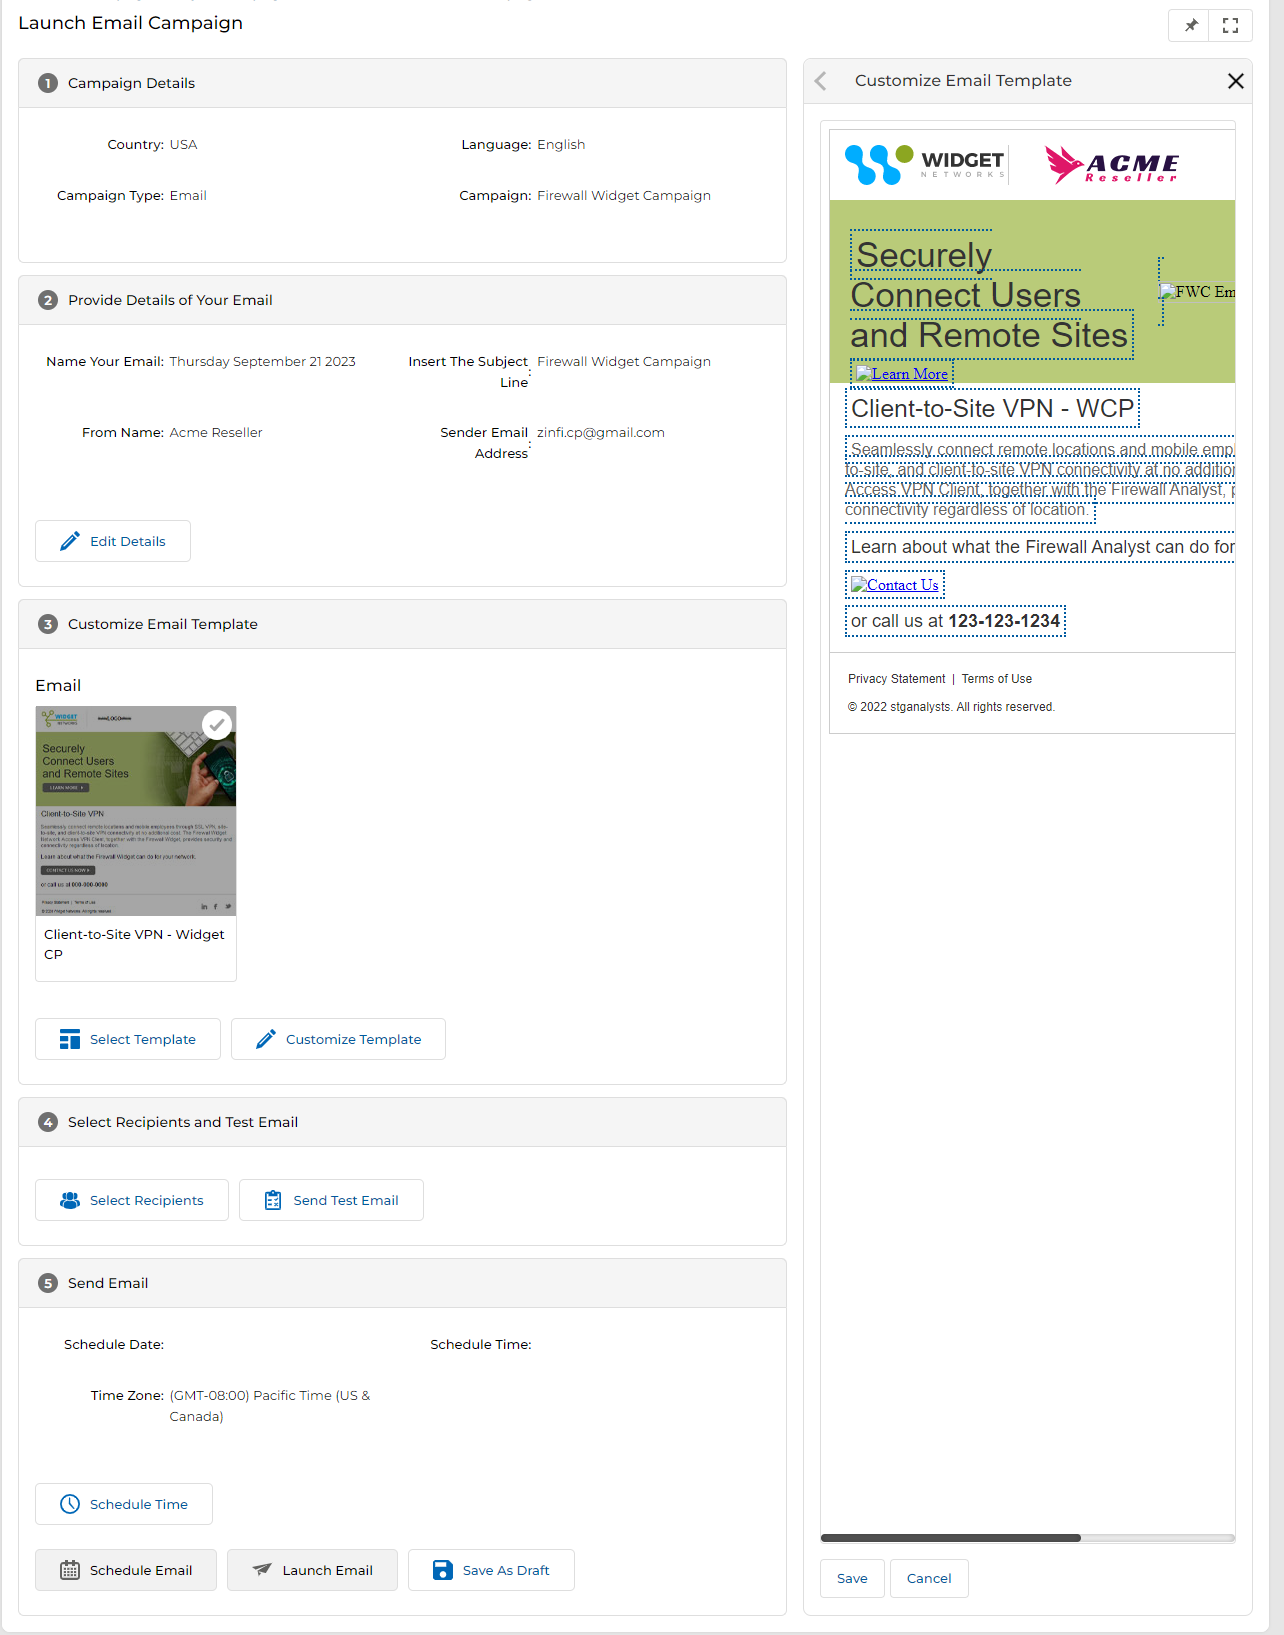
c. Customize Email Template

Click Select Template to choose the email template you want to use — either a previously co-branded template or a master template to co-brand now. Once selected, click Customize Template to open the editor in the right-hand workspace.

  • Editable areas are enclosed in dotted lines. Hovering over any editable area changes its background to grey; clicking activates the CK Editor for rich text editing.
  • Social Connector icons in the email footer are also editable — hovering triggers the grey state, and clicking opens the CK Editor to link them to your social pages.
Launch Email Campaign page with Customize Email Template panel open showing a co-branded email template with WIDGET and ACME logos, dotted-line editable areas highlighted in green and blue
Figure 10 — Customize Email Template editor showing co-branded template with dotted editable areas.
Customize Email Template panel showing the CK Editor toolbar activated and social connector icons in the footer highlighted, ready for editing
Figure 11 — Social Connector footer icons with CK Editor toolbar activated for linking to social pages.

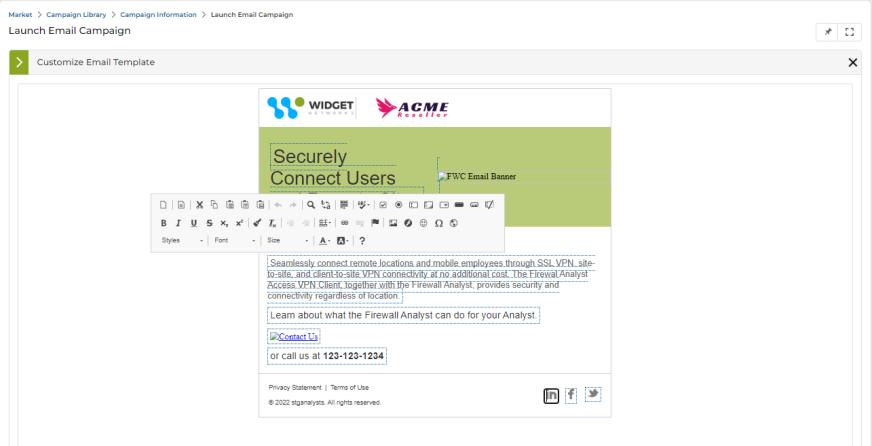
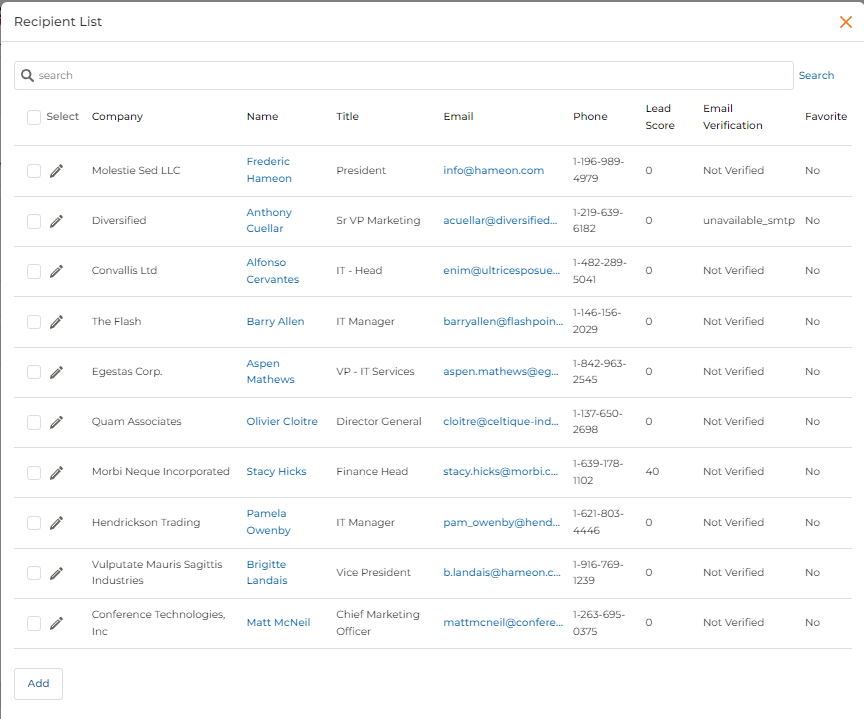
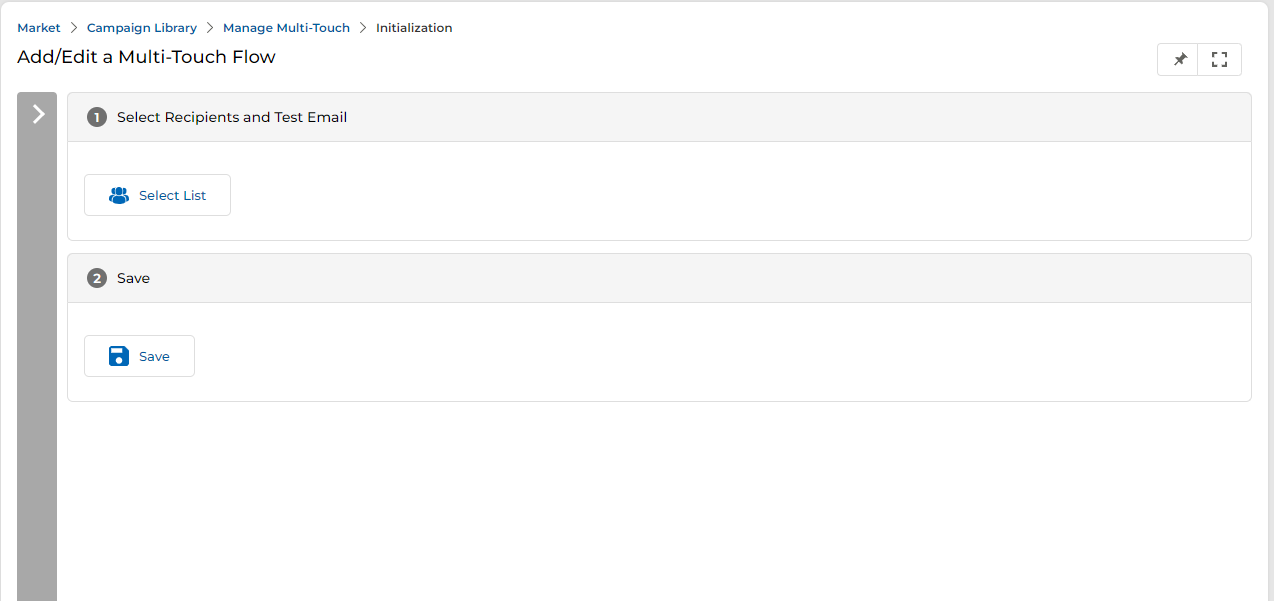
d. Select Recipients and Test Email

  1. Click Select Recipients to choose from your prepared mailing lists, or click Create New List to build a new list on the spot.
  2. Once a list is selected, click Send Test Email to send a test campaign receipt.
Launch Web Syndication Campaign page with Select Recipients and Test Email panel open on the right, showing a paginated list of mailing lists including Prospect Lists and Contact lists with View buttons
Figure 12 — Select Recipients panel showing available mailing lists with recipient module types and counts.
Recipient List dialog showing a searchable table of prospects: Company, Name, Title, Email, Phone, Lead Score, Email Verification columns — with an Add button at the bottom
Figure 13 — Recipient List dialog for searching and adding contacts to a mailing list.

e. Send Email

The final section offers four dispatch options:

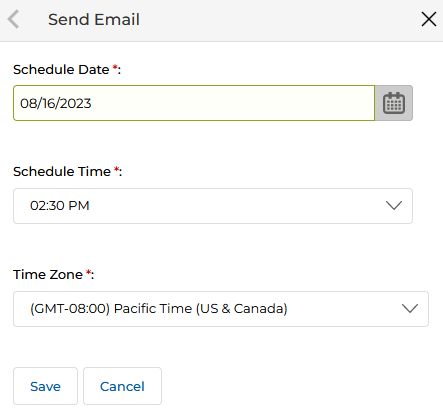
  • Schedule Time — Opens the Send Email dialog to select a specific date, time, and time zone. Click Save to confirm.
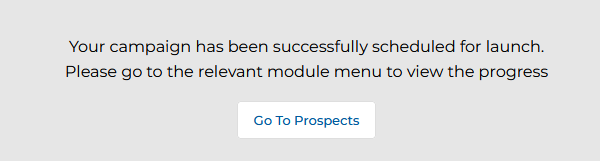
  • Schedule Email — Queues the email to send at the scheduled time. A confirmation message appears on screen.
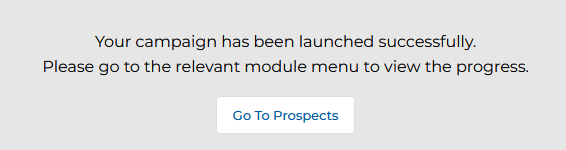
  • Launch Email — Blasts the email immediately. A confirmation confirms the email was launched successfully.
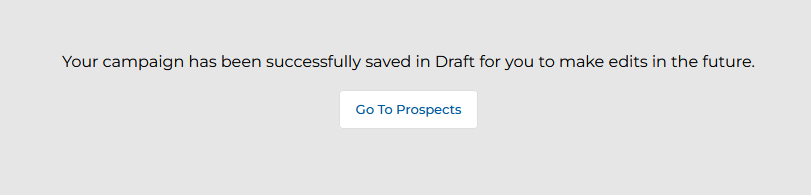
  • Save As Draft — Saves the campaign configuration as a draft for future editing. A confirmation confirms the draft was saved.
Send Email dialog showing Schedule Date field with 08/16/2023, Schedule Time as 02:30 PM, Time Zone as GMT-08:00 Pacific Time, with Save and Cancel buttons
Figure 14 — Schedule Time dialog for setting the email send date and time.
Send Email section showing the confirmed schedule: Date 08/16/2023, Time 02:30 PM, Time Zone GMT-08:00 Pacific Time in a highlighted box, with Schedule Time, Schedule Email, Launch Email, and Save As Draft buttons
Figure 15 — Confirmed schedule shown in the Send Email section.
Confirmation message: Your campaign has been successfully scheduled for launch. Please go to the relevant module menu to view the progress. Go To Prospects button.
Figure 16 — Schedule Email confirmation message.
Confirmation message: Your campaign has been launched successfully. Please go to the relevant module menu to view the progress. Go To Prospects button.
Figure 17 — Launch Email confirmation message.
Confirmation message: Your campaign has been successfully saved in Draft for you to make edits in the future. Go To Prospects button.
Figure 18 — Save as Draft confirmation message.
04

Multi-Touch Campaigns

Multi-Touch Campaigns are automated drip sequences assigned by the Admin — combining emails, microsites, and other tactics in a sequential flow. Partners copy an assigned flow, co-brand each step, and then launch the complete sequence to a mailing list.

4.1 View Campaigns

Multi-Touch Campaigns are visible in the Campaign Library under the Multi-Touch execution type. To access them, look for campaigns whose Execution Type is listed as Multi Touch in the Campaign Library, then click Get Started.

View Campaigns list showing Server Widget FlexiTouch Campaign with Execution Type Multi Touch and Tactics: Microsite, Email, Event, Social Syndication and a Get Started button
Figure 19 — Multi-Touch campaign in the Campaign Library showing Execution Type: Multi Touch.

4.2 Manage Campaigns

Clicking Get Started on a Multi-Touch campaign opens the Campaign Interstitial page. From there:

  1. Click the Set-up & Launch button in the Multi-Touch tactic tile to open the Manage Multi-Touch page.
Campaign Information page for Server Widget FlexiTouch Campaign showing tactic tiles including 1 Multi-Touch with Set-up and Launch buttons highlighted
Figure 20 — Campaign Interstitial page showing the Multi-Touch tactic Set-up & Launch button.
  1. The Manage Multi-Touch page opens, showing all flows assigned to the partner under the Assigned to You tab. Each entry displays its Status — either Draft or Ready for Copy.
NOTE

A flow with Status: Draft can only be previewed. A flow with Status: Ready for Copy can be copied by the partner to create a co-branded instance of the campaign workflow.

Manage Multi-Touch page showing Assigned to You tab with Server Widget FlexiTouch Multi Touch Flow listed with Status: Ready for Copy, and Copy and Preview buttons
Figure 21 — Manage Multi-Touch page showing a flow with Status: Ready for Copy.
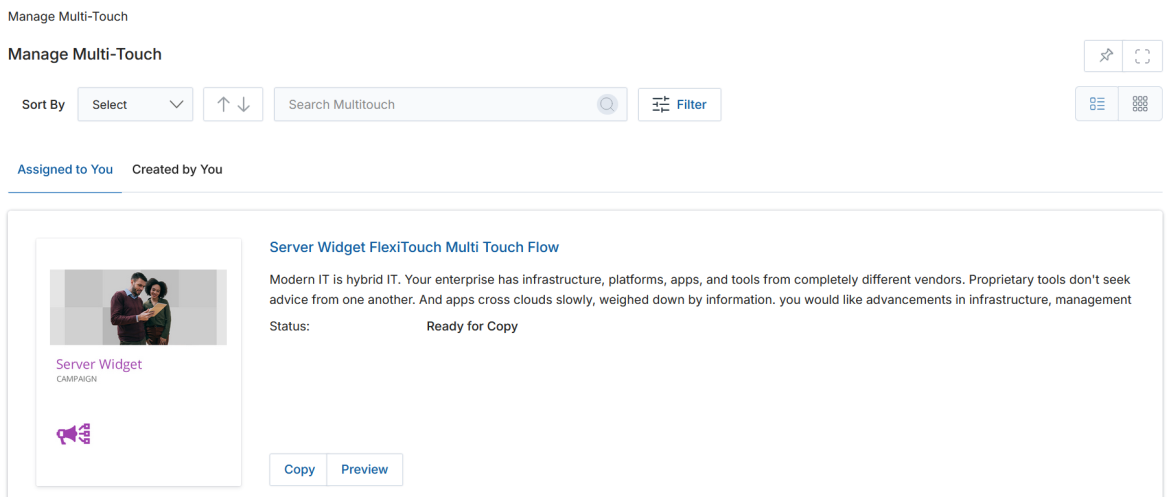
  1. Click Copy to co-brand the assigned Multi-Touch Campaign and create a new Multi-Touch Flow for your use.
Manage Multi-Touch page showing same Assigned to You entry with Copy button highlighted, ready to be clicked
Figure 22 — Click Copy to create your co-branded version of the Multi-Touch Flow.

4.3 Multi-Touch Flow

Setting Up the Flow

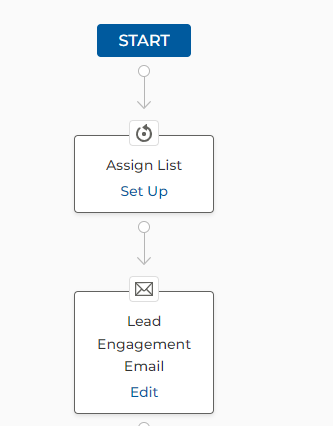
Clicking Copy lands you on the Add/Edit a Multi-Touch Flow page where the flow diagram is displayed. The partner can rename the flow in the Multi-Touch Name field at the top of the page.

Add/Edit a Multi-Touch Flow page showing the Multi-Touch Name field with a default timestamp name, and a visual flow diagram with START node, Assign List Set Up node, and Lead Engagement Email Edit node
Figure 23 — Add/Edit a Multi-Touch Flow page showing the flow diagram and name field.
Flow diagram showing: START button at top, arrow down to Assign List Set Up box, arrow down to Lead Engagement Email Edit box
Figure 24 — Initial flow diagram with Assign List and Lead Engagement Email nodes awaiting configuration.

Setting Up the List

  1. Click Set Up in the Assign List flow node to open the list assignment page.
Initialization page for Add/Edit a Multi-Touch Flow showing Section 1: Select Recipients and Test Email with a Select List button, and Section 2: Save with a Save button
Figure 25 — Assign List initialization page with Select List and Save sections.
  1. Click Select List. The Select Recipients and Test Email panel opens on the right, showing all existing mailing lists. Recipients in any list can be viewed in a new tab by clicking View.
Add/Edit a Multi-Touch Flow page with Select Recipients and Test Email panel open showing lists: ZINFI-TEST-ELST, Widget list, ZINFI TEST, The Test List 1, Training 2, ZINFI TEST ZONE — with recipient counts and View links
Figure 26 — Select Recipients panel showing available mailing lists for the Multi-Touch Flow.
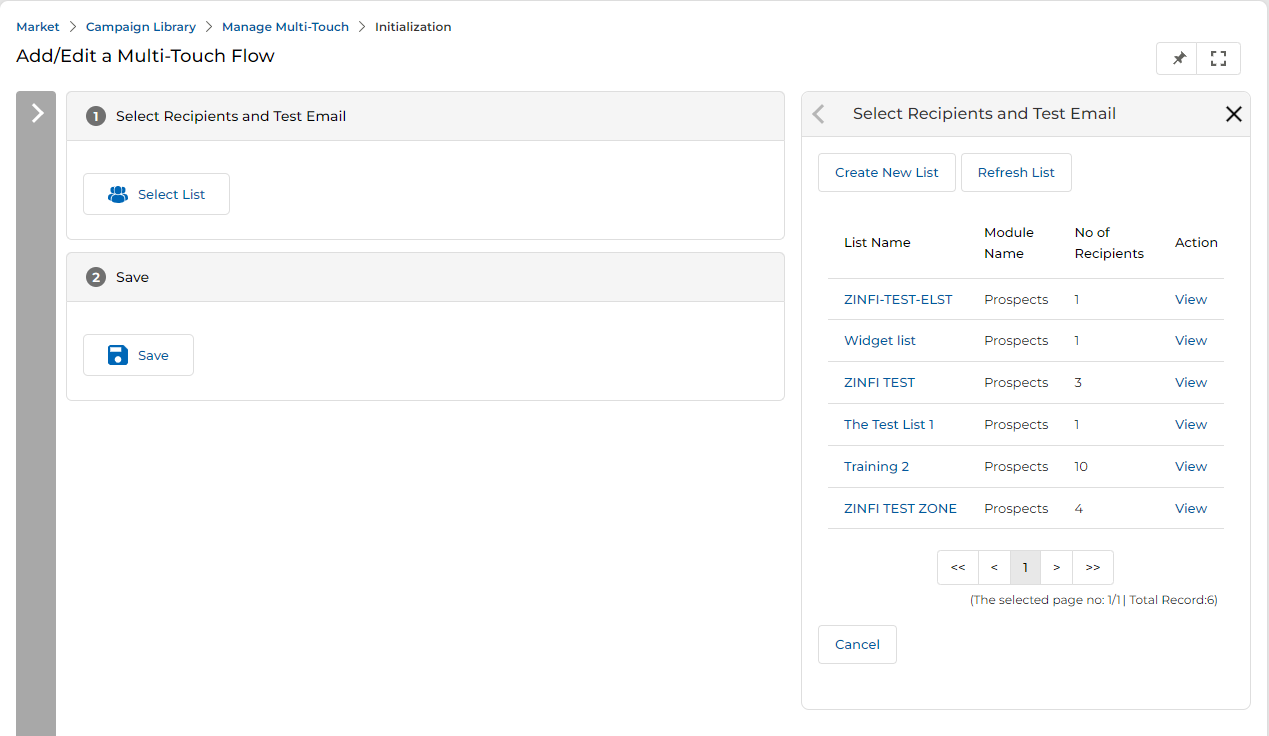
  1. To view or add recipients to an existing list, click the list name to open the View Mailing Details page. From there, click Add Recipient to search for and add individual contacts.
Recipient List dialog showing a searchable prospect table with Company, Name, Title, Email, Phone, Lead Score, Email Verification columns and an Add button
Figure 27 — Recipient List dialog for adding contacts to the mailing list.
  1. Click Create New List in the panel to build a new mailing list from scratch.
  2. Select the desired list from the right-hand panel; the chosen list appears in the Select Recipients and Test Email section. Click Save to confirm.
Add/Edit a Multi-Touch Flow page showing Widget list selected in Select Recipients and Test Email section with Prospects module and 1 recipient, with a Select List button and a Save button below
Figure 28 — Selected mailing list confirmed in the Assign List section before saving.
  1. Once saved, the partner is redirected to the Add/Edit Multi-Touch Flow page. The Assign List action box updates from Set Up to Edit and its color changes from white to green, indicating that step is complete.
Flow diagram showing: START at top, then Assign List Edit box (now green), then Lead Engagement Email Edit box (still white)
Figure 29 — Flow diagram showing the Assign List node turned green after the list was saved.
NOTE

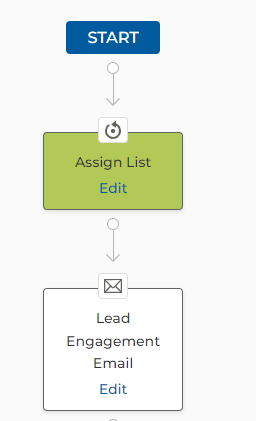
Throughout the entire flow, whenever the partner modifies any content or tactic, the respective Process Box changes its color from white to green. This provides a visual status indicator of which flow steps have been co-branded.

Editing the Lead Engagement Email

In the flow, the partner can click Edit on any tactic node to modify its content. For example, clicking Edit on the Lead Engagement Email node opens the email configuration page.

Add/Edit a Multi-Touch Flow page in email edit mode, showing sections: 1 Campaign Details, 2 Provide Email Details (with Lead Engagement Email pre-filled), 3 Configure Email Template Details showing Wireframe Server Widget template, 4 Save Email
Figure 30 — Lead Engagement Email edit page within the Multi-Touch Flow.

Setting Up the Microsite

Similarly, the partner can edit the Lead Engagement Microsite node in the flow by clicking Edit.

Add/Edit a Multi-Touch Flow page with Set Up Microsite tab active, showing Campaign Details section, Configure Microsite Details with Selected Microsite Server Widget Solution, Select Microsite button, Configure Pages section with toggles, and Save Microsite button
Figure 31 — Set Up Microsite page within the Multi-Touch Flow showing configuration sections.

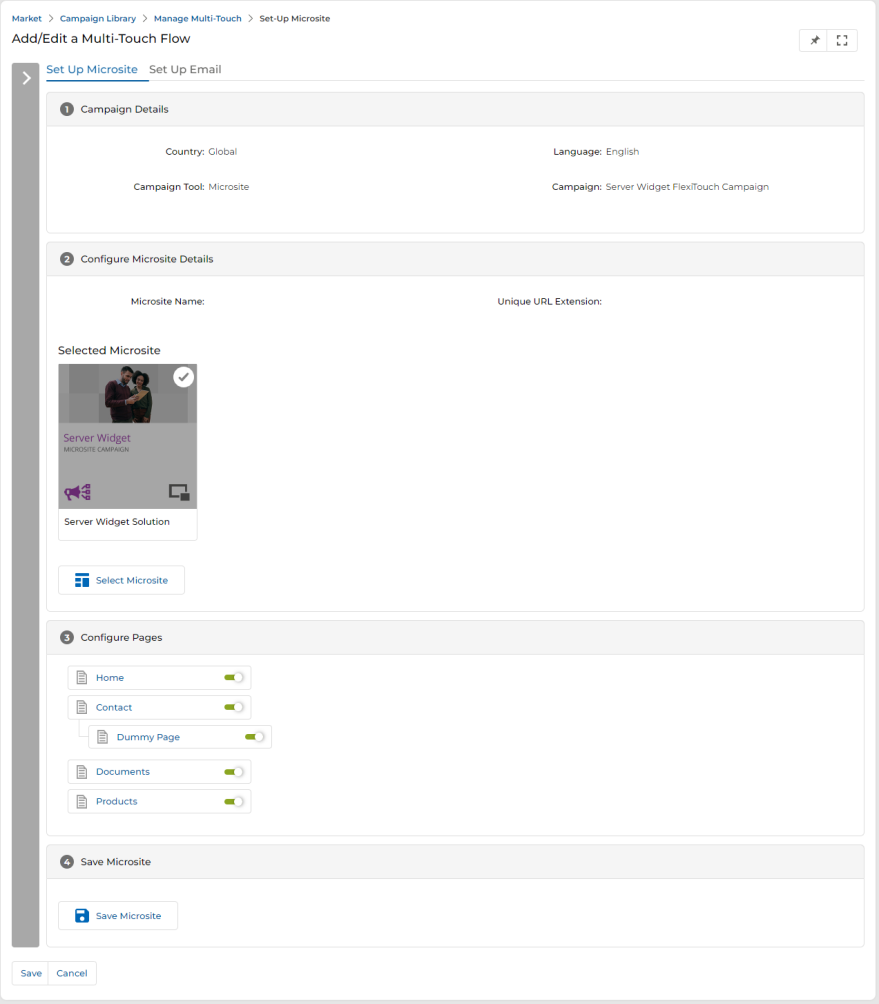
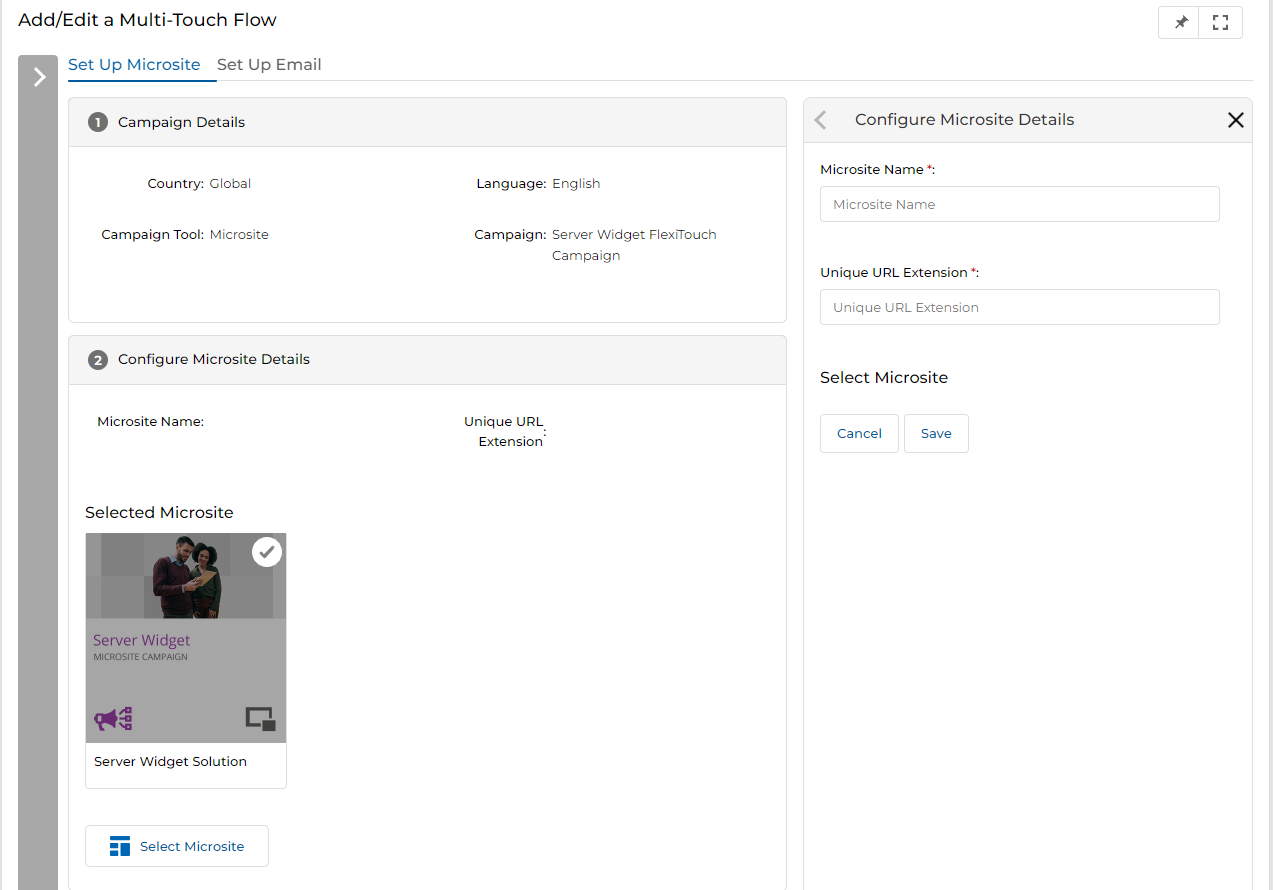
On the Set Up Microsite page:

  1. Click Select Microsite to open the Configure Microsite Details panel. Fill in the Microsite Name and Unique URL Extension, then click Save.
Add/Edit a Multi-Touch Flow page with Configure Microsite Details panel open on the right showing Microsite Name and Unique URL Extension input fields and Select Microsite placeholder, with Cancel and Save buttons
Figure 32 — Configure Microsite Details panel for entering the microsite name and URL extension.
  1. In the Configure Pages section, toggle individual pages on or off as required.
  2. Click Save Microsite to save the configuration.
Configure Pages section showing toggles for Home (on), Contact (on), Dummy Page (on), Documents (on), Products (on) — all green
Figure 33 — Configure Pages section with page toggle controls.

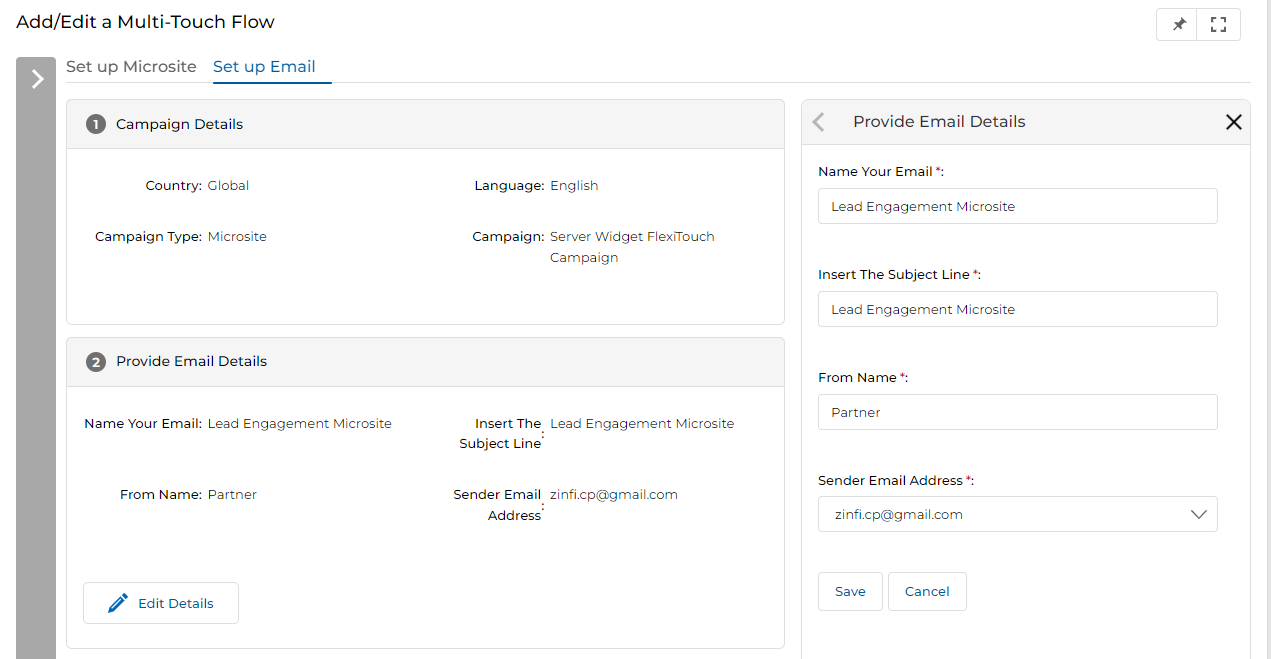
Set Up Email (within Microsite node)

After saving the microsite configuration, switch to the Set Up Email tab to configure the associated trigger email for this microsite step.

Add/Edit a Multi-Touch Flow page with Set up Email tab active, showing Campaign Details, Provide Email Details (Lead Engagement Microsite), Configure Email Template Details with Server Widget VPN template card, and Save Email section
Figure 34 — Set Up Email tab within the microsite node, showing email template configuration.

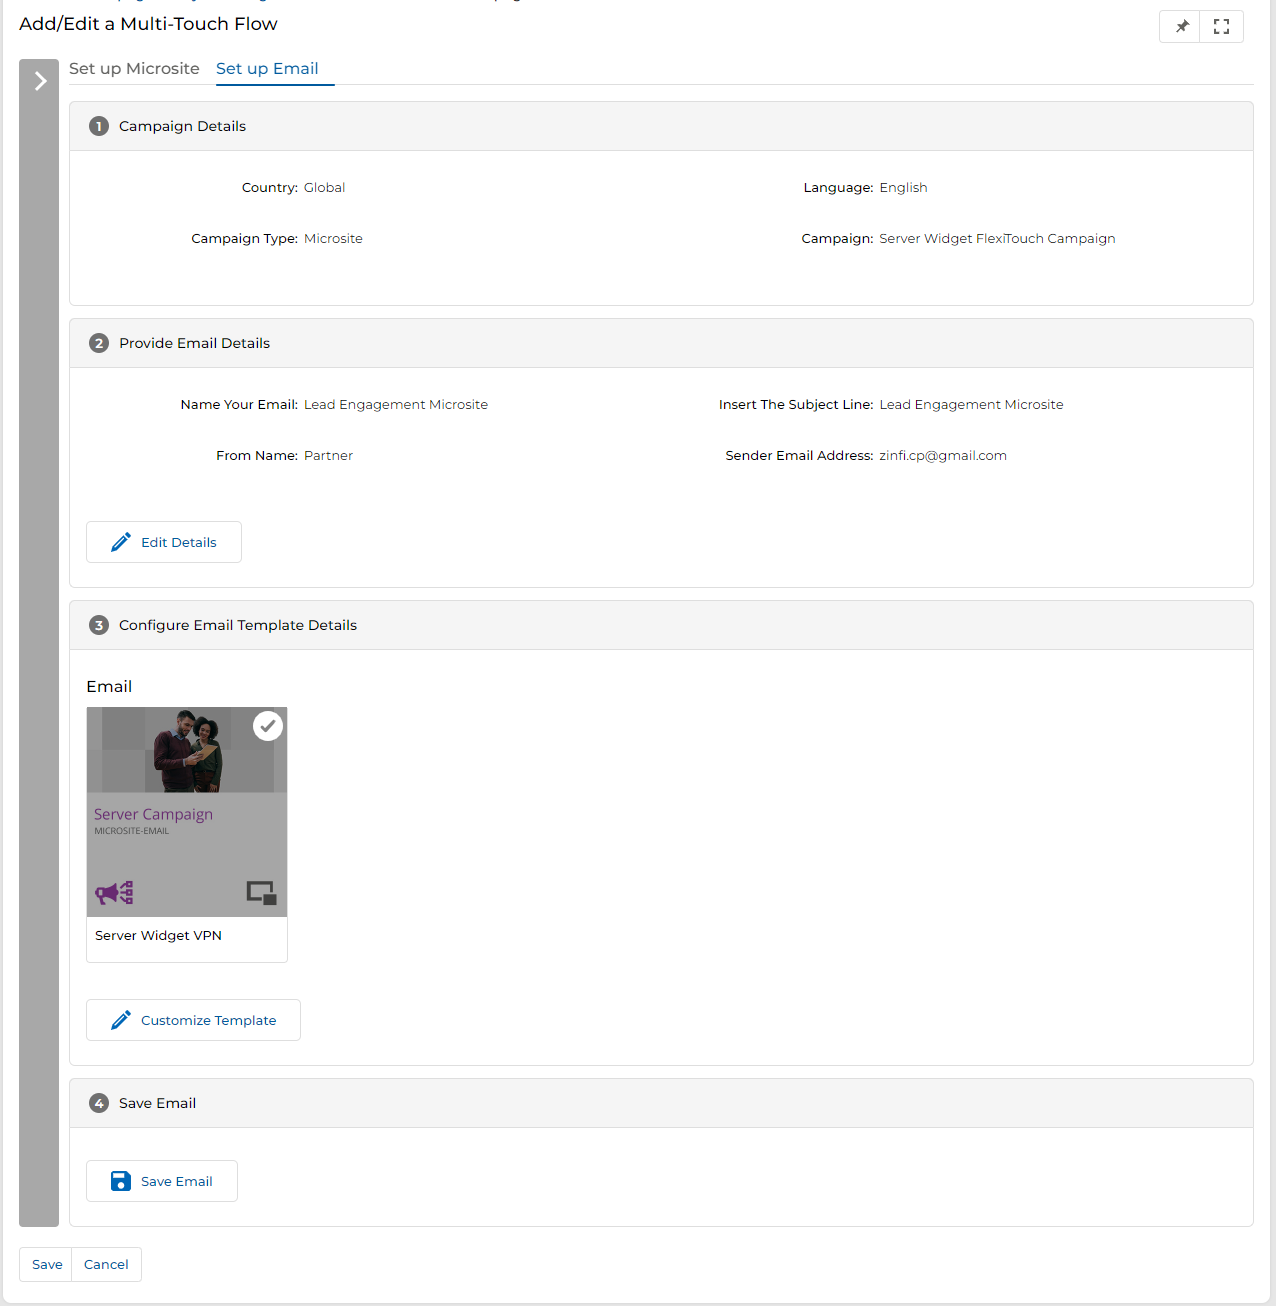
Click Edit Details to update the email name, subject line, from name, and sender address for this step:

Add/Edit a Multi-Touch Flow page with Provide Email Details panel open showing Name Your Email as Lead Engagement Microsite, Subject Line, From Name as Partner, and Sender Email Address fields
Figure 35 — Provide Email Details panel for configuring the microsite step email.

4.4 Launching the Campaign

  1. Once the entire flow is configured and saved, it appears under the Created by You tab in the Manage Multi-Touch page. Completed flows show Status: Ready for launch; incomplete drafts show Status: Draft.
Manage Multi-Touch page on Created by You tab showing two entries: Server Widget FlexiTouch Multi Touch Flow_Copy with Status: Ready for launch and Edit, Launch, Delete buttons; and a Draft entry below it
Figure 36 — Manage Multi-Touch page showing a flow ready for launch in the Created by You tab.
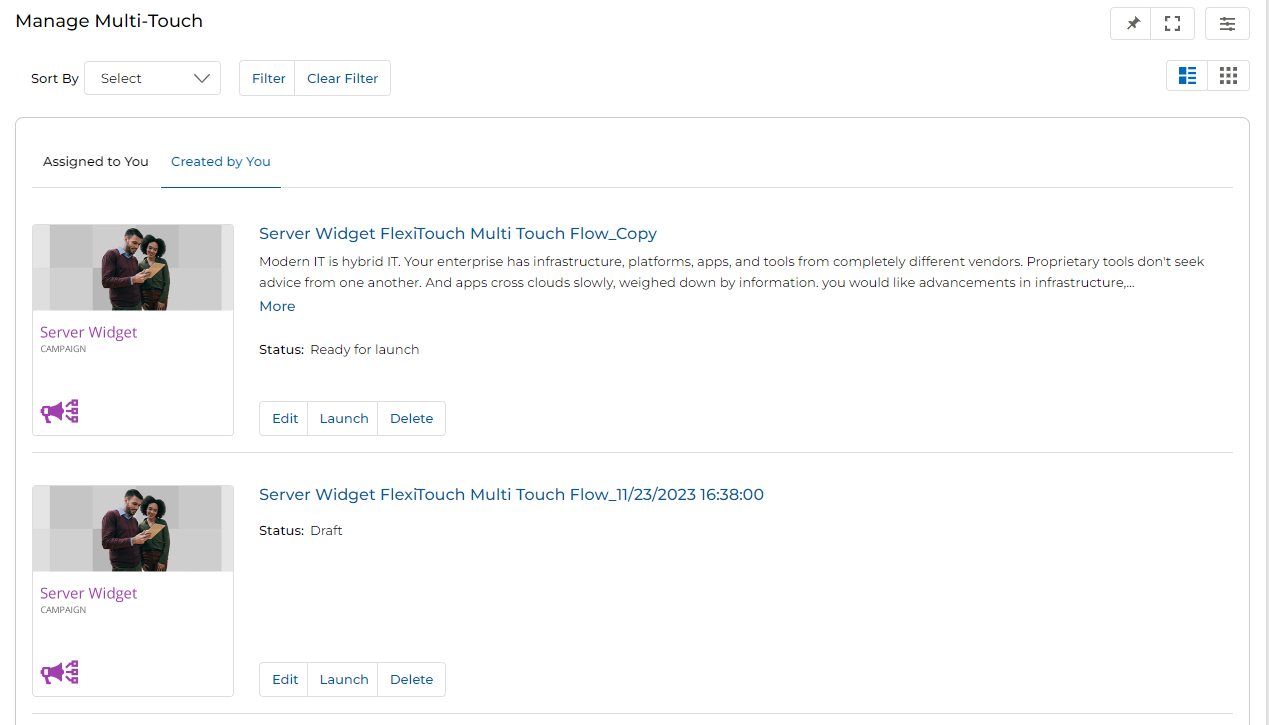
  1. Click the Launch button next to the flow. Once clicked, the Status changes from Ready for launch to Launched.
TIP

Use the Edit button on the Manage Multi-Touch page to revisit and modify the flow before launching. Use Delete to remove a flow that is no longer needed.

Document ID
ext.prd.006.09
Published
02.20.26
Platform Version
UPM 26.x