Introduction
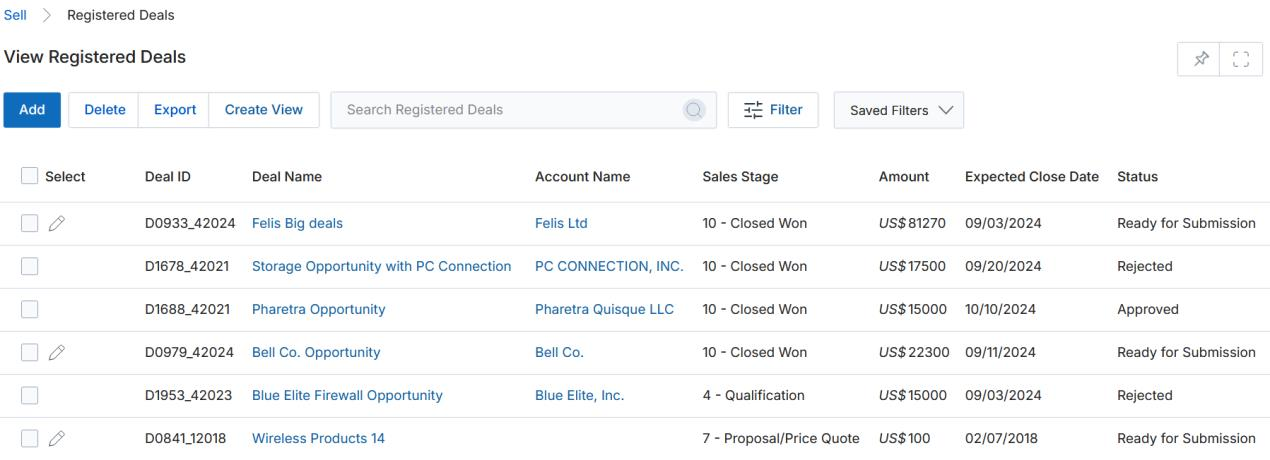
ZINFI's UPM Registered Deal Management provides a unified dashboard displaying all your registered deals along with information about associated accounts, Sales stage, Deal amount, and Deal Status.
Deal properties vary from business to business. In UPM, you can create custom fields from a range of field types to structure your deal view. While creating your deal, you can link it with the related contact, allocate possibilities, estimate a normal close date, set yourself as the primary assignee or assign to another user, and more. Related discussions via phone and email are also visible in the Notes section.
Registered Deals
2.1 Accessing Registered Deals
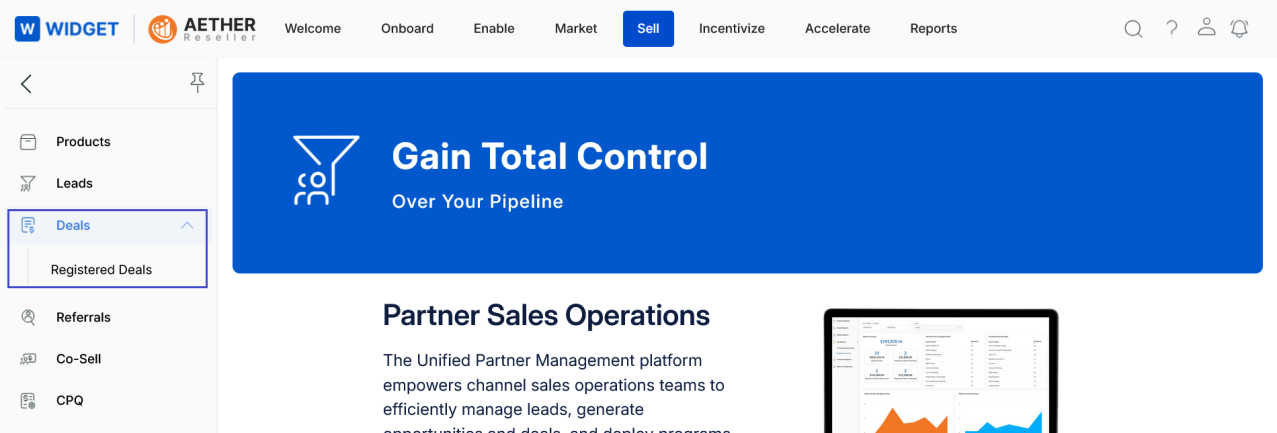
- Click Sell on the top menu.
- Click Deals > Registered Deals in the left menu bar.
2.2 View Registered Deals
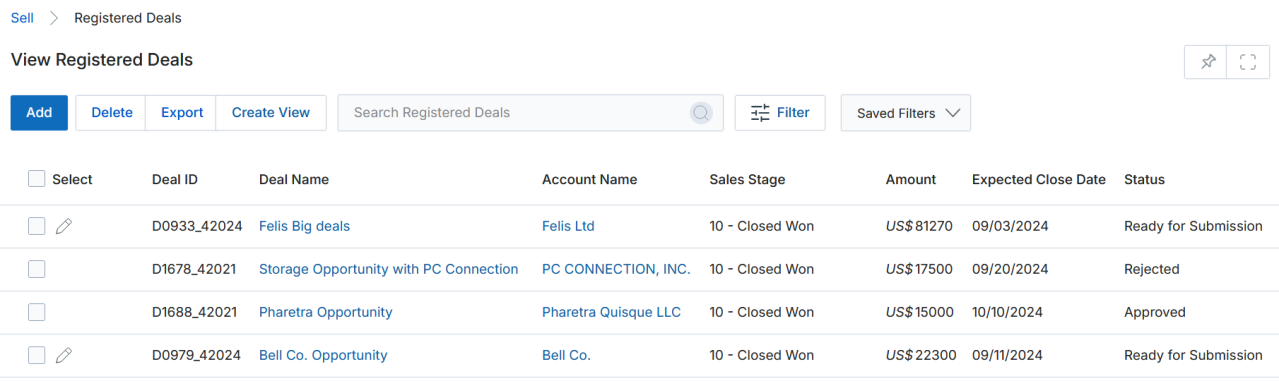
- Clicking Registered Deals from the left menu opens the View Registered Deals page, which lists all deals that have been generated and registered.
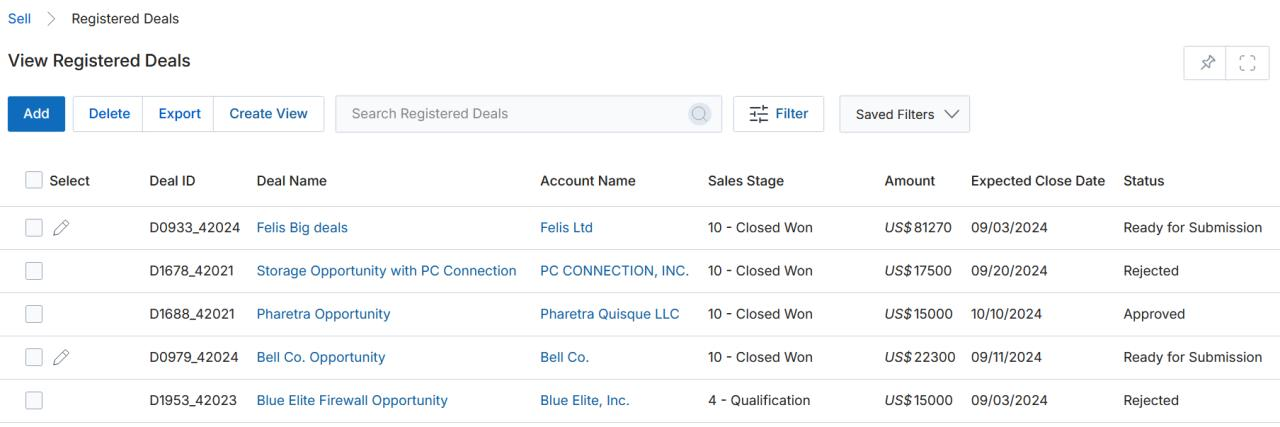
- The toolbar at the top of the page provides the following actions:
- Add — Opens a new page to create a new deal.
- Delete — Removes the selected record(s) from the listing page.
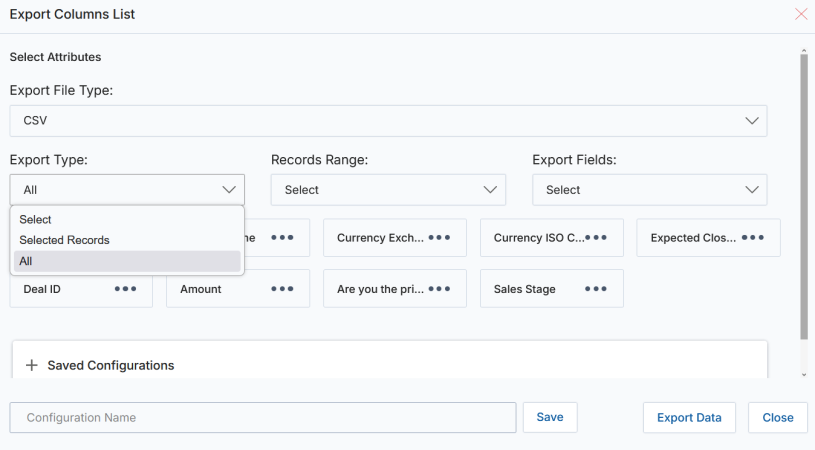
- Export — Exports records from the listing page into CSV format.
- Selected Records — Exports only the records you have selected.
- All — Exports records within a specified range selected from the associated range dropdown.
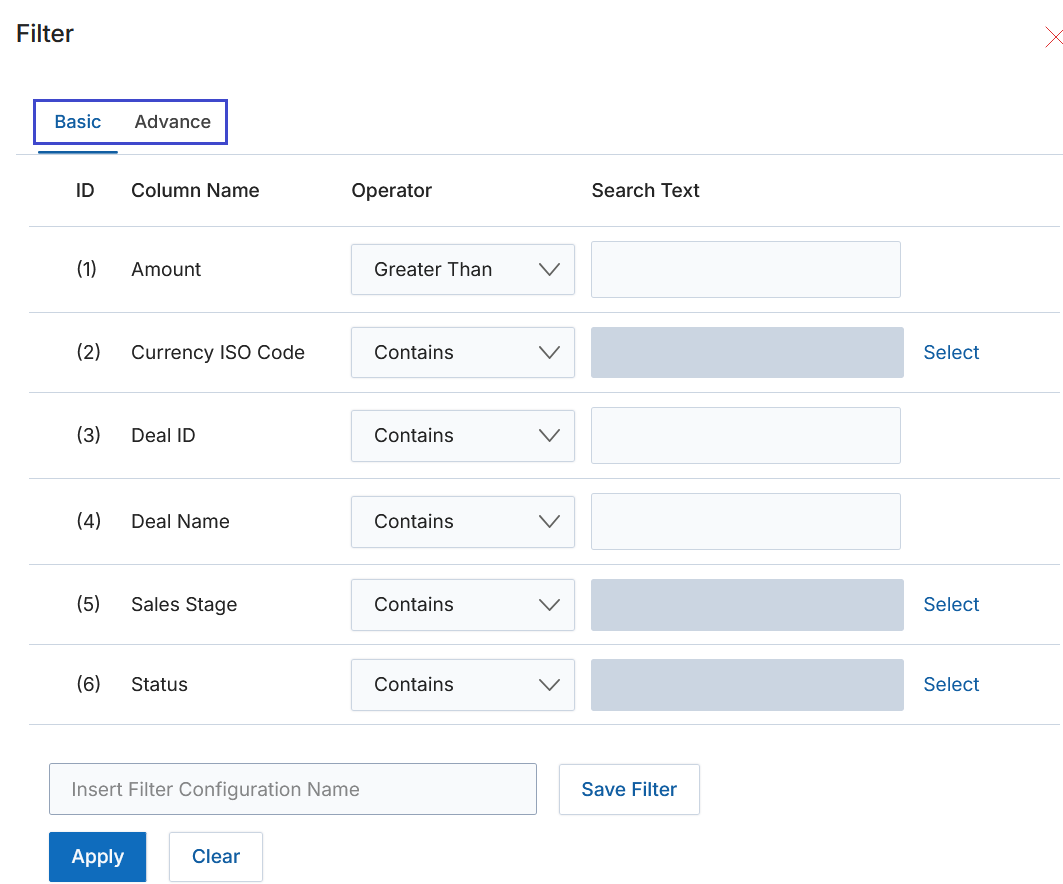
2.3 Filter
Clicking the Filter button opens a pop-up window with two search modes: Basic and Advanced.
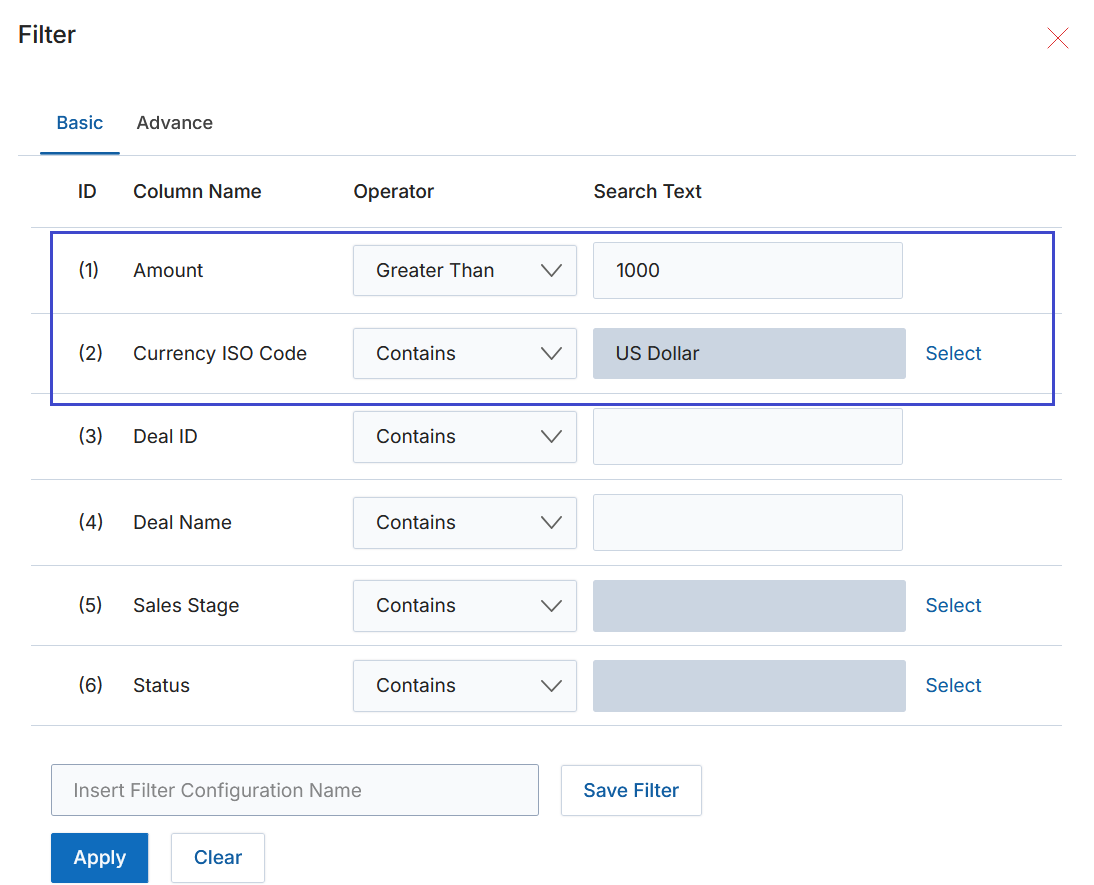
Basic Search
Basic Search lets you query any record using fields that have been made searchable from the workflow automation page. All criteria are combined using AND logic.
- Clear — Clears the search criteria, removes filtered results, and restores the default view of all registered deals.
- Save Filter — Shows a list of saved searches in the dropdown so you can re-apply common filters quickly.
Advanced Search
The Advanced Search feature provides a flexible, multi-criteria search capability. It is particularly valuable for managing large datasets and complex filtering scenarios.
- Multiple Field Selection — Define conditions across multiple fields such as Deal Name, Favorite, and Status.
- Customizable Operators — Choose from Contains, Equals, Begins with, Ends with, Is Blank, Is Not Blank, and more.
- Criteria Logic — Combine conditions using AND, OR, or custom expressions such as (1 AND 2) OR 3.
- Condition Grouping — Group multiple conditions to retrieve highly targeted results.
- Save and Reuse — Save search configurations for frequently performed queries.
- Interactive Filtering — Results update dynamically as conditions are applied.
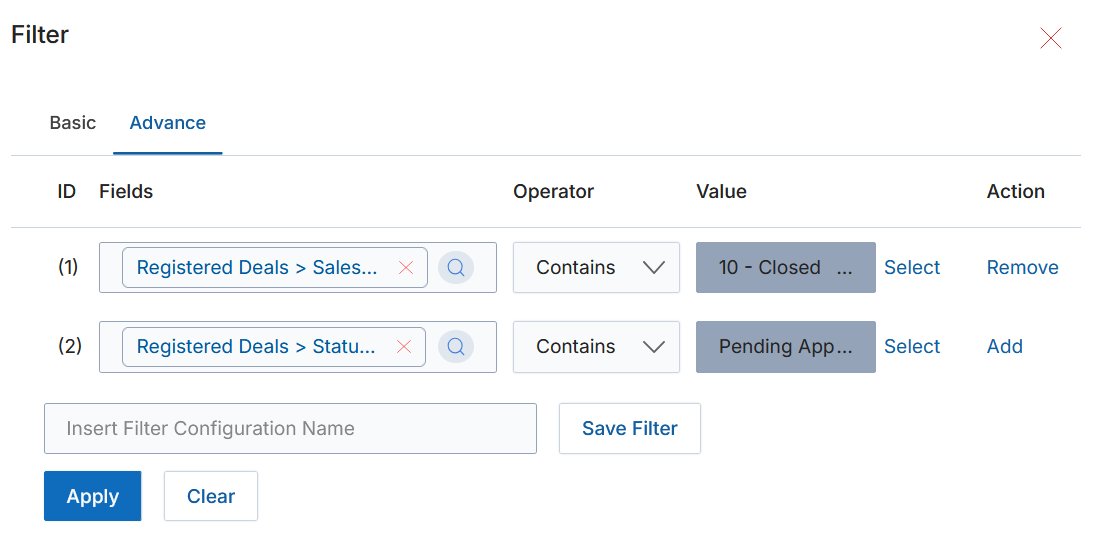
- After selecting fields, specifying operators and values, and defining the condition logic, click Apply to execute the query.
View Registered Deals Details
- The View Registered Deals page displays a list of all generated and registered deals.
- To view the details of any deal, click its Deal Name. This opens the View Registered Deal detail page.
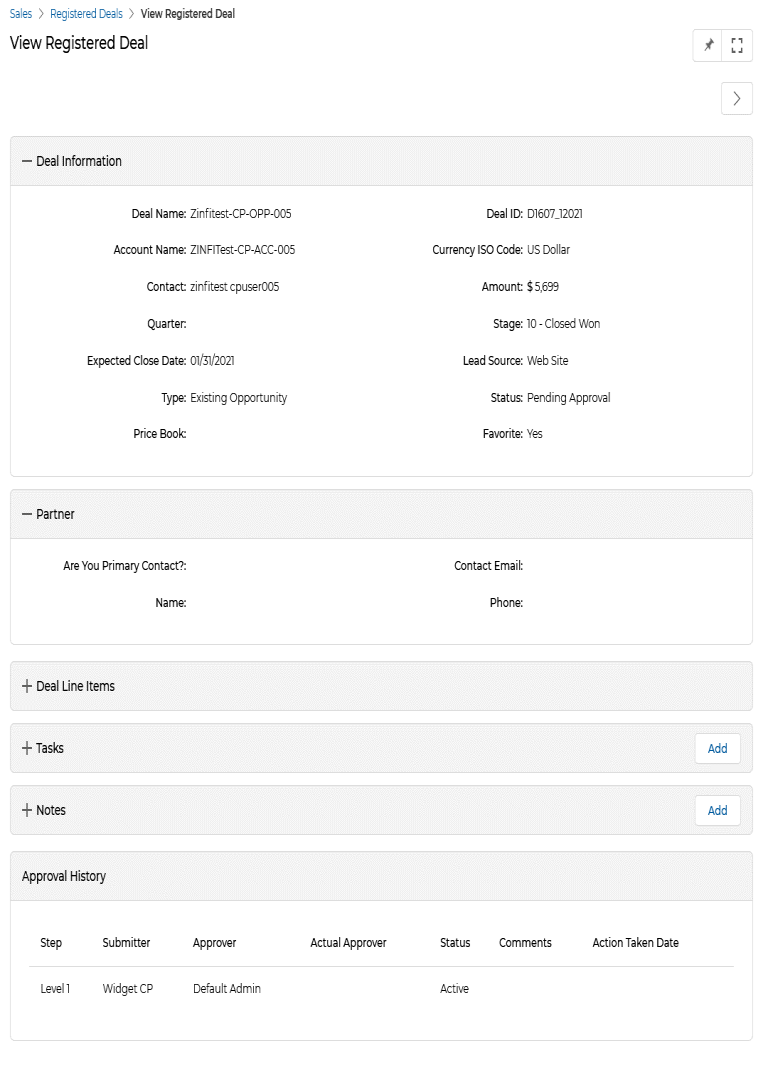
- The detail page is organised into the following sections:
3.1 My Community
Click My Community to start discussions about the deal with associated users or contacts.
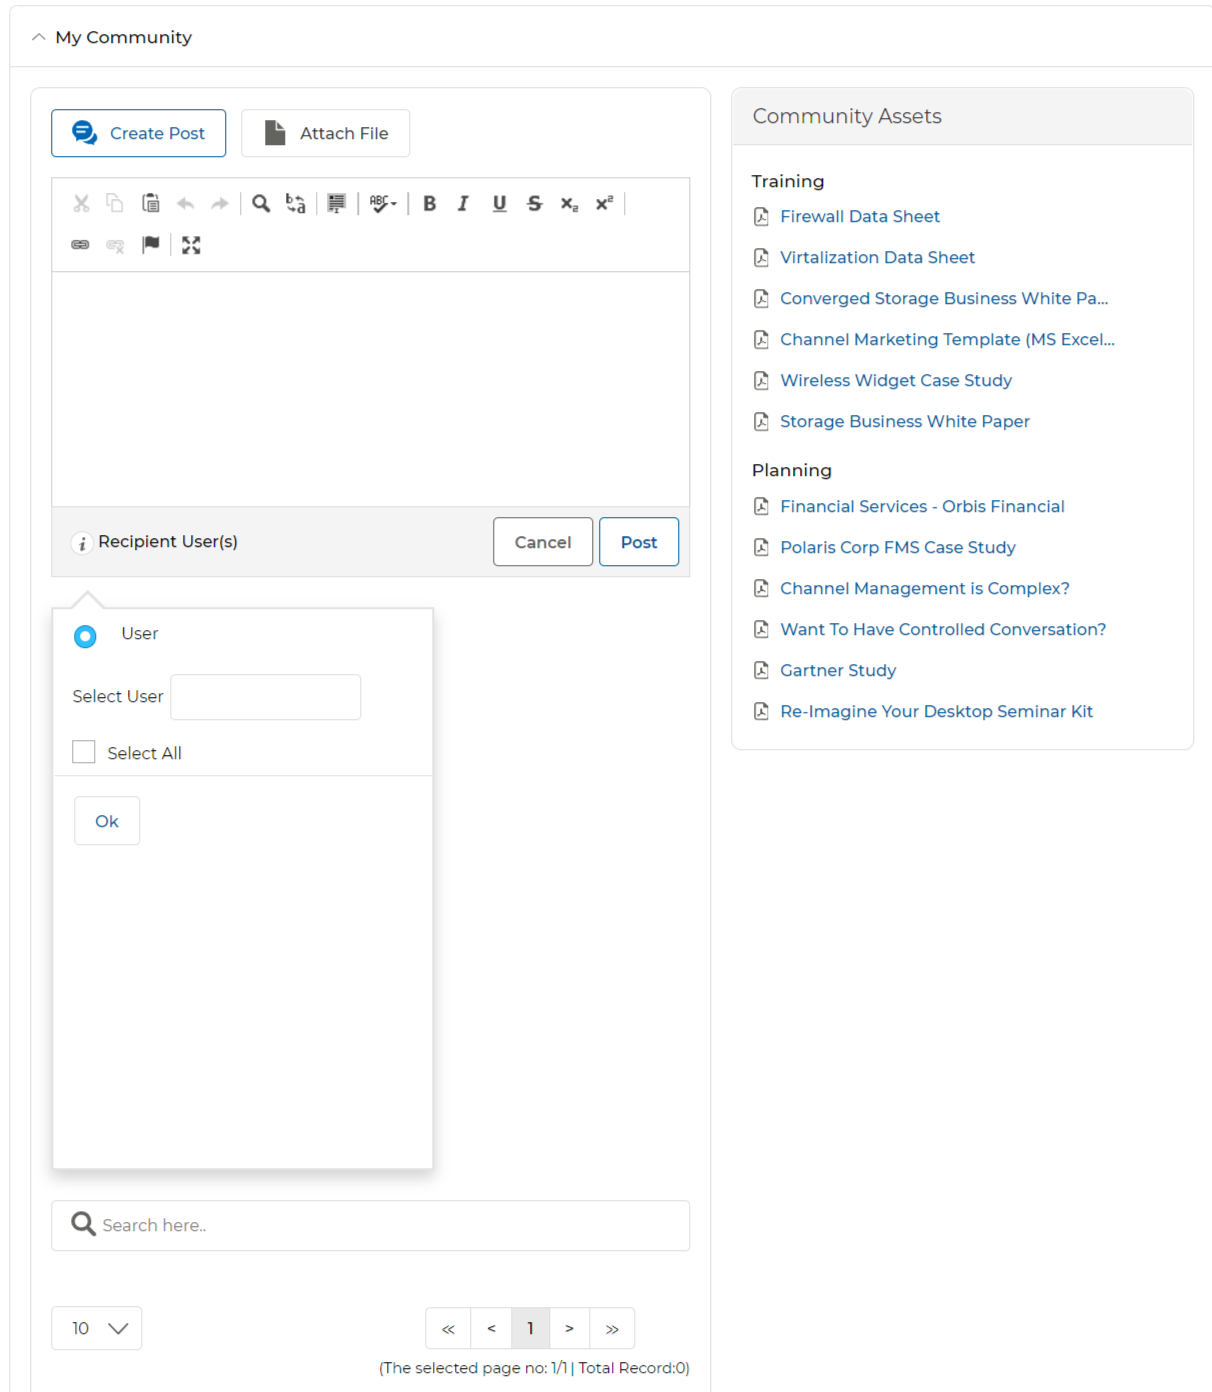
- Click Attach File to attach a file; click Create Post to return to the post editor.
- Select an asset from the Community Assets panel to share.
- Select the User Contact you want to share the comment and attachment with.
- Type your comment in the editor.
- Click Post to publish the comment.
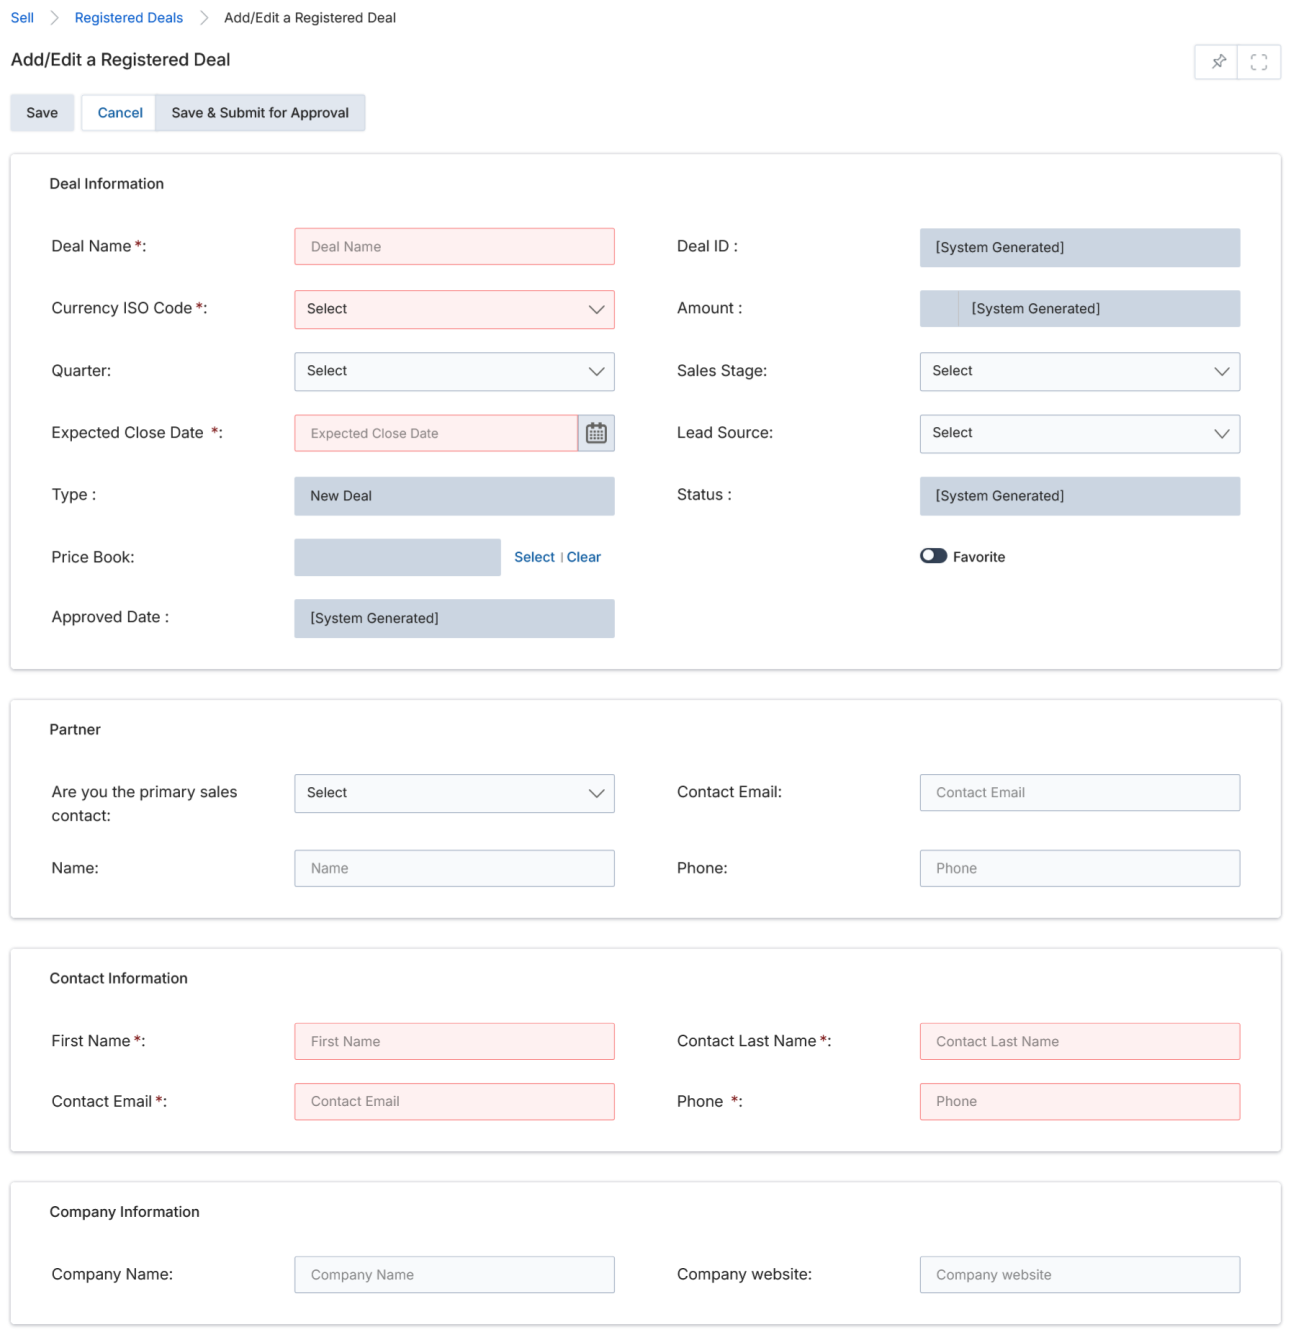
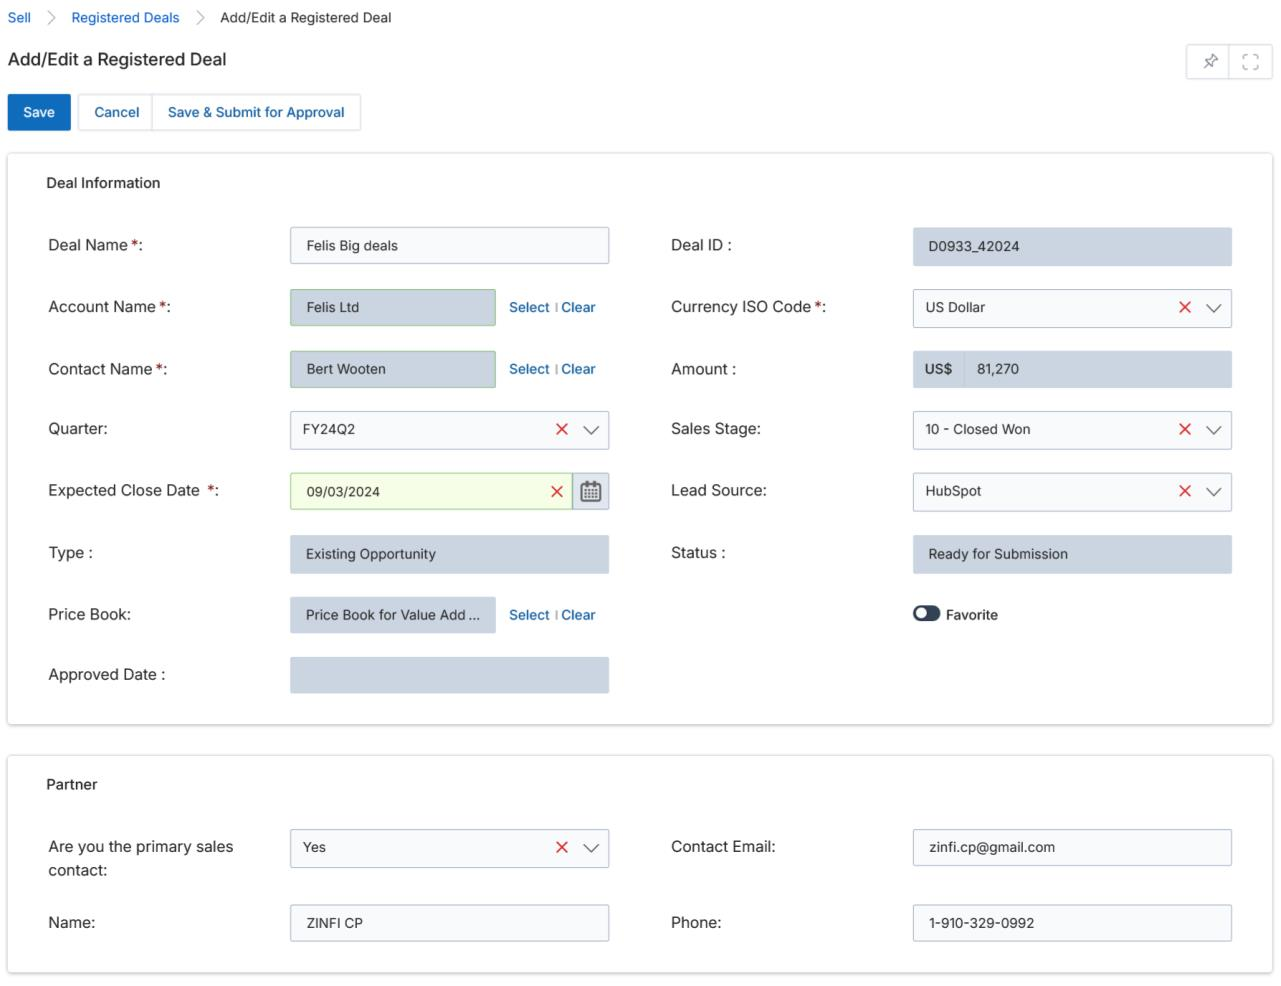
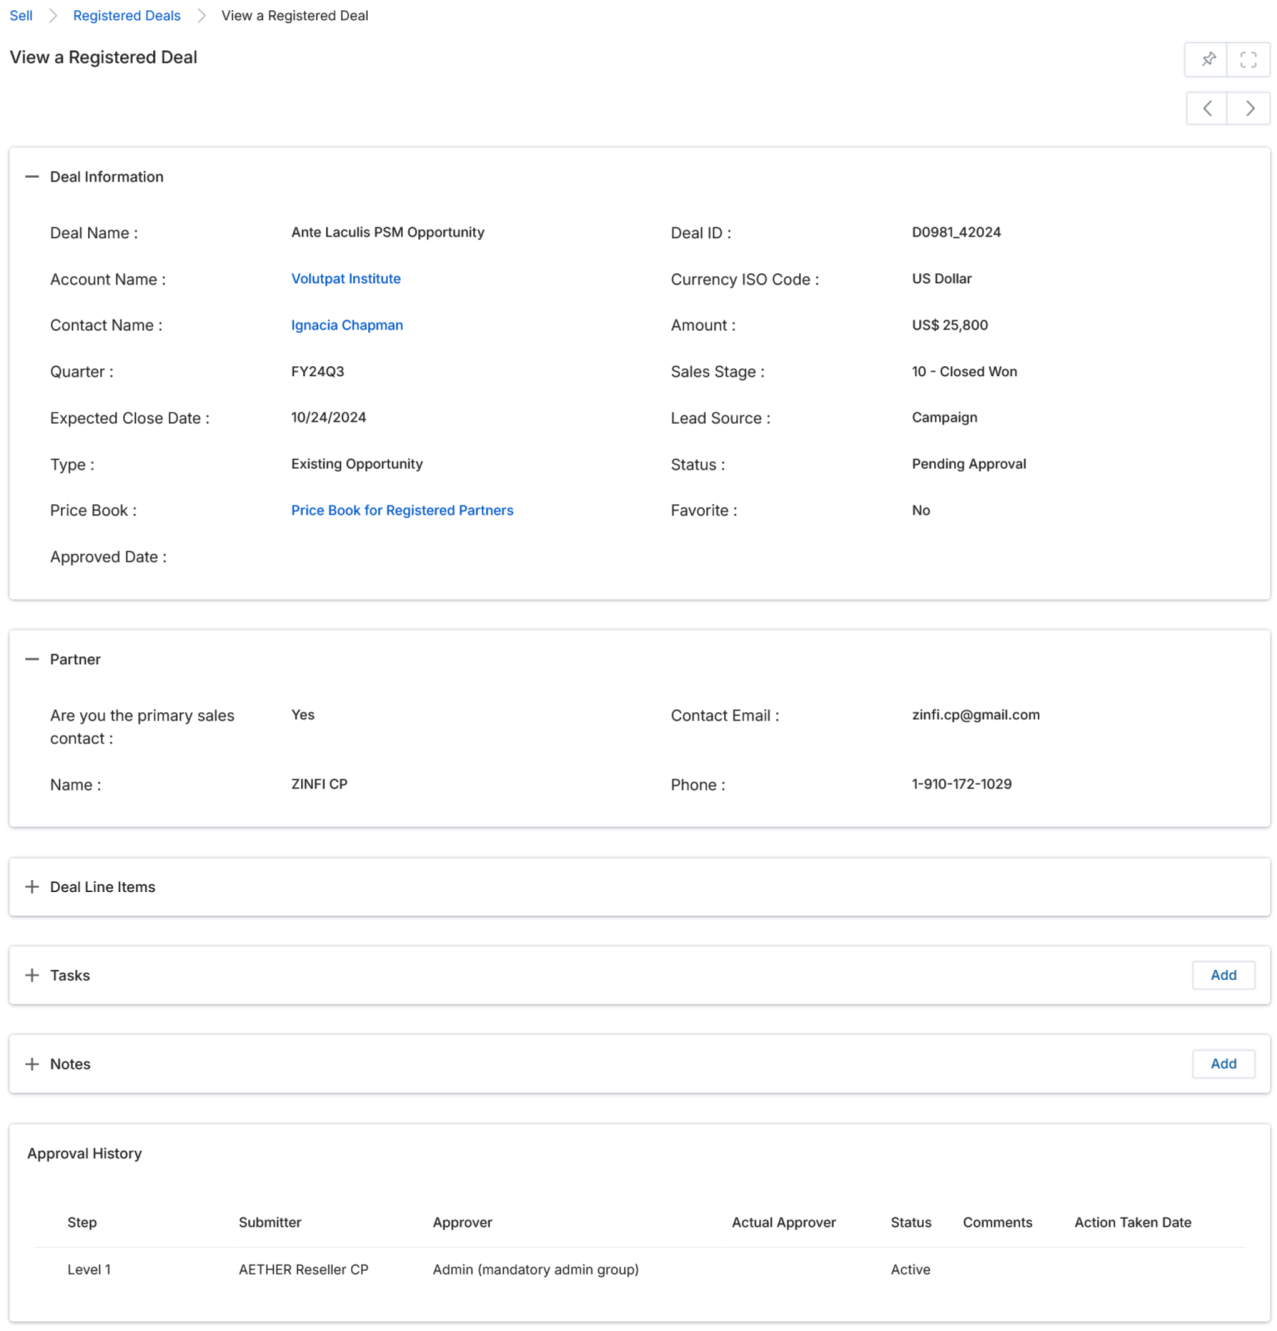
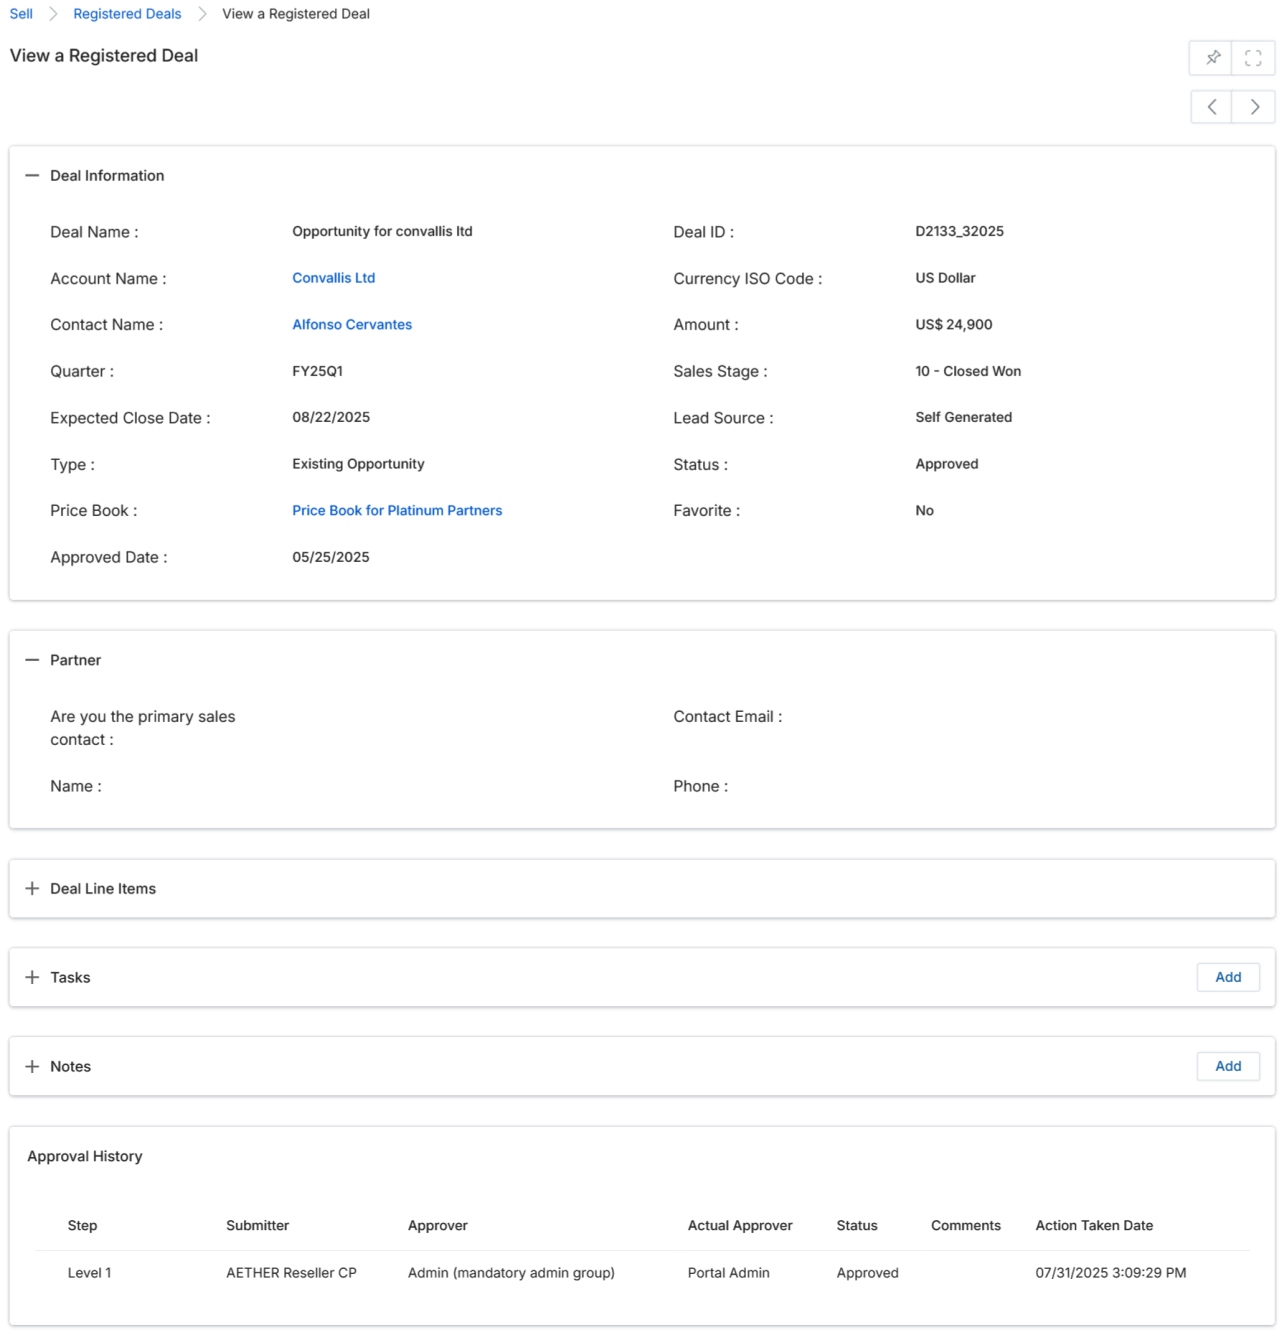
3.2 Deal Information
| Field | Description |
|---|---|
| Deal Name | Name of the opportunity. |
| Deal ID | Unique auto-generated identifier for the deal. |
| Account Name | Name of the account the deal originated from. |
| Currency | Currency used for the deal. Supported currencies: US Dollar, Pound Sterling, Australian Dollar, Indian Rupee. |
| Contact | Name of the contact associated with the deal. |
| Amount | Deal amount. |
| Quarter | Fiscal quarter in which the deal was created. |
| Stage | Current sales stage of the deal. |
| Expected Close Date | Anticipated date of deal closure. |
| Type | Type of deal (e.g., New Deal, Existing Opportunity). |
| Campaign Name | Name of the campaign associated with the deal. |
| Lead Source | Source of the deal (e.g., Web Site, HubSpot, Campaign). |
| Status | Current workflow status of the deal (e.g., Ready for Submission, Pending Approval, Approved, Rejected). |
| Price Book | Price book associated with the deal. |
| Favorite | Toggle to mark the deal as a Favorite. Favorited deals are pushed to the top of the View Registered Deals list for both Admin and Partner users. |
3.3 Contact Information
| Field | Description |
|---|---|
| First Name | First name of the deal contact. |
| Last Name | Last name of the deal contact. |
| Email address of the deal contact. | |
| Phone | Phone number of the deal contact. |
3.4 Company Information
| Field | Description |
|---|---|
| Company Name | Name of the company to which the contact belongs. |
| Company Website | Website of the company the contact belongs to. |
3.5 Partner
Basic contact information for the partner user associated with the deal.

| Field | Description |
|---|---|
| Are You the Primary Contact? | Indicates whether the logged-in partner user is the primary contact for this deal. |
| Contact Email | Email of the partner contact involved in the deal. |
| Name | Name of the partner contact involved in the deal. |
| Phone | Phone number of the partner contact involved in the deal. |
3.6 Deal Line Items
Products associated with the deal. Each line item contains the following fields:
| Field | Description |
|---|---|
| Deal Name | Name of the product. Click to navigate to its product details page. |
| SKU | Stock Keeping Unit (SKU) identifier for the product. |
| Sales Price | Listed sales price of the product. |
| Quantity | Quantity of the product on this line item. |
| Total Line Item | Total price for this product line item (Sales Price × Quantity). |
| Net Line Item | Net price of the selected product line item after any adjustments. |
| Line Description | A brief description of the product line item. |
3.7 Tasks
Tasks associated with the deal. Click a Task Name to view its details. Use the toolbar actions to manage tasks:
- Add — Click the Add button to open the Add/Edit a Task form.
- Pen icon — Edit the respective task item inline.
- Trash icon — Delete the respective task item.
- Task Name link — Navigate to the task details page.
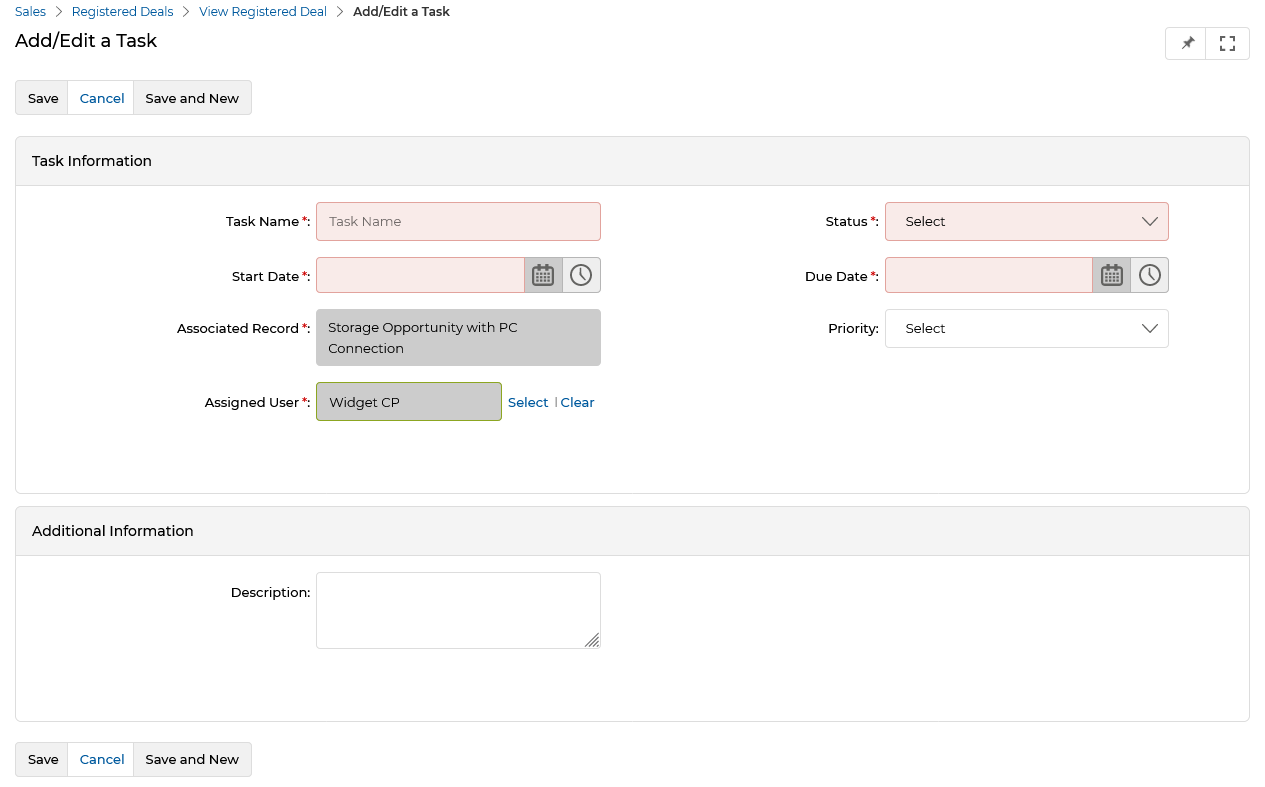
The Task Information section contains the following fields:
| Field | Description |
|---|---|
| Task Name | Name of the task. |
| Status | Current status of the task: Completed, Deferred, In Progress, or Not Started. |
| Start Date | Date the task begins. |
| Due Date | Date by which the task must be completed. |
| Associated Record | The deal record linked to this task. |
| Priority | Task priority: High, Low, or Medium. |
| Assigned User | The user assigned to this task. |
The Additional Information section contains a free-text Description field for a short summary of the task.
3.8 Notes
Notes associated with the deal. Use the following controls to manage notes:
- Add — Creates a new note line item.
- Pen icon — Edits the respective note item.
- Trash icon — Deletes the respective note item.
- Note Name link — Navigates to the note detail page.
3.9 Approval History
The Approval History section shows the multi-level approval workflow for the deal.

| Column | Description |
|---|---|
| Step | Indicates the level of the approval process (e.g., Level 1). |
| Submitter | The partner user who submitted the deal for approval. |
| Approver | The approver profile configured for this level (e.g., Channel Marketing Manager). |
| Actual Approver | The OEM user who actually approved or rejected the deal at this level. |
| Status | Current status of the approval step (Active, Approved, Rejected). |
| Comments | Comments submitted by the approver alongside their decision. |
| Action Taken Date | Date and time the approval action (Approve or Reject) was taken. |
Submitting a Deal for Approval
- On the View Registered Deals page, click the Add button to create a new deal.
- The Add/Edit a Registered Deal form opens. Complete all required fields (marked with a red asterisk).
- Provide all required information and click Save. Refer to the Deal Information field descriptions in Section 3.2 for details on each field.
- After saving, return to the View Registered Deals page and click the name of the newly created deal. A Submit for Approval button will appear — click it to initiate the approval workflow.
- Alternatively, after filling in the required fields, click Save & Submit for Approval to save the deal and submit it for approval in a single action.
- Once submitted, the deal Status changes to Pending Approval and an Approval History section appears at the bottom of the View Registered Deal page showing the active approval step.
- Once the approver takes action, the deal status changes to Approved or Rejected as applicable. The Approval History section updates to reflect the final decision and the Action Taken Date.
- The final status is reflected back on the View Registered Deals listing page, where all deals are displayed alongside their current status.