
Introduction
The Partner Programs Management application of ZINFI's UPM platform enables organizations to automate the partner recruitment and onboarding process with step-by-step activities. Partners can be assigned to different onboarding tracks based on partner type, profile, level of engagement, and other variables.
The application gives partners a complete view of their own engagement cycle — they can review and track completed and still-outstanding Programs, Program Levels, and Level Tasks, helping them monitor their own progress through the onboarding lifecycle.
1.1 Dashboard Management
Dashboard management defines a step-by-step process for onboarding new channel partners in the existing channel ecosystem — from agreement signing to campaign launch.
- New Partner Profile Setup
- Training & Certification Setup
- Business Plan Approval
- Contract Sign-up
1.2 Partner Setup Management
Once channel partners sign contracts they gain access to partner training materials (certifications, courses, and tests) based on the configuration of the partner program on-completion benefits. Partners can check each activity performed during this phase, keeping them posted on their progress.
- Contract Sign-up & Management
- Partner Profile Configuration
- Training Assets / Program Management
1.3 Programs and Program Level Management
The application automates the partner onboarding process through a series of step-by-step activities. Programs are a group of Program Levels (or a single Program Level), set up by the Program Manager/Admin and completed by the Channel Partner. Each Program Level further constitutes Level Tasks, which may comprise multiple assets or activities. Program Levels are flexible and can be sequential or non-sequential based on the completion logic configured by the Admin. A Partner can also be auto-enrolled in more than one Program.
- Manage Program Levels
- Associate Program Level Tasks with Program Levels
- Define your Channel Ecosystem for your Partners
Available Programs
- Click Onboard from the top menu.
- Click Programs > Available Programs from the left menu bar.

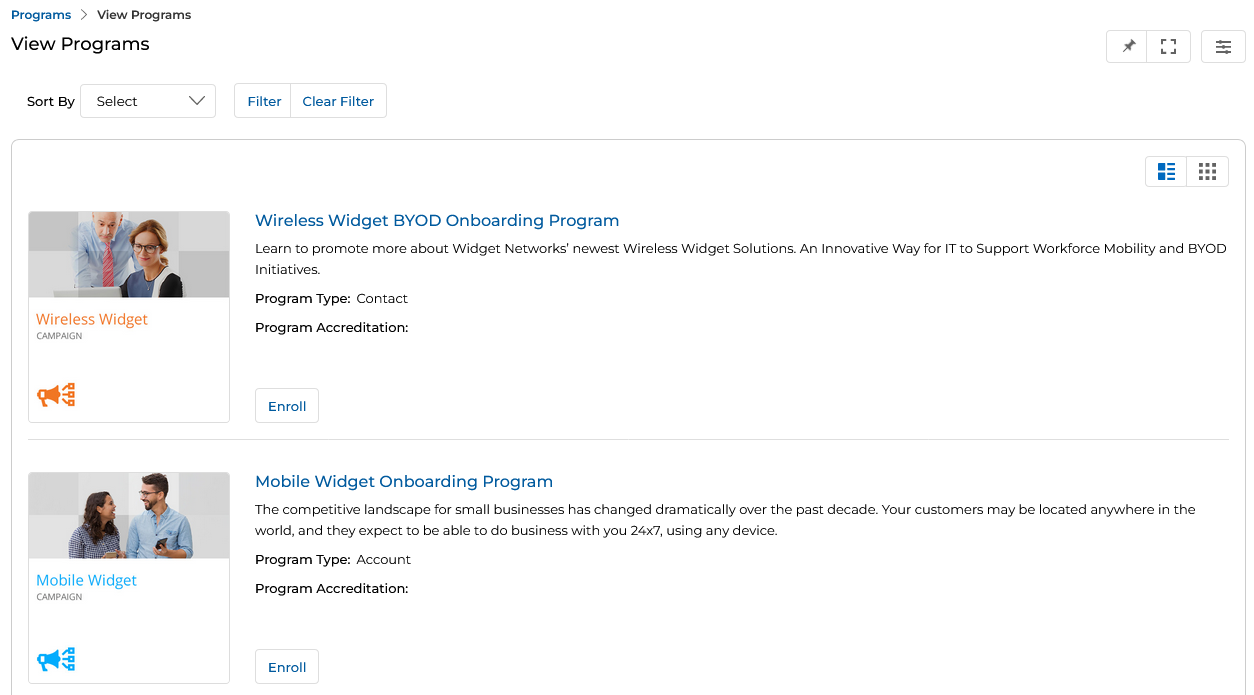
2.1 View Programs
Clicking Available Programs from the left menu opens the View Programs page, where all programs assigned to the partner are displayed.
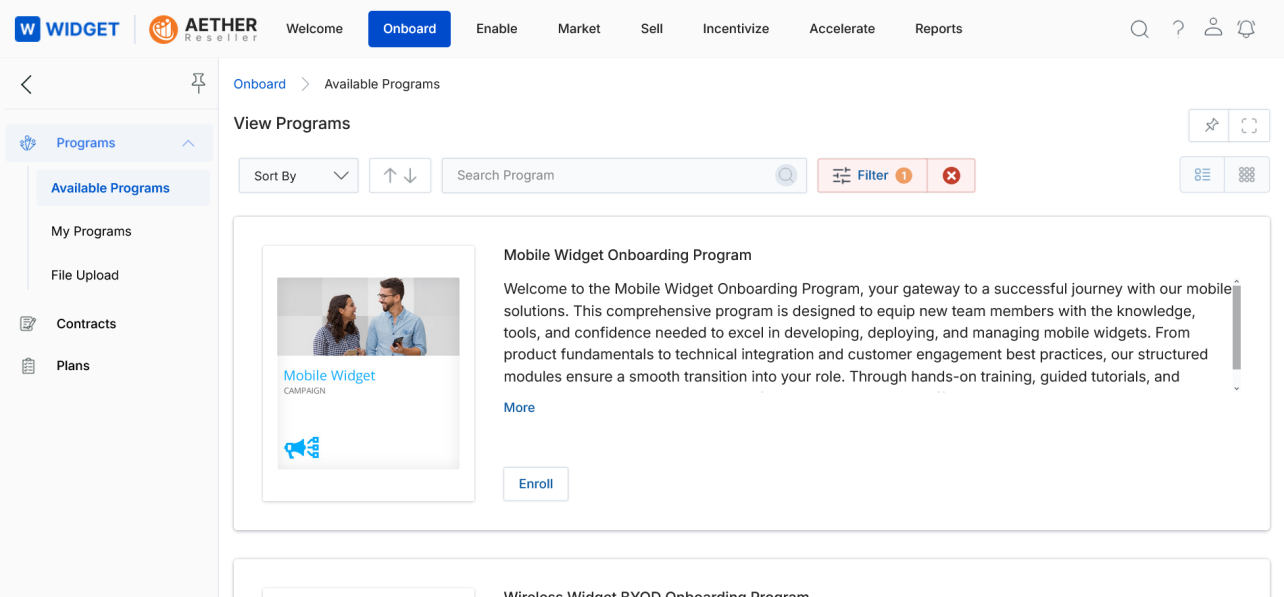
The page provides the following controls and metadata:
- Sort By — Sorts the program list based on selected criteria.
- Filter — Opens the filter pane with a searchable Program Name field. Click Apply to narrow results, or Clear to reset.
- Clear Filter — Clears the currently active filter.
- Program Type — Each program card shows whether it is assigned to a Contact (individual user) or to an Account (accessible to all contacts at that account).
- Program Accreditation — Programs are either Onboarding (for new partners) or Enablement (for existing partners).
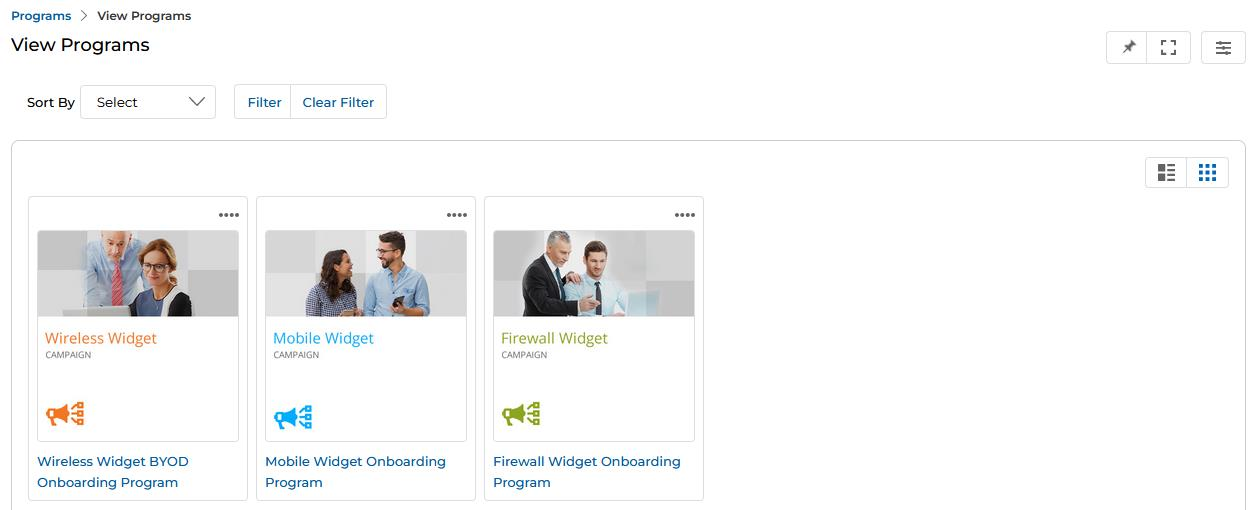
- List View / Thumb View — Toggle between list and thumbnail arrangements using the icons in the upper right of the content area.

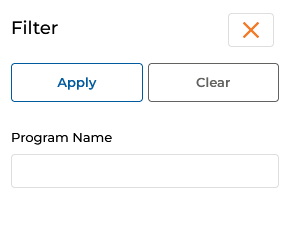
Filtering Programs
Click the Filter icon (three parallel lines) to open the filter pane. Enter a Program Name and click Apply to show only matching programs. Click the X to close the pane.
2.2 Getting Enrolled
- Click the Enroll button on any assigned Program you want to join. In Thumb View, click the three-dot menu (⋯) on the program card first to reveal the Enroll option.
- Clicking Enroll moves the program from Available Programs to My Programs and takes you directly to the View My Programs page, where the newly enrolled program is displayed.
- The enrolled program will no longer appear in Available Programs and will only be accessible via My Programs.
My Programs
- Click Onboard from the top menu.
- Click Programs > My Programs from the left menu bar.
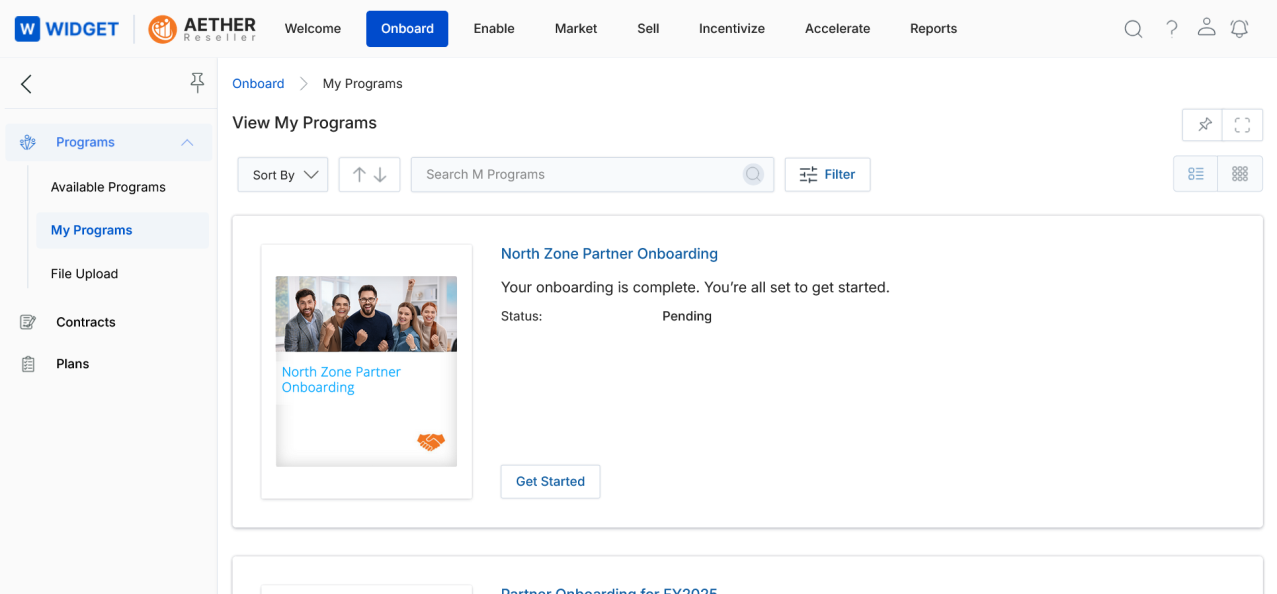
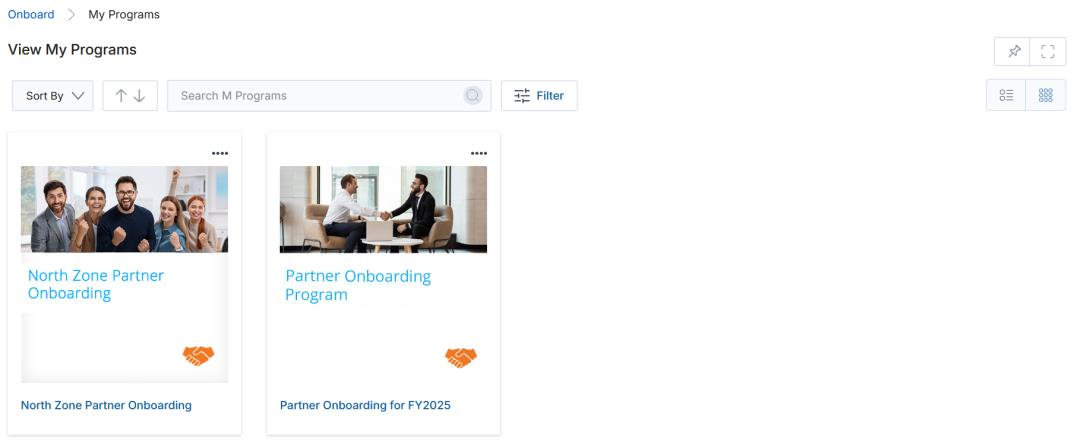
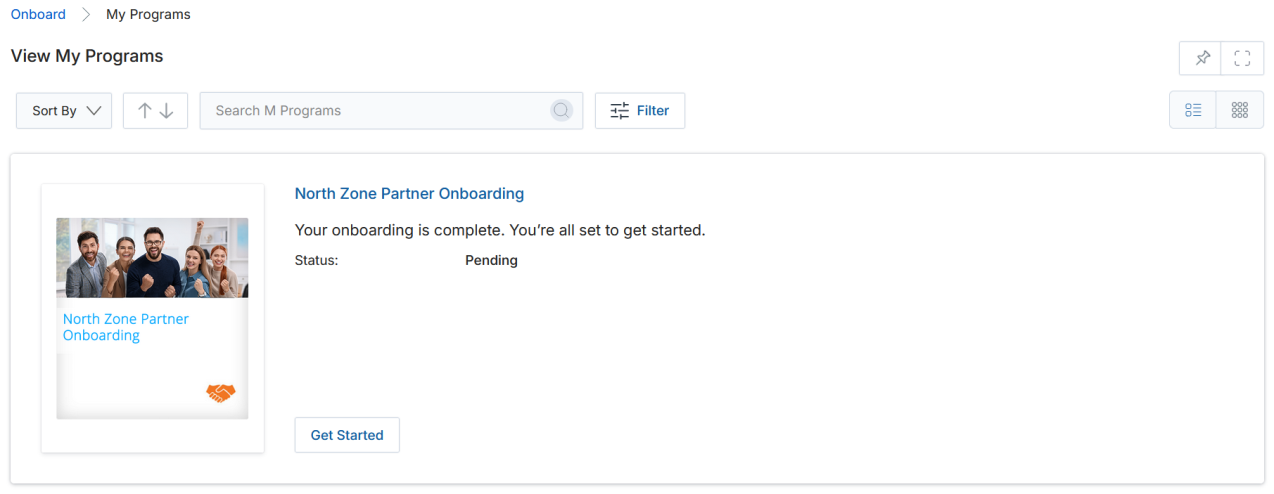
3.1 View My Programs
Clicking My Programs from the left menu opens the View My Programs page, which lists all programs in which the partner is enrolled, along with the Program Description and current Status (Pending or In Progress).
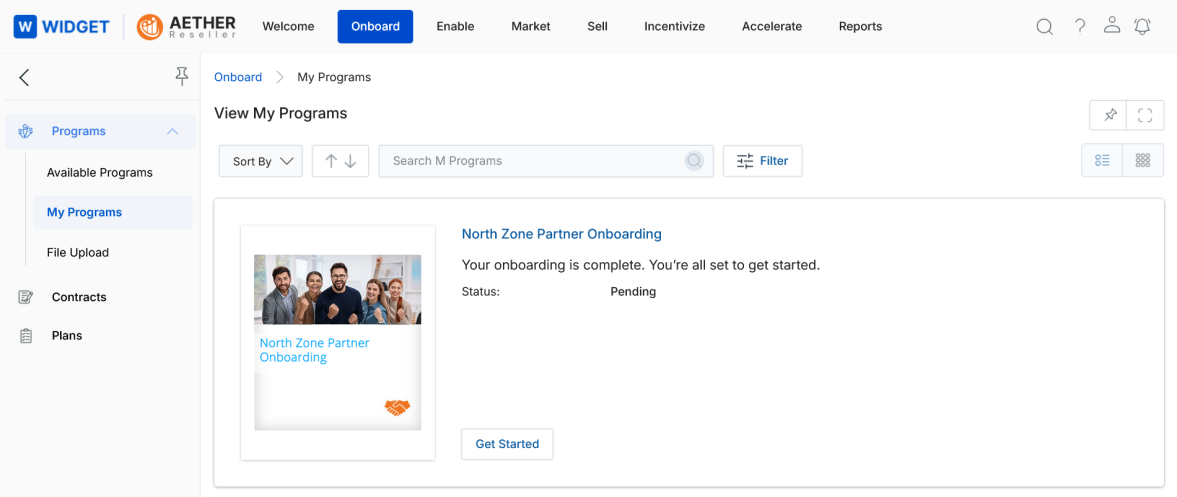
Use Sort By to sort programs by criteria, and toggle between List View and Thumb View using the icons at the upper right.
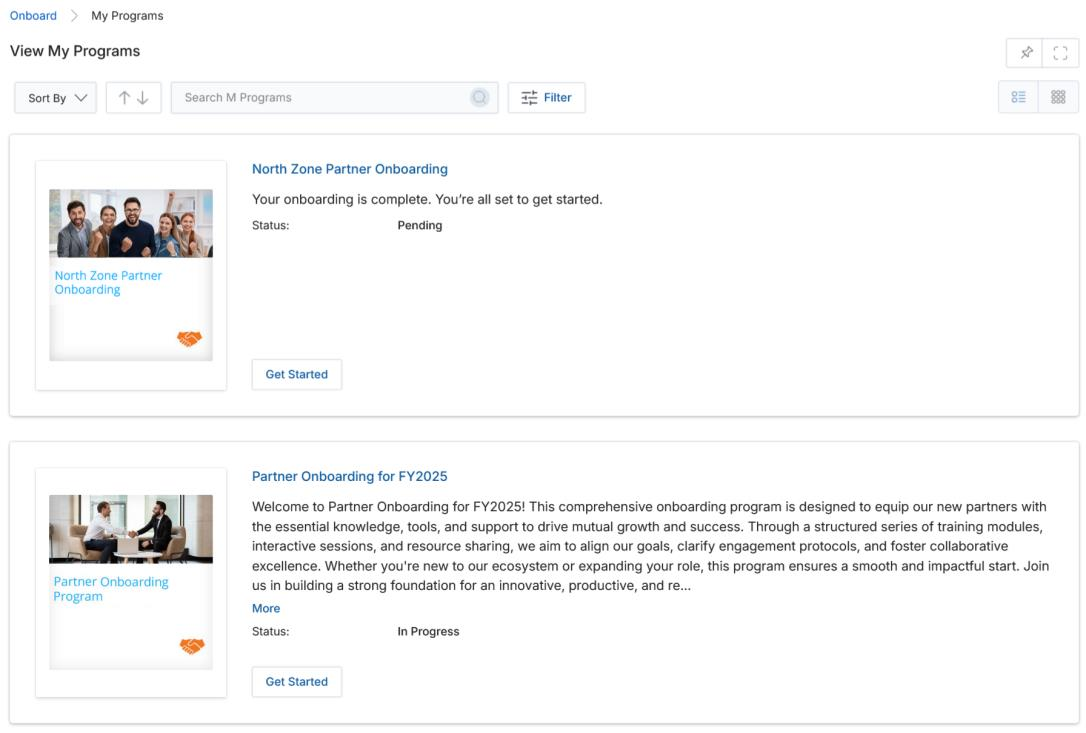
To search for a specific enrolled program, open the Filter pane, enter the Program Name, and click Apply.
3.2 Executing My Program
- To enter a program and complete its tasks, click the Get Started button on the program card.

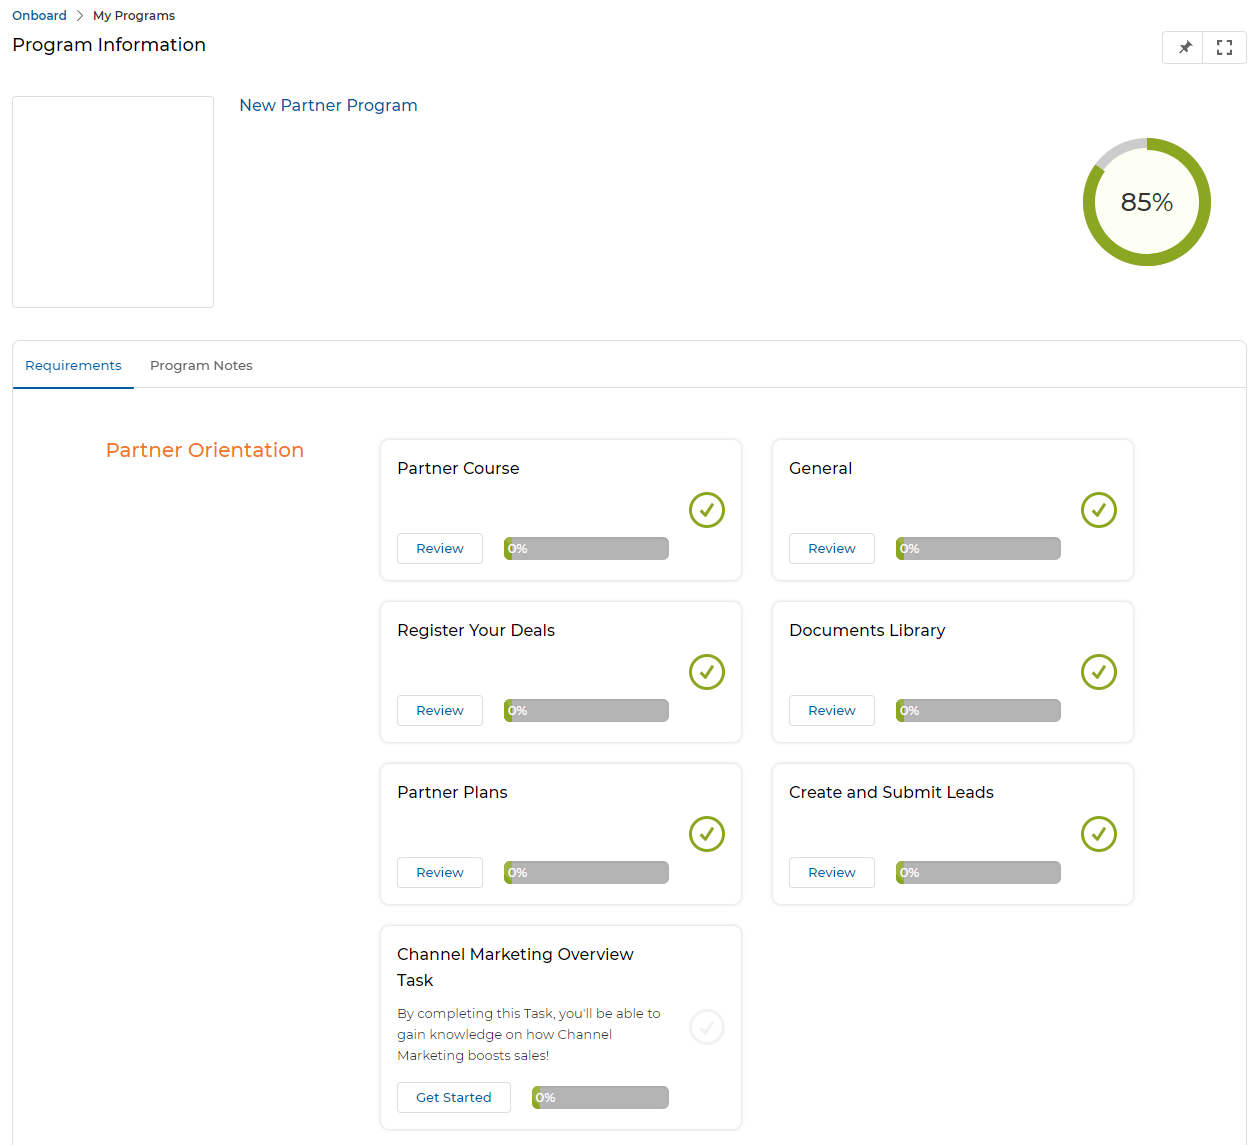
- Clicking Get Started opens the Program Information page.
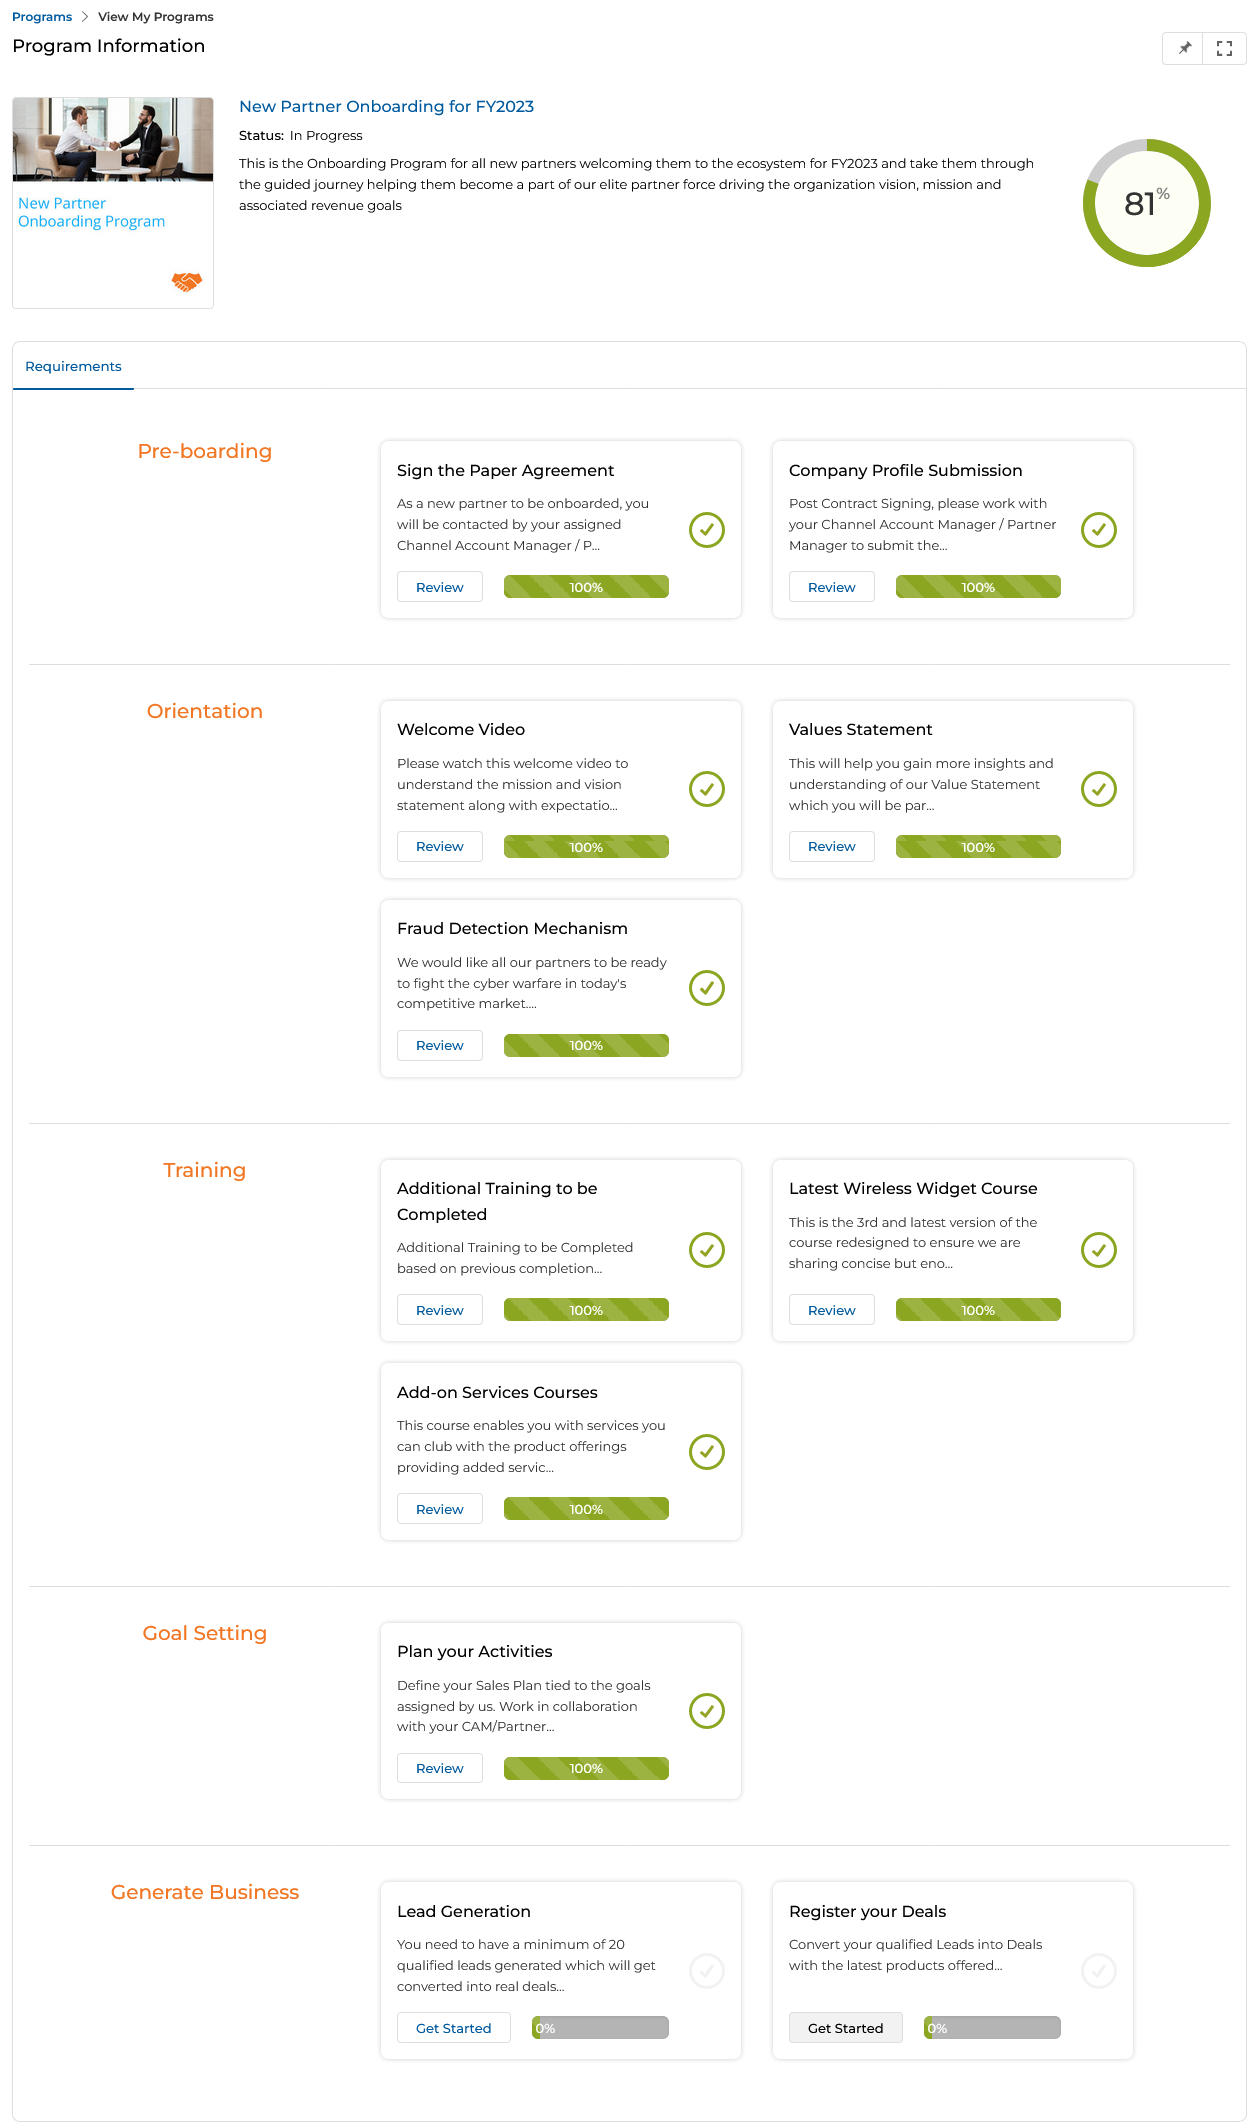
The Program Information page contains:
- Program Level — Displayed in orange. Each Program Level contains multiple Program Level Tasks.
- Program Level Task — Each task card shows a short description and status (Completed / Pending / In Progress).
- Progress Donut Graph — Auto-tracks overall program completion as a percentage.
- Requirements tab — All associated Levels and Level Tasks required to complete the program.
- Program Notes tab — Allows communication between all Partner Contacts associated with the same Partner Account. Notes are account-specific and are not visible to the Partner Admin.
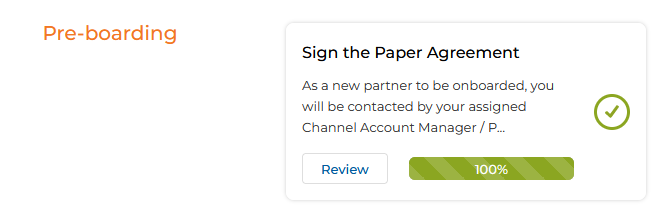
- Review — A green tick mark with a Review button indicates that a specific Level Task has been completed.
- Get Started — Appears on tasks that are yet to be completed. Clicking it opens the View a My Program Level Task side panel.

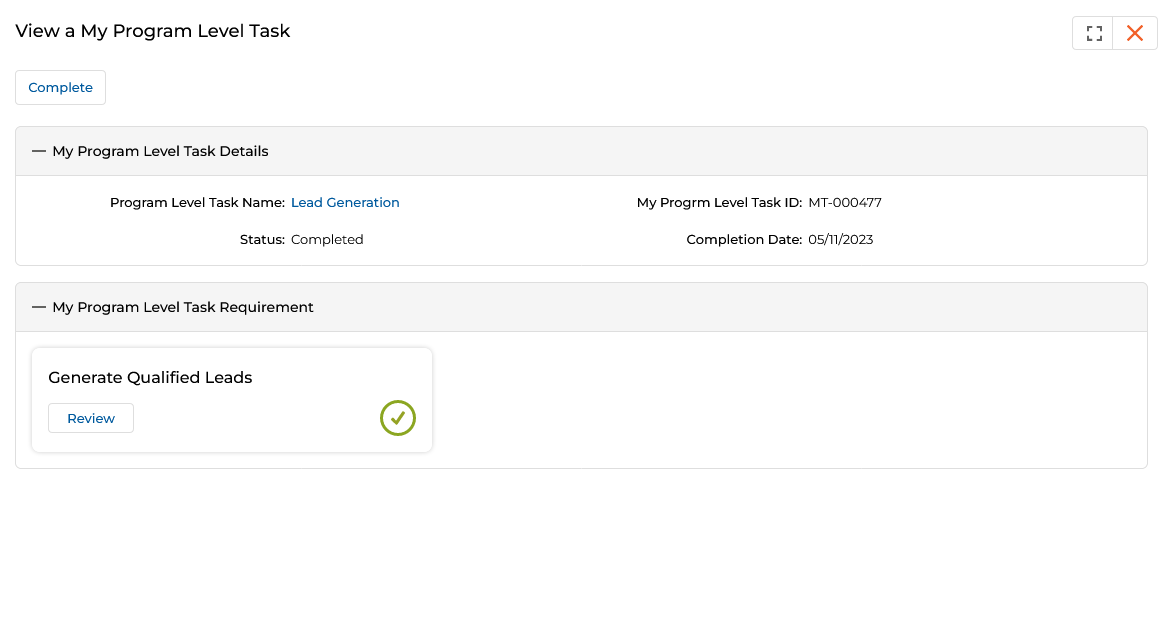
- Click the Get Started button on a task to open the View a My Program Level Task panel, which contains:
- Program Level Task Name — Name of the task.
- My Program Level Task ID — Unique identifier for the task instance.
- Status — Current status (Pending, In Progress, or Completed).
- Completion Date — Populated once the task is completed.
- My Program Level Task Requirement — The specific activity to be fulfilled.
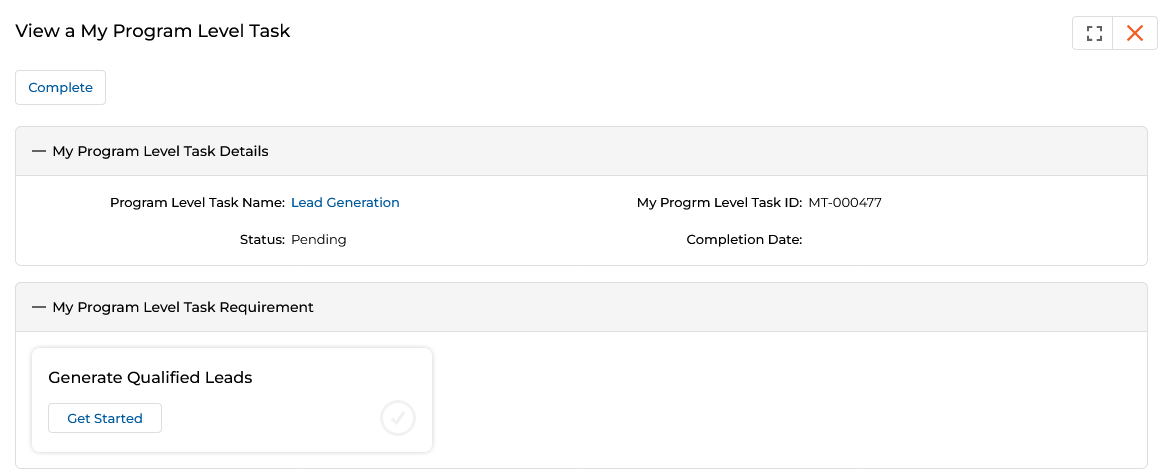
- In the My Program Level Task Requirement section, click Get Started to begin fulfilling the requirement. In this example, the partner must generate 20 qualified leads.

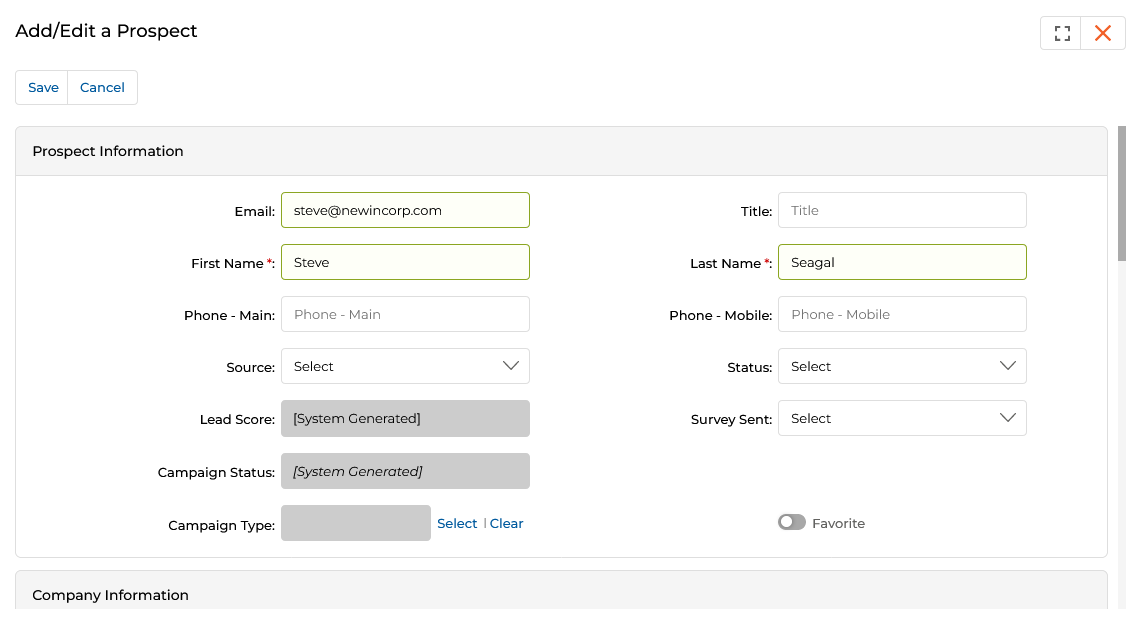
- Clicking Get Started on the requirement opens the relevant action page — for example, the Add/Edit a Prospect form to submit lead details.
- Once the required number of actions is completed, the Get Started button in the Task Requirement section is replaced by the Review button with a green tick symbol.

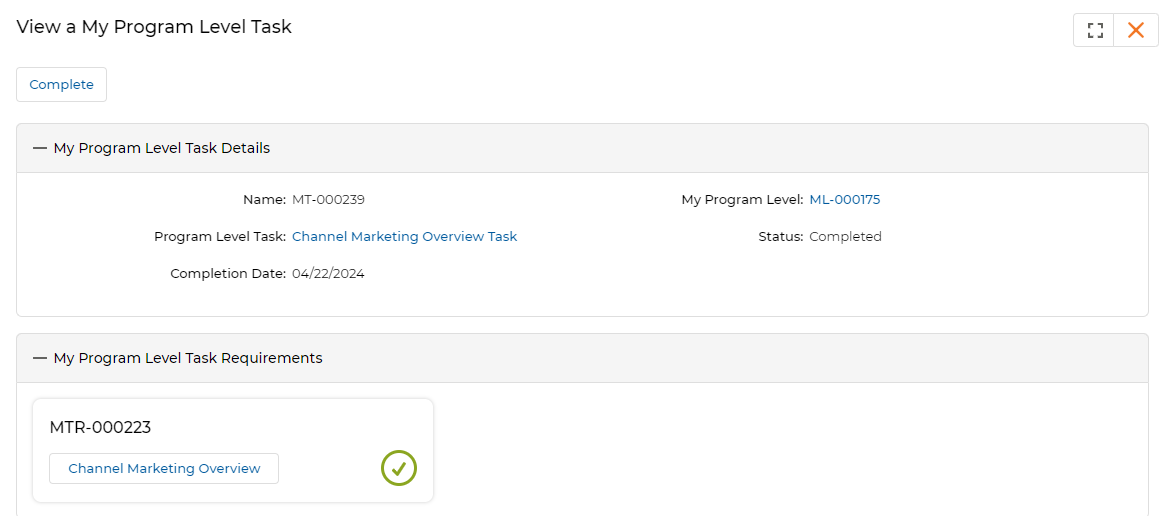
- Click the Complete button in the task panel to change the task Status from Pending to Completed. The completion date is recorded.
- Returning to the Program Information page shows the completed task's Get Started button replaced by Review, the progress bar at 100%, and the next dependent task's Get Started button now activated.

'External URL' Type Task
In an External URL type task, the Task Requirement is an external web link. Clicking the requirement button opens the URL in a new browser tab and automatically marks the Level Task as Completed.
- The Admin assigns a Program where a Task's Task Requirement type is set to External URL.
- The partner enrolls in the program and clicks Get Started on the relevant Level Task.
- Clicking Get Started opens the View a My Program Level Task panel showing the Task Requirement button (the external URL link name).
- Clicking the Task Requirement button opens the external URL in a new tab and simultaneously changes the Level Task Status from Pending to Completed.
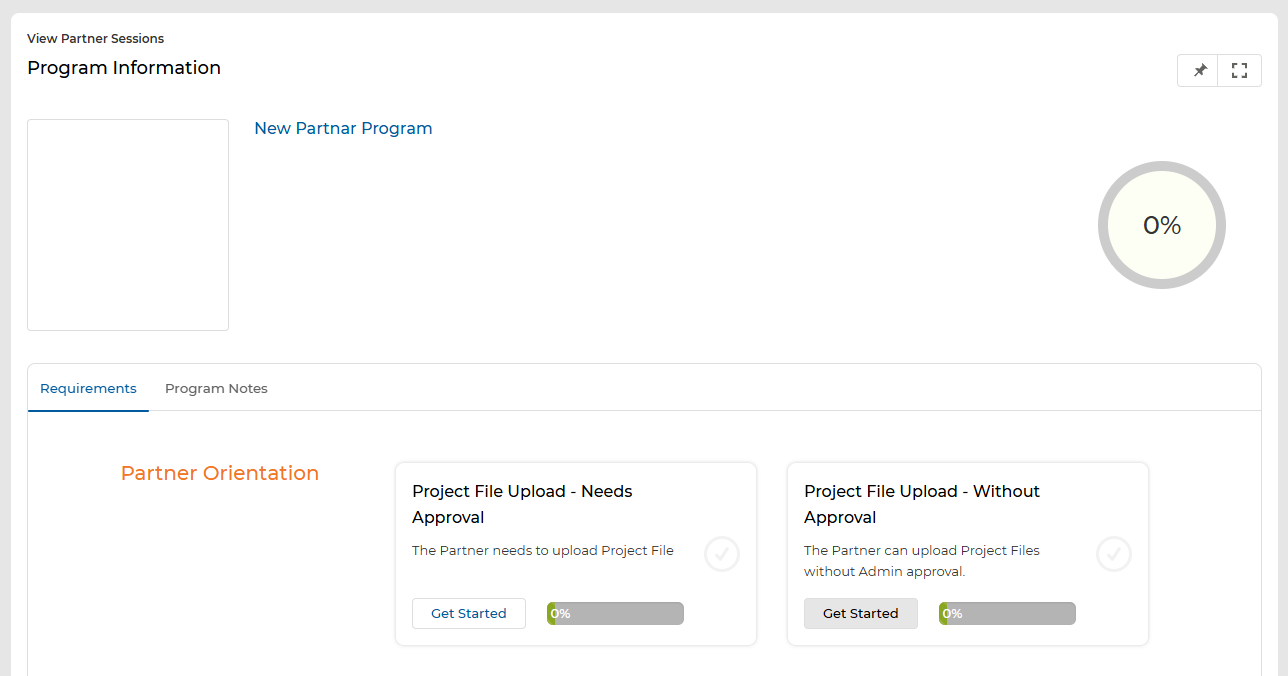
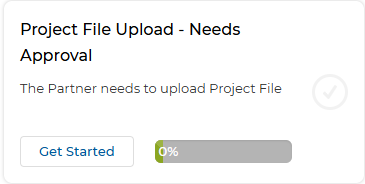
'File Upload' Task
In a File Upload type task, the partner uploads a document or file to complete the Program Level Task. Two sub-types exist:
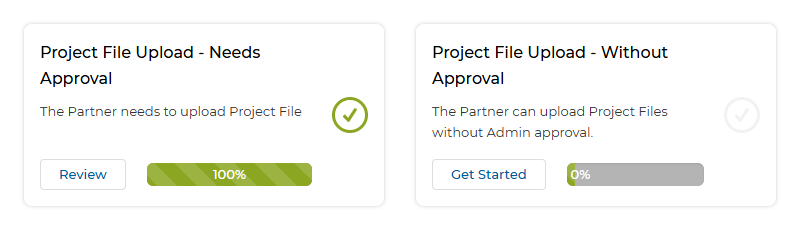
- File Upload — Needs Approval — The uploaded file must be approved by the Admin before the task is considered complete.
- File Upload — Without Approval — The partner can upload files and complete the task without Admin approval.
- The Admin assigns a Program where a Task Requirement type is set to File Upload.
- The partner enrolls in the program and clicks Get Started.
- Click the Get Started button on the task that requires Admin approval.
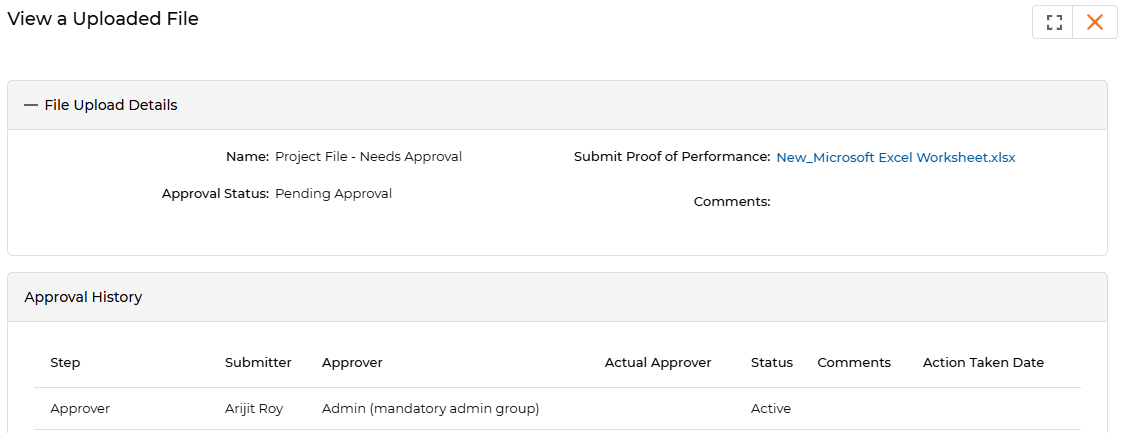
- The View a My Program Level Task panel opens. Click the Task Requirement button to be redirected to the View Uploaded Files page.
- In the View Uploaded Files form, attach the required file to the Submit Proof of Performance field, then click Save.
![View Uploaded Files — Name: Project File – Needs Approval; Submit Proof of Performance file attached; Approval Status: [System Generated]; Comments field](https://ghcmnhevjmhnfwyuvkls.supabase.co/storage/v1/object/public/page-images/inline/8bde41d849bb4ca4ff8da7f759e5c51beb253484b9e36f33096ecddc04c61bfa.png)
- After saving, the View a Uploaded File page shows the file details with Approval Status: Pending Approval and the name of the Admin Approver in the Approval History table.
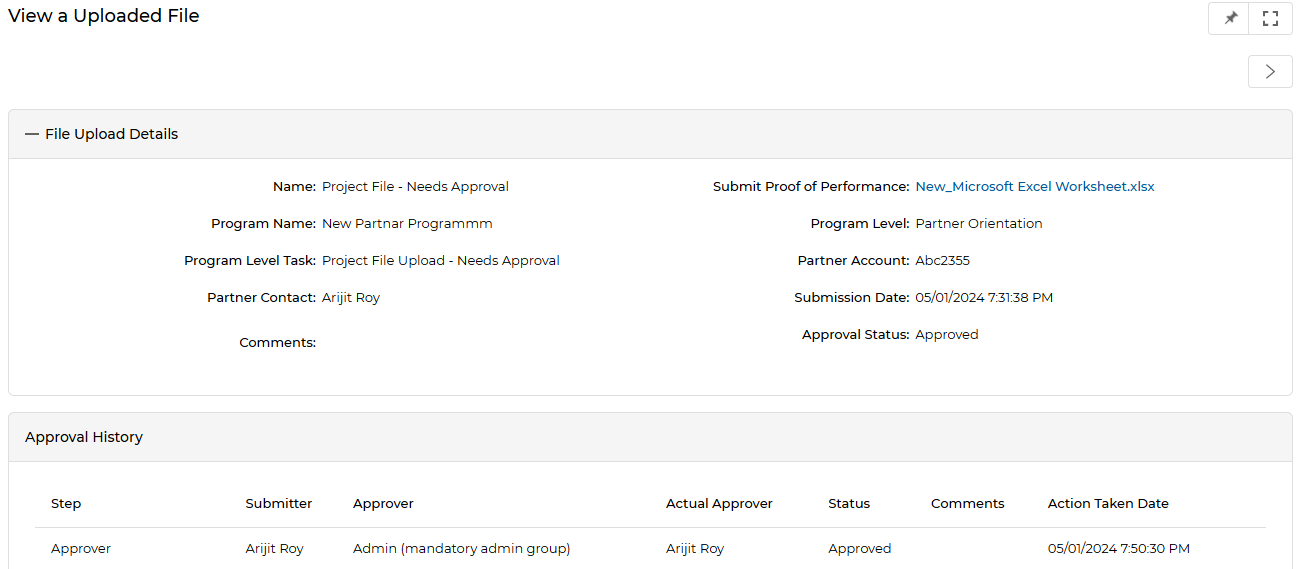
- Once the Admin approves the file, the Approval Status changes to Approved and the Approval History table records the action taken date.
- With the first task approved, the second task (Project File Upload – Without Approval) becomes available. The process for uploading is the same, but the file is accepted immediately without Admin review.
Completing Dependency-based Program Level and Tasks
Program Levels and their Tasks can be configured with dependencies, meaning certain levels or tasks only become active after prerequisite levels or tasks are completed.
In this example the Admin configures a program — New Onboard Program — with three levels:
- Level 1 — Contains Onboard Task 1 and Onboard Task 2 (Task 2 depends on Task 1).
- Level 3 — Depends on Level 1 being completed; contains Onboard Task 4.
- Level 2 — Depends on Level 3 being completed; contains Onboard Task 3.
- The partner enrolls in the program. It appears on the View My Programs page.
- Clicking Get Started opens the Program Information page showing all three levels. Level 2 and Level 3 tasks are greyed out (inactive).
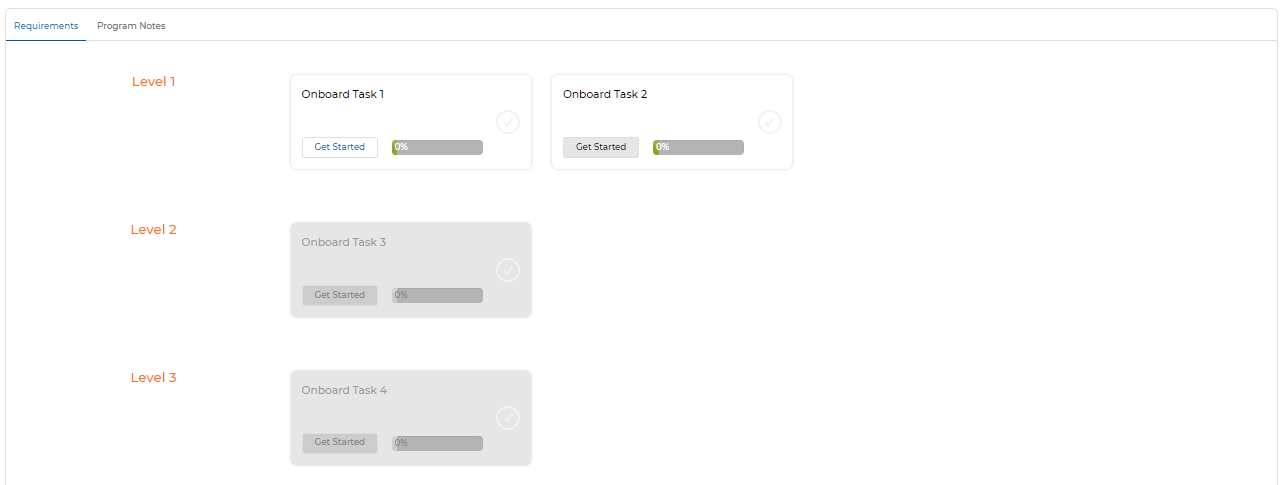
- The partner completes Onboard Task 1 in Level 1. Because Task 2 depends on Task 1, Task 2's Get Started button activates.
- The partner completes Onboard Task 2, completing all of Level 1. This activates Level 3 (which depends on Level 1), unlocking Onboard Task 4.
- The partner completes Onboard Task 4 in Level 3. This activates Level 2 (which depends on Level 3), unlocking Onboard Task 3.