

Overview
Effective partner program management relies on precise control over who can access the platform and what actions they can perform. The User Management module in the Onboard section is crucial for maintaining the integrity and security of your partner ecosystem by providing comprehensive tools for managing all user accounts. This includes both vendor-side administrators and partner-side users across various roles and organizations, ensuring that each user has appropriate permissions and access levels tailored to their function.
Accessing and Managing Users
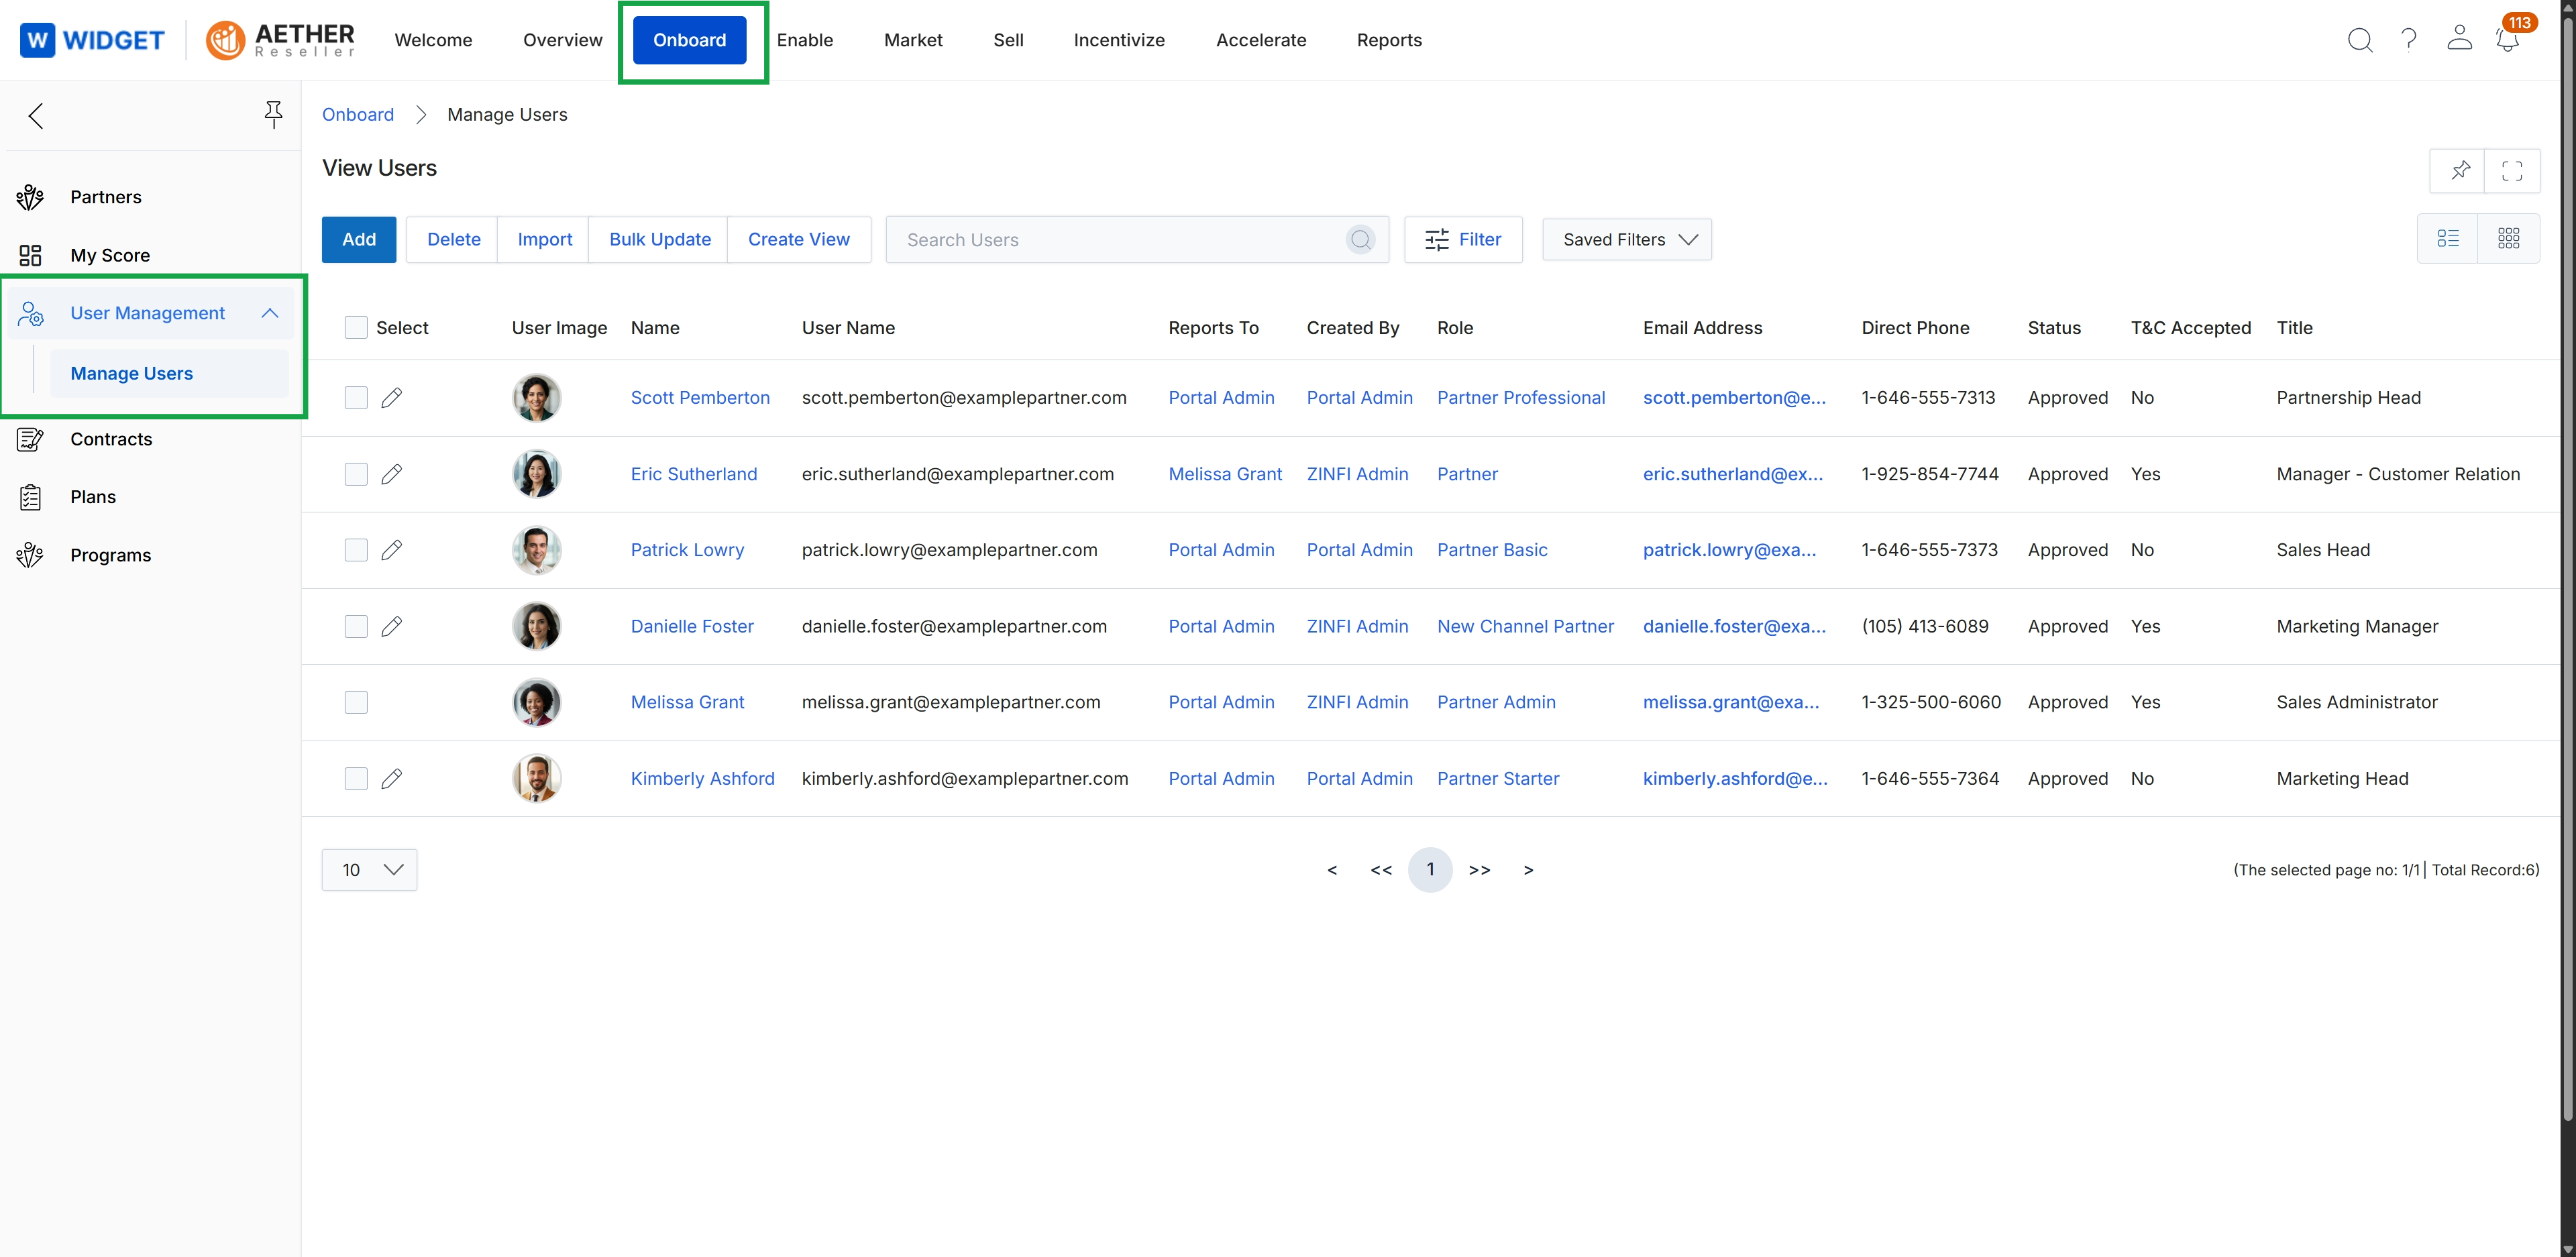
Click Onboard → User Management → Manage Users.
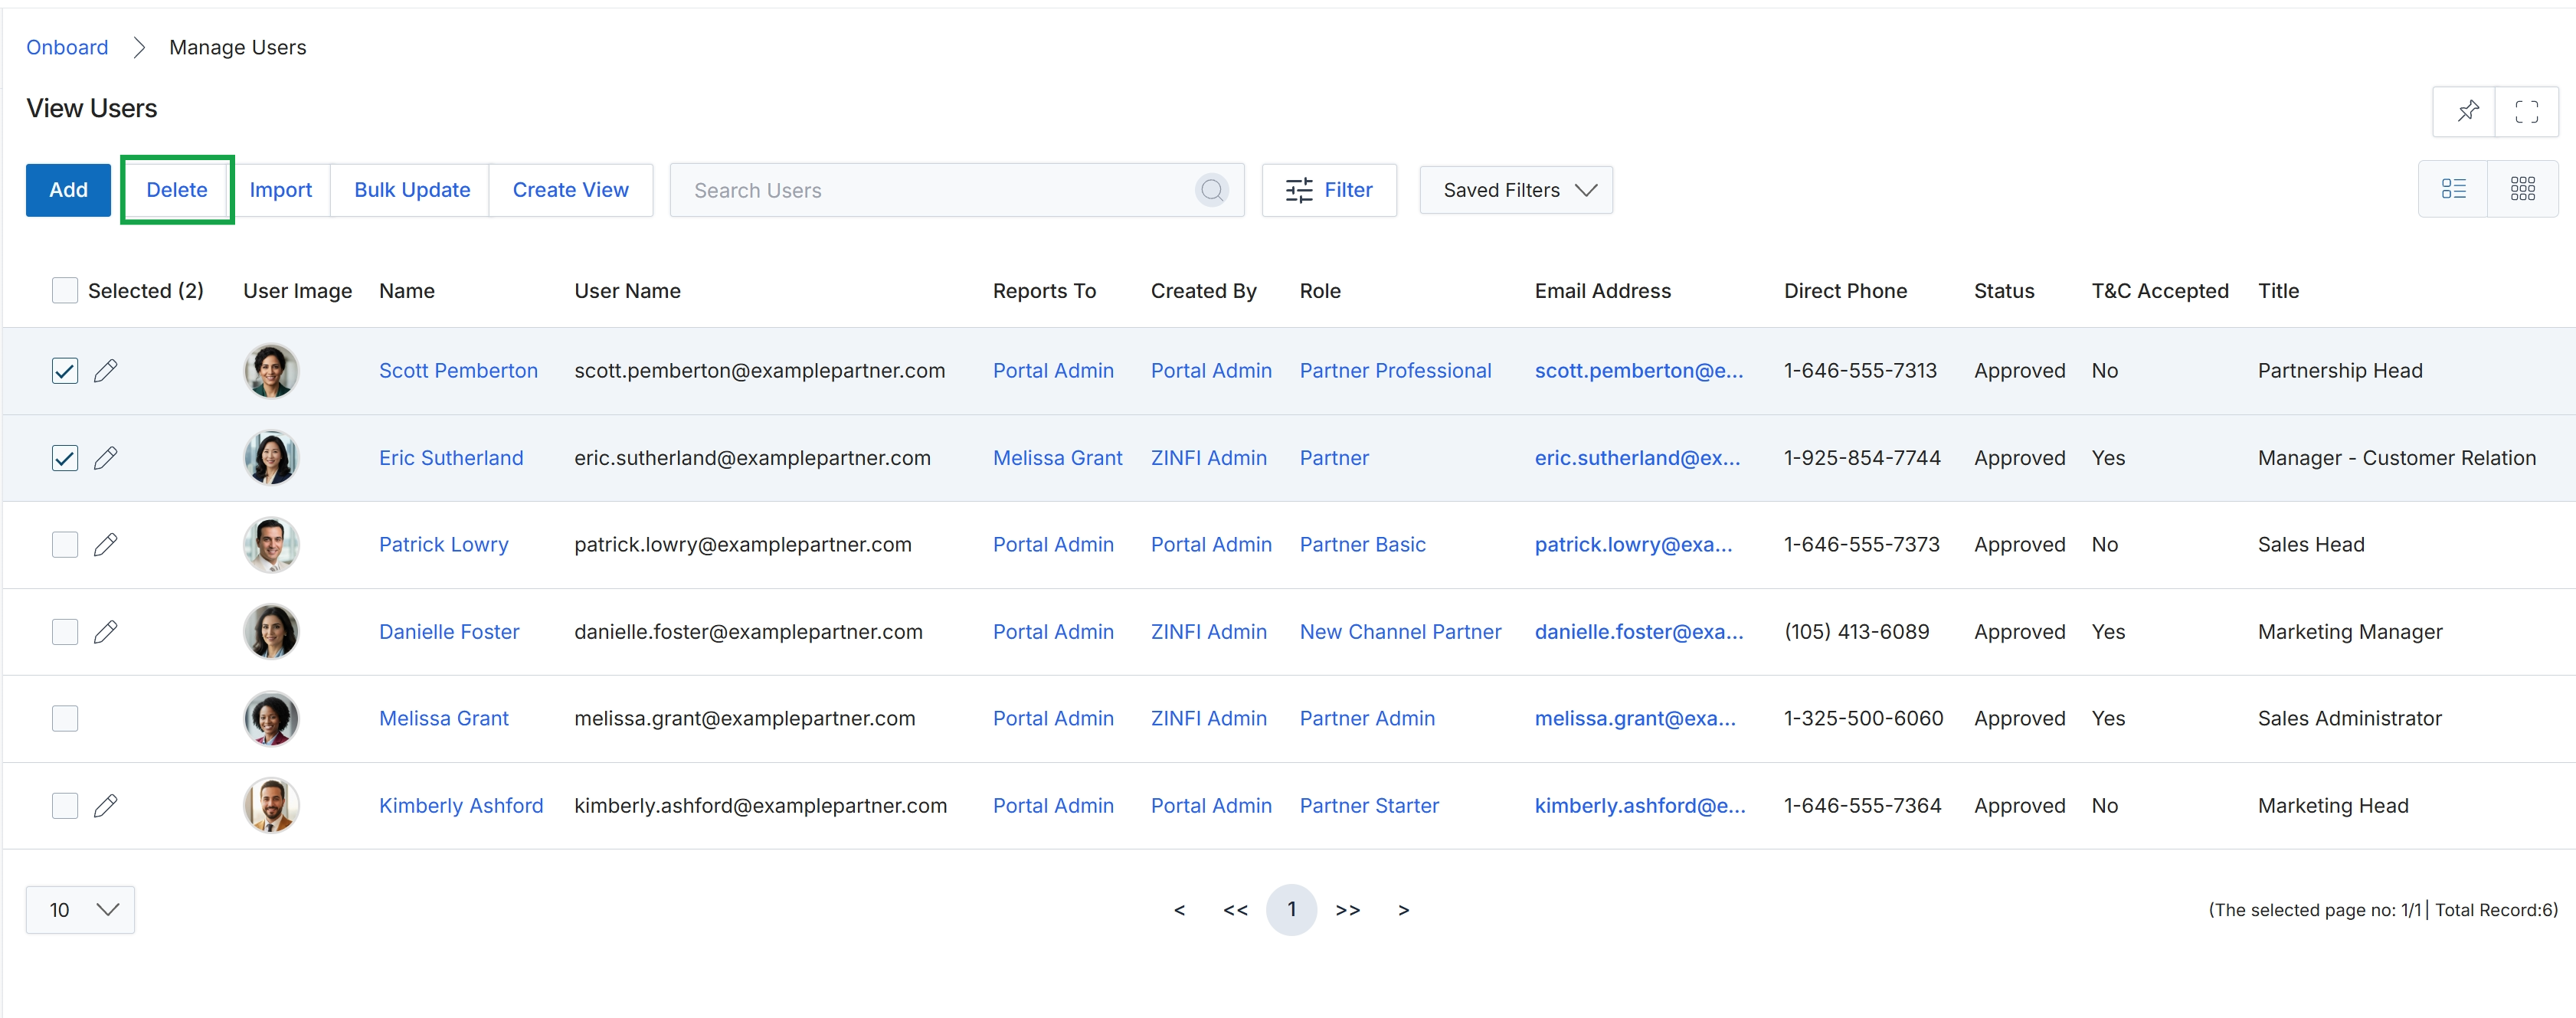
Click the Add button.
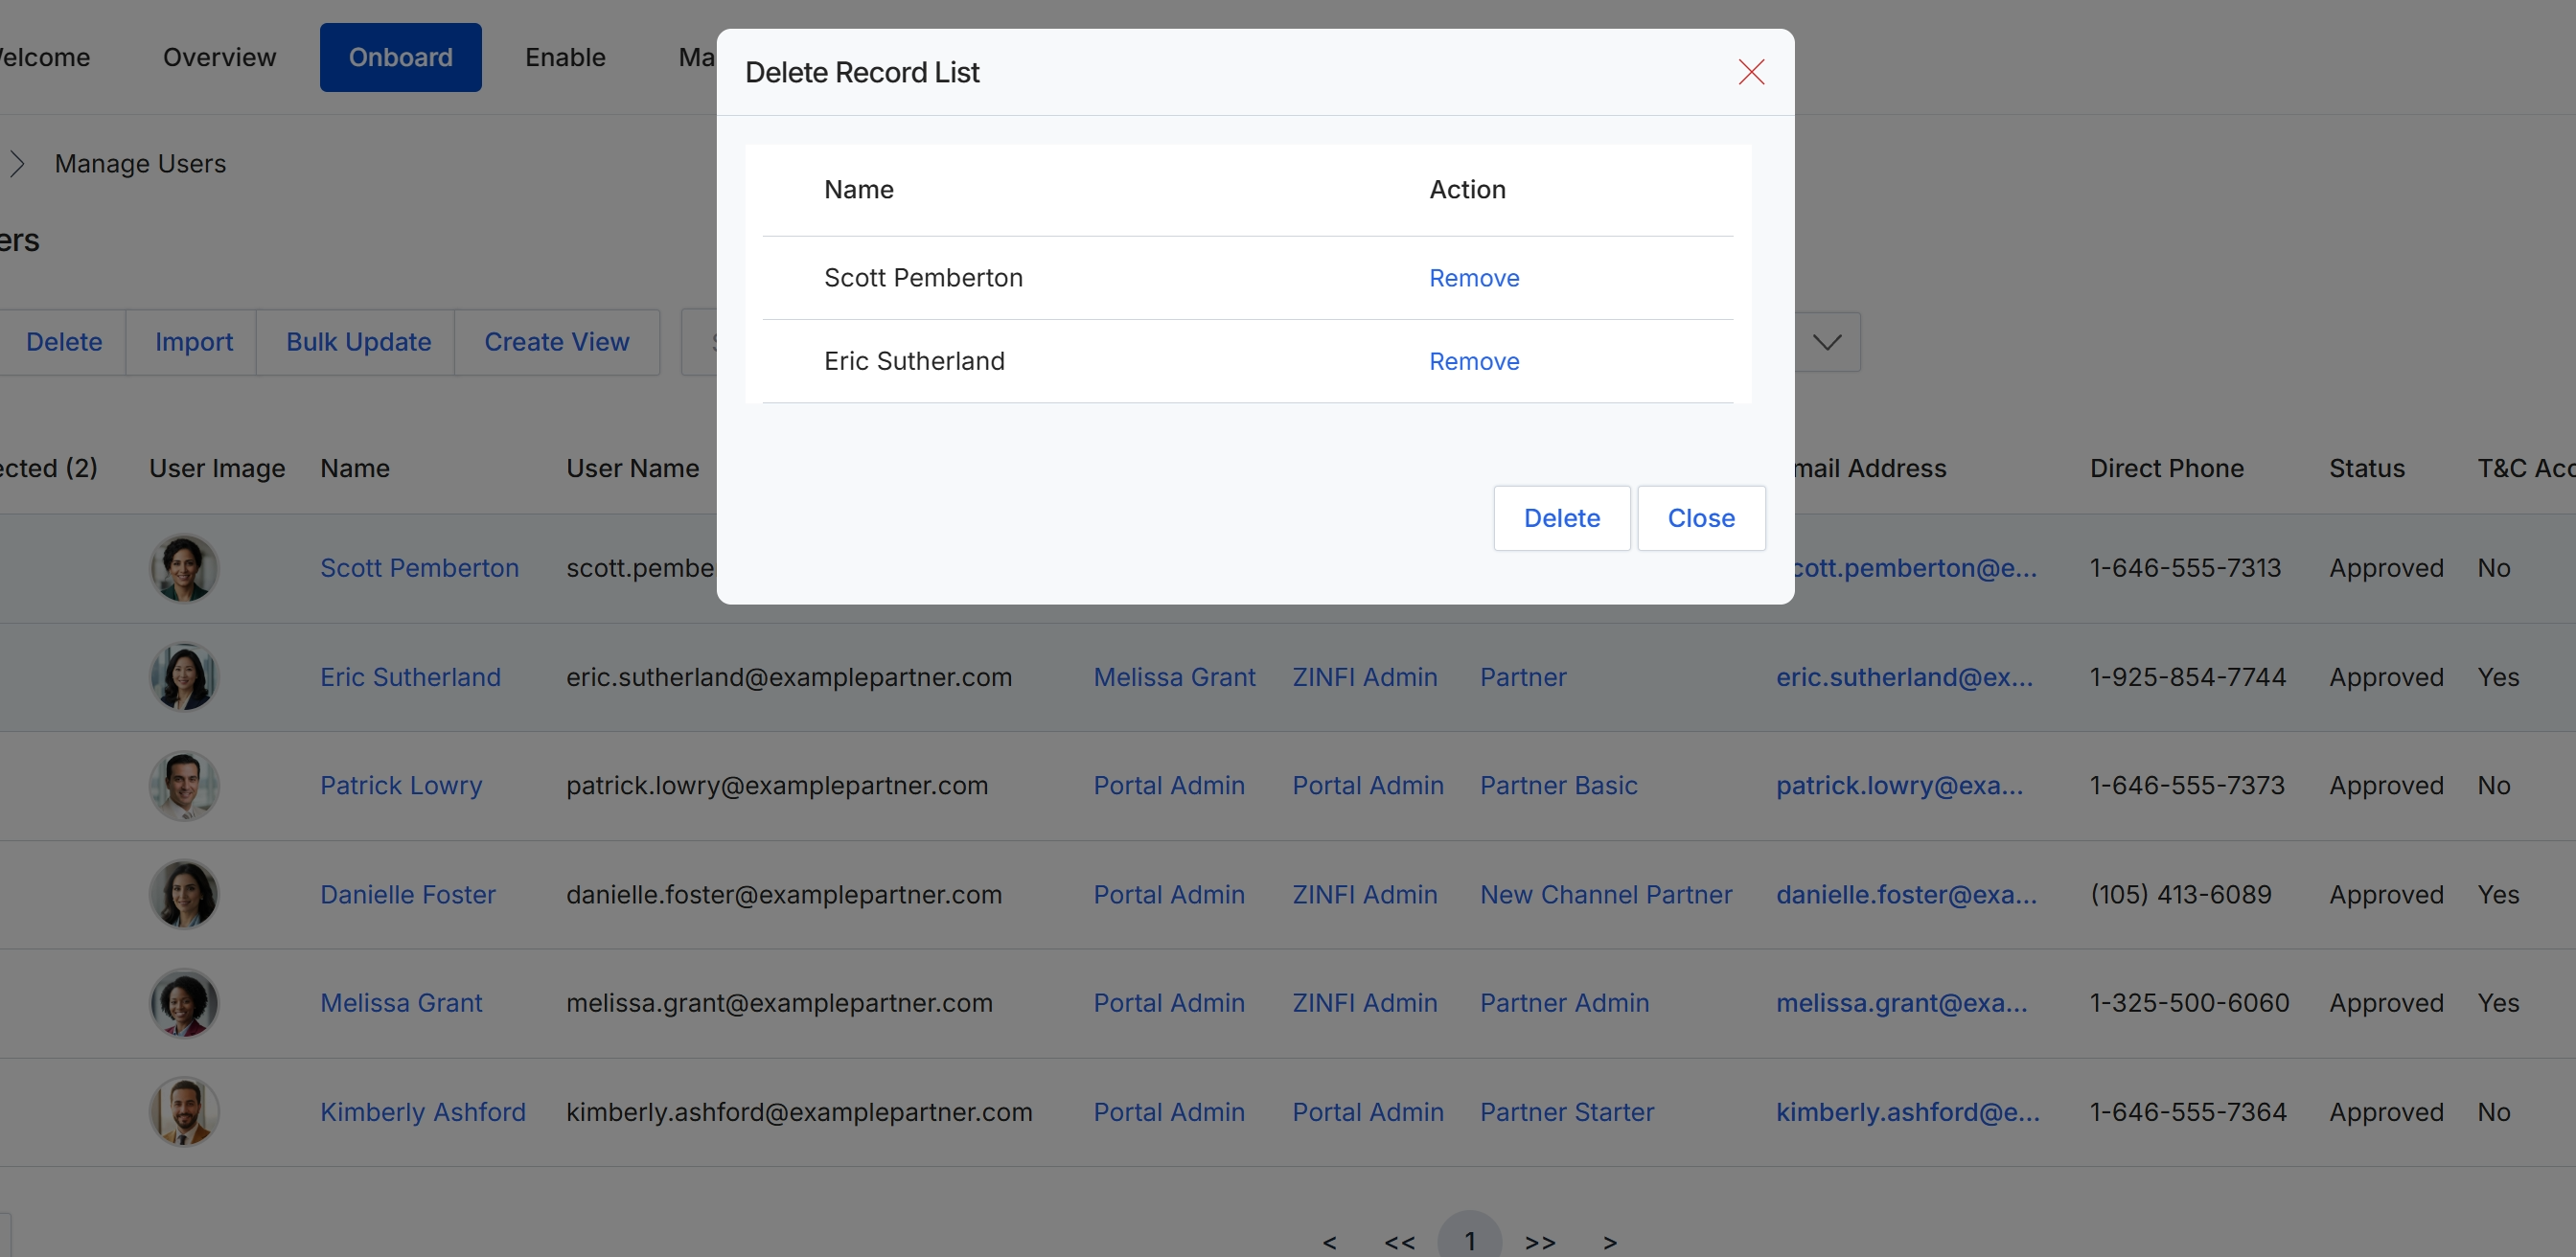
This screen displays a confirmation dialog that appears when an administrator initiates the deletion of one or more user records from the platform. The dialog presents a list of the selected users by name, allowing the administrator to review the specific accounts chosen for removal. Each listed user also includes an option to remove them from the current deletion list before the final action is taken. This step ensures that administrators can verify the intended deletions, preventing accidental data loss before the permanent removal of user accounts.
Importing User Data
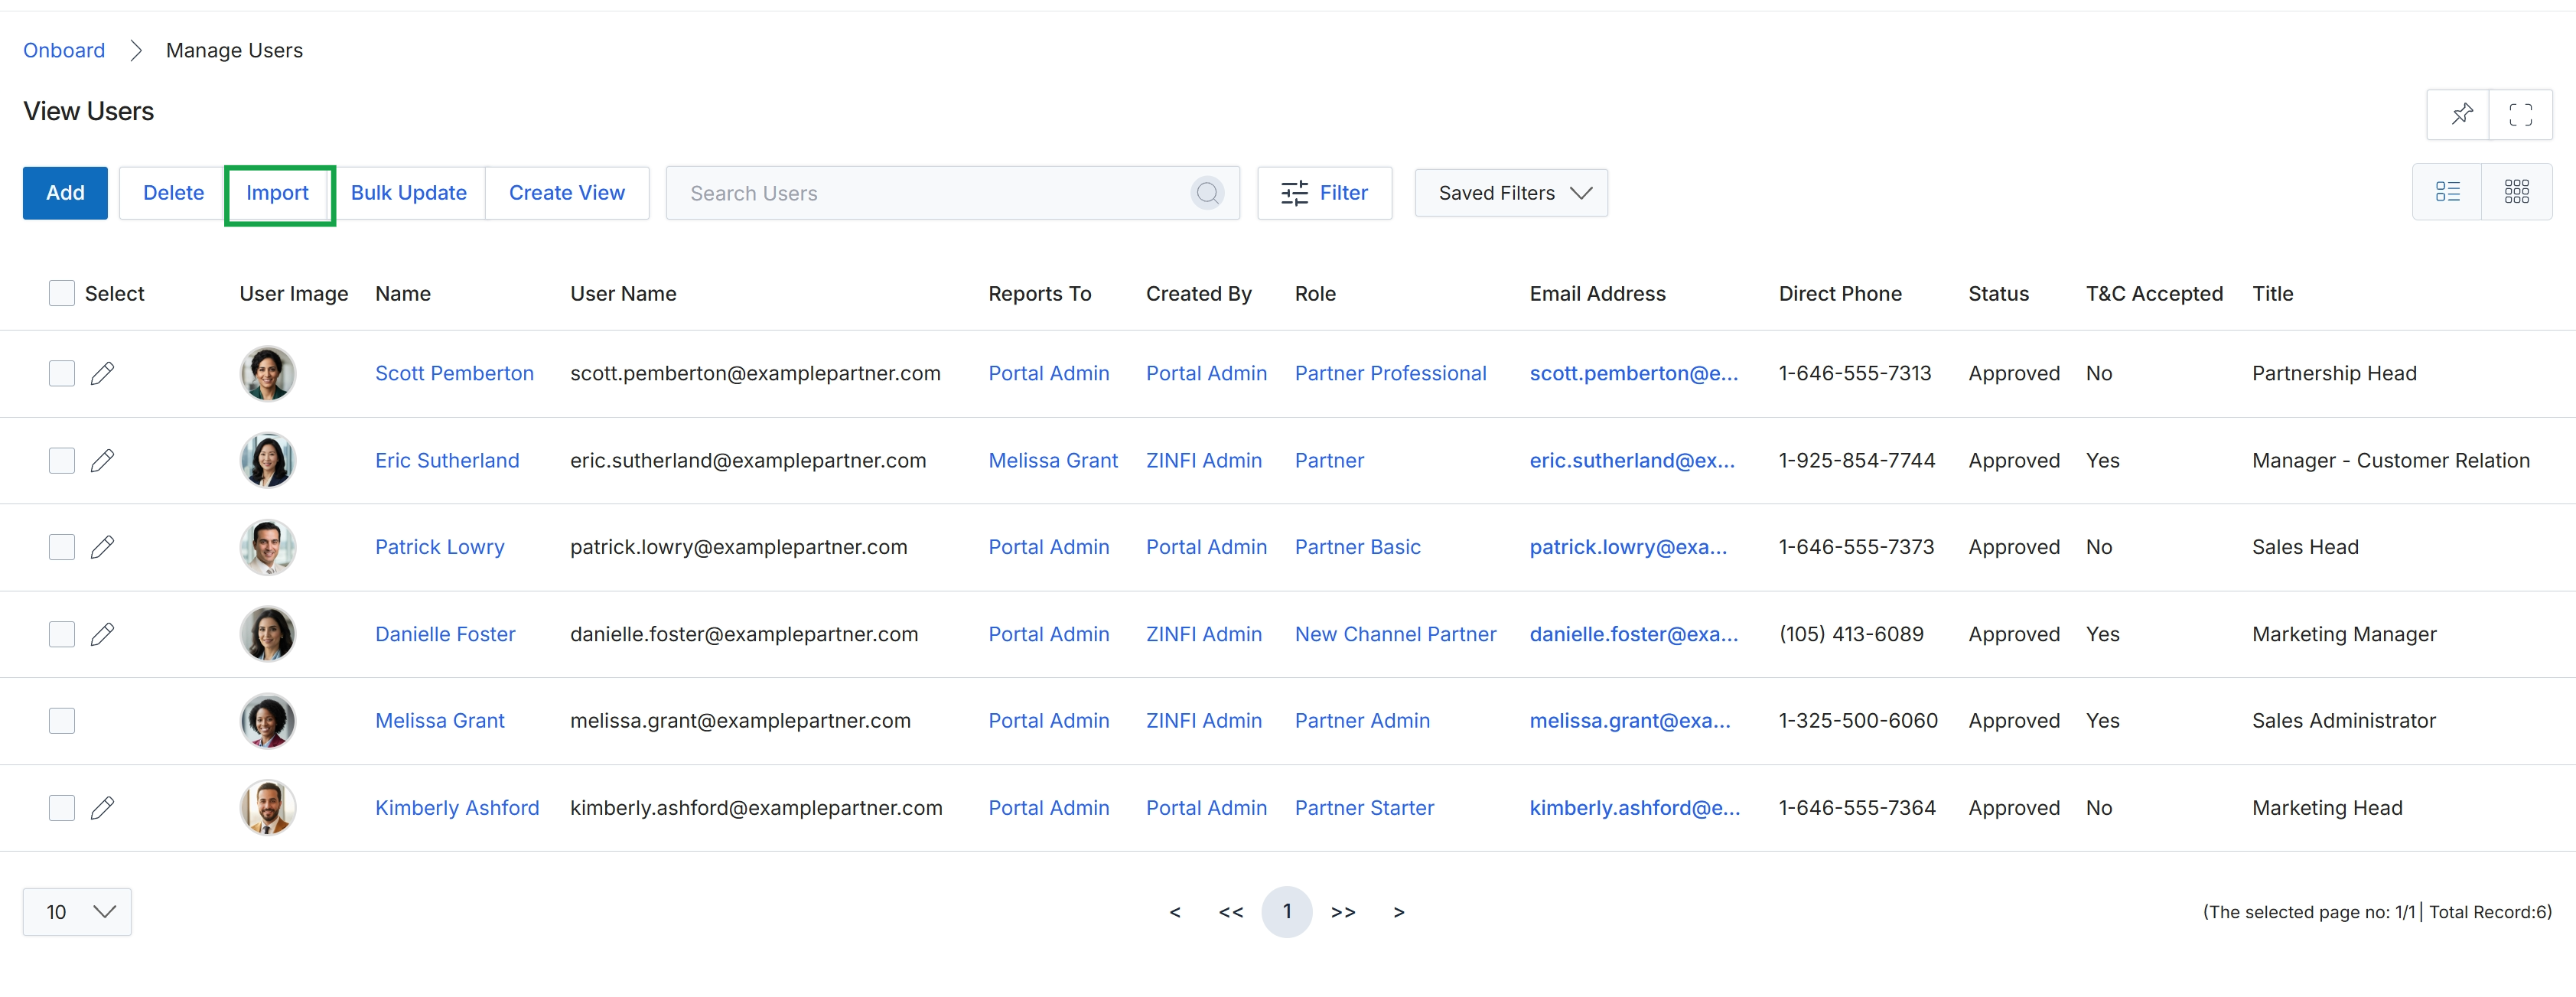
Click Close.
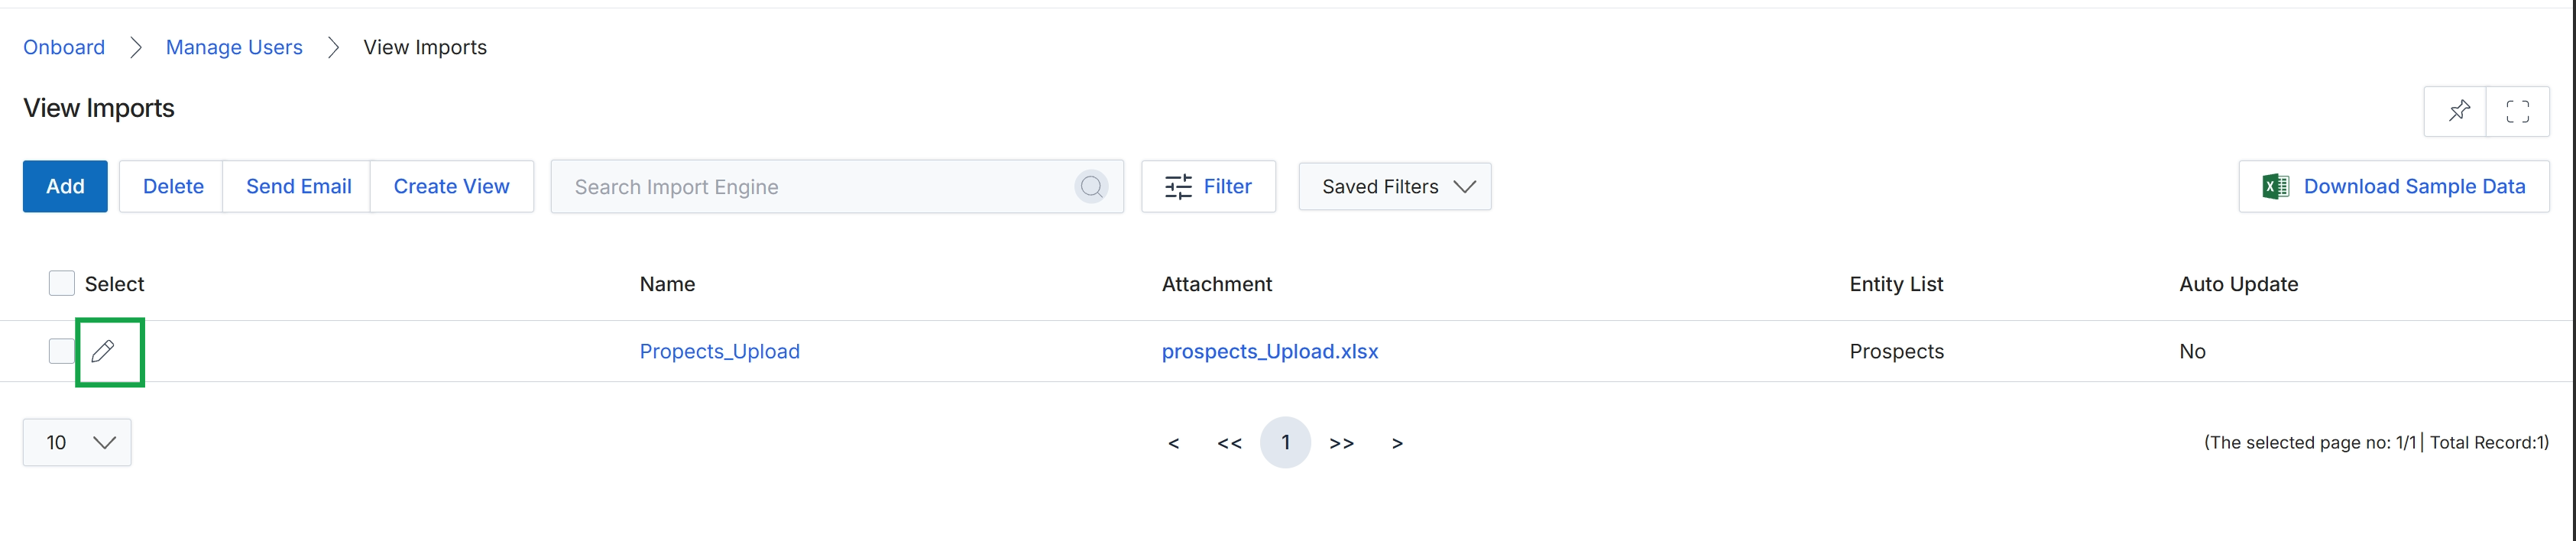
The View Imports screen provides a centralized list of all data import configurations within the UPM, allowing administrators to manage how various entities, such as prospects, are brought into the platform. This screen displays existing import jobs, including their names, associated file attachments, the target entity list, and whether they are configured for automatic updates. Administrators can use this interface to review import settings, initiate new imports, or modify the parameters of existing import configurations to ensure data accuracy and consistency across the system. This functionality is crucial for maintaining up-to-date partner and prospect information, supporting workflows like partner recruitment (WF-01) by enabling bulk data entry.
Click the 'Edit' icon next to an import entry to modify its configuration.
Buttons
| Button | Description |
|---|---|
| Add | Initiates the process to create a new data import configuration. |
| Delete | Deletes the selected import configurations. |
| Send Email | Sends an email related to the selected import configuration. |
| Create View | Allows the user to define and save a custom view for the import list, specifying columns and filters. |
| Filter | Opens a panel to apply advanced filters to the list of import configurations. |
| Saved Filters | A dropdown menu to select and apply previously saved filter configurations. |
| Download Sample Data | Downloads a sample file template to guide users on the correct format for data imports. |
| Edit icon | An icon to open the selected import configuration for editing. |
Fields
| Field | Description |
|---|---|
| Search Import Engine | A text input field to search for specific import configurations by name or other criteria. |
Column Headings
| Column | Description |
|---|---|
| Select | A checkbox to select individual import entries for bulk actions. |
| Name | The name assigned to the data import configuration. |
| Attachment | The name of the file attached to this import configuration. |
| Entity List | The type of entity (e.g., Prospects, Partners) that this import configuration targets. |
| Auto Update | Indicates whether the import is configured to run automatically on a scheduled basis. |
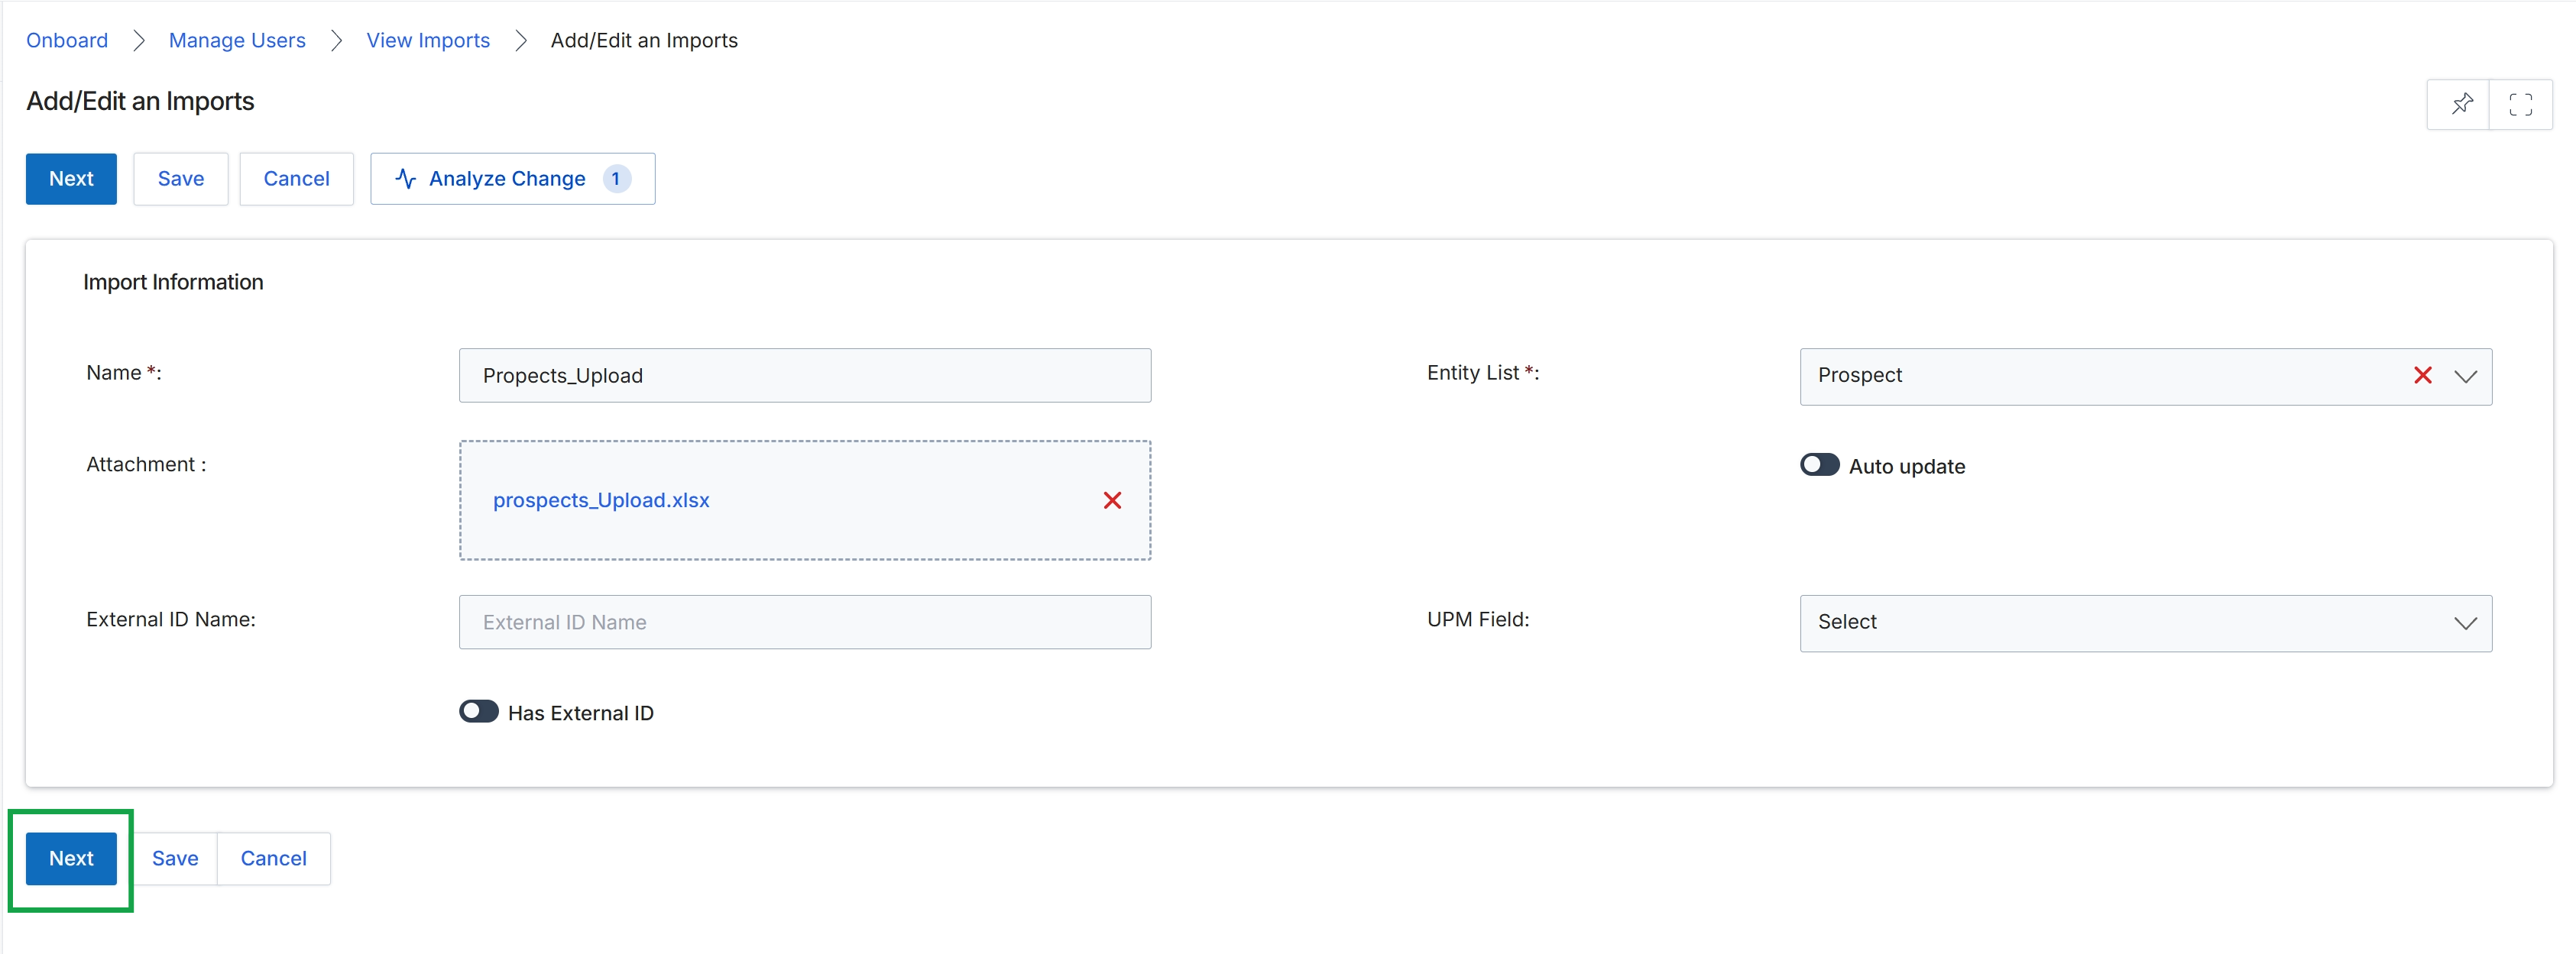
This screen allows administrators to define and configure new data import jobs or modify existing ones within the UPM. It serves as the initial setup phase where key parameters for an import are specified, such as a descriptive name for the job, the type of entity being imported (like Prospects), and the associated data file. The platform's import functionality is crucial for populating the system with initial data, updating records in bulk, or synchronizing information, supporting workflows like Partner Recruitment by enabling the import of pre-application recruitment targets. This ensures that partner-related information is accurately reflected and maintained across the system.
Click the 'Next' button to proceed with the import configuration after defining the import information.
Buttons
| Button | Description |
|---|---|
| Next | Proceeds to the next step in the import configuration process. |
| Save | Saves the current import configuration without proceeding to the next step. |
| Cancel | Discards any changes and cancels the import configuration. |
| Analyze Change 1 | Initiates an analysis of the uploaded file to identify potential changes or issues before proceeding with the import. The number '1' indicates there is one pending change or item to analyze. |
Import Information
| Field | Description |
|---|---|
| Name * | A required field to provide a descriptive name for the import job. |
| Entity List * | A required dropdown field to select the type of entity being imported, such as 'Prospect'. |
| Attachment | Displays the name of the attached file ('prospects_Upload.xlsx') that contains the data for the import. |
| Auto update | A toggle to enable or disable automatic updates for existing records based on the import data. |
| External ID Name | A text input field to specify the name of the external ID column in the import file, if applicable. |
| UPM Field | A dropdown field to select the corresponding UPM field for mapping purposes, typically used when 'Has External ID' is enabled. |
| Has External ID | A toggle to indicate whether the import file contains an external ID column for matching records. |
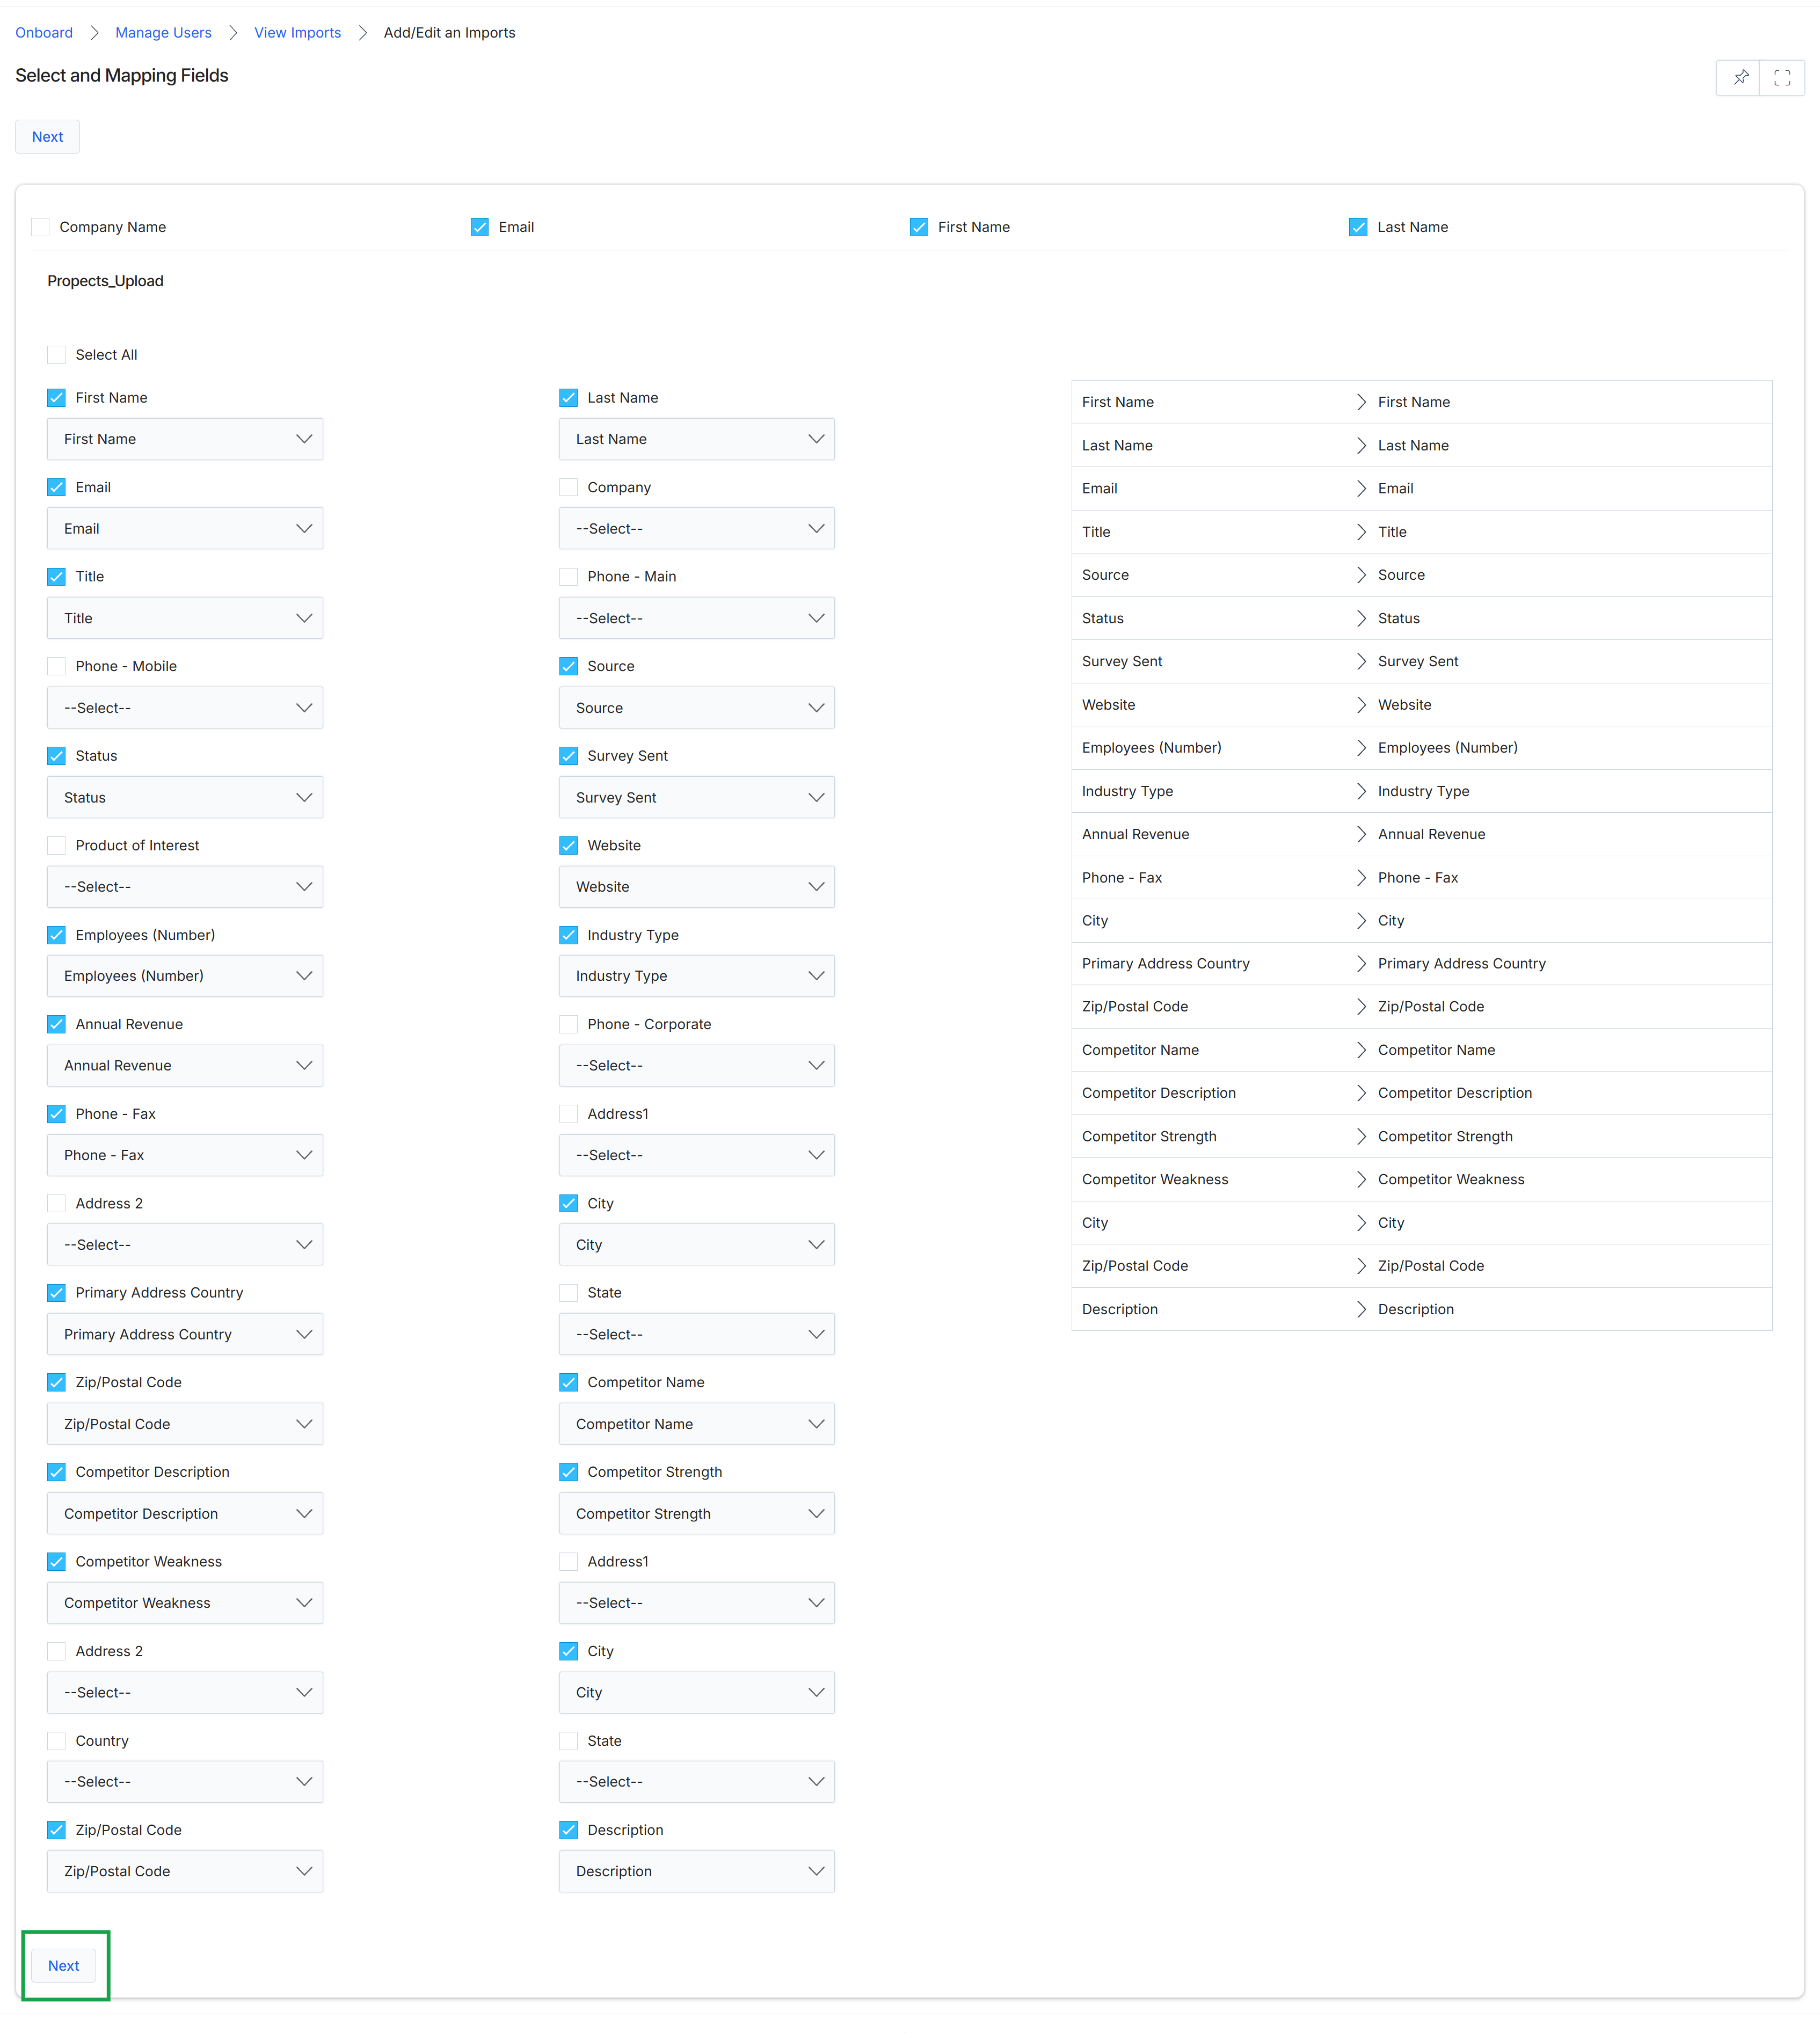
Click Next.
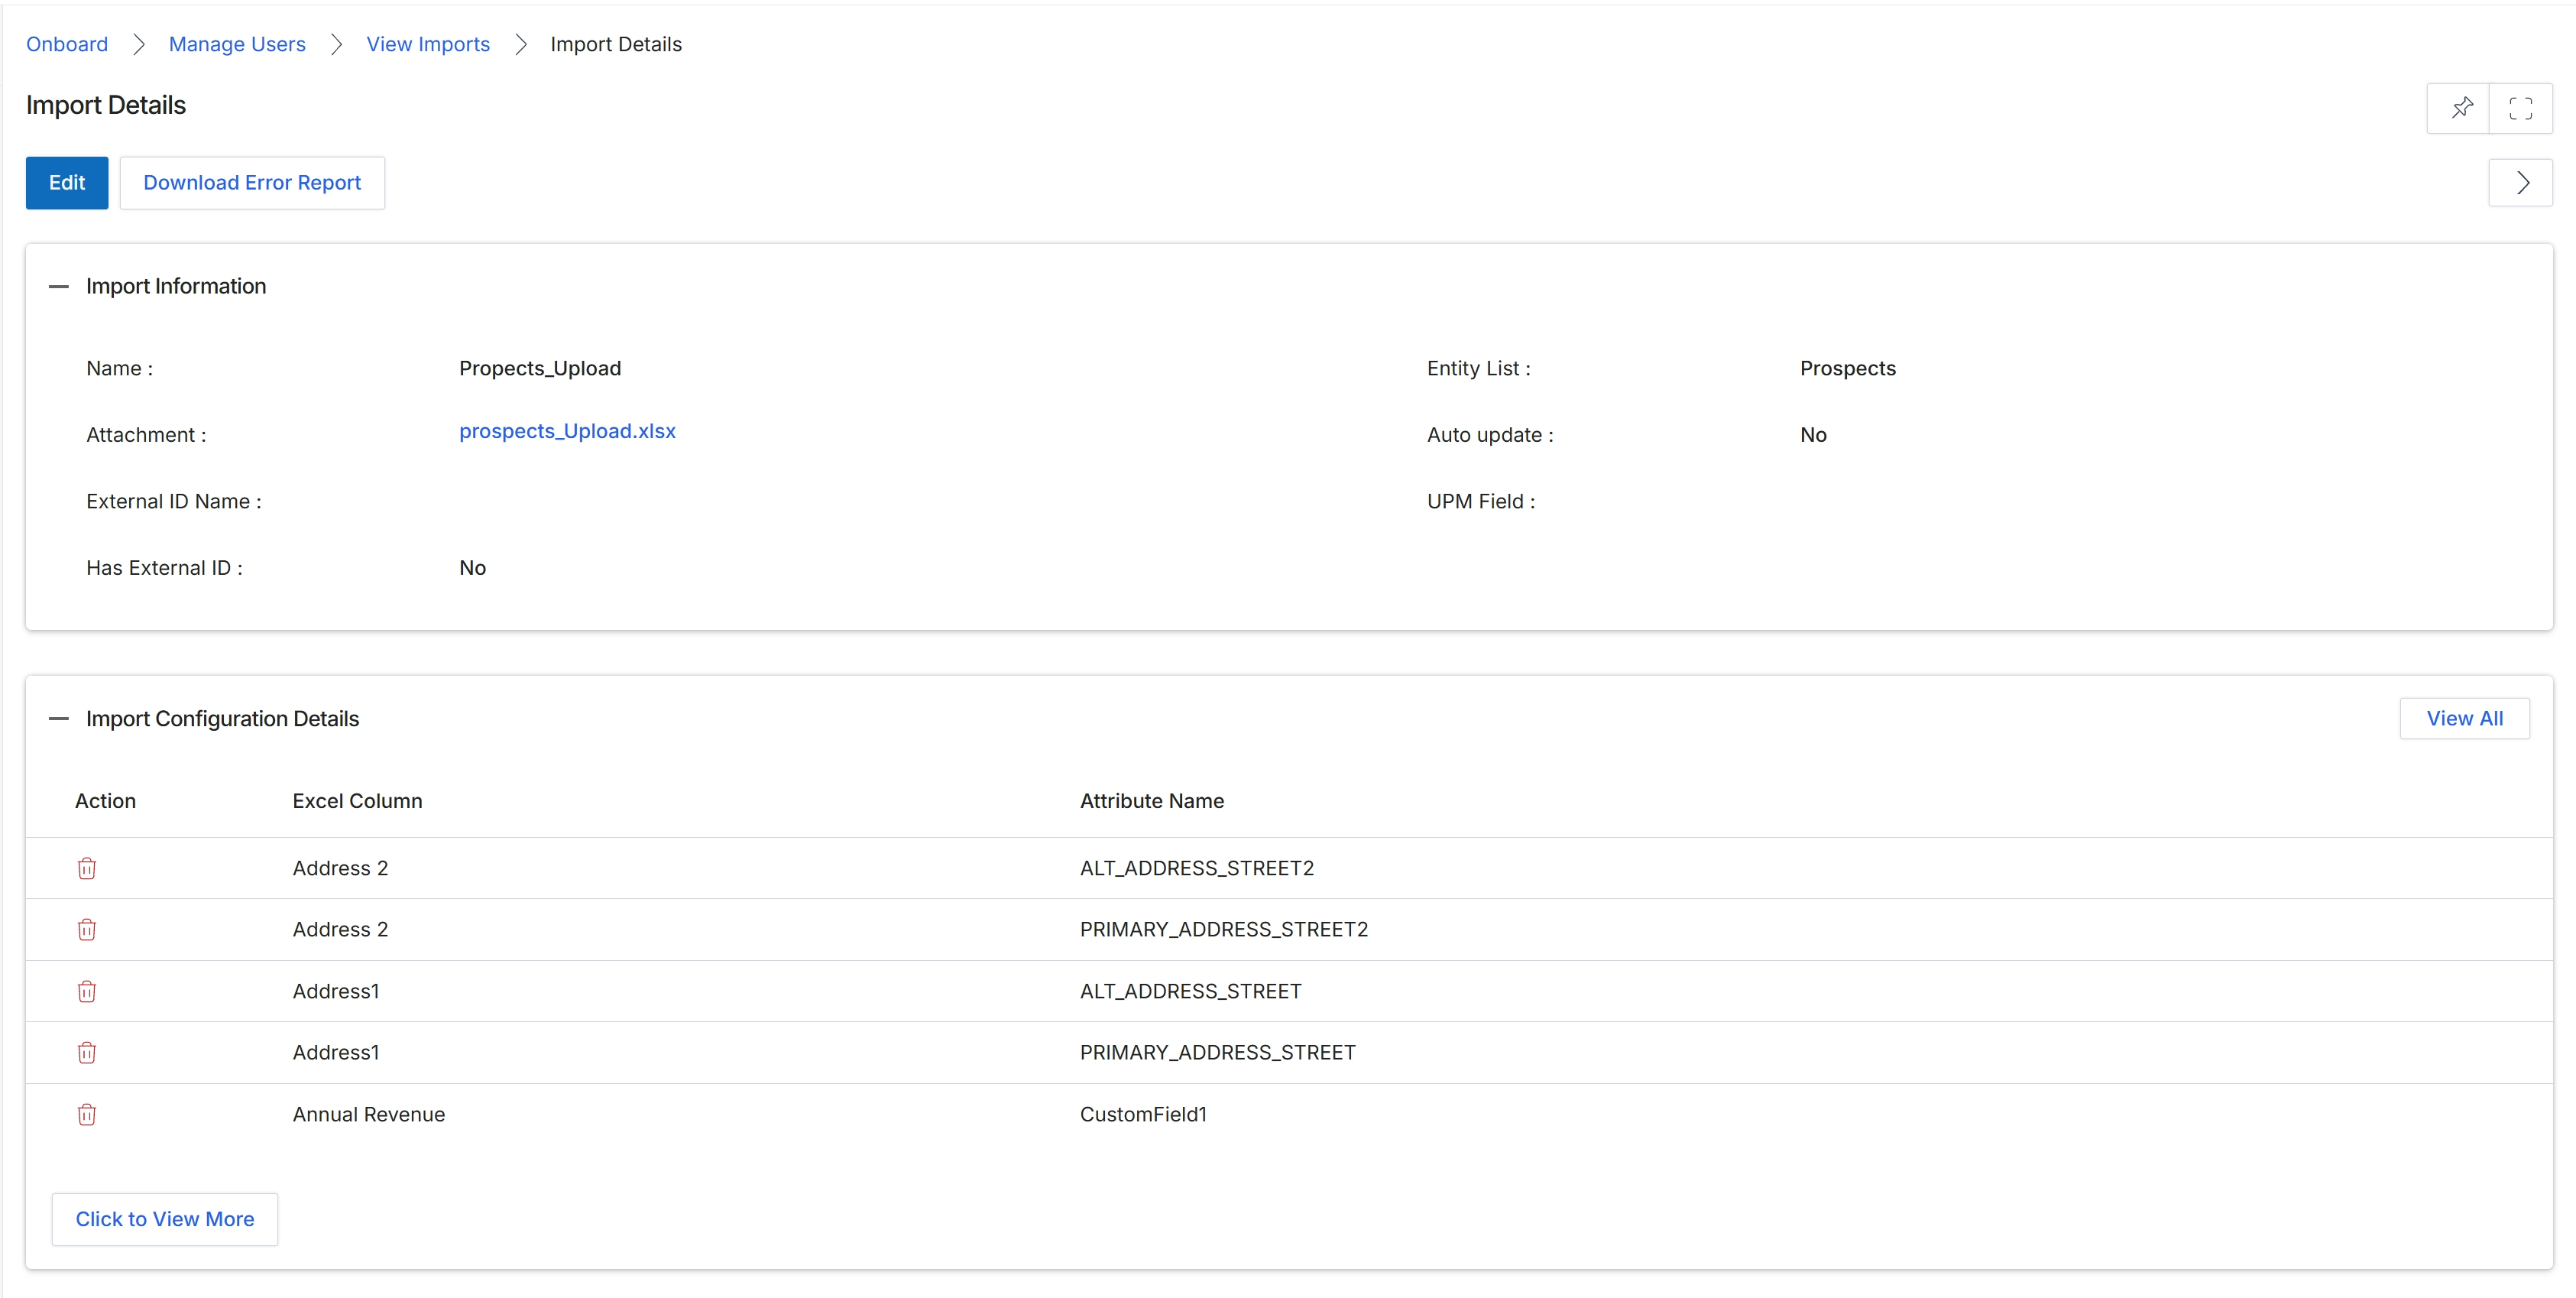
This screen displays the comprehensive details of a specific data import record, providing a summary of the import operation and its configuration. It is typically accessed after an import has been initiated or completed, allowing administrators to review the parameters and status of the data transfer. The screen is divided into sections that present general import information and the specific mappings used to align source data with platform fields. This view is crucial for auditing import processes, troubleshooting data discrepancies, and understanding how external data is integrated into the UPM.
Review the details of the selected import, including its general information and the configured column mappings.
Buttons
| Button | Description |
|---|---|
| Edit | Allows modification of the import details or configuration. |
| Download Error Report | Downloads a report detailing any errors encountered during the import process, which helps in identifying and correcting issues with the source data. |
| View All | Navigates to a full list of all import configuration details. |
| Click to View More | Displays additional import configuration details if the list is truncated. |
Import Information
| Field | Description |
|---|---|
| Name | The name assigned to this specific import operation. |
| Attachment | The name of the file that was uploaded for this import. |
| External ID Name | The name of the external identifier used for this import, if applicable. |
| Has External ID | Indicates whether the imported data includes an external identifier. |
| Entity List | The target entity within the platform where the data was imported. |
| Auto update | Indicates whether this import is configured to automatically update existing records. |
| UPM Field | The specific platform field targeted by the import, if a single field is being updated. |
Import Configuration Details
| Column | Description |
|---|---|
| Action | An icon to delete the corresponding mapping row. |
| Excel Column | The header of the column from the uploaded Excel file. |
| Attribute Name | The name of the platform attribute to which the Excel column data is mapped. |
Performing Bulk Updates
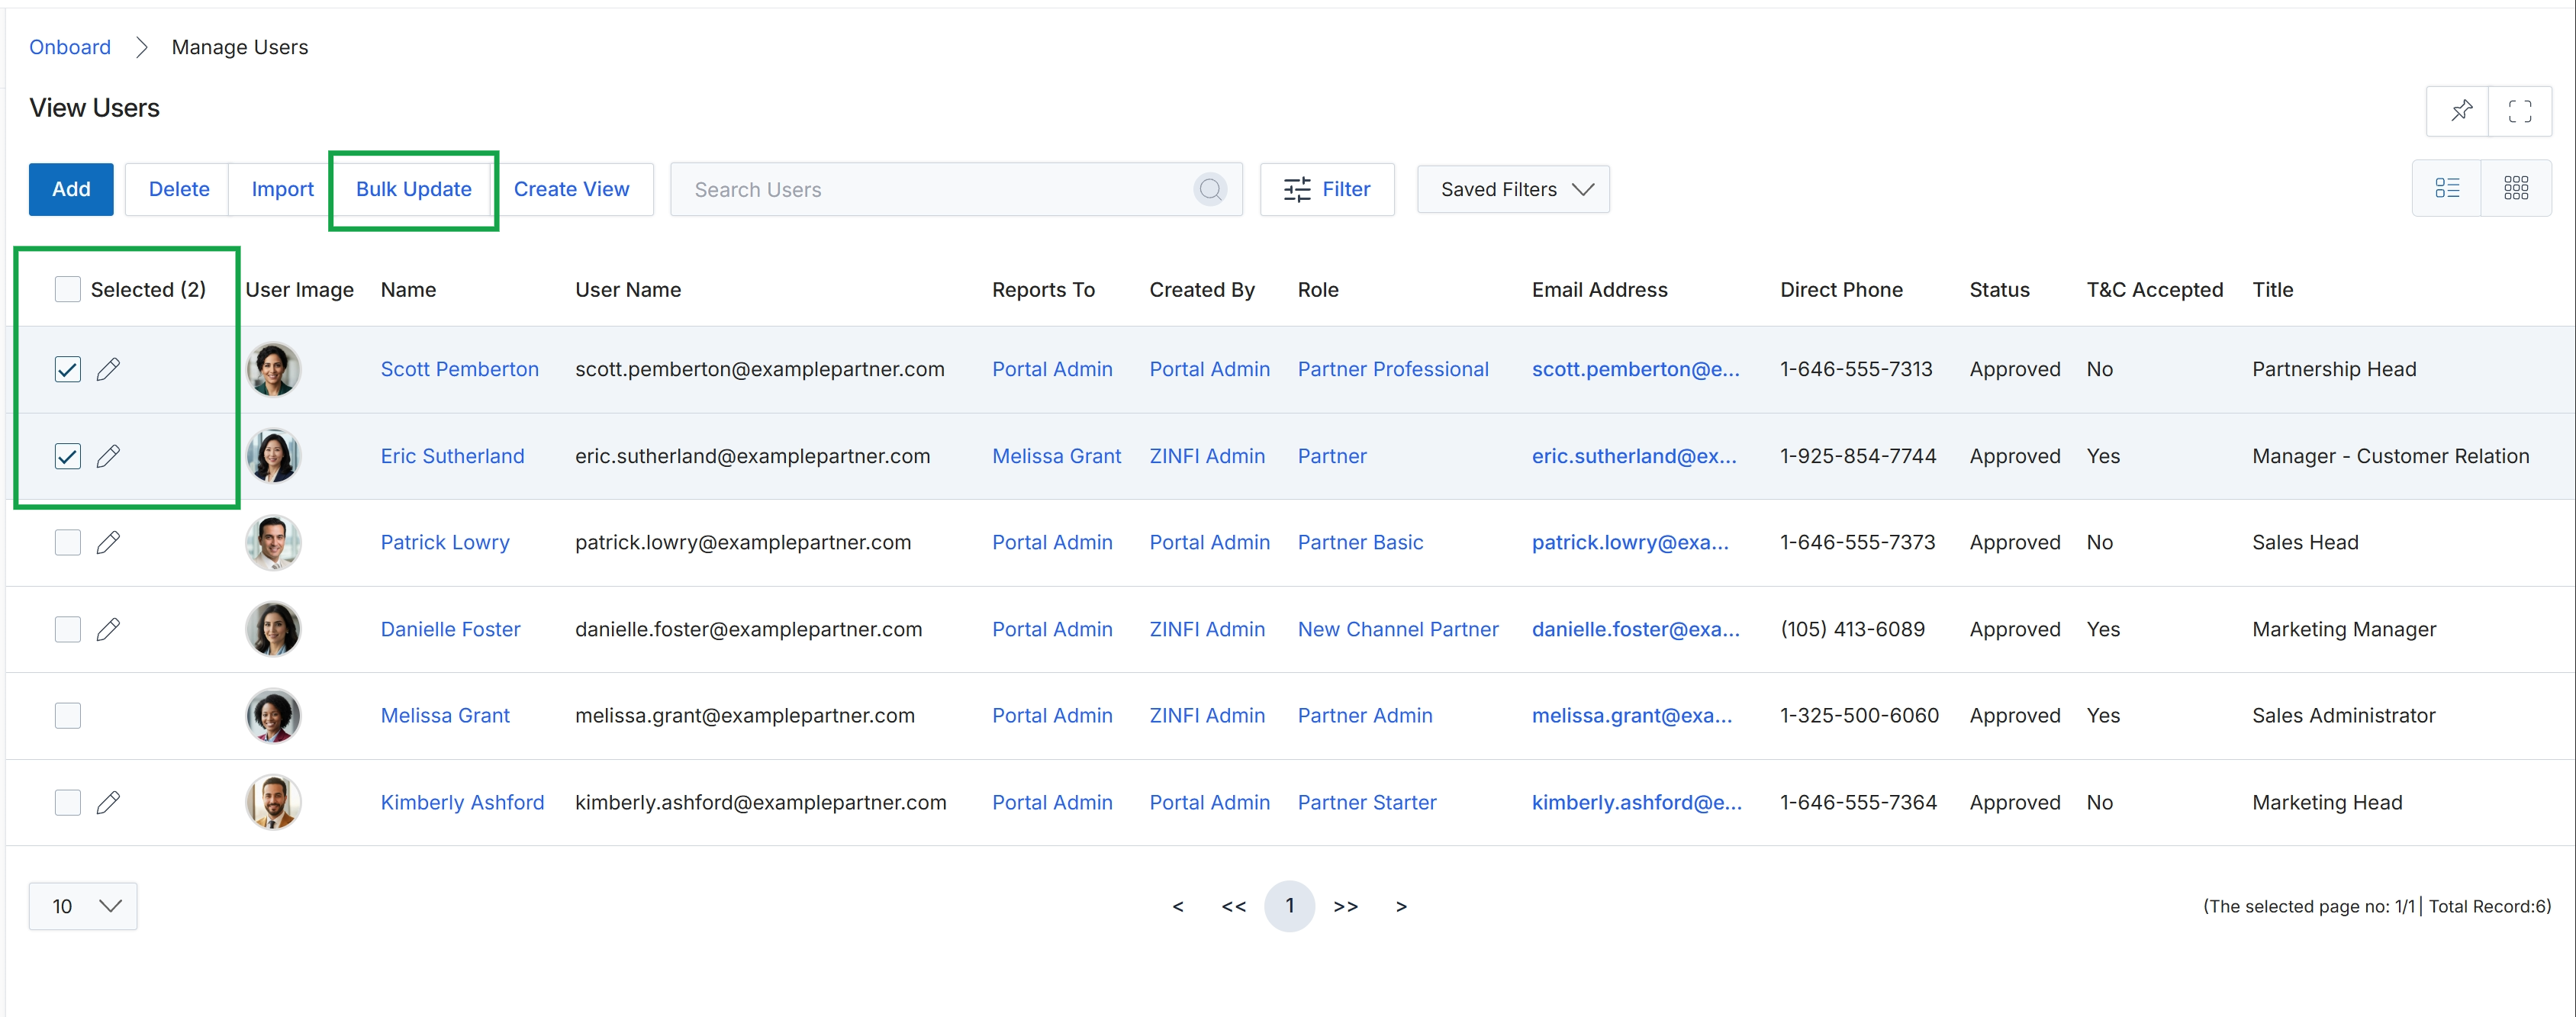
Click the Bulk Update button.
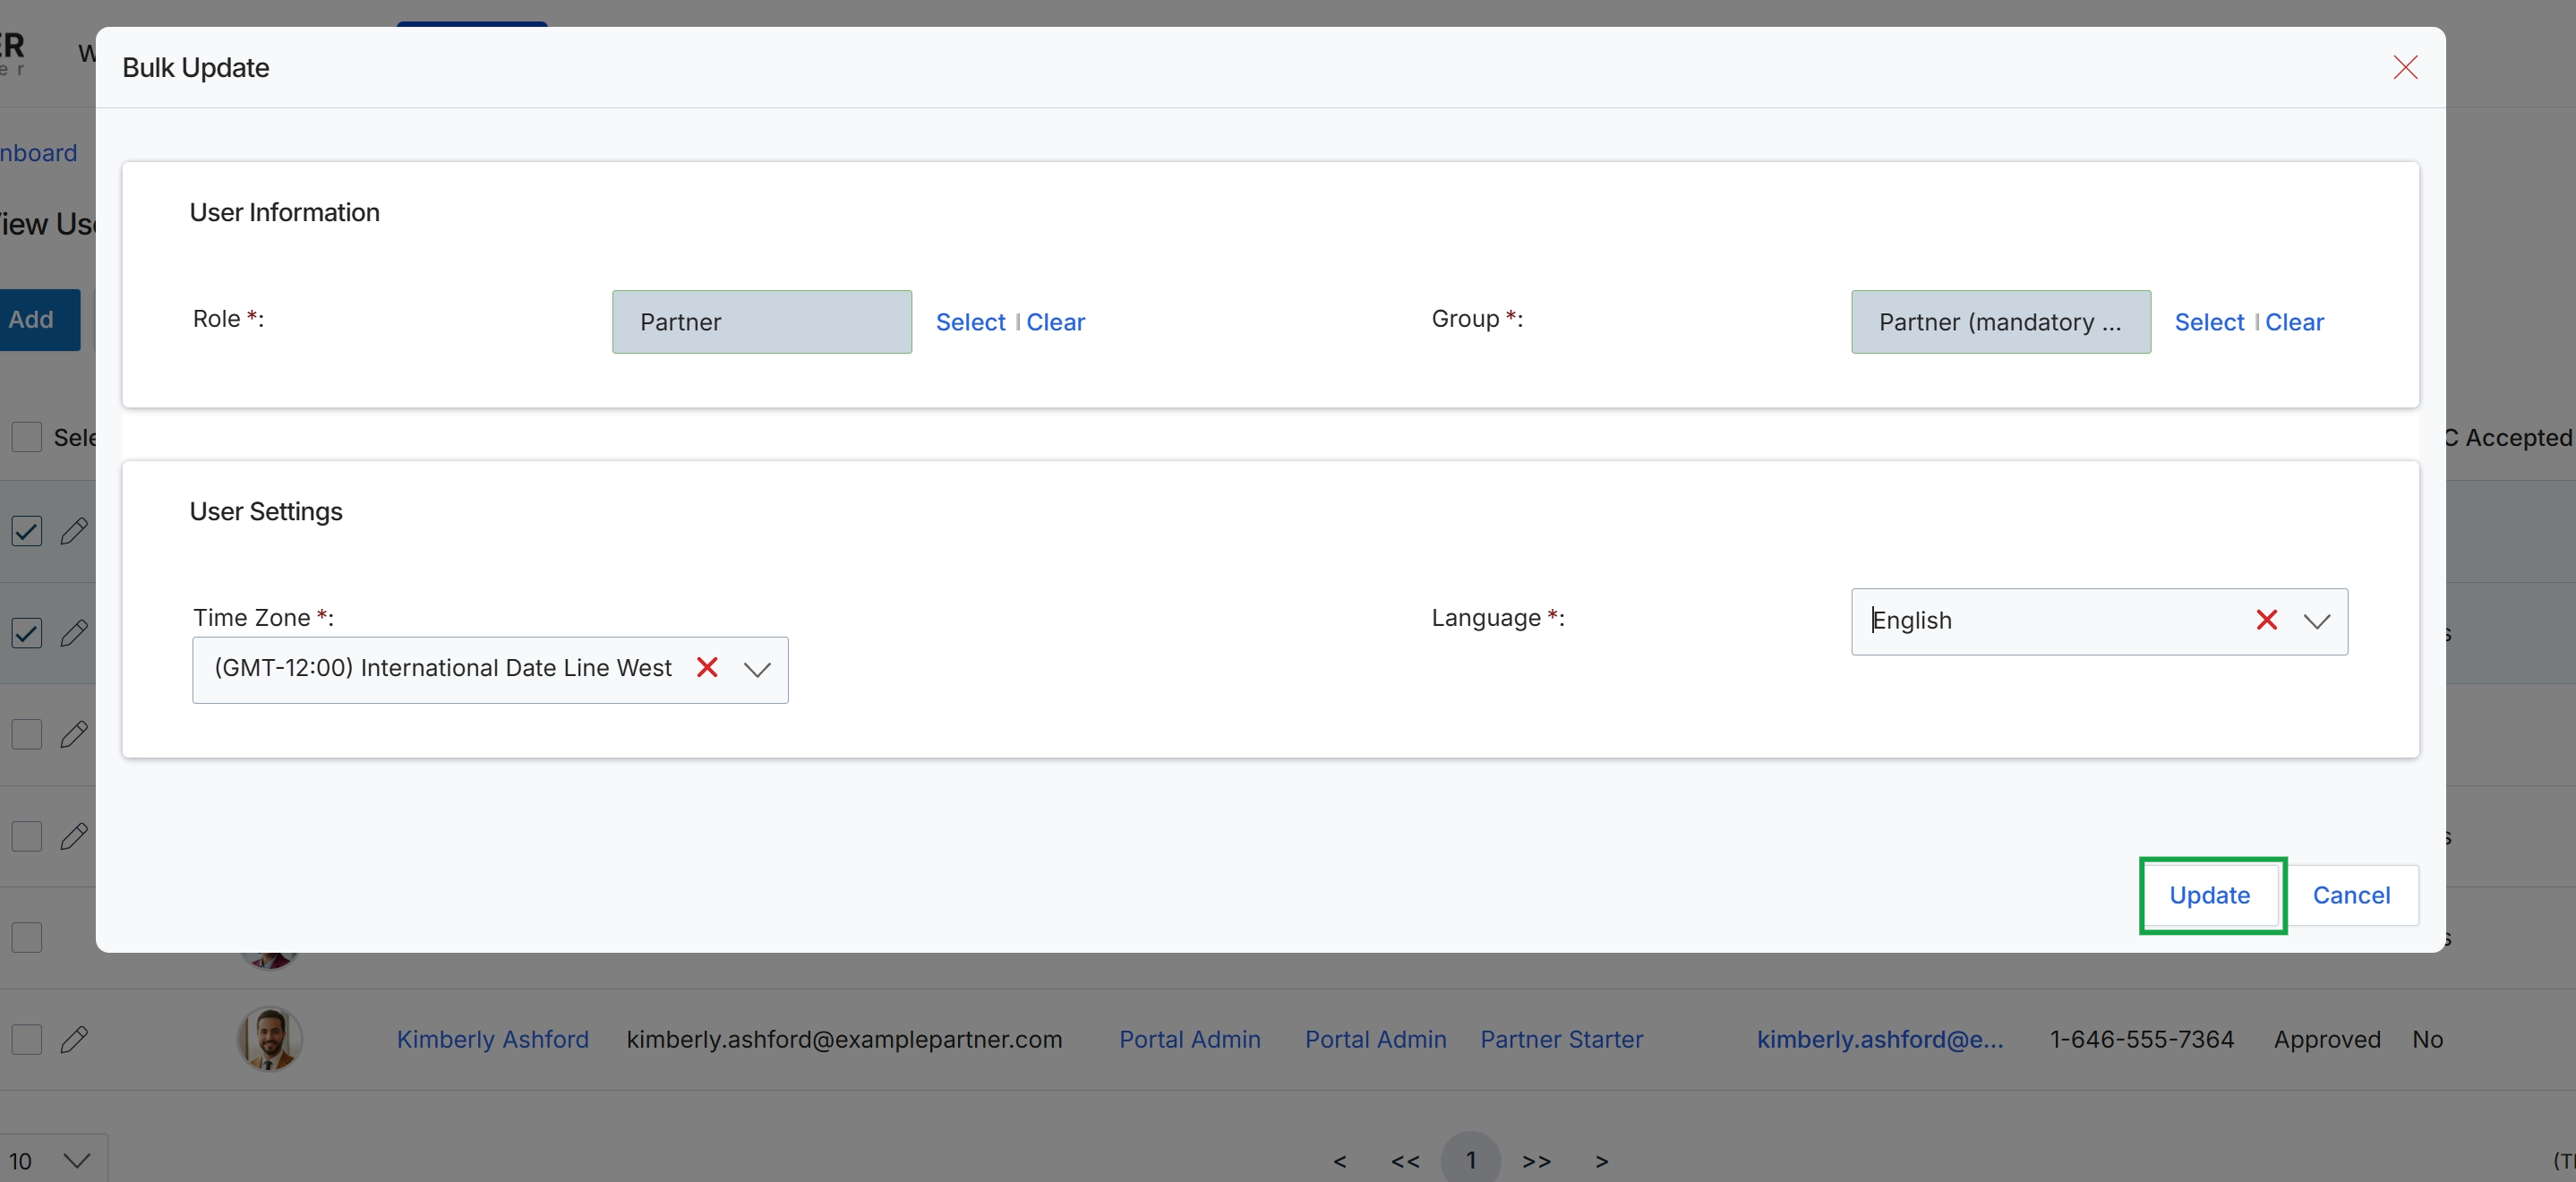
This 'Bulk Update' dialog allows administrators to modify common attributes for multiple selected user accounts simultaneously. It provides a streamlined way to adjust user roles, assign users to specific groups, and configure user-specific settings such as time zone and language preferences across a batch of users. This feature is particularly useful for managing partner users, ensuring they have the correct permissions and portal experience tailored to their function and location within the partner ecosystem. The dialog is designed to apply changes efficiently without requiring individual edits for each user.
Click the 'Update' button to apply the selected bulk changes to the user accounts.
Buttons
| Button | Description |
|---|---|
| Select | A button to open a selection dialog for choosing a different role for the users. |
| Clear | A button to remove the currently assigned role from the users. |
| Select | A button to open a selection dialog for choosing a different group for the users. |
| Clear | A button to remove the currently assigned group from the users. |
| Update | Applies the specified changes to all selected user accounts. |
| Cancel | Discards any changes made in the dialog and closes it. |
User Information
| Field | Description |
|---|---|
| Role * | The role assigned to the selected users, determining their permissions and access levels within the platform. The current value 'Partner' is displayed, with options to 'Select' a different role or 'Clear' the current assignment. |
| Group * | The group to which the selected users belong, which can influence access, content visibility, and reporting. The current value 'Partner (mandatory ...' is displayed, with options to 'Select' a different group or 'Clear' the current assignment. |
User Settings
| Field | Description |
|---|---|
| Time Zone * | A dropdown field to select the time zone for the selected users, which affects how timestamps are displayed within the platform. The current value is '(GMT-12:00) International Date Line West'. |
| Language * | A dropdown field to select the preferred language for the user interface for the selected users. The current value is 'English'. |
Creating Custom Views and Filtering Users
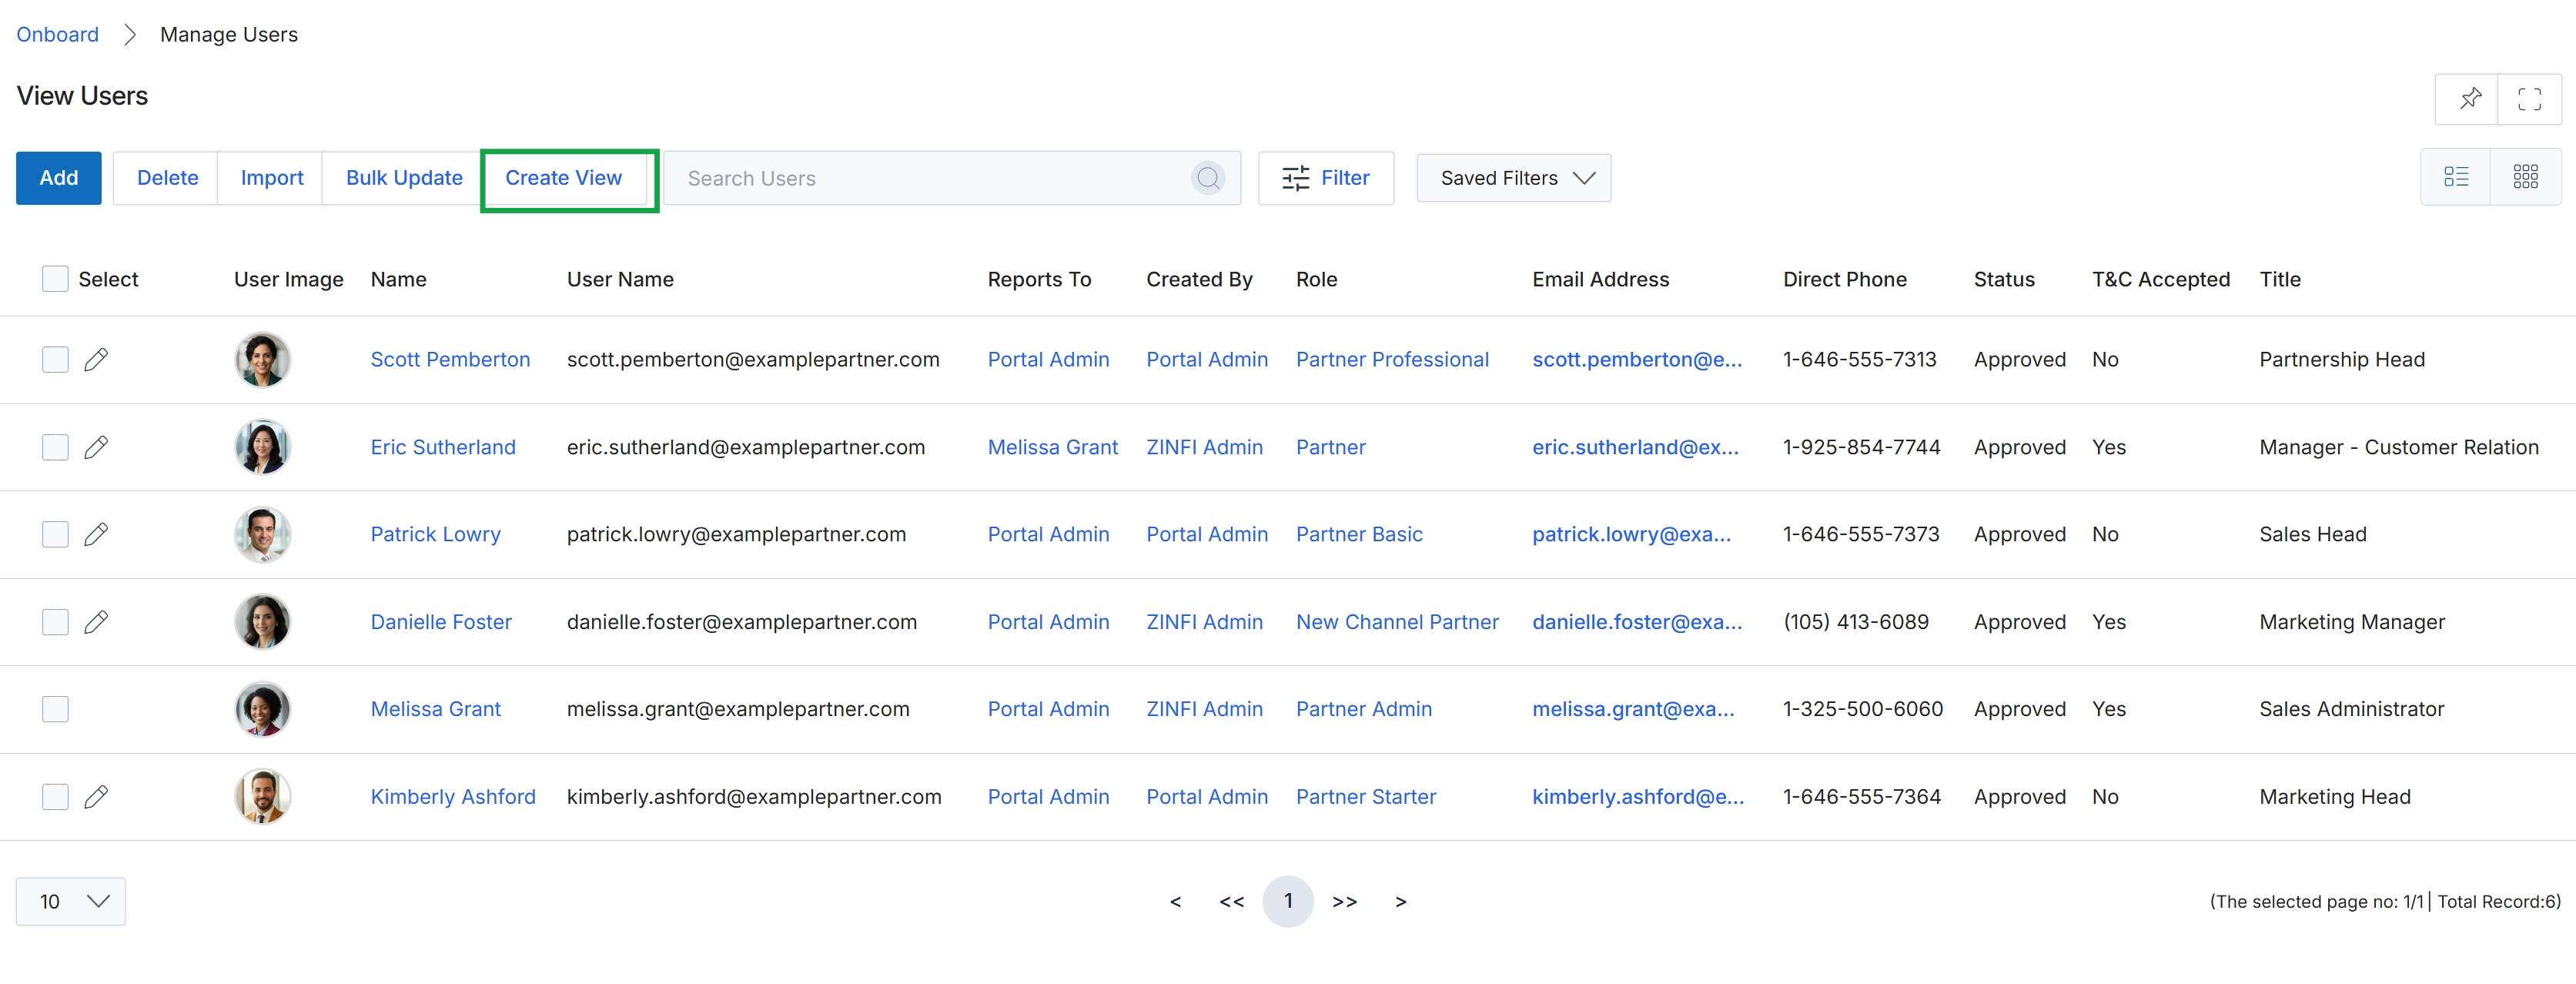
Click Update.
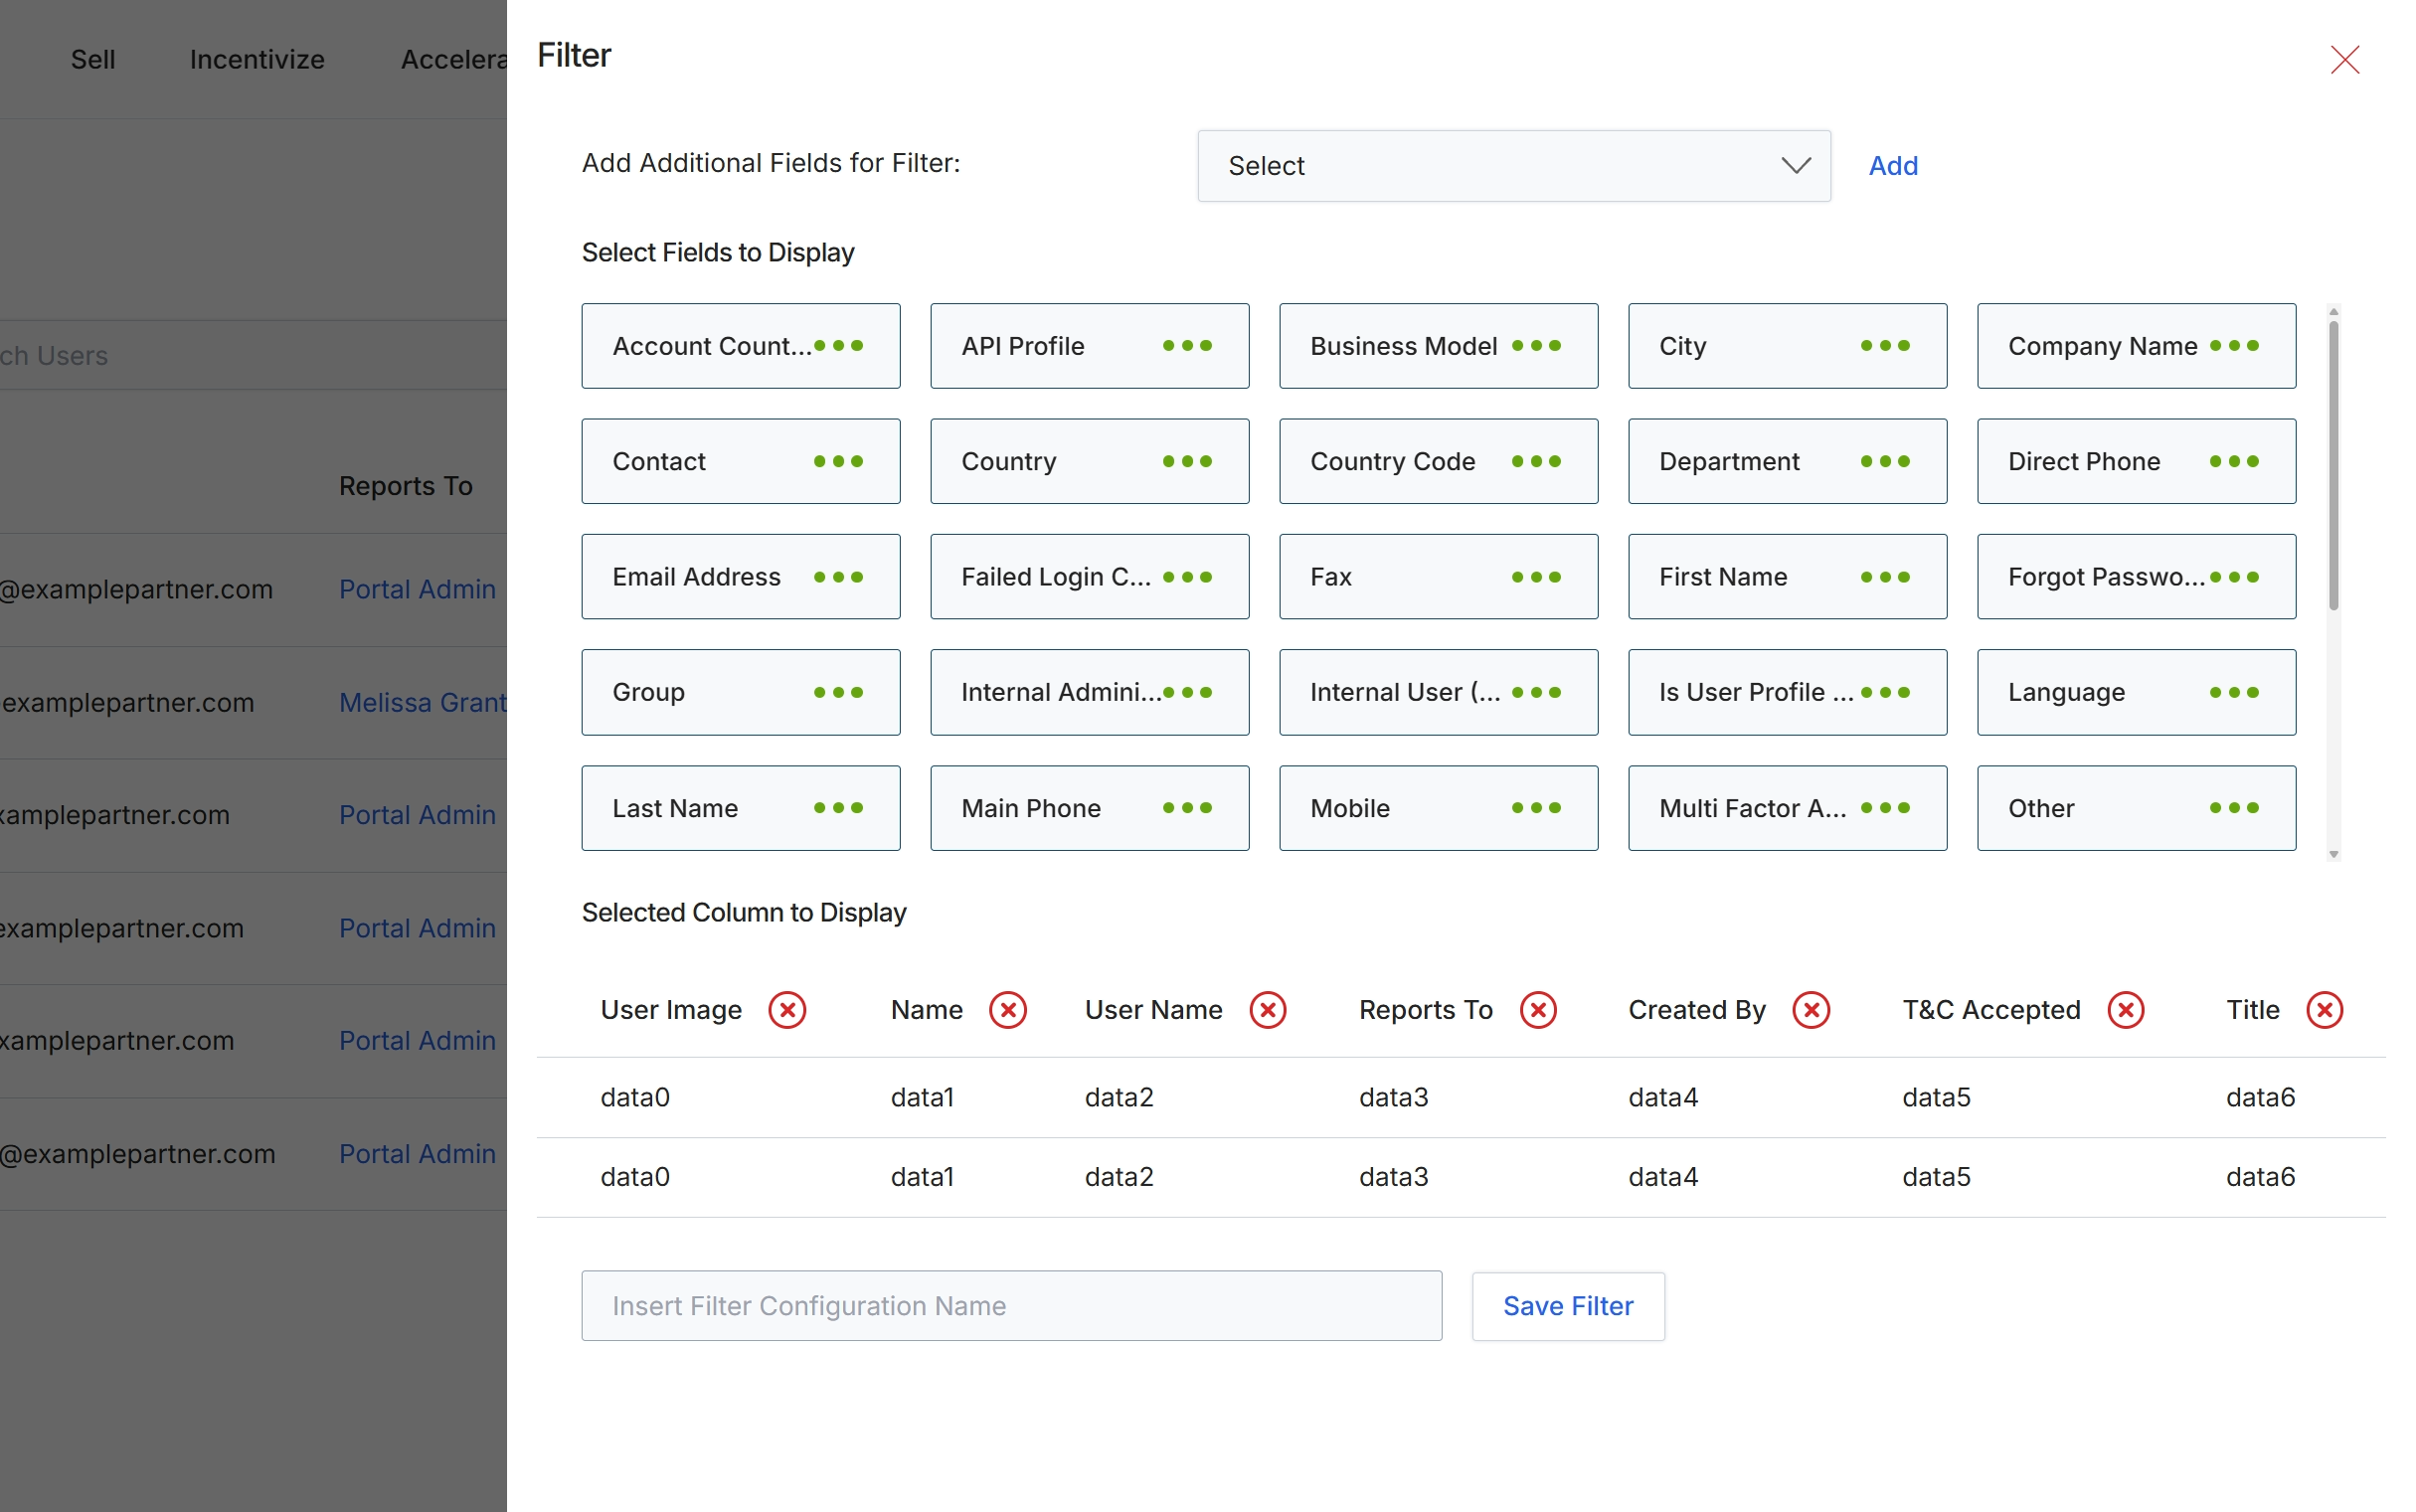
This modal window allows administrators to customize the filtering and column display settings for a list view, such as the Users list. It provides options to add specific fields for filtering data and to select which columns are visible in the main data table. This customization capability enables users to tailor their view of the data, focusing on the most relevant information for their tasks and creating saved filter configurations for repeated use. The ability to define custom filters and column layouts enhances data analysis and operational efficiency within the module.
Configure the filter and column display settings by selecting fields and columns to include, and optionally save the configuration for future use.
Buttons
| Button | Description |
|---|---|
| Add | Click this button to add the selected field from the dropdown to the filter criteria. |
| Save Filter | Click this button to save the current filter and column display configuration under the specified name. |
Fields
| Field | Description |
|---|---|
| Add Additional Fields for Filter | A dropdown menu to select additional fields that can be used to filter the data in the list view. |
| Select | The dropdown control for selecting additional fields to add to the filter criteria. |
| Insert Filter Configuration Name | An input field to enter a name for the current filter and column display configuration, allowing it to be saved and reused. |
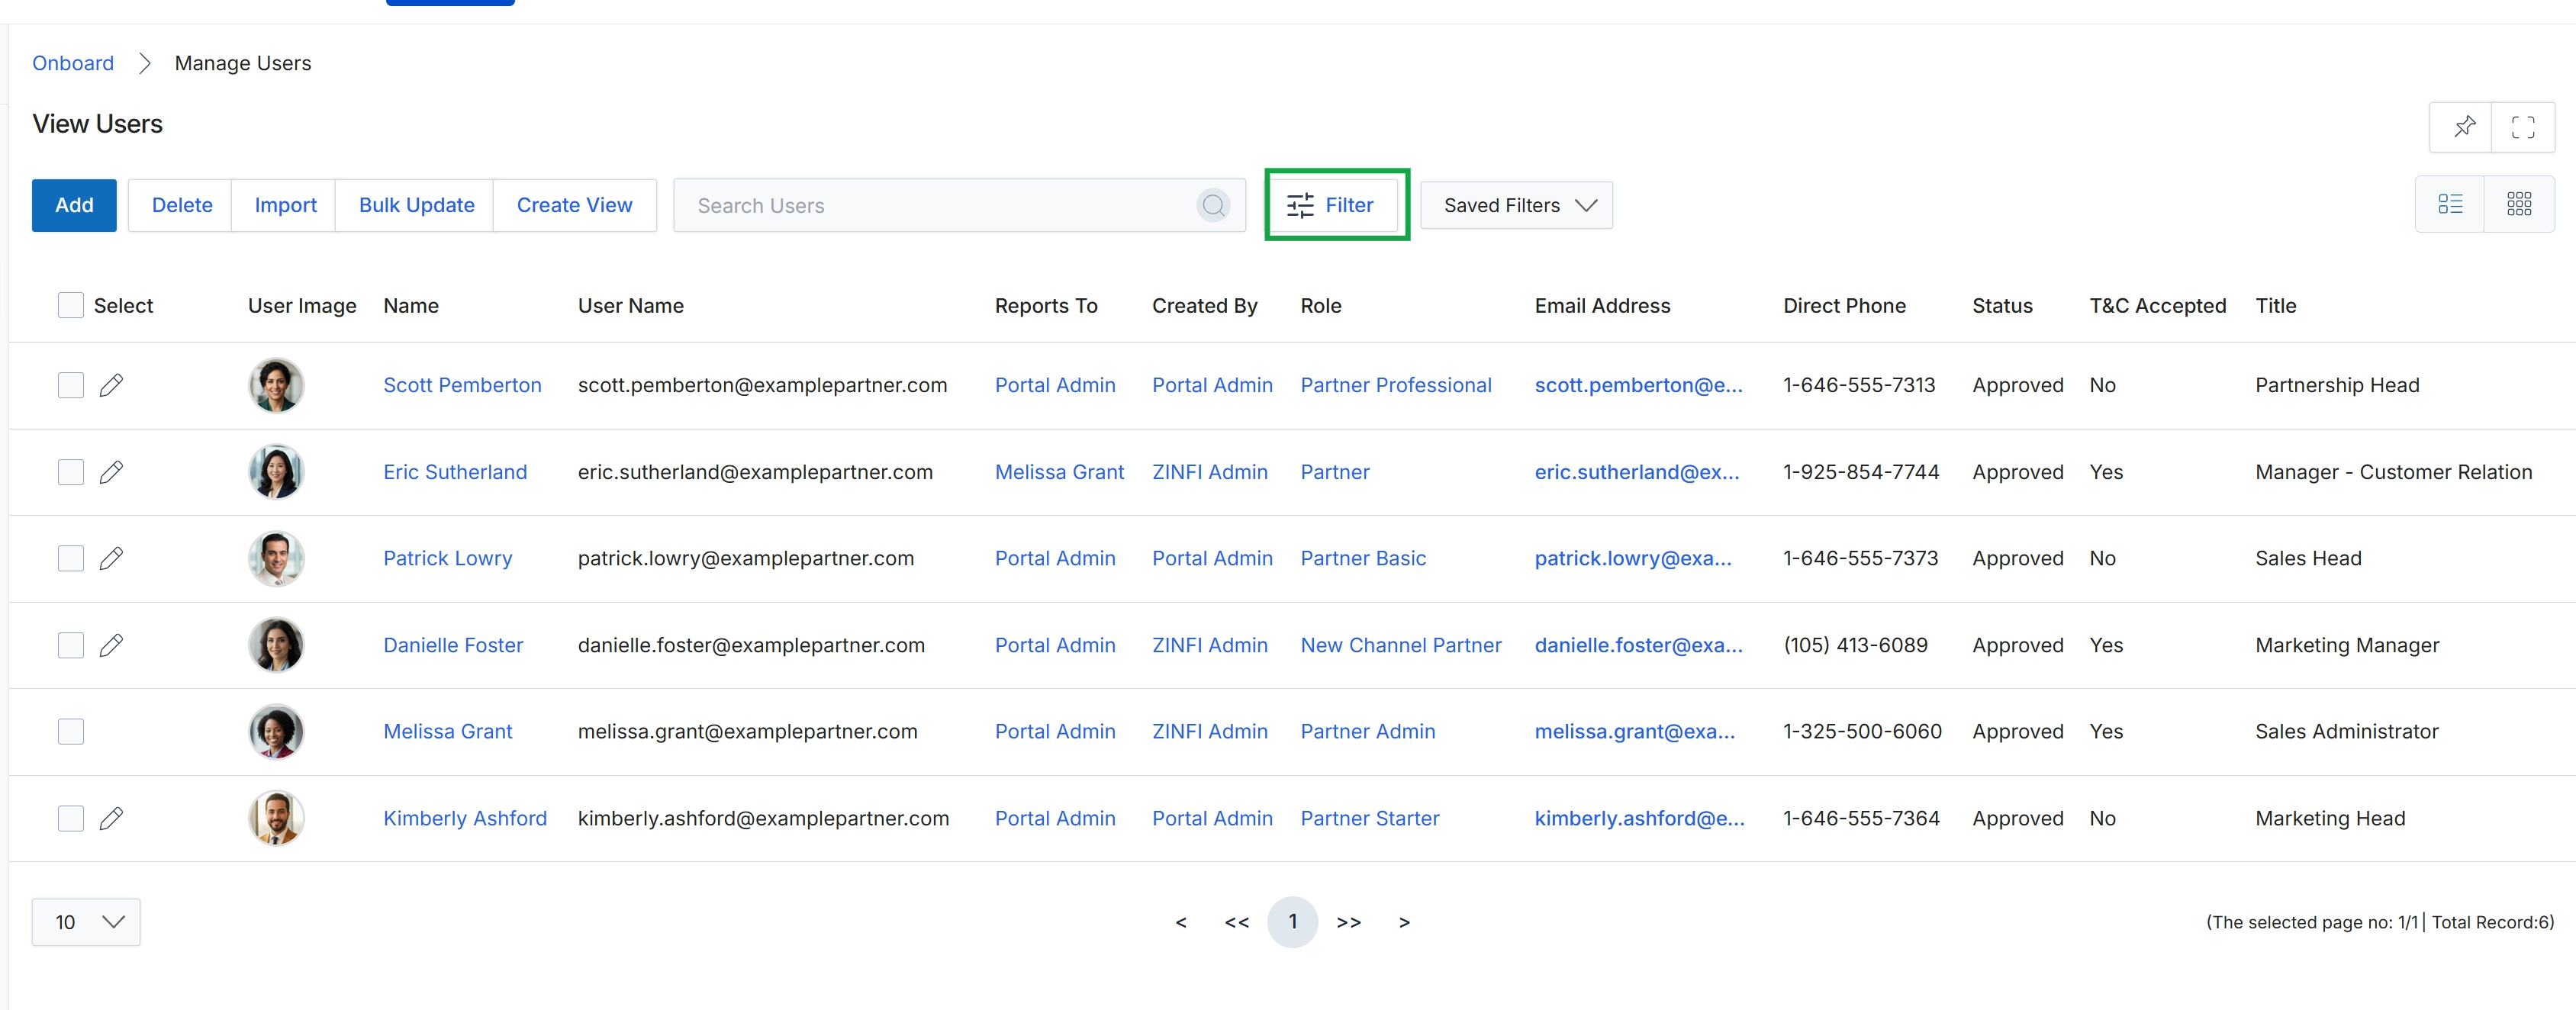
Click the Filter button to close the filter panel.
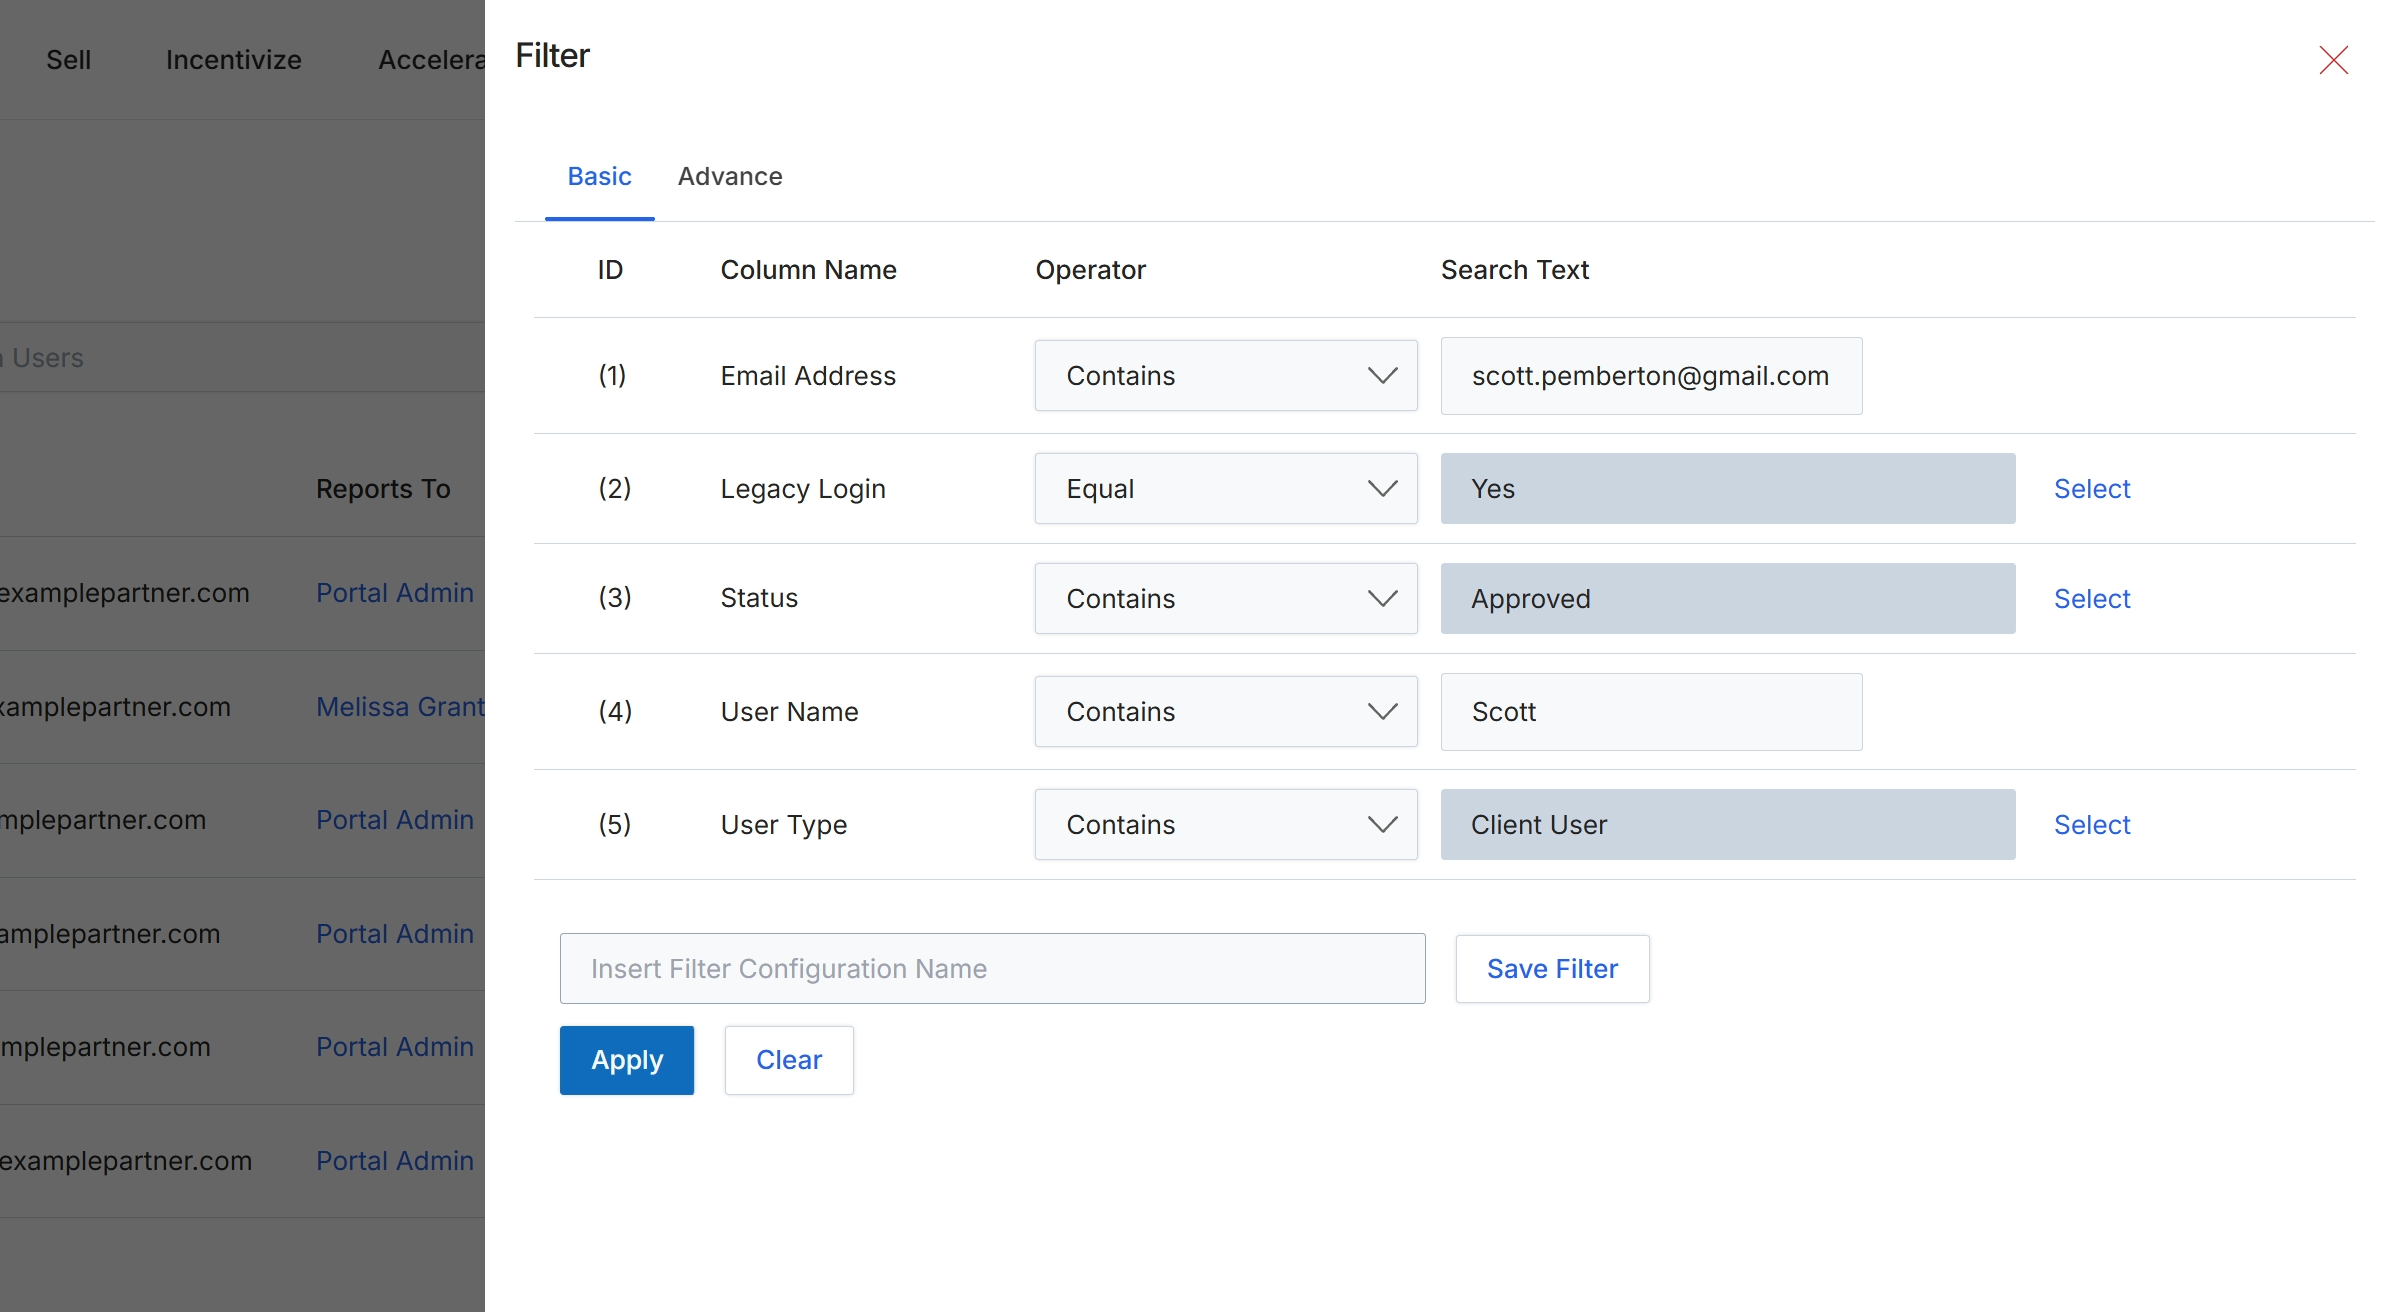
This filter dialog allows administrators to refine the list of users displayed in the user management interface by applying specific criteria. Users are a core entity in the UPM, representing individuals who can access either the vendor-side platform or the partner-side portal. Filtering helps administrators quickly locate specific users based on attributes like email, login status, user type, or name, which is crucial for managing access, roles, and permissions across the partner ecosystem. The dialog supports both basic and advanced filtering options, enabling precise control over the displayed user data.
Click the Apply button to apply the configured filter criteria to the user list.
Buttons
| Button | Description |
|---|---|
| Basic | A tab that presents a simplified interface for applying common filter criteria. |
| Advance | A tab that provides more complex and granular filtering options. |
| Select | A button to select a value for the Legacy Login filter. |
| Select | A button to select a value for the Status filter. |
| Select | A button to select a value for the User Type filter. |
| Save Filter | A button to save the current filter configuration under the specified name. |
| Apply | A button to apply the configured filter criteria to the user list. |
| Clear | A button to clear all applied filter criteria. |
Fields
| Field | Description |
|---|---|
| Contains | The selected operator for the Email Address filter, indicating that the email address should contain the specified search text. |
| scott.pemberton@gmail.com | The search text entered for the Email Address filter. |
| Equal | The selected operator for the Legacy Login filter, indicating an exact match for the specified value. |
| Yes | The selected value for the Legacy Login filter, indicating users with legacy login enabled. |
| Contains | The selected operator for the Status filter, indicating that the user status should contain the specified search text. |
| Approved | The selected value for the Status filter, indicating users with an 'Approved' status. |
| Contains | The selected operator for the User Name filter, indicating that the user name should contain the specified search text. |
| Scott | The search text entered for the User Name filter. |
| Contains | The selected operator for the User Type filter, indicating that the user type should contain the specified search text. |
| Client User | The selected value for the User Type filter, indicating users classified as 'Client User'. |
| Insert Filter Configuration Name | A text input field to enter a name for the current filter configuration to save it for future use. |
Column Headings
| Column | Description |
|---|---|
| ID | A column header indicating the numerical identifier for each filter row. |
| Column Name | A column header indicating the user attribute being filtered. |
| Operator | A column header indicating the comparison operator used for the filter criterion. |
| Search Text | A column header indicating the value to be matched against the selected user attribute. |
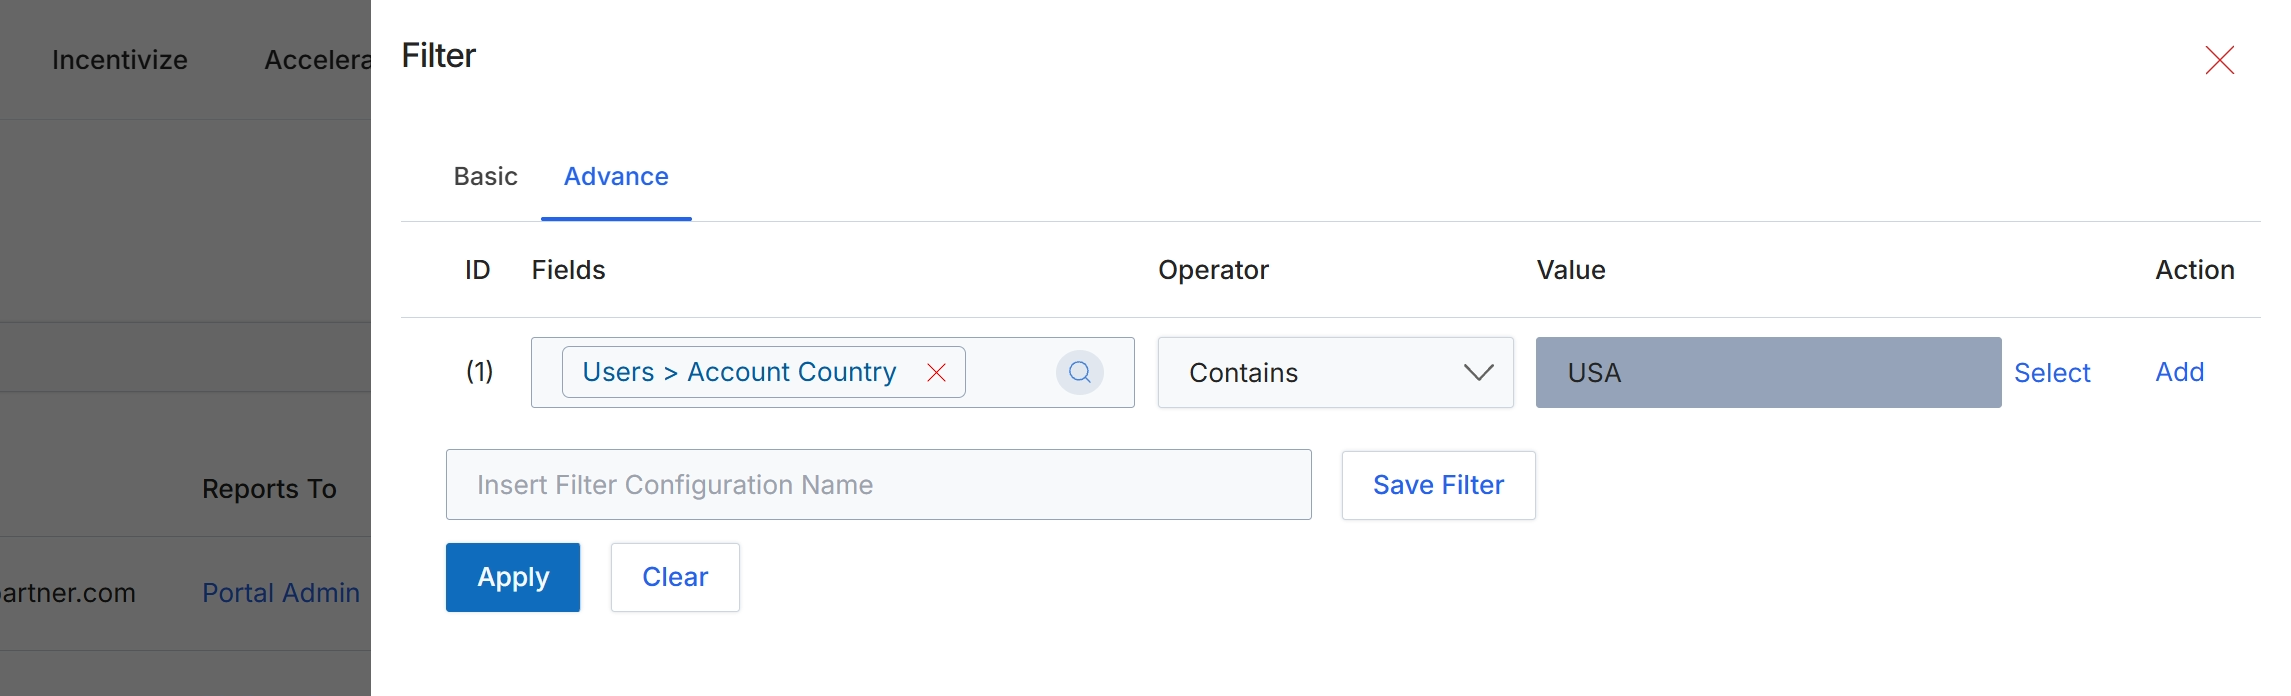
This screen displays the advanced filter configuration dialog, which allows administrators to define precise criteria for segmenting and viewing user records within the platform. The advanced filtering capability enables the creation of complex, multi-condition filter rules, essential for managing large datasets of users, identifying specific groups for targeted actions, or generating specialized reports. Users can specify fields, operators, and values to construct granular search queries, and these configurations can be saved for future use, promoting efficiency and consistency in data analysis. This dialog is part of the broader user management functionality, providing tools to effectively organize and interact with user data.
Configure the advanced filter rules by selecting fields, operators, and values, then click "Apply" to filter the user list.
Buttons
| Button | Description |
|---|---|
| Basic | Switches the filter interface to a simpler, basic mode. |
| Advance | Activates the advanced filter interface, allowing for complex, multi-condition rule creation. |
| X (Remove Field) | Removes the selected field from the current filter rule. |
| Search Field | Opens a dialog to search for and select a different field for the filter rule. |
| Select | Allows selection of a value for the filter rule, typically from a predefined list or lookup. |
| Add | Adds another row to the filter configuration, allowing for additional filter rules. |
| Save Filter | Saves the current filter configuration under the specified name for later retrieval. |
| Apply | Applies the configured filter rules to the user list, displaying only the matching records. |
| Clear | Resets all filter rules and removes any applied filters. |
Fields
| Field | Description |
|---|---|
| Users > Account Country | The currently selected field for the filter rule, indicating that users will be filtered based on their associated account's country. |
| Contains | The selected operator for the filter rule, specifying that the selected field's value must contain the specified text. |
| USA | The value used in conjunction with the selected operator to filter the results. |
| Filter Configuration Name text input | An input field to enter a name for the current filter configuration, enabling it to be saved for future use. |
Column Headings
| Column | Description |
|---|---|
| ID | Column header for the rule identifier. |
| Fields | Column header for the field selection dropdown, where users choose the data attribute to filter by. |
| Operator | Column header for the operator selection dropdown, defining how the field's value should be compared to the specified filter value. |
| Value | Column header for the input field where the specific value for the filter rule is entered. |
| Action | Column header for actions related to individual filter rules. |