

Overview
Effective email communication is a cornerstone of successful marketing, especially in a partner ecosystem. UPM's Email Marketing Management module empowers both vendors and partners to execute targeted email campaigns, ensuring consistent branding and messaging while allowing for necessary customization. This feature streamlines the process of creating and distributing marketing emails, from selecting pre-approved templates to defining recipient lists and scheduling send times.
By centralizing email campaign management, UPM helps maintain brand integrity, track campaign performance, and facilitate co-marketing initiatives. It supports various campaign types, enabling partners to leverage vendor-provided assets and reach their specific customer segments with relevant, timely communications, ultimately driving engagement and sales.
Accessing and Managing Outgoing Emails
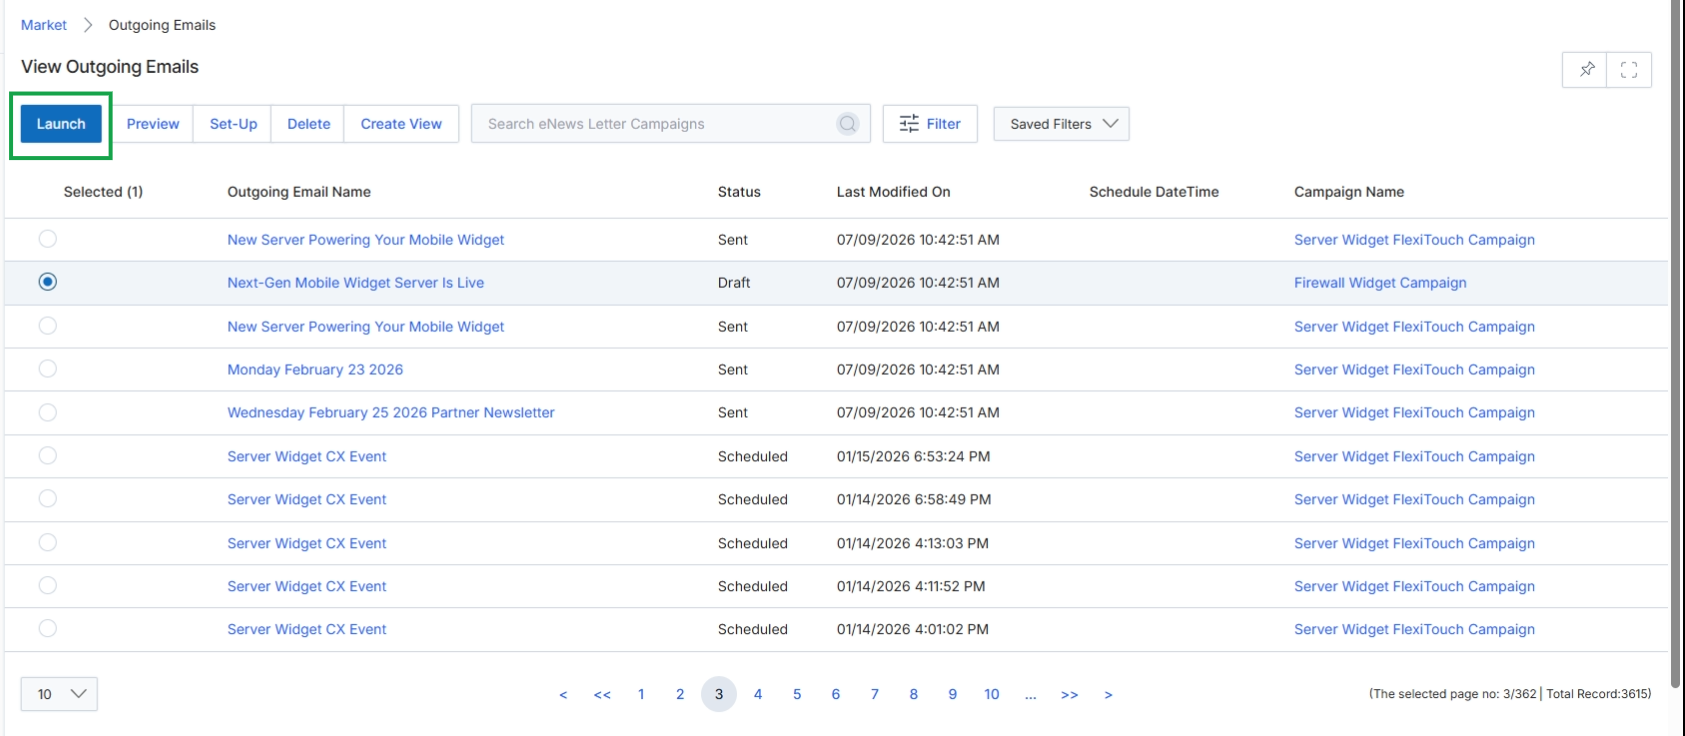
Click the Market module in the top navigation bar, then click Emails in the left navigation panel to expand it, and then click Outgoing Emails.
Configuring Email Campaign Details
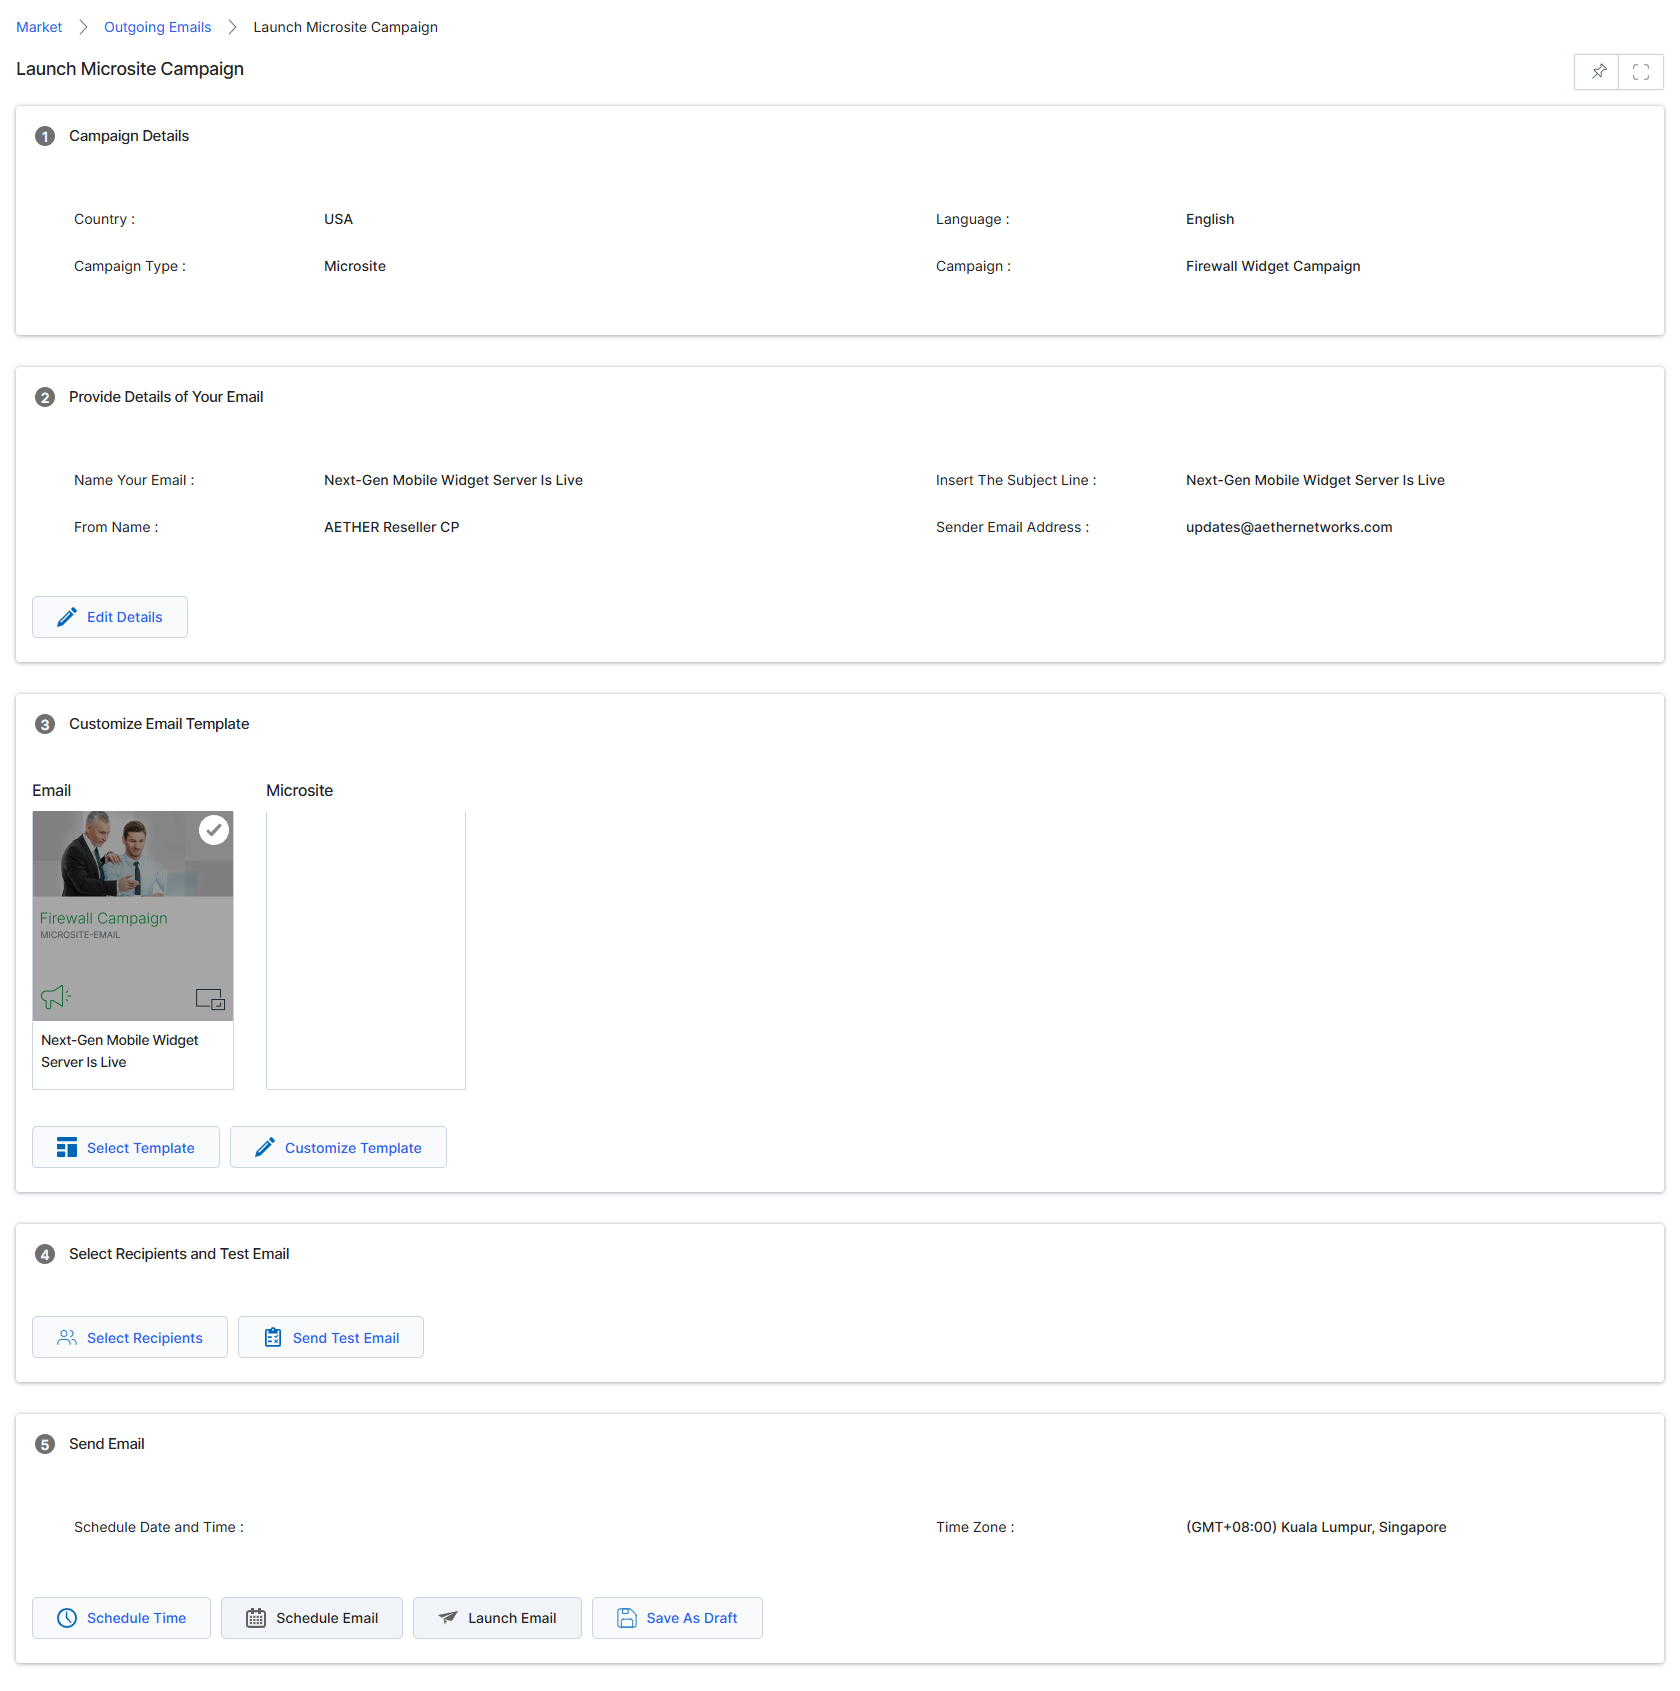
This screen, 'Launch Microsite Campaign,' is part of the email campaign execution workflow within the Market module. It provides a consolidated view for configuring and launching an outgoing email campaign that is associated with a microsite. Users arrive here after selecting an email from the 'Outgoing Emails' list and initiating the launch process. The screen displays campaign details, allows for customization of the email and microsite, enables recipient selection, and provides options for scheduling and sending the email. This step is crucial for partners or vendors to finalize their co-marketing email campaigns before deployment, ensuring all elements like content, branding, and targeting are correctly set up.
Configure the details for the outgoing email campaign, including campaign details, email content, recipients, and scheduling.
Buttons
| Button | Description |
|---|---|
| Edit Details | Click to modify the email's name, subject line, sender name, and sender email address. |
| Select Template | Click to choose a different email template from the library. |
| Customize Template | Click to open the email editor and customize the selected template. |
| Select Recipients | Click to choose the mailing list or individual recipients for this email campaign. |
| Send Test Email | Click to send a test version of the email to a specified address for review. |
| Schedule Time | Click to set or change the date and time for the email to be sent. |
| Schedule Email | Click to schedule the email for sending at the specified date and time. |
| Launch Email | Click to immediately send the email campaign. |
| Save As Draft | Click to save the current configuration as a draft without sending. |
Campaign Details
| Field | Description |
|---|---|
| Country | The country associated with the campaign. |
| Language | The language of the campaign content. |
| Campaign Type | The type of campaign, in this case, 'Microsite'. |
| Campaign | The name of the campaign this email is part of. |
Provide Details of Your Email
| Field | Description |
|---|---|
| Name Your Email | The internal name of the outgoing email. |
| Insert The Subject Line | The subject line that will appear in the recipient's inbox. |
| From Name | The name displayed as the sender of the email. |
| Sender Email Address | The email address from which the email will be sent. |
Send Email
| Field | Description |
|---|---|
| Schedule Date and Time | The selected date and time for the email to be sent. |
| Time Zone | The time zone for the scheduled send time. |
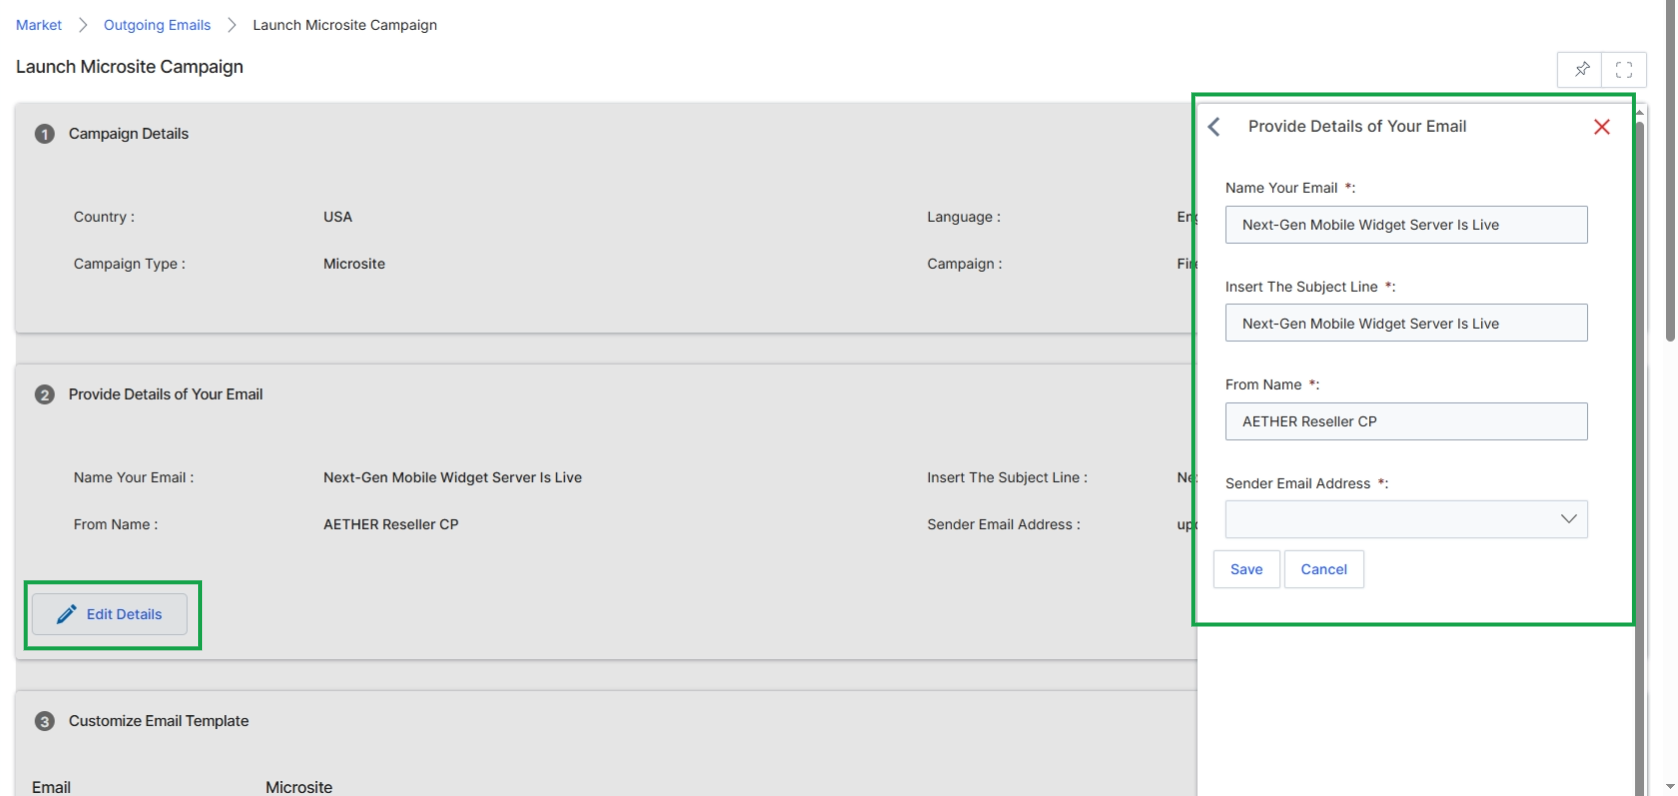
This screen provides a comprehensive overview of a specific campaign within the Market module, allowing vendors to manage and launch co-marketing initiatives. It consolidates all relevant information, from campaign details and email content to recipient selection and scheduling, into a single interface. The 'Provide Details of Your Email' section specifically allows for the configuration of the email's identity, including its name, subject line, sender name, and sender email address, which are crucial for branding and deliverability. This section is part of the broader workflow for launching an email campaign, ensuring that all necessary parameters are defined before deployment.
Click the "Edit Details" button within the "Provide Details of Your Email" section to open a slide panel for editing the email's identity.
Buttons
| Button | Description |
|---|---|
| Save | Saves the changes made to the email details. |
| Cancel | Discards any changes and closes the slide panel. |
Provide Details of Your Email
| Field | Description |
|---|---|
| Name Your Email | The internal name for the email campaign, used for identification and reporting. |
| Insert The Subject Line | The subject line of the email, which recipients will see in their inbox. |
| From Name | The name displayed as the sender of the email. |
| Sender Email Address | The email address from which the campaign email will be sent. |
Customizing Email Templates
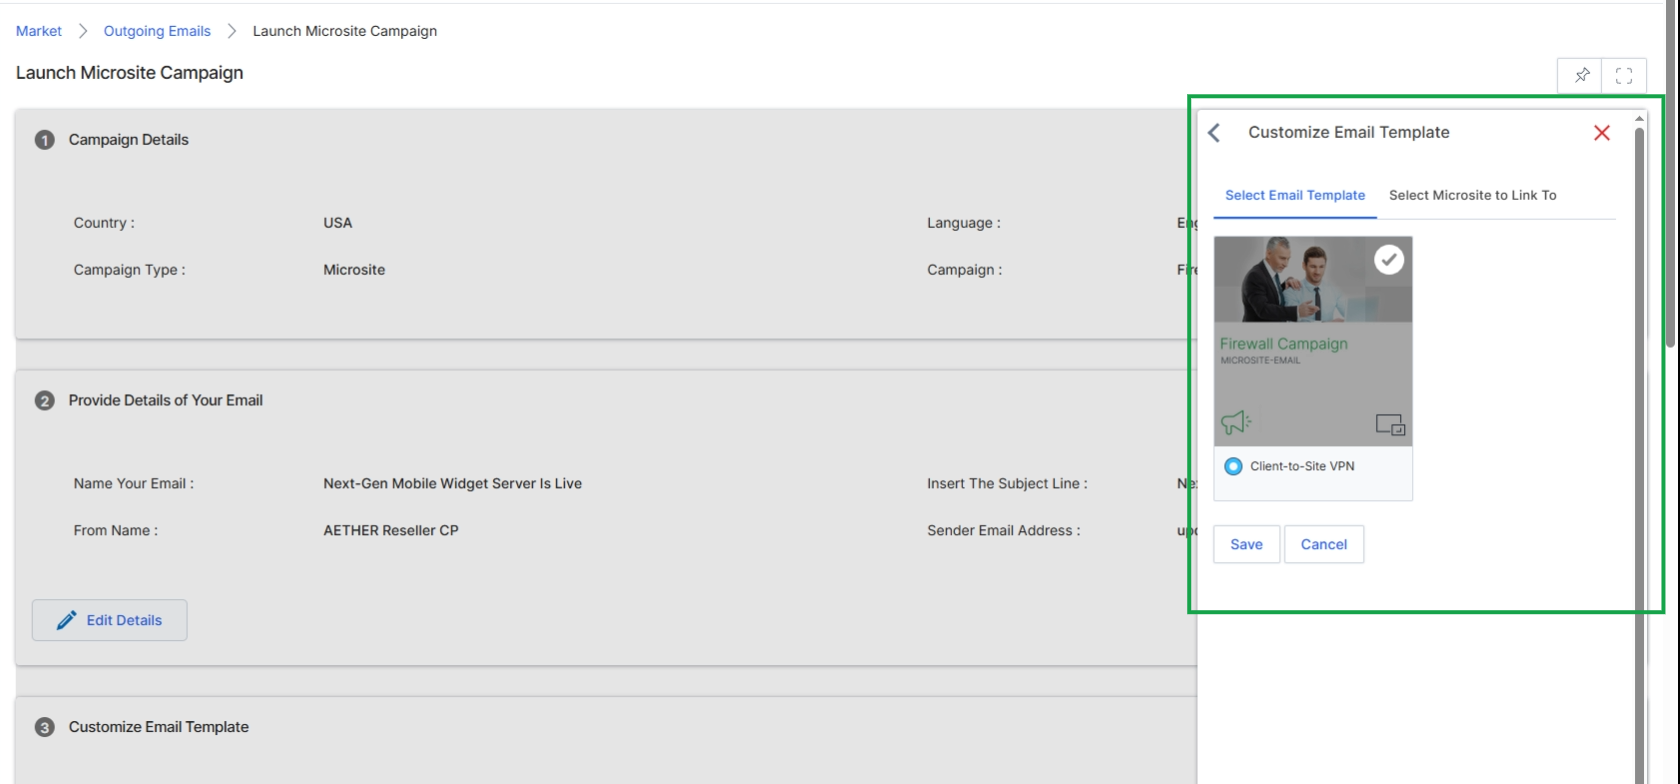
This screen displays the process of customizing an email template within a Microsite Campaign, a key step in the Market module's campaign execution workflow. The right-hand panel, which previously allowed for editing basic email details like name, subject, and sender information, has now transitioned to a view for selecting an email template. This change indicates a progression in the campaign setup, moving from defining the email's metadata to choosing its structural and visual foundation from a library of pre-approved templates, which can then be further customized.
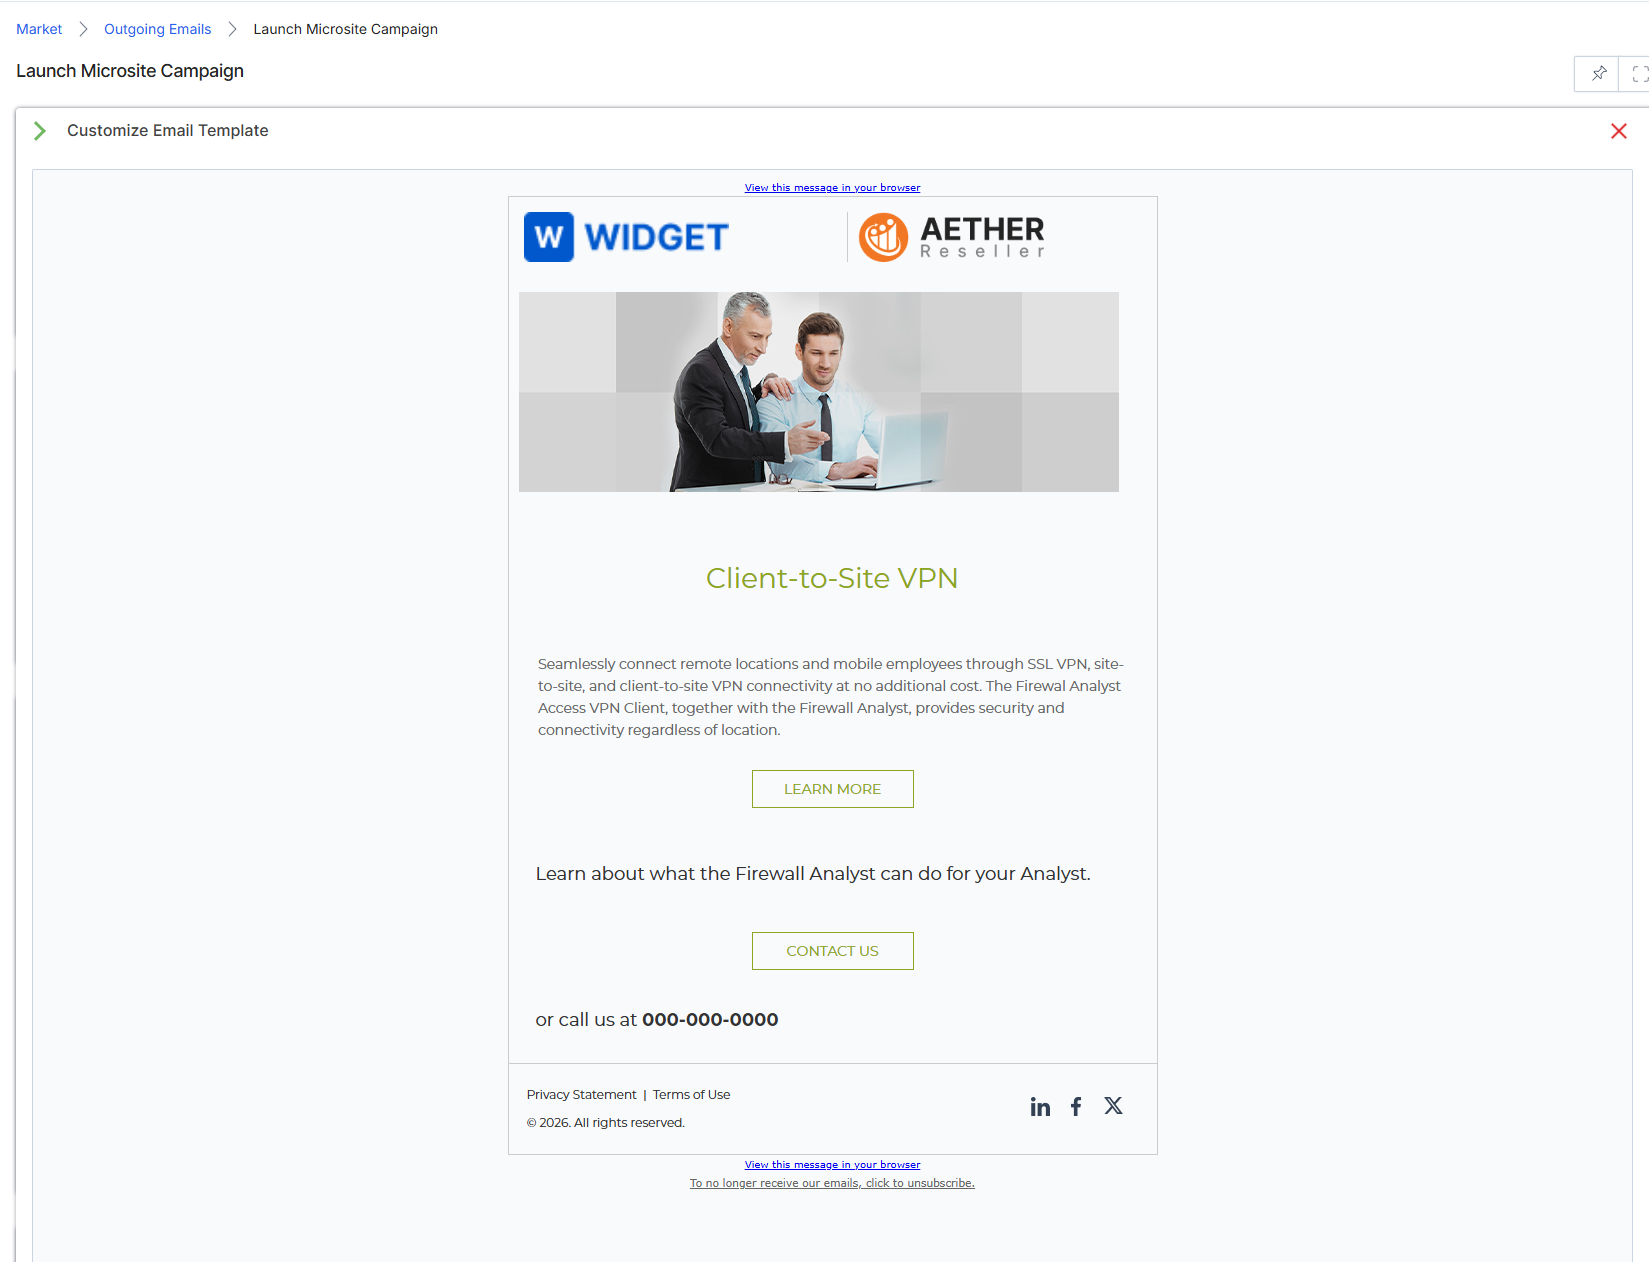
This screen displays the 'Customize Email Template' interface, which is part of the email campaign execution workflow within the Market module. It allows users to preview and potentially modify an email template before it is sent as part of a campaign. The preview shows the email's rendered appearance, including co-branded elements like the vendor's and partner's logos, and the main content. This step is crucial for ensuring the email's visual integrity and content accuracy before deployment, aligning with the co-marketing capabilities of the Market module that enable partners to execute campaigns using vendor-provided assets.
Review the email template preview to ensure its content and branding are correct.
Buttons
| Button | Description |
|---|---|
| Save | Saves any changes made to the email template and closes the preview. |
| Cancel | Discards any changes and closes the email template preview without saving. |
Selecting Recipients and Sending Test Emails
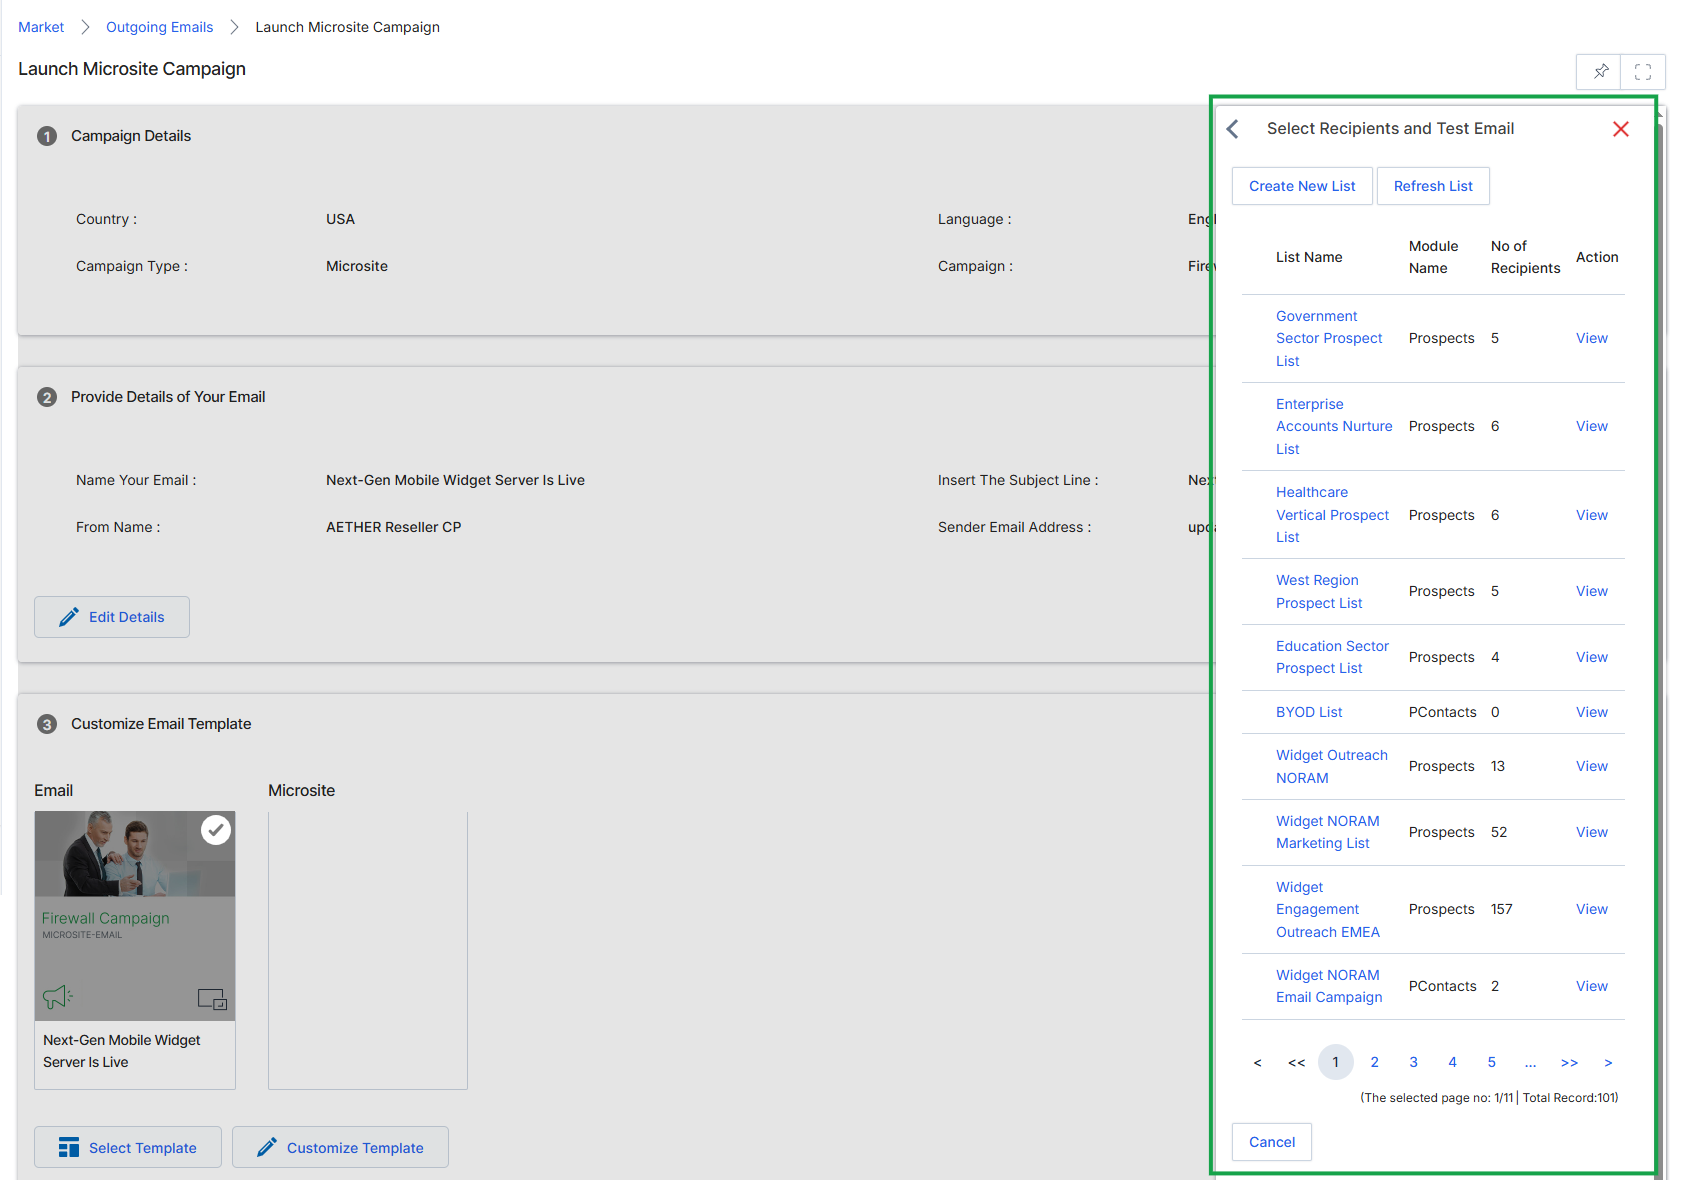
This screen, part of the Email Marketing Management module, allows vendors to finalize the details for launching an email campaign. It displays the campaign's core information, provides options to customize the email template, and crucially, enables the selection of recipients and the sending of test emails. This step is vital for ensuring the email reaches the correct audience and that its content and formatting are accurate before a full launch. The recipient selection process integrates with existing mailing lists, allowing for targeted communication based on partner types, tiers, or segments, while the test email functionality helps prevent errors and ensures brand compliance. The right-hand panel, 'Select Recipients and Test Email', specifically focuses on managing the target audience for the email campaign and facilitating pre-send content verification.
Select the desired mailing list from the 'Select Recipients and Test Email' panel to target the email campaign to specific recipients.
Buttons
| Button | Description |
|---|---|
| Create New List | Allows the creation of a new mailing list for recipient selection. |
| Refresh List | Refreshes the displayed list of available mailing lists. |
| Cancel | Discards changes and closes the recipient selection panel. |
Column Headings
| Column | Description |
|---|---|
| List Name | The name of the available mailing list. |
| Module Name | Indicates the module from which the mailing list originates. |
| No of Recipients | Shows the number of recipients included in each mailing list. |
| Action | Provides actions that can be performed on each mailing list, such as 'View' its details. |
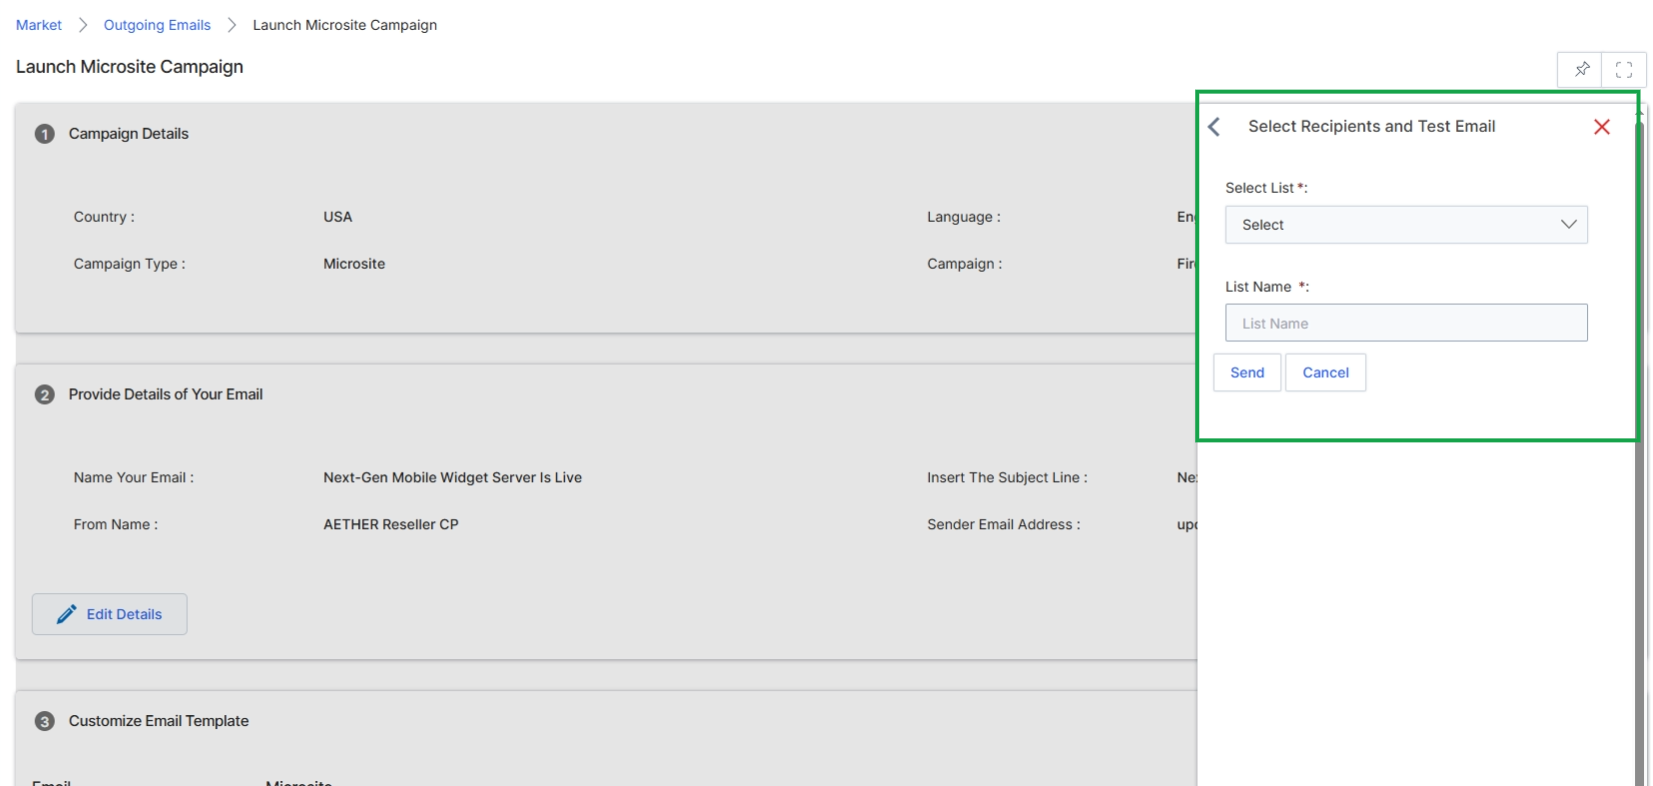
This screen is part of the email campaign launch workflow within the Market module, allowing vendors to manage and execute co-marketing email campaigns. It displays the overall campaign details, email content, and provides options for selecting recipients and sending test emails. The right-hand panel, specifically, is dedicated to managing the recipient list for the email campaign. This panel allows the user to select an existing mailing list or create a new one, ensuring the email reaches the intended audience. This step is crucial for targeting the right partners or prospects with the campaign message.
Click the "Select Recipients" button to open the panel for choosing email recipients.
Buttons
| Button | Description |
|---|---|
| Send | Sends the email campaign to the selected recipients. |
| Cancel | Cancels the recipient selection process and closes the panel. |
Fields
| Field | Description |
|---|---|
| Select List * | A dropdown menu to select an existing mailing list for the campaign. |
| List Name * | The name of the mailing list to be used for the campaign. |
Scheduling and Launching the Email
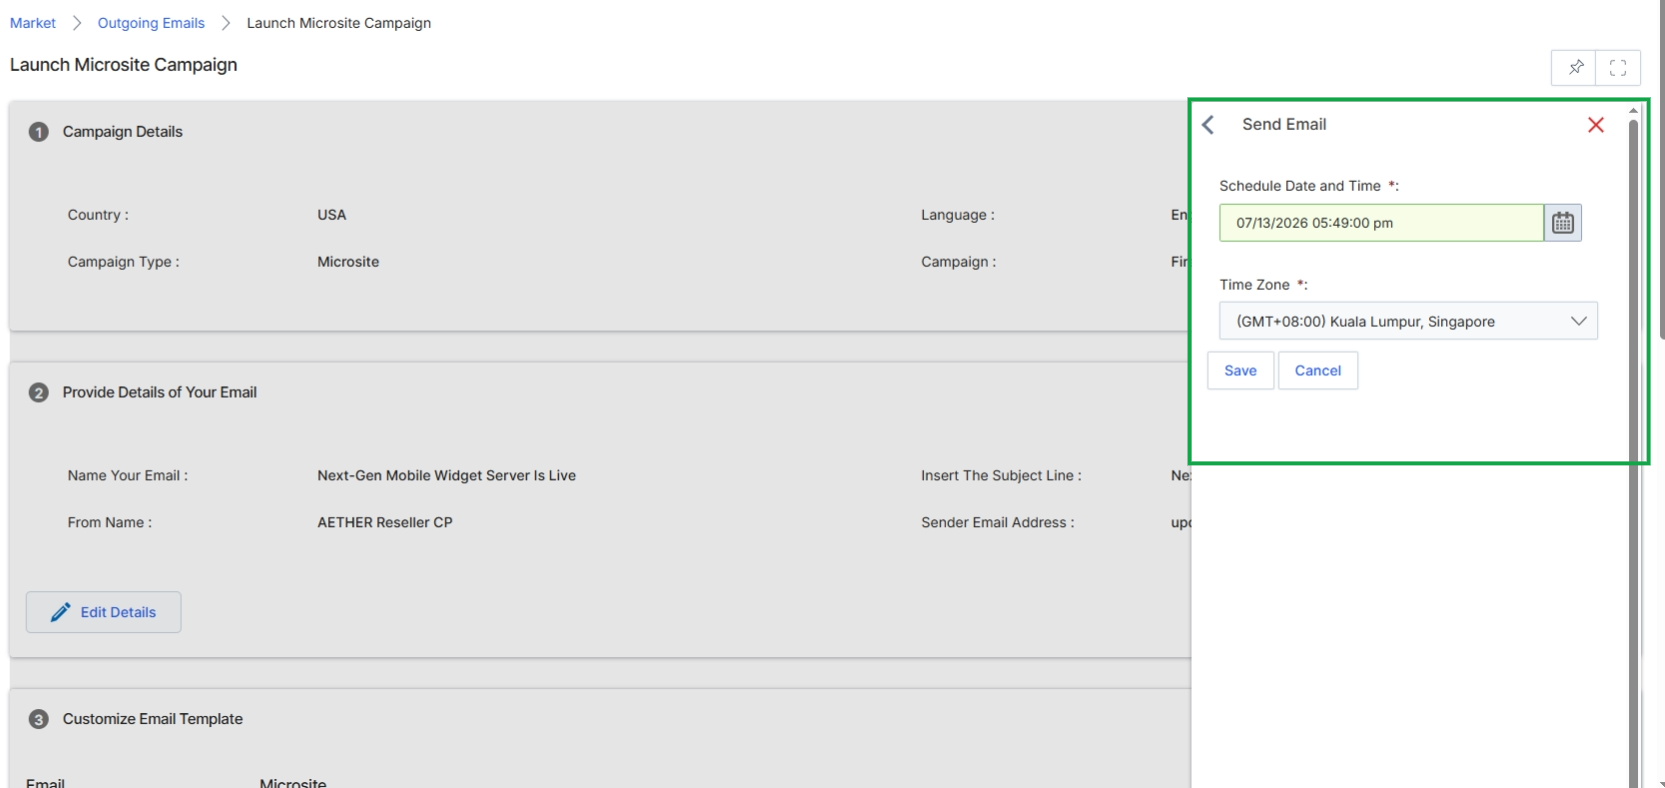
This screen displays the 'Launch Microsite Campaign' interface, which is part of the Market module in UPM. It allows vendors to configure and launch marketing campaigns, specifically those involving microsites and email communication. The screen presents a multi-step process for campaign setup, including campaign details, email content, and customization options. The right-hand slide panel is used for specific actions related to the campaign, such as selecting recipients and scheduling email sends. This panel dynamically changes based on the current step or action being performed within the campaign launch workflow.
After selecting recipients, specify the schedule and time for sending the email using the 'Send Email' panel.
Buttons
| Button | Description |
|---|---|
| Save | Saves the scheduled email send configuration. |
| Cancel | Discards any changes made to the email send schedule and closes the panel. |
Fields
| Field | Description |
|---|---|
| Schedule Date and Time | The date and time when the email campaign is scheduled to be sent. This field includes a calendar icon for easy date selection. |
| Time Zone | The time zone for the scheduled email send, ensuring accurate delivery times regardless of the user's location. |

This screen displays the final step in launching an email campaign, specifically focusing on the scheduling of the email send. It presents a slide-out panel where the user specifies the exact date and time for the email to be sent, along with the relevant time zone. This functionality allows for precise control over campaign deployment, ensuring emails are delivered at optimal times for the target audience. The panel appears after the user has configured the email content, recipients, and other campaign details, representing the last action before the campaign is scheduled for execution.