

Overview
In the UPM Sell module, 'Prospects' represents individuals or companies that are potential leads or future partners, but have not yet entered the formal lead or deal registration process. This feature allows vendor administrators to nurture these early-stage opportunities, ensuring that potential sales or recruitment efforts are tracked and managed efficiently. By providing tools for assigning prospects to specific users or groups, importing external prospect lists, and applying lead scoring rules, the system helps prioritize and streamline the initial outreach and qualification process.
Effective management of prospects is crucial for building a robust sales pipeline and identifying high-potential partners. The ability to score prospects based on various activities helps administrators focus resources on the most promising opportunities, while bulk assignment and import/export functionalities enhance operational efficiency. This module integrates with other Sell functionalities by feeding qualified prospects into the lead management and deal registration workflows, ultimately contributing to the overall revenue generation and partner ecosystem growth.
Accessing and Viewing Prospects
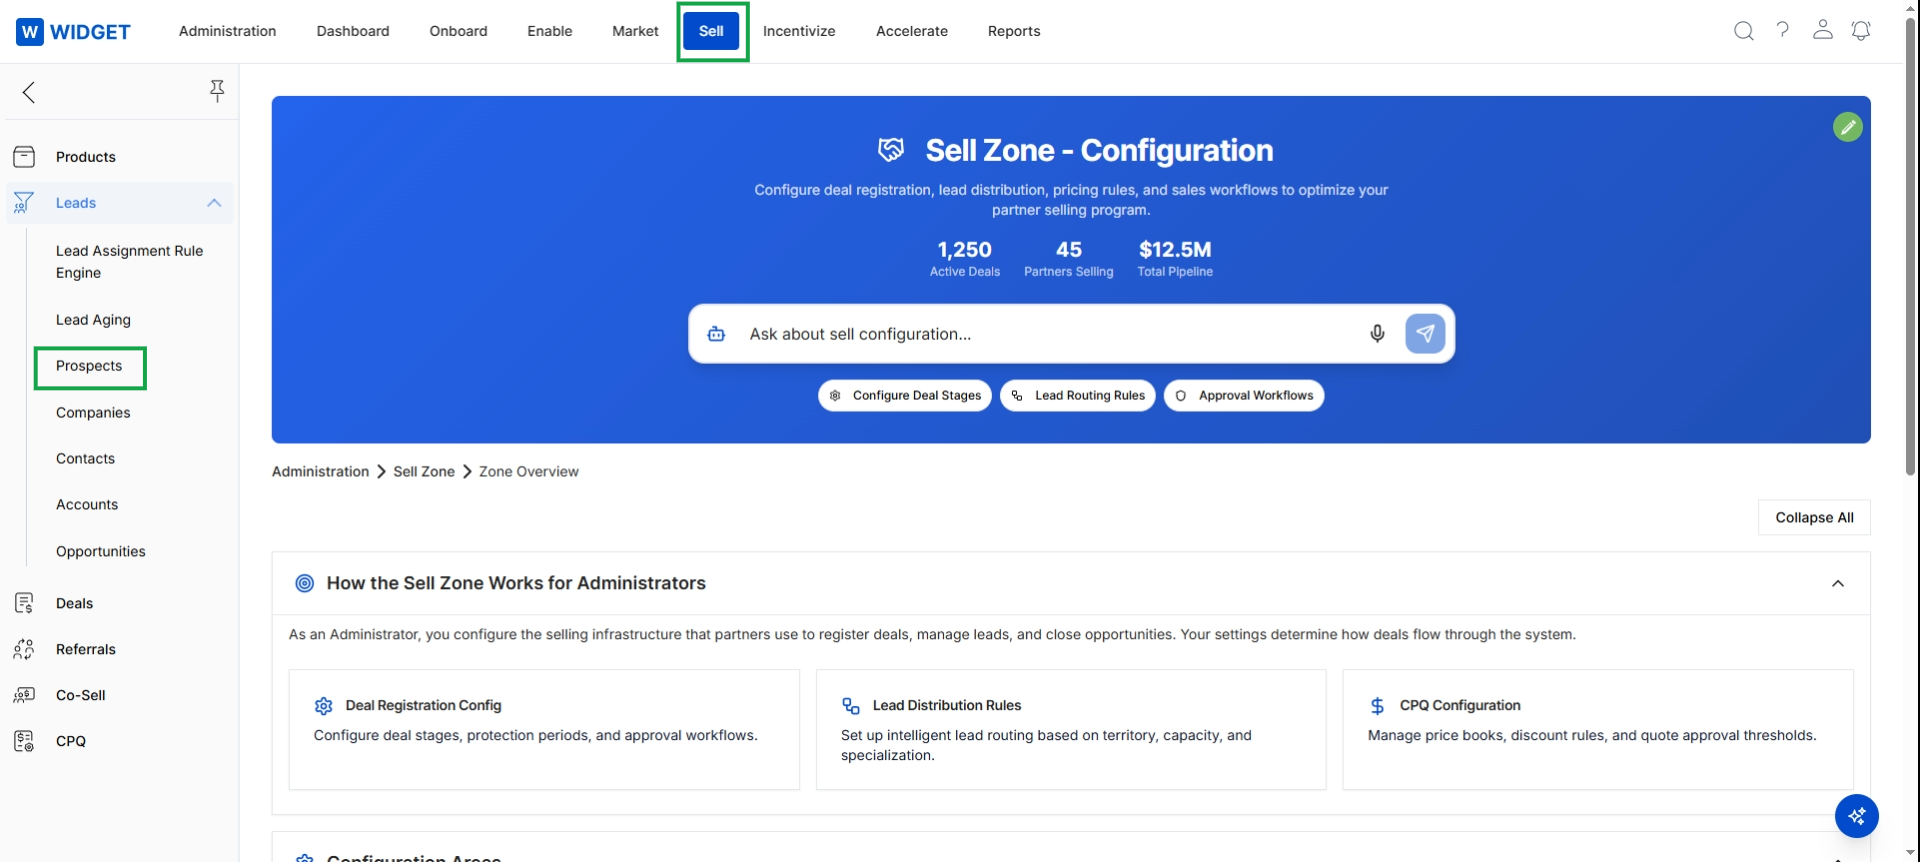
Click Sell in the top navigation bar, then click Prospects in the left navigation menu under the Leads section.
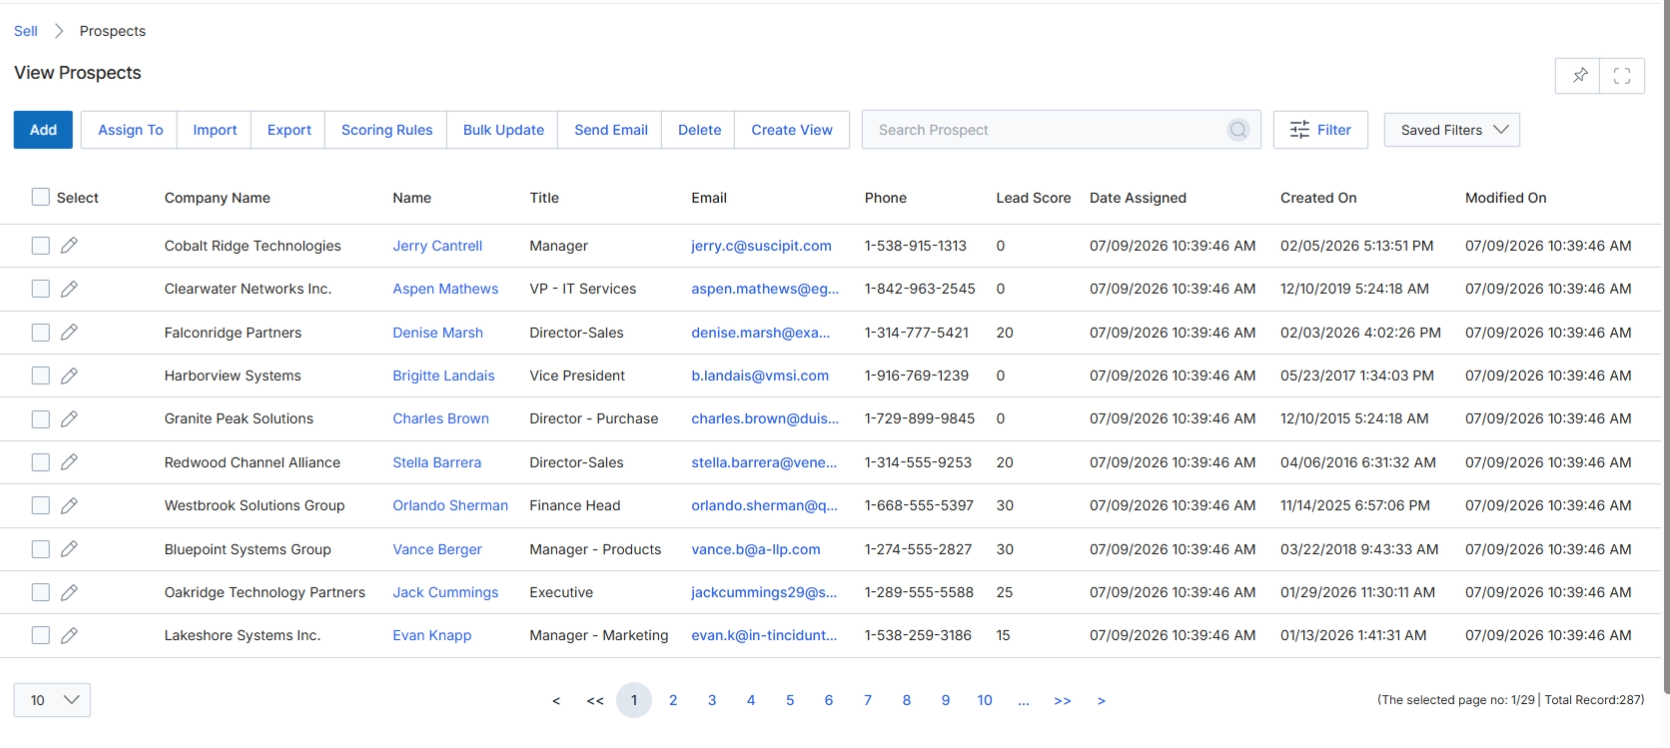
The View Prospects screen provides a comprehensive list of all prospect records within the UPM system. This list serves as a central repository for early-stage sales contacts that have not yet been qualified into leads or opportunities, allowing administrators to monitor and manage potential sales pipeline entries. Each entry displays key contact and company information, along with system-generated metadata such as lead score, assignment details, and creation/modification timestamps. This view is crucial for tracking the initial stages of the channel sales funnel and supports actions like assigning prospects to partners, exporting data, or initiating communication. The data presented here can originate from manual entry, CRM synchronization, or other inbound lead sources integrated with UPM.
Navigate to the Prospects list view by clicking on 'Prospects' under the Leads section in the left navigation menu.
Buttons
| Button | Description |
|---|---|
| Add | Initiates the process to manually add a new prospect record to the system. |
| Assign To | Allows administrators to assign selected prospects to specific partners or internal users for follow-up. |
| Import | Enables bulk import of prospect data from an external file. |
| Export | Exports the current list of prospects to a file, typically for external analysis or reporting. |
| Scoring Rules | Navigates to the configuration area for defining and managing prospect scoring rules. |
| Bulk Update | Applies changes to multiple selected prospect records simultaneously. |
| Send Email | Composes and sends an email to selected prospects. |
| Create View | Allows users to create and save custom filtered views of the prospect list. |
| Filter | Opens a panel to apply advanced filters to the prospect list. |
| Saved Filters | Displays a dropdown of previously saved custom filter configurations. |
Fields
| Field | Description |
|---|---|
| Search Prospect | A text input field to search for specific prospects by keywords. |
Column Headings
| Column | Description |
|---|---|
| Select | A checkbox to select individual prospect records for bulk actions. |
| Company Name | The name of the company associated with the prospect. |
| Name | The full name of the prospect. |
| Title | The job title of the prospect within their company. |
| The primary email address of the prospect. | |
| Phone | The contact phone number of the prospect. |
| Lead Score | A numerical score indicating the prospect's engagement and potential, based on defined scoring rules. |
| Date Assigned | The date when the prospect was assigned to a partner or internal user. |
| Created On | The date and time when the prospect record was initially created in the system. |
| Modified On | The date and time when the prospect record was last updated. |
Assigning Prospects
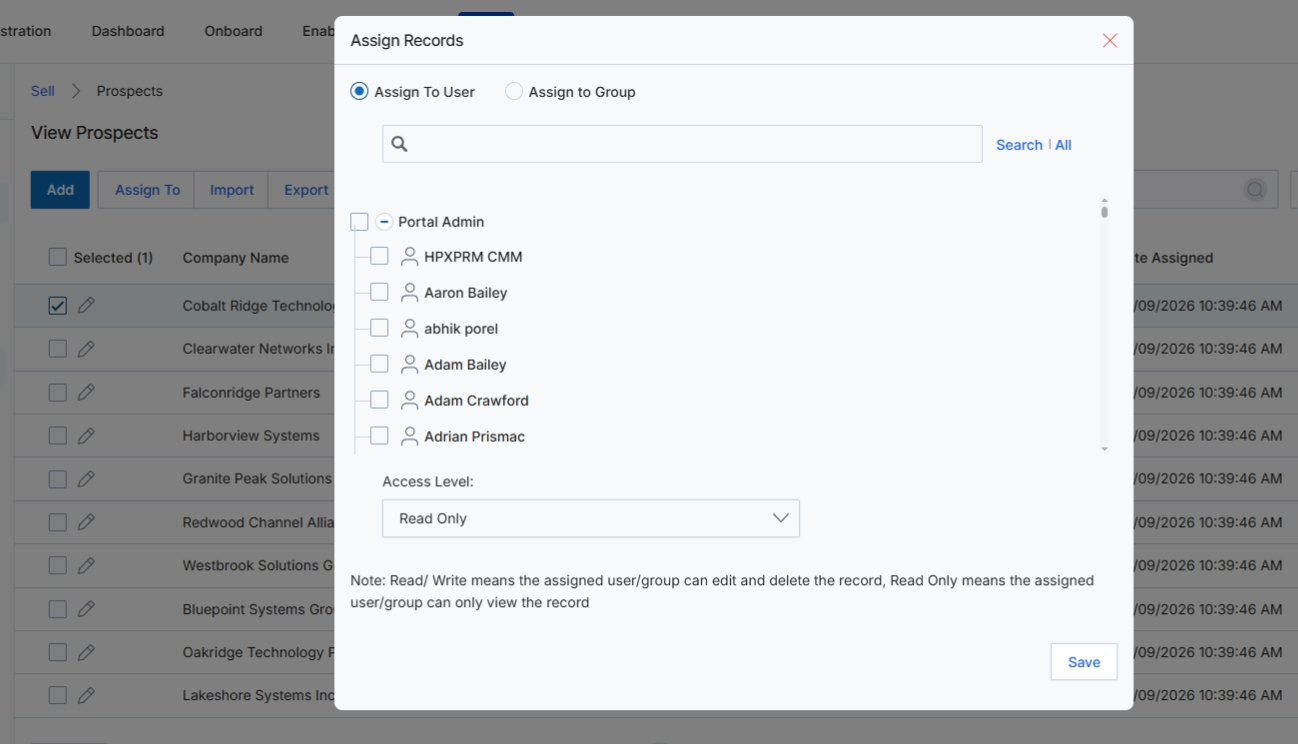
The Assign Records dialog allows vendor-side administrators to assign selected prospect records to specific users or user groups within the UPM platform. This functionality is crucial for managing ownership and access control for prospects, ensuring that the right internal team members are responsible for nurturing or processing these early-stage sales contacts. By assigning prospects, administrators can streamline workflows, distribute workloads, and control who can view or modify prospect data, which is especially important for maintaining data integrity and adhering to internal sales processes. The dialog supports assigning either to an individual user or to a predefined user group, with options to define the level of access granted to the assignee.
Select the "Assign To User" tab to assign the selected prospect records to a specific user.
Buttons
| Button | Description |
|---|---|
| Assign To User | Select this tab to assign the selected records to an individual user. |
| Assign To Group | Select this tab to assign the selected records to a predefined user group. |
| Save | Click to confirm the assignment of records to the selected user or group with the specified access level. |
Fields
| Field | Description |
|---|---|
| Search | Enter keywords to search for a specific user to assign the records to. |
| Portal Admin | Checkbox to select the 'Portal Admin' user for assignment. |
| HPRXM CMM | Checkbox to select the 'HPRXM CMM' user for assignment. |
| Aaron Bailey | Checkbox to select the 'Aaron Bailey' user for assignment. |
| abhik.porel | Checkbox to select the 'abhik.porel' user for assignment. |
| Adam Bailey | Checkbox to select the 'Adam Bailey' user for assignment. |
| Adam Crawford | Checkbox to select the 'Adam Crawford' user for assignment. |
| Adrian Prismac | Checkbox to select the 'Adrian Prismac' user for assignment. |
| Access Level | Dropdown to select the access level (e.g., Read Only) for the assigned user or group. |
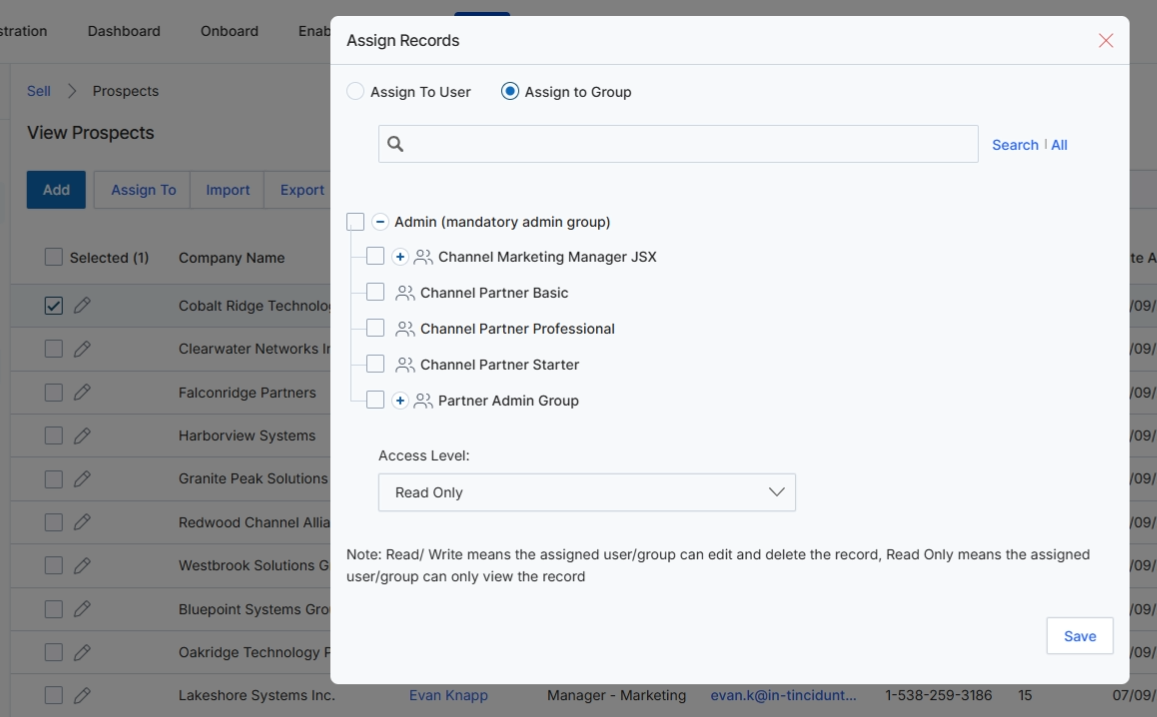
The Assign Records dialog allows vendor-side administrators to manage access and ownership for selected prospect records. This is a critical governance function within the Sell module, ensuring that prospects are routed to the correct internal teams or partner groups for follow-up and preventing conflicts. By assigning prospects to specific users or groups, the system enforces data visibility rules and can influence subsequent lead assignment and deal registration workflows. This dialog supports both individual user assignments and broader group assignments, reflecting the organizational structure and collaboration needs of the partner program. The access level granted during assignment determines the scope of actions the assigned user or group can perform on the prospect record.
Click the "Assign To Group" tab to view options for assigning the selected prospect records to a user group.
Buttons
| Button | Description |
|---|---|
| Assign To User | A tab to select individual users for assigning the records. |
| Assign To Group | A tab to select a group of users for assigning the records. |
| Save | A button to save the assignment changes and close the dialog. |
Fields
| Field | Description |
|---|---|
| Search | A search bar to find specific users or groups within the assignment list. |
| Admin (mandatory admin group) | A checkbox to select the mandatory Admin group for record assignment. |
| Channel Marketing Manager JSX | A checkbox to select the 'Channel Marketing Manager JSX' group for record assignment. |
| Channel Partner Basic | A checkbox to select the 'Channel Partner Basic' group for record assignment. |
| Channel Partner Professional | A checkbox to select the 'Channel Partner Professional' group for record assignment. |
| Channel Partner Starter | A checkbox to select the 'Channel Partner Starter' group for record assignment. |
| Partner Admin Group | A checkbox to select the 'Partner Admin Group' for record assignment. |
| Access Level | A dropdown menu to define the level of access the assigned user/group will have to the records. 'Read Only' allows viewing only, while 'Read Write' allows editing and deleting. |
Importing Prospect Data
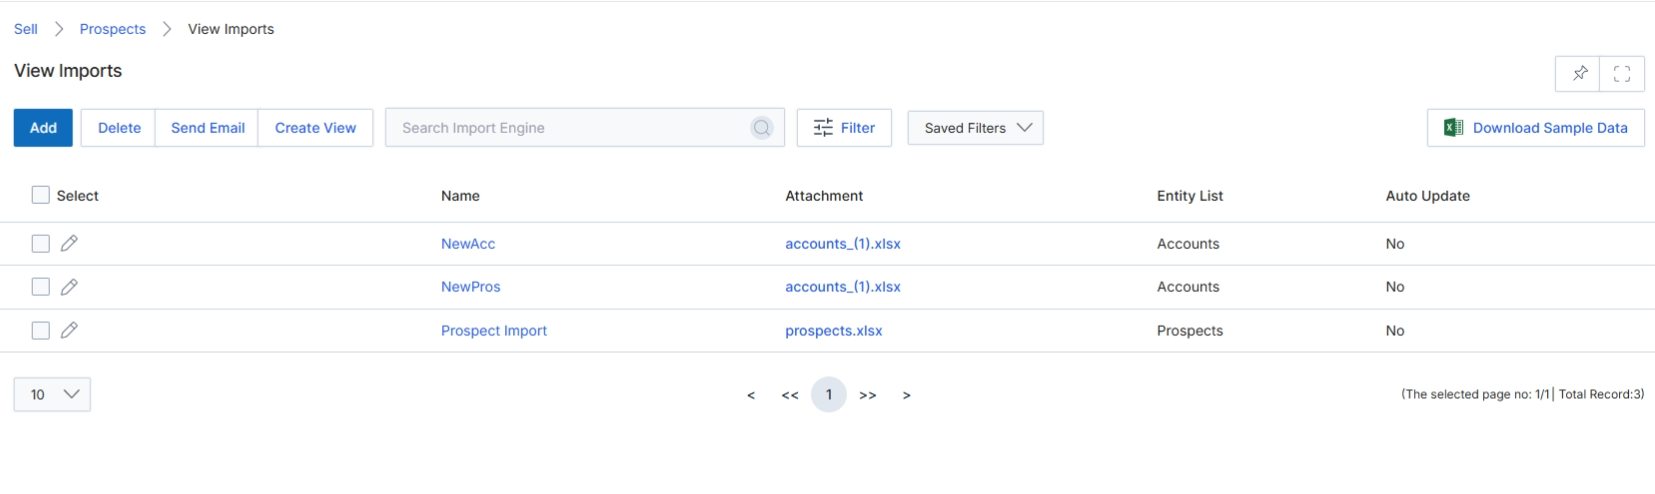
The View Imports screen provides a centralized list of all data import jobs previously executed within the UPM platform. This includes imports for various entities such as Accounts and Prospects, as indicated by the 'Entity List' column. Administrators use this screen to review past import activities, check the associated attachment files, and verify whether an import is configured for automatic updates. This functionality is crucial for data governance, ensuring data integrity, and troubleshooting any issues that may arise from bulk data operations, particularly when integrating with external systems or migrating data.
Navigate to the View Imports page to review past data import activities.
Buttons
| Button | Description |
|---|---|
| Add | Initiates a new data import process. |
| Delete | Deletes selected import records. |
| Send Email | Sends an email related to the selected import records. |
| Create View | Creates a custom view for the import list. |
| Filter | Applies filters to narrow down the list of import records. |
| Saved Filters | Accesses previously saved filter configurations. |
| Download Sample Data | Downloads a sample data template for various entities to aid in preparing import files. |
Fields
| Field | Description |
|---|---|
| Search Import Engine | Searches for specific import records by keyword. |
Column Headings
| Column | Description |
|---|---|
| Select | Checkbox to select individual import records for bulk actions. |
| Name | The name given to the import job. |
| Attachment | The file attached to the import job, typically the source data file. |
| Entity List | The type of entity (e.g., Accounts, Prospects) that was imported. |
| Auto Update | Indicates whether the import is configured to run automatically on a schedule. |
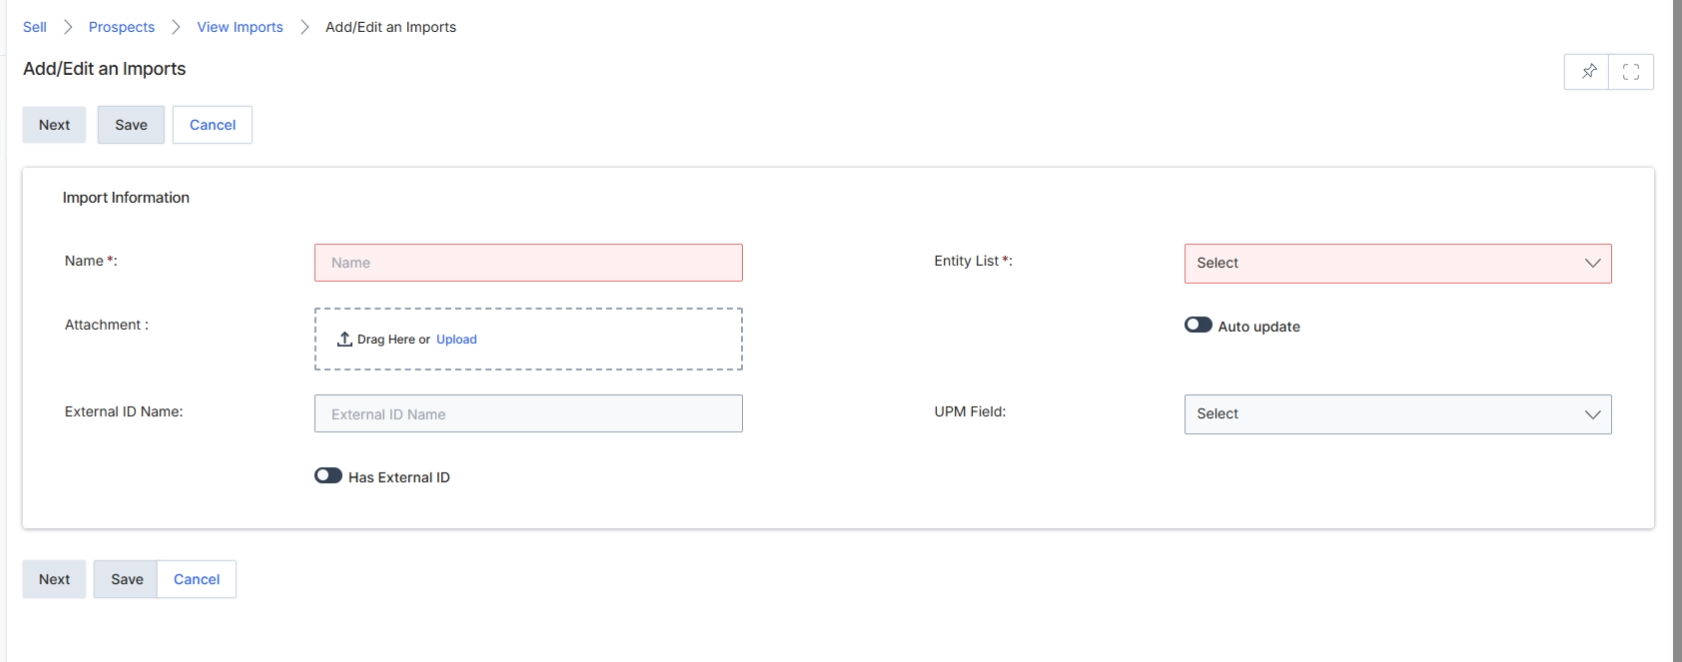
The Add/Edit an Imports page is where UPM administrators configure the details for importing data into the system, such as prospect or account records. This functionality supports the ingestion of external data, which is critical for populating the UPM platform with existing customer or prospect information, often sourced from CRM systems or other databases. By defining import parameters like the entity type, attachment files, and mapping external IDs to UPM fields, administrators can ensure that data is accurately transferred and integrated, facilitating a streamlined onboarding process for new data sets and maintaining up-to-date records within the Sell module. This screen is a key part of data management, allowing for the initial setup or modification of data import jobs.
Click the Add button to open the Add/Edit an Imports form.
Buttons
| Button | Description |
|---|---|
| Next | Proceeds to the next step in the import configuration process. |
| Save | Saves the current import configuration. |
| Cancel | Discards any changes and returns to the previous screen. |
Import Information
| Field | Description |
|---|---|
| Name | Enter a descriptive name for this import configuration. |
| Entity List | Select the type of entity (e.g., Prospects, Accounts) that will be imported. |
| Attachment | Upload the data file (e.g., CSV, XLSX) containing the records to be imported. |
| Auto update | Toggle to enable or disable automatic updates for this import, which can periodically refresh data. |
| External ID Name | Enter the name of the external identifier column in the uploaded file. |
| UPM Field | Select the corresponding UPM field to map the external ID to. |
| Has External ID | Toggle to indicate whether the import file contains an external identifier column that needs to be mapped. |
Exporting Prospect Data
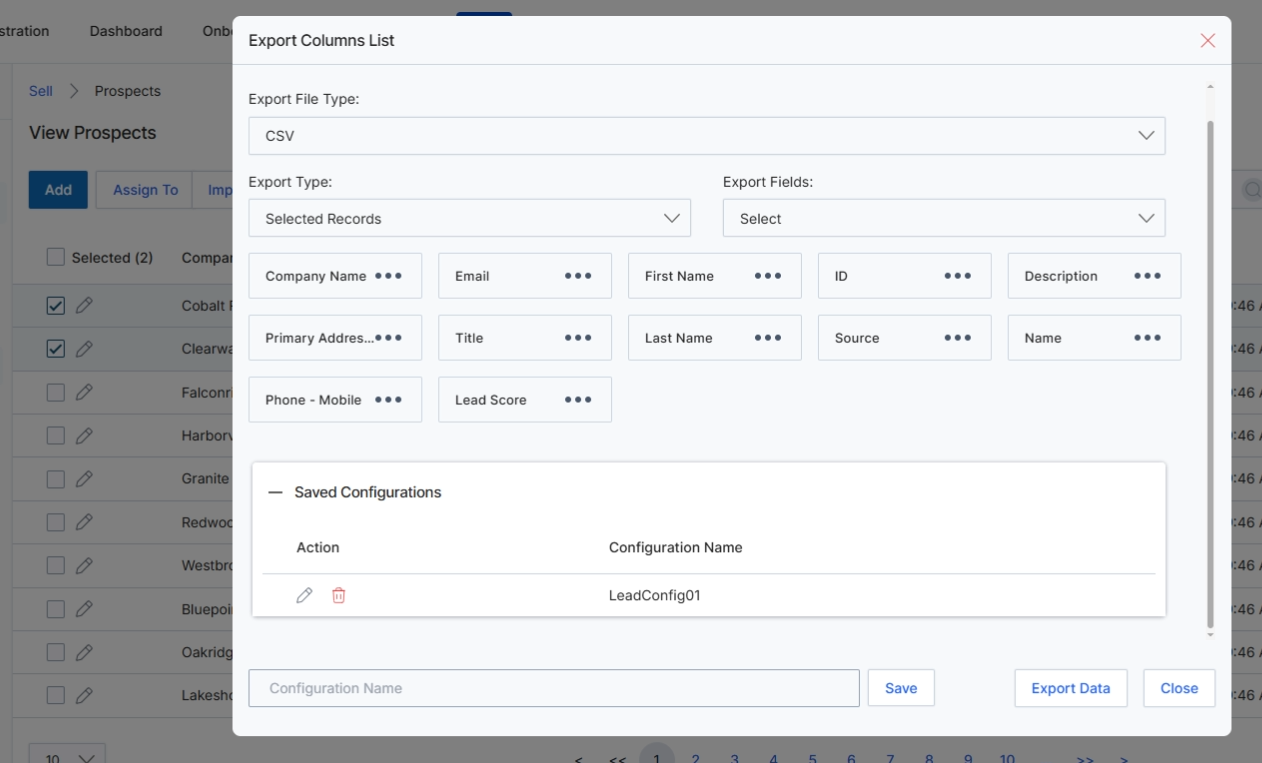
This modal window, 'Export Columns List', allows users to define and manage the columns included when exporting prospect data from the UPM platform. Users can select specific fields to include in their export file, choose the export file type and scope, and save these configurations for future use. This functionality is crucial for generating customized reports or transferring prospect data to external systems, supporting various analytical and operational needs within the Sell module's lead management capabilities. The ability to save configurations streamlines repetitive export tasks and ensures consistency in data extraction.
Select the desired fields to include in the export file from the 'Export Columns List' modal.
Buttons
| Button | Description |
|---|---|
| Save | A button to save the current export column selection as a named configuration. |
| Export Data | A button to initiate the data export based on the selected fields and export type. |
| Close | A button to close the 'Export Columns List' modal. |
Fields
| Field | Description |
|---|---|
| Export File Type | A dropdown menu to select the format of the export file, such as CSV. |
| Export Type | A dropdown menu to specify whether to export all records or only selected records. |
| Export Fields | A dropdown menu to select which fields or columns to include in the export. |
| Configuration Name | An input field to enter a name for a new export configuration to save it. |
Column Headings
| Column | Description |
|---|---|
| Action | A column displaying actions that can be performed on saved export configurations, such as deleting a configuration. |
| Configuration Name | A column displaying the names of saved export configurations. |
Managing Lead Scoring Rules
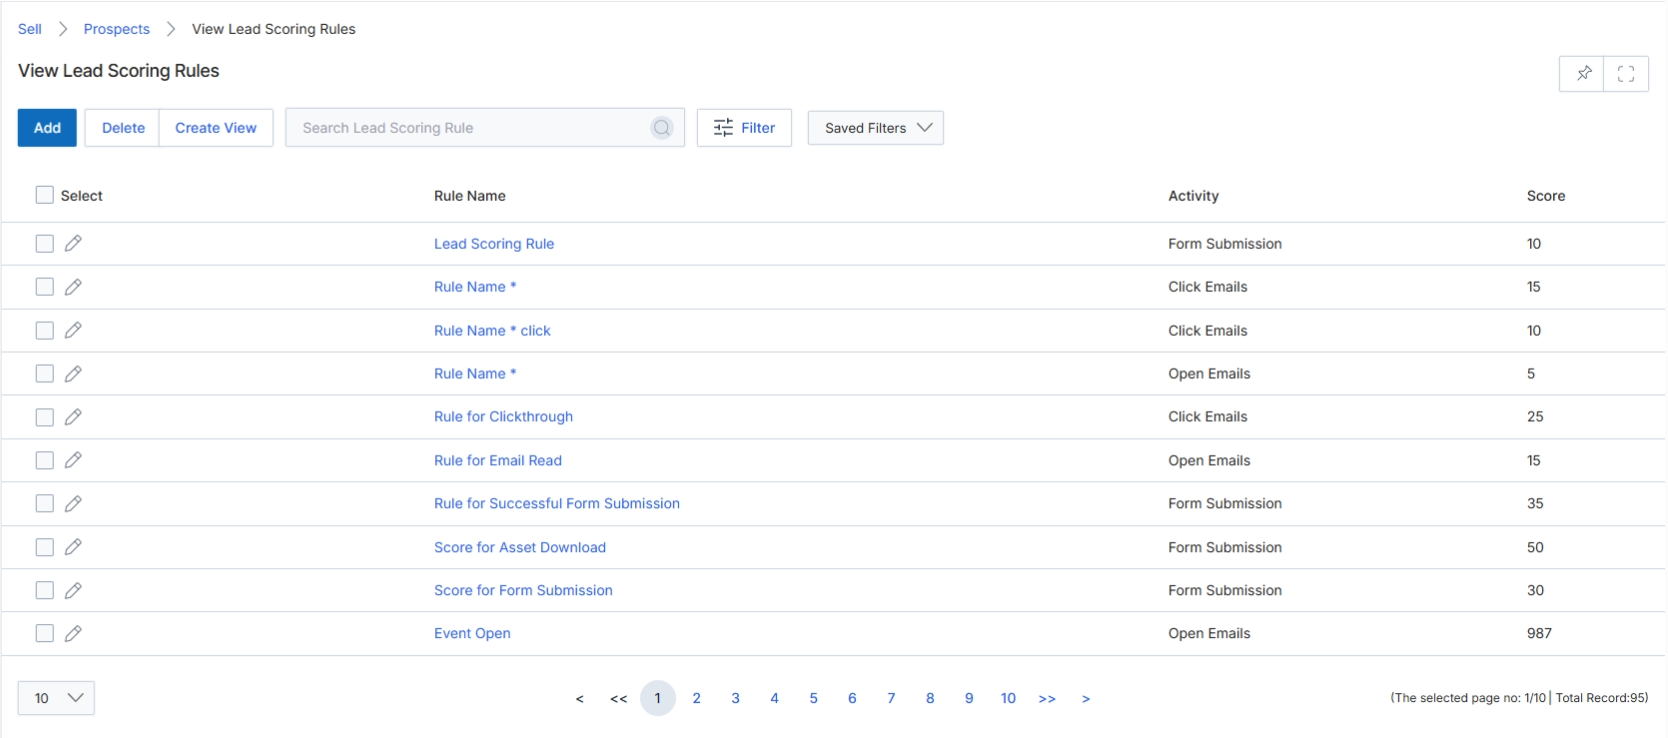
This screen displays the 'View Lead Scoring Rules' list, which is part of the Leads Management module within UPM's Sell zone. This list provides an overview of all configured lead scoring rules, which are critical for evaluating and prioritizing prospects and leads. Lead scoring rules assign numerical scores to various partner activities or lead attributes, helping vendors identify the most engaged or promising leads. These scores can influence lead qualification, assignment, and progression through the sales funnel, ultimately impacting commission calculations in the Incentivize module. The list view allows administrators to quickly review existing rules, their associated activities, and the scores they contribute.
Navigate to the Lead Scoring Rules page to view the list of defined rules.
Buttons
| Button | Description |
|---|---|
| Add | Button to create a new lead scoring rule. |
| Delete | Button to delete selected lead scoring rules. |
| Create View | Button to create a custom filtered view of the lead scoring rules list. |
| Filter | Button to apply advanced filters to the list of lead scoring rules. |
| Saved Filters | Dropdown to select and apply previously saved filter configurations. |
Fields
| Field | Description |
|---|---|
| Search Lead Scoring Rule | Input field to search for lead scoring rules by name or other criteria. |
Column Headings
| Column | Description |
|---|---|
| Select | Checkbox to select individual lead scoring rules for bulk actions. |
| Rule Name | The name assigned to the lead scoring rule. |
| Activity | The specific partner or lead activity that triggers this scoring rule. |
| Score | The numerical score assigned when the associated activity occurs. |
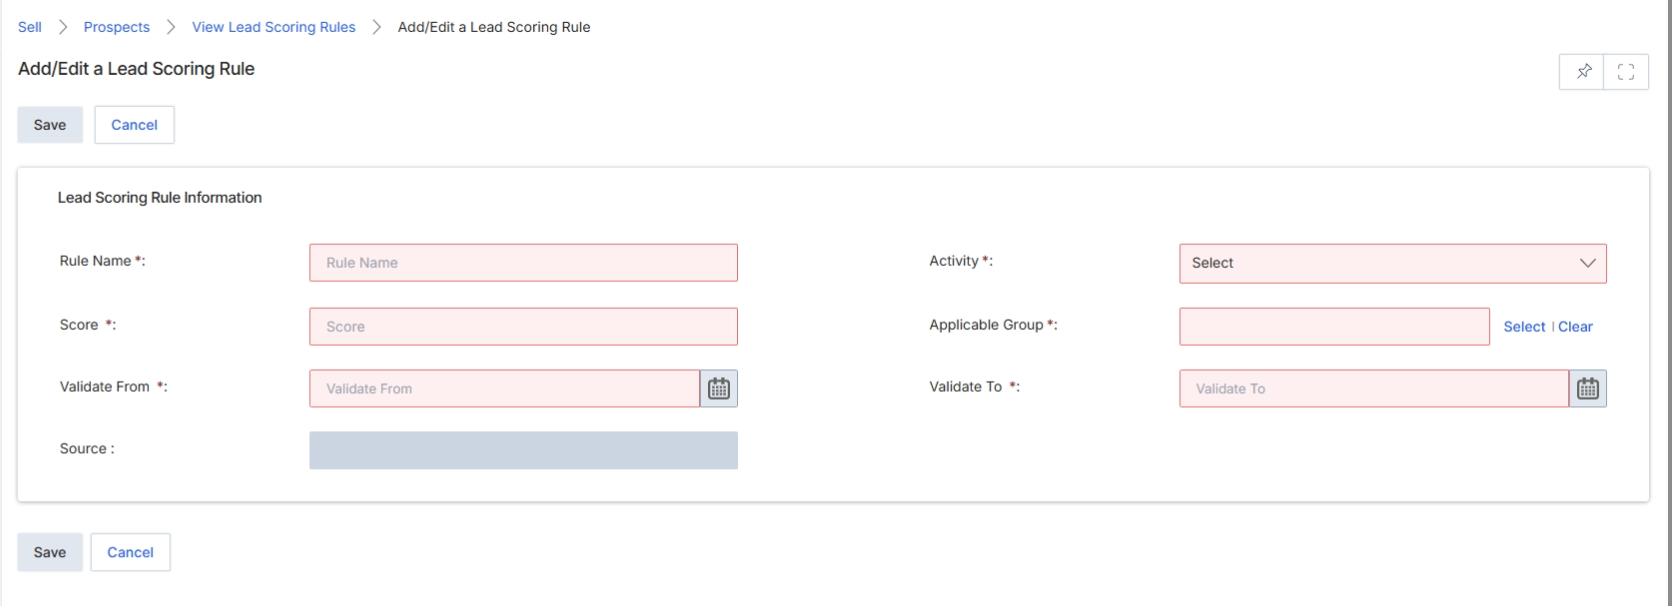
The Add/Edit a Lead Scoring Rule form allows vendor administrators to define and manage rules that assign scores to prospect activities, which can influence lead qualification, tier progression, and partner segmentation. Lead scoring is a critical component of the UPM platform, enabling automated evaluation of prospect engagement and readiness. Each rule specifies an activity and the score associated with it, along with validity periods and applicable groups, ensuring that lead scores accurately reflect current marketing and sales priorities. This form supports the creation of new scoring rules or the modification of existing ones, providing flexibility in how prospect interactions are valued within the system.
Click the Add button to create a new Lead Scoring Rule.
Buttons
| Button | Description |
|---|---|
| Save | Saves the newly configured or updated lead scoring rule. |
| Cancel | Discards any changes and returns to the Lead Scoring Rules list. |
Lead Scoring Rule Information
| Field | Description |
|---|---|
| Rule Name | Enter a descriptive name for the lead scoring rule. |
| Activity | Select the specific prospect activity that this rule will score. |
| Score | Enter the numerical score to be assigned when the specified activity occurs. |
| Applicable Group | Select the group(s) to which this lead scoring rule applies. |
| Validate From | Specify the start date from which this scoring rule becomes active. |
| Validate To | Specify the end date until which this scoring rule remains active. |
| Source | Enter the source of the lead activity, if applicable. |
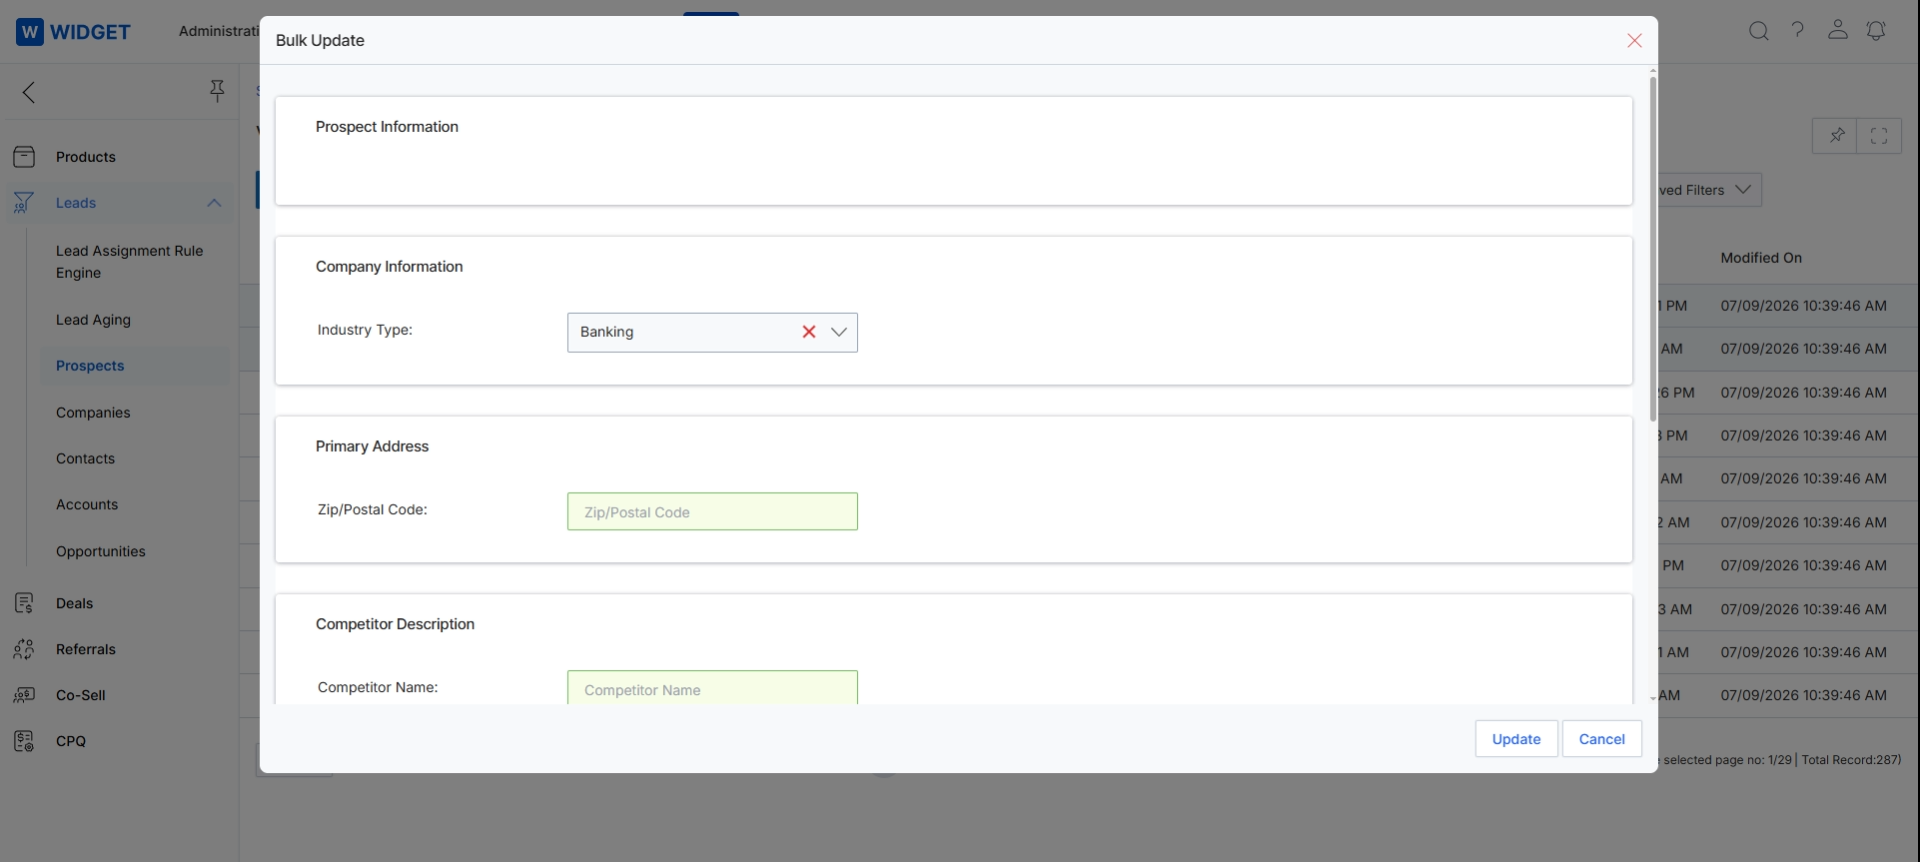
The Bulk Update dialog provides a streamlined interface for modifying multiple prospect records simultaneously, allowing administrators to apply consistent updates across a selected group of prospects. This feature is crucial for maintaining data hygiene, correcting errors, or updating prospect attributes in bulk, which can significantly improve efficiency compared to editing individual records. The dialog is structured into logical sections such as 'Prospect Information', 'Company Information', 'Primary Address', and 'Competitor Description' to organize the various fields that can be updated. Changes made here are applied to all selected prospects, ensuring uniformity and reducing manual effort in managing large datasets within the Sell module.
Update the prospect records by entering the new Industry Type, Zip/Postal Code, and Competitor Name in the Bulk Update dialog.
Buttons
| Button | Description |
|---|---|
| Update | Applies the entered changes to all selected prospect records. |
| Cancel | Discards any changes and closes the Bulk Update dialog. |
Company Information
| Field | Description |
|---|---|
| Industry Type | The industry type associated with the prospect's company. This field can be updated in bulk to categorize multiple prospects under a specific industry. |
Primary Address
| Field | Description |
|---|---|
| Zip/Postal Code | The postal code for the prospect's primary address. This allows for bulk updates to geographical information for selected prospects. |
Competitor Description
| Field | Description |
|---|---|
| Competitor Name | The name of a competitor associated with the prospect. This field can be updated in bulk to reflect competitive intelligence across multiple prospect records. |
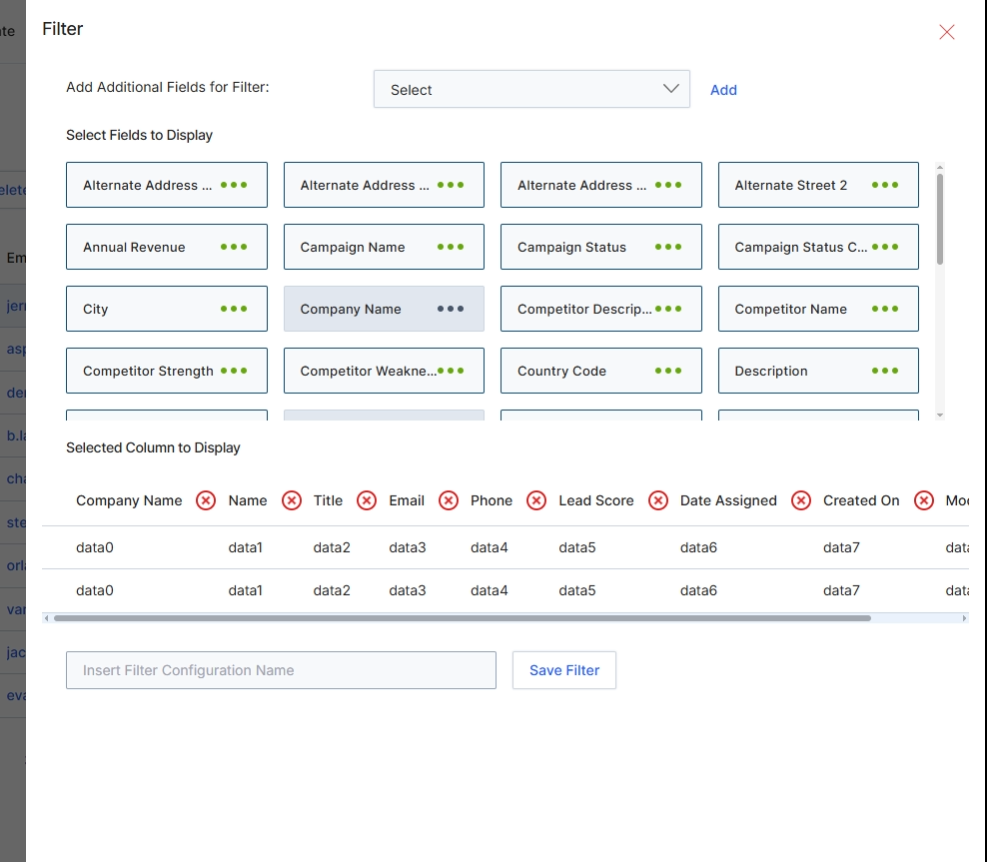
The Filter configuration panel allows users to customize the displayed columns and apply filters to the 'View Prospects' list. This feature is crucial for tailoring the prospect data view to specific analytical or operational needs, enabling users to focus on relevant information such as company details, contact information, or lead scoring metrics. By selecting which fields to display and applying additional filters, users can streamline their workflow, identify key prospects more efficiently, and prepare data for reporting or further action within the Sell module. This customization capability supports various user roles, from program managers analyzing pipeline health to sales representatives managing their assigned prospects.
Click the Filter icon to open the Filter configuration panel.
Buttons
| Button | Description |
|---|---|
| Save Filter | Saves the current filter and column display configuration under the specified name. |
Fields
| Field | Description |
|---|---|
| Add Additional Fields for Filter | Allows users to select additional fields from a dropdown to use as filtering criteria for the prospect list. |
| Select Fields to Display | This section shows the fields currently selected to be displayed as columns in the 'View Prospects' table. Users can add or remove fields to customize the table view. |
| Insert Filter Configuration Name | A text input field to enter a name for the current filter configuration, allowing it to be saved for future use. |
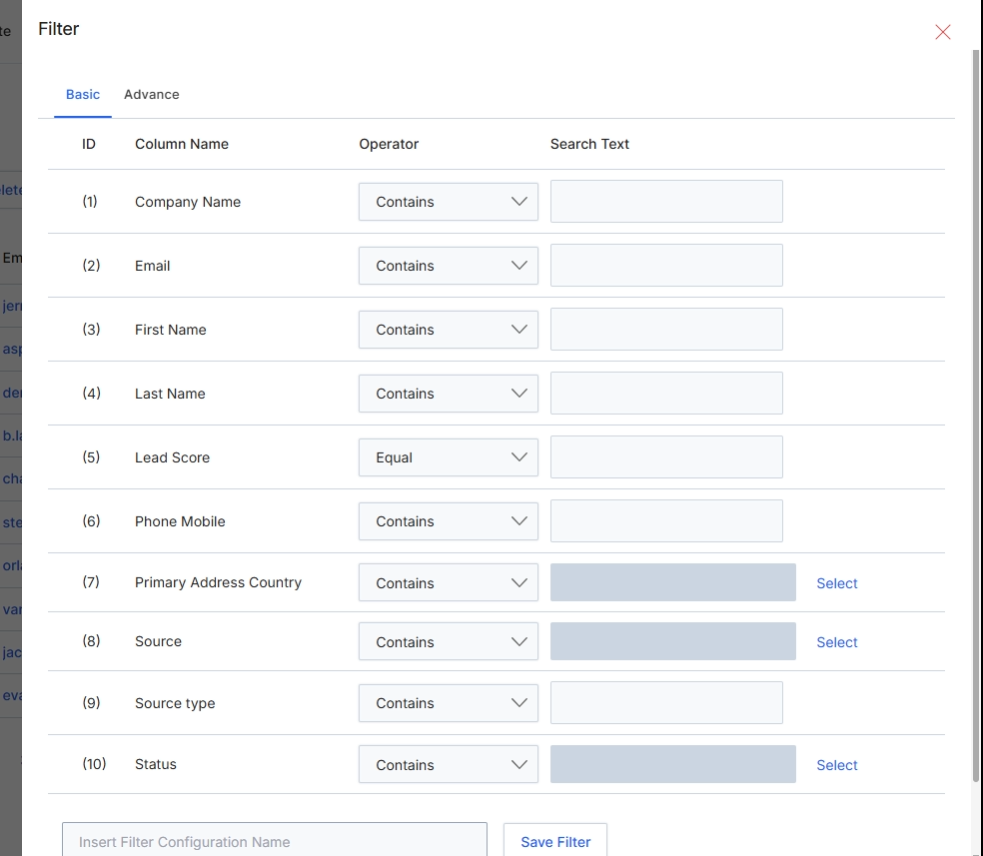
The Filter dialog provides a mechanism for users to refine the data displayed in list views, such as the Prospects list, by applying various criteria. This allows for focused analysis and management of specific subsets of prospects based on their attributes. The dialog supports both basic and advanced filtering options, enabling users to construct simple or complex queries to narrow down the displayed records. This capability is crucial for managing large datasets, identifying specific prospects for targeted actions, or preparing custom reports, directly impacting the efficiency of lead management within the Sell module.
Click the 'Basic' tab to define specific search criteria for filtering the prospect list.
Buttons
| Button | Description |
|---|---|
| Basic | Activates the basic filtering interface, allowing users to apply simple search conditions to various prospect attributes. |
| Advance | Activates the advanced filtering interface, providing more complex query building options. |
| Save Filter | Saves the currently defined filter criteria under the specified name. |
Column Headings
| Column | Description |
|---|---|
| ID | A sequential identifier for each filter row. |
| Column Name | The name of the prospect attribute to be filtered. |
| Operator | The logical operator (e.g., Contains, Equal, Greater Than) to apply to the filter condition. |
| Search Text | The value or text to search for within the specified column. |