

Overview
Effective partner relationship management relies on accurate and accessible contact information. The Partner Contacts module enables administrators to maintain a comprehensive database of all individuals within their partner organizations. This includes not only primary contacts but also other key personnel involved in sales, marketing, technical support, or management roles.
By centralizing this data, the platform ensures that communications, program updates, and support efforts are directed to the correct individuals, enhancing engagement and operational efficiency. The robust import and export capabilities, along with customizable views and advanced filtering, provide the flexibility needed to manage large and diverse partner ecosystems effectively.
Accessing and Viewing Partner Contacts
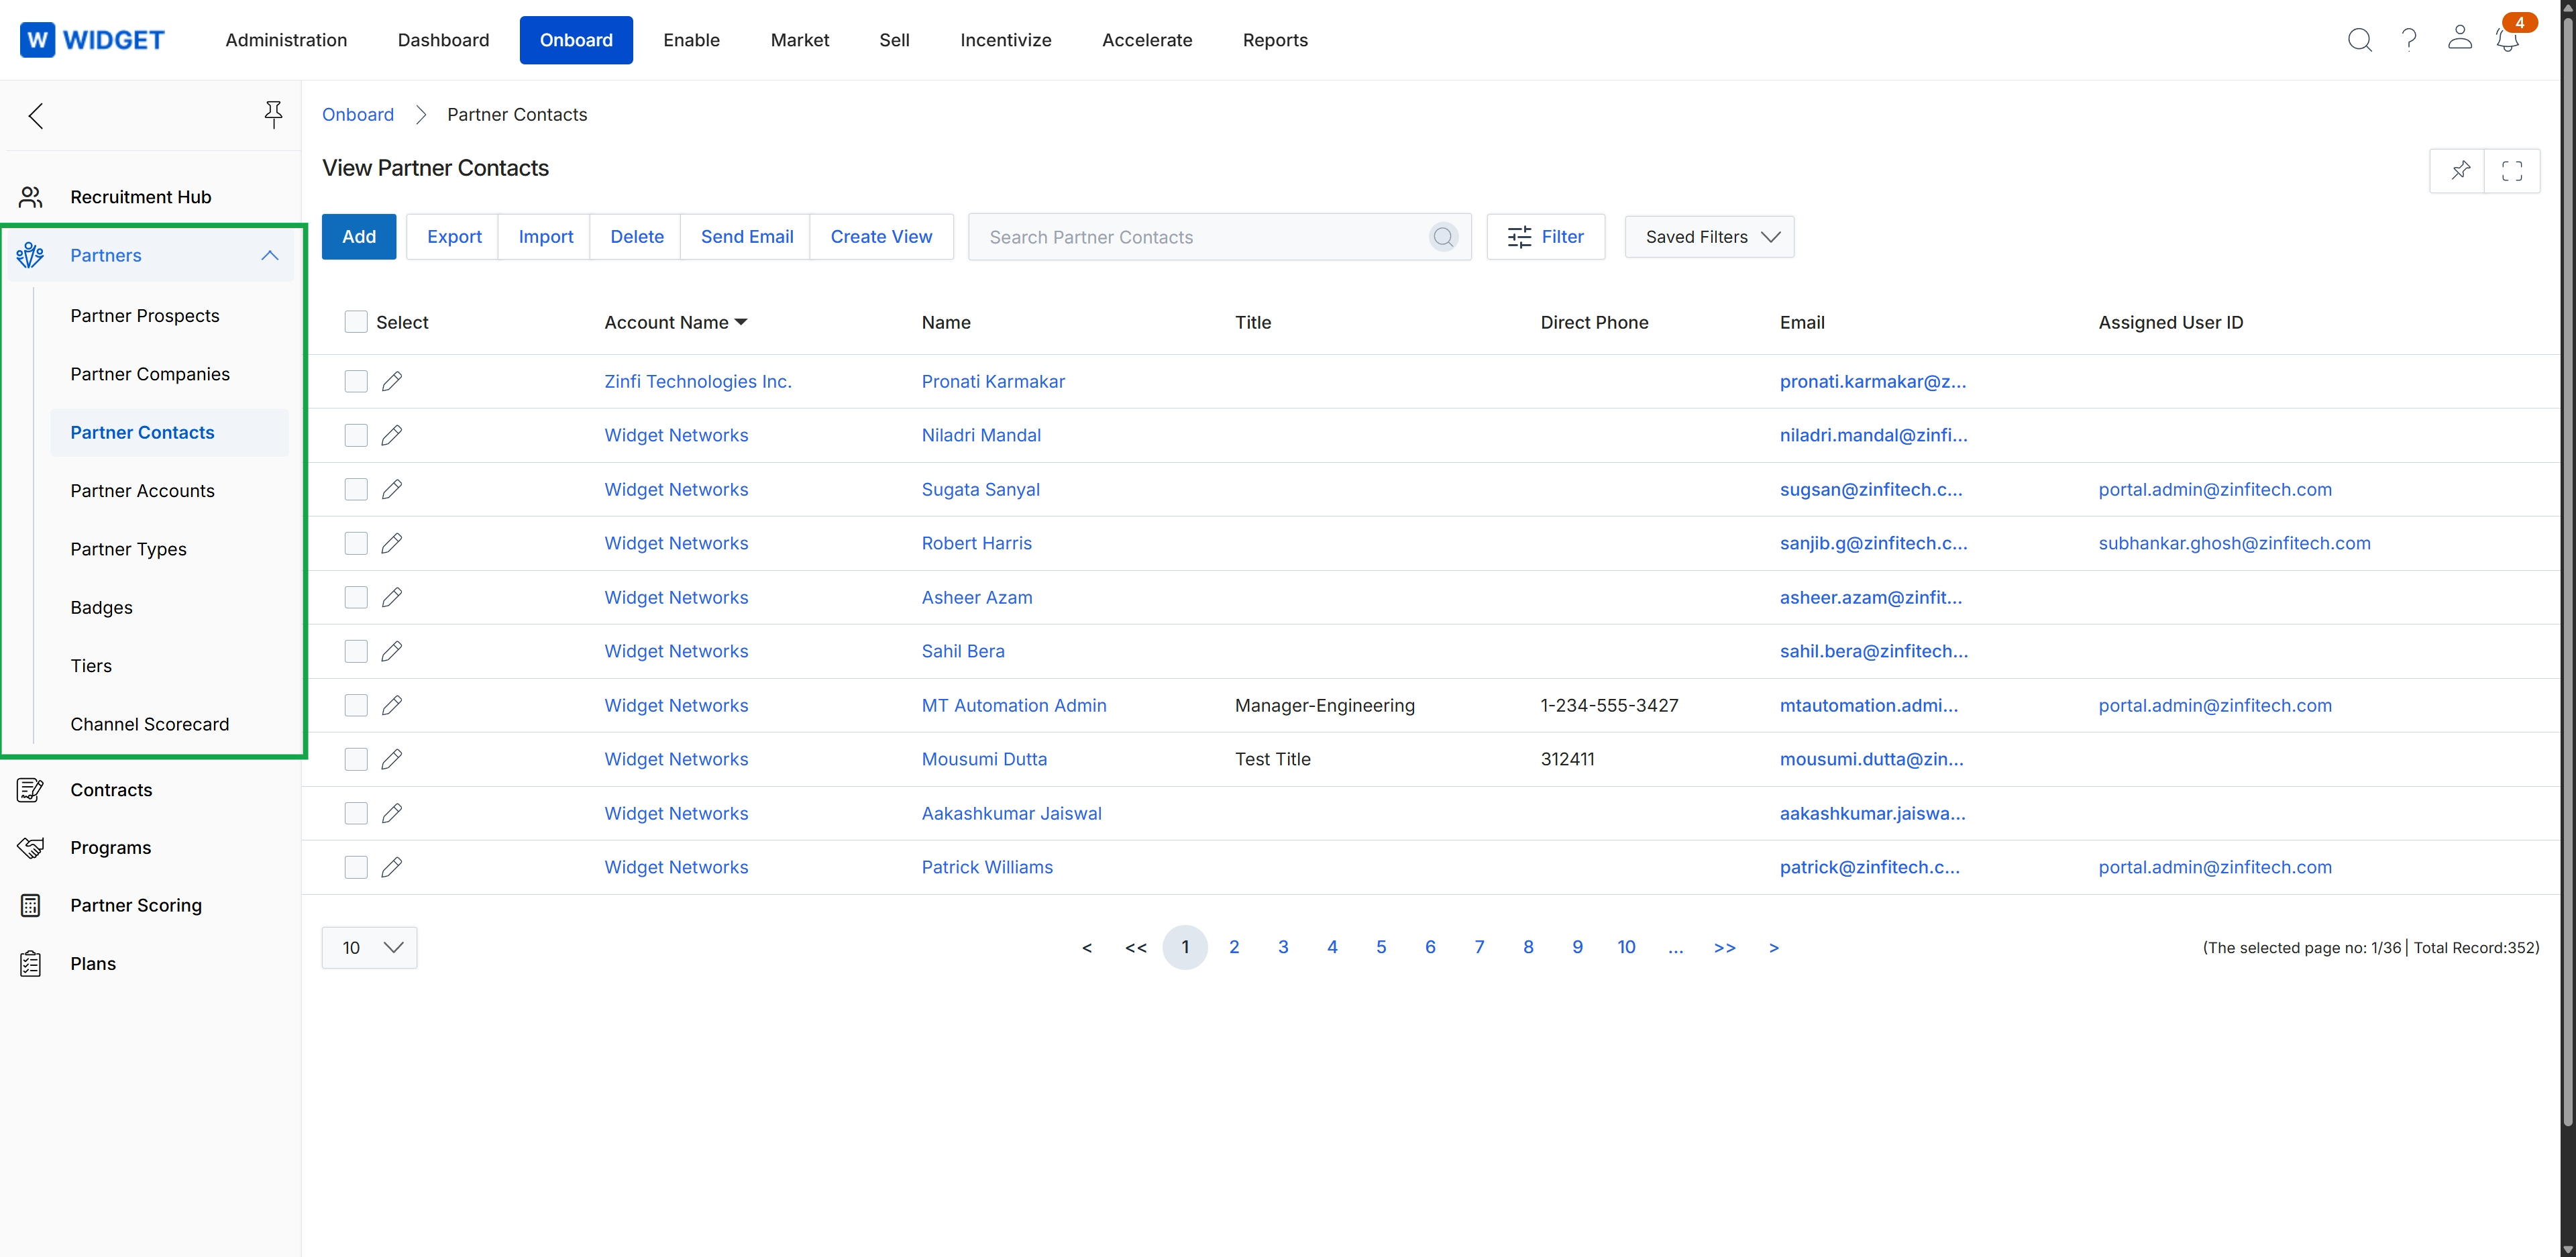
Click Onboard → Partners → Partner Contacts.
Exporting Partner Contacts
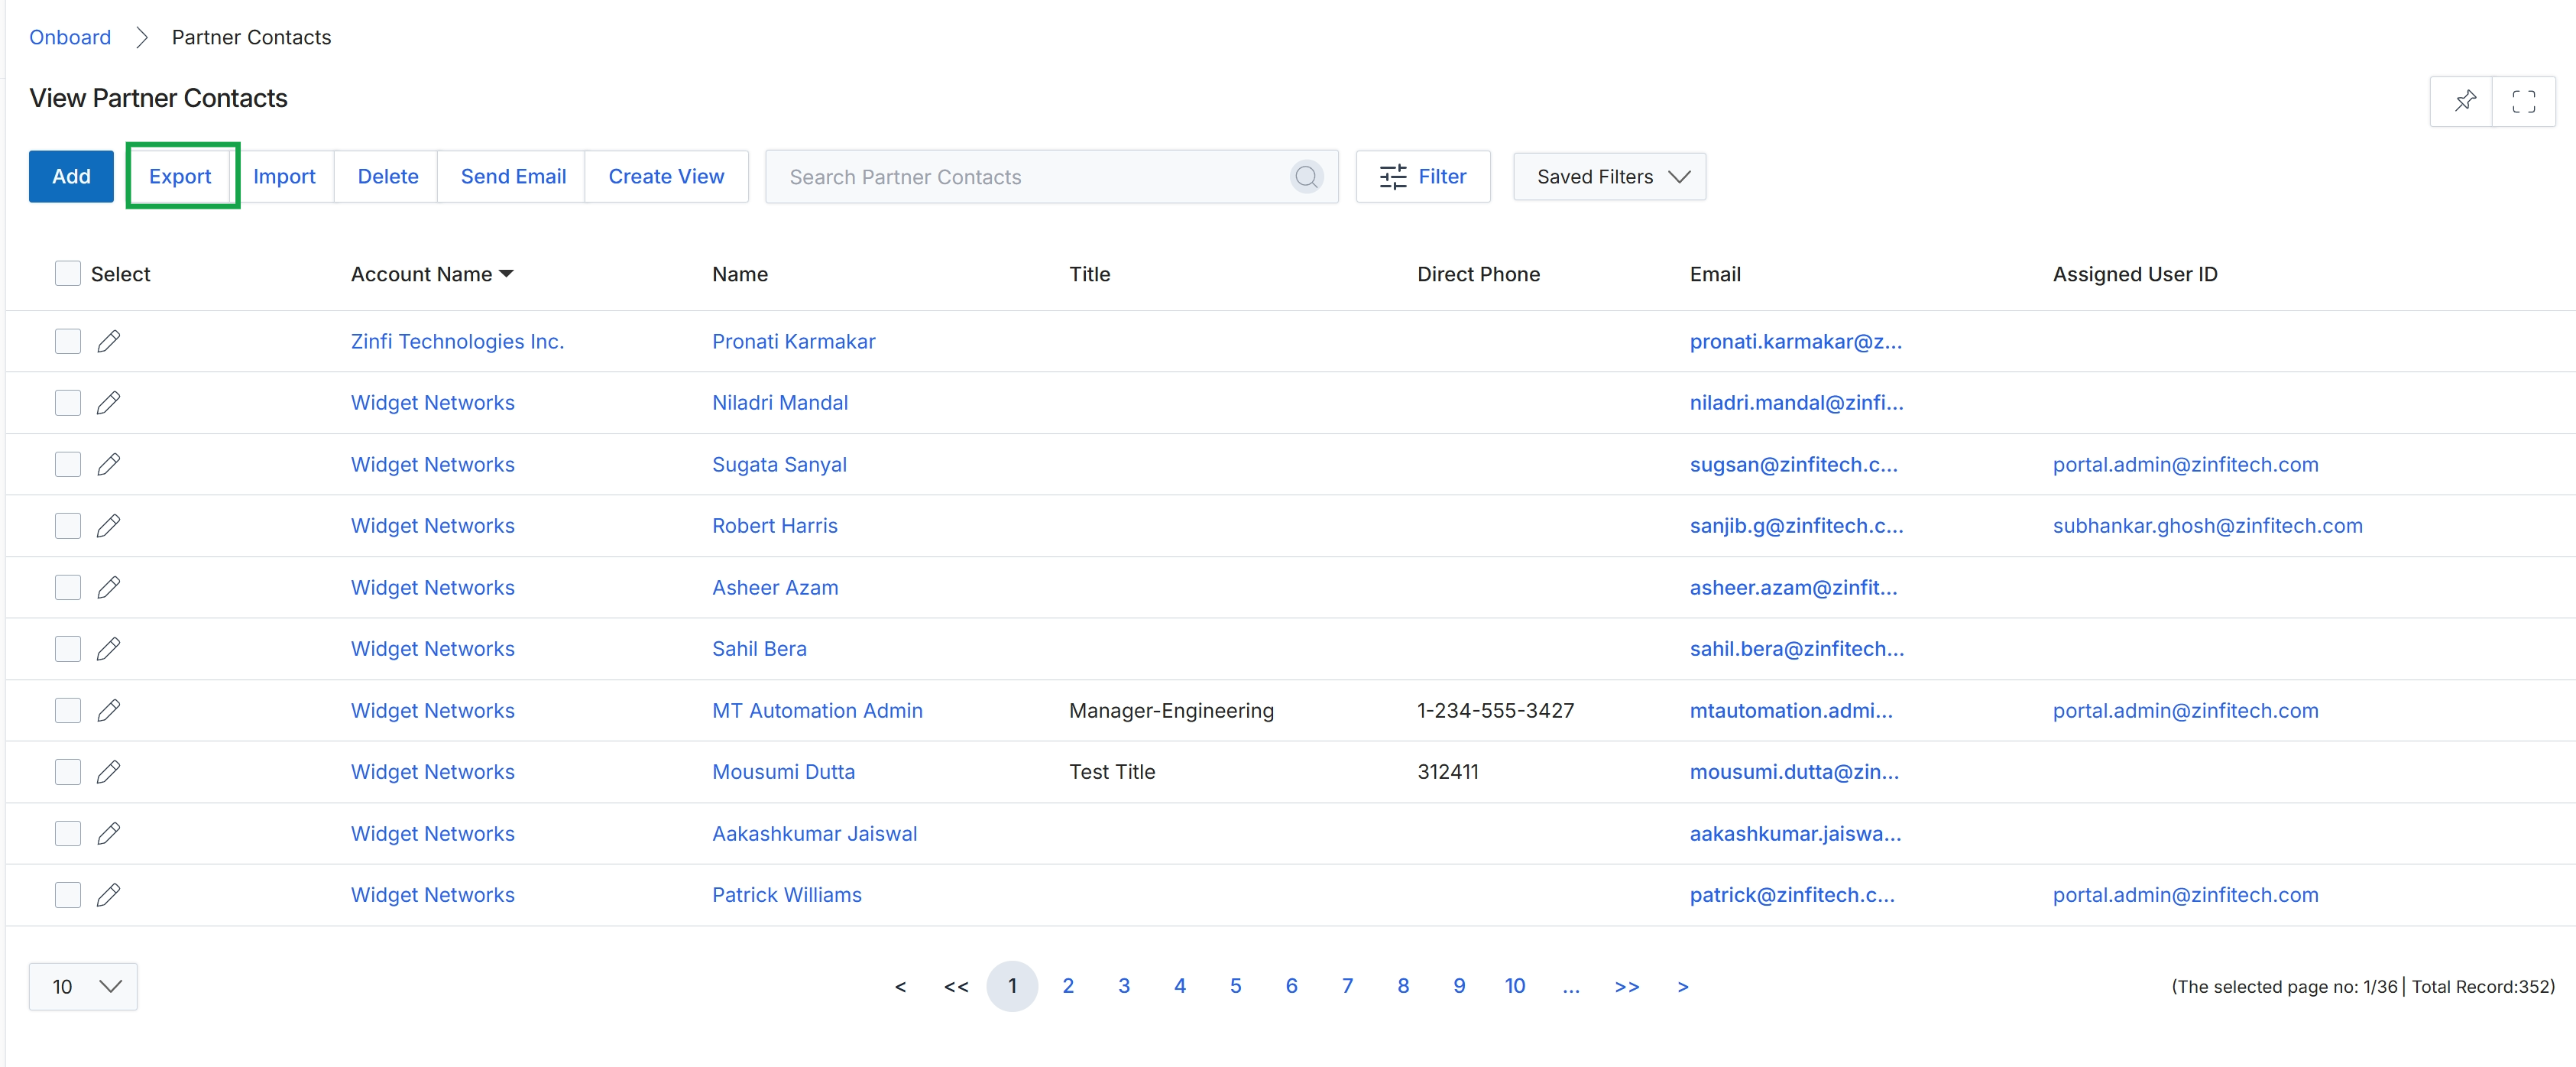
Click the Add button.
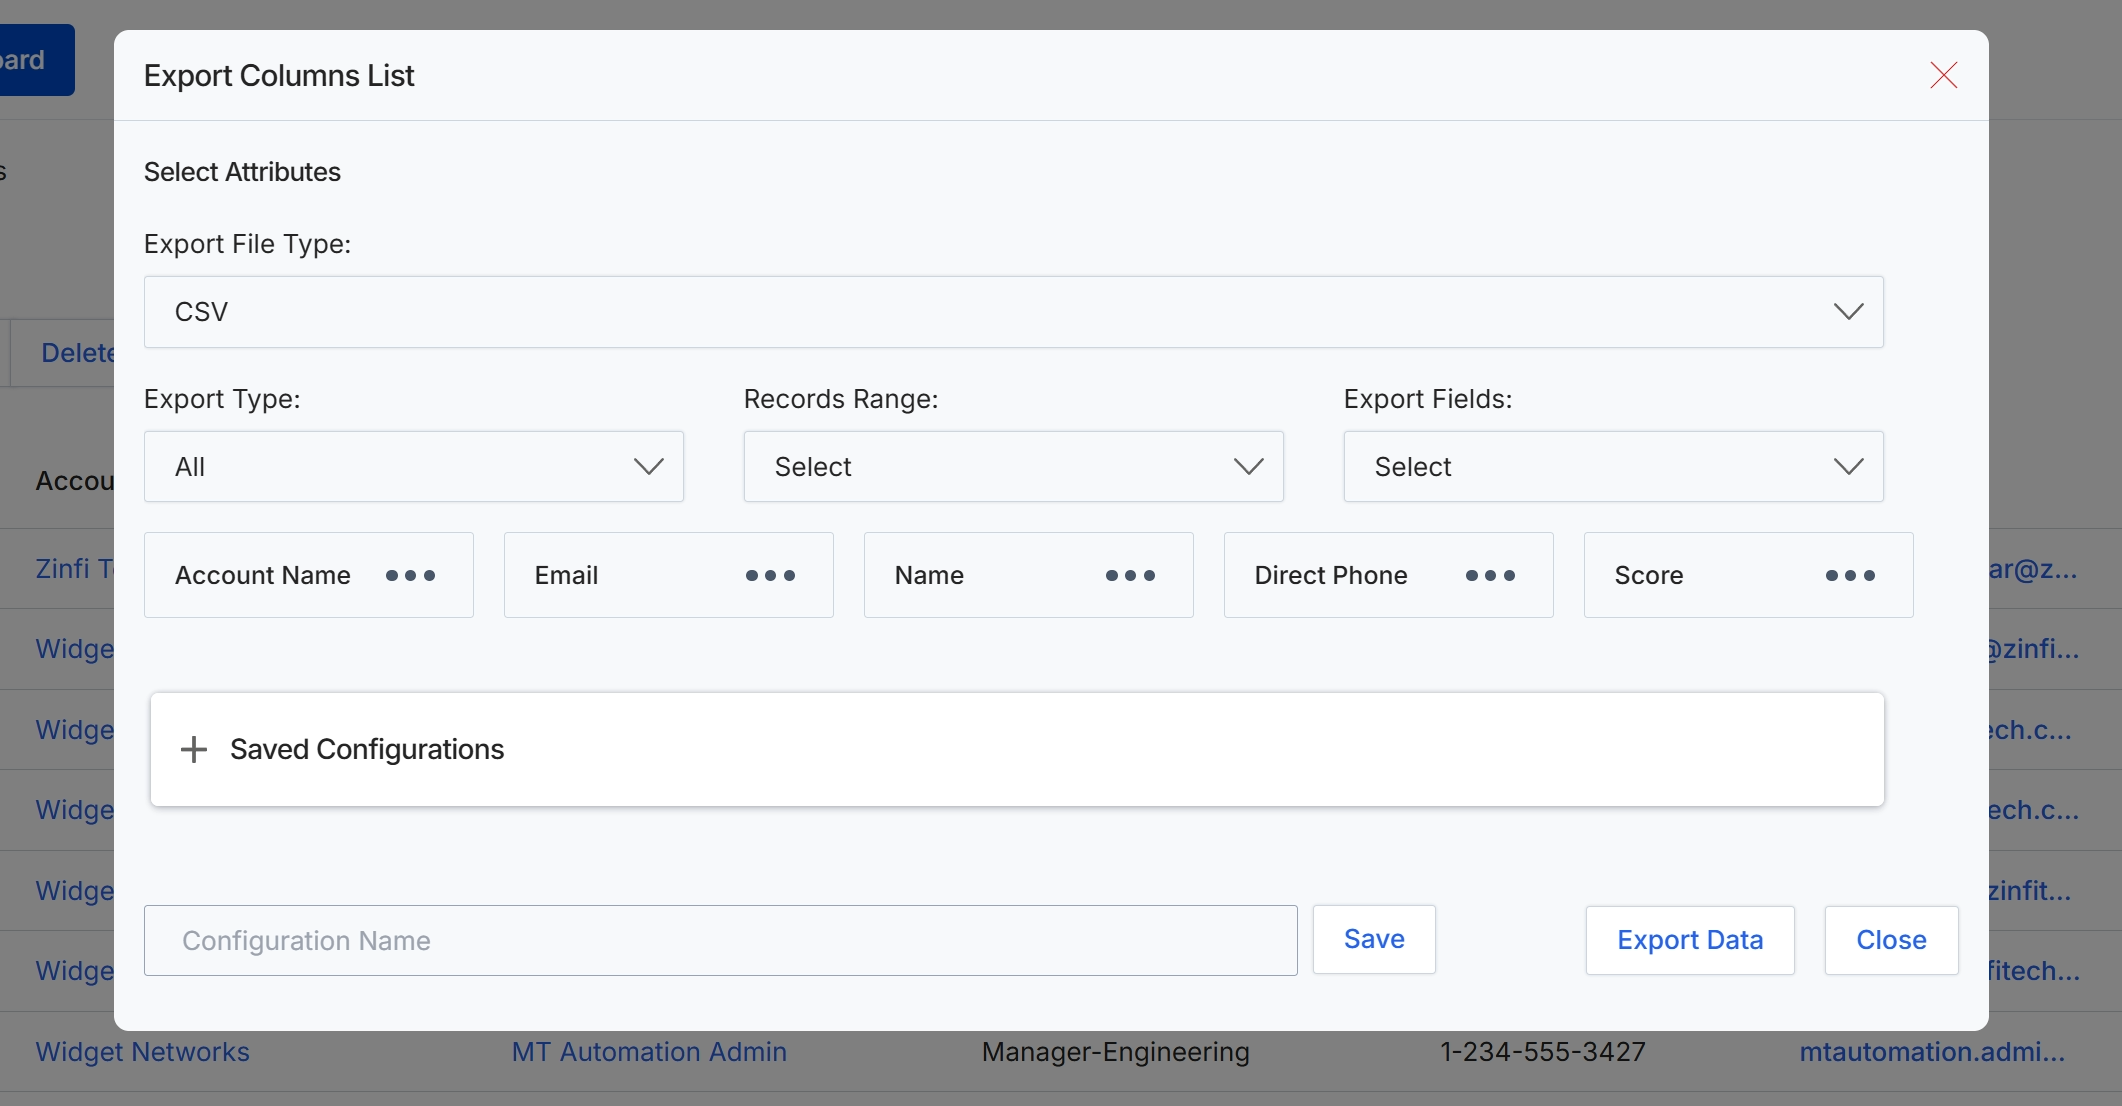
This dialog box, 'Export Columns List', allows users to configure and initiate data exports from the current list view. It provides options to specify the export file type, the range of records to include, and the specific fields or columns to be exported. Users can also save their export configurations for future use, streamlining repetitive export tasks. This functionality is crucial for data analysis, reporting, and integration with external systems, enabling administrators to extract relevant partner contact information in a structured format.
Configure the export settings by selecting the desired attributes, export file type, export type, records range, and export fields, then click "Export Data" to download the file.
Buttons
| Button | Description |
|---|---|
| Save | A button to save the current export configuration under the specified configuration name. |
| Export Data | A button to initiate the data export based on the selected settings. |
| Close | A button to close the 'Export Columns List' dialog without performing an export. |
Fields
| Field | Description |
|---|---|
| Select Attributes | This section displays the attributes (columns) that are currently selected for export. Users can add or remove attributes from this list. |
| Export File Type | A dropdown menu to select the desired file format for the export, with 'CSV' being the default and currently selected option. |
| Export Type | A dropdown menu to specify the type of export, with 'All' currently selected, indicating all records will be considered for export based on other filters. |
| Records Range | A dropdown menu to select the range of records to be included in the export. |
| Saved Configurations | An expandable section that allows users to view and manage previously saved export configurations. |
| Configuration Name | An input field to enter a name for the current export configuration if the user wishes to save it for future use. |
Importing Partner Contacts
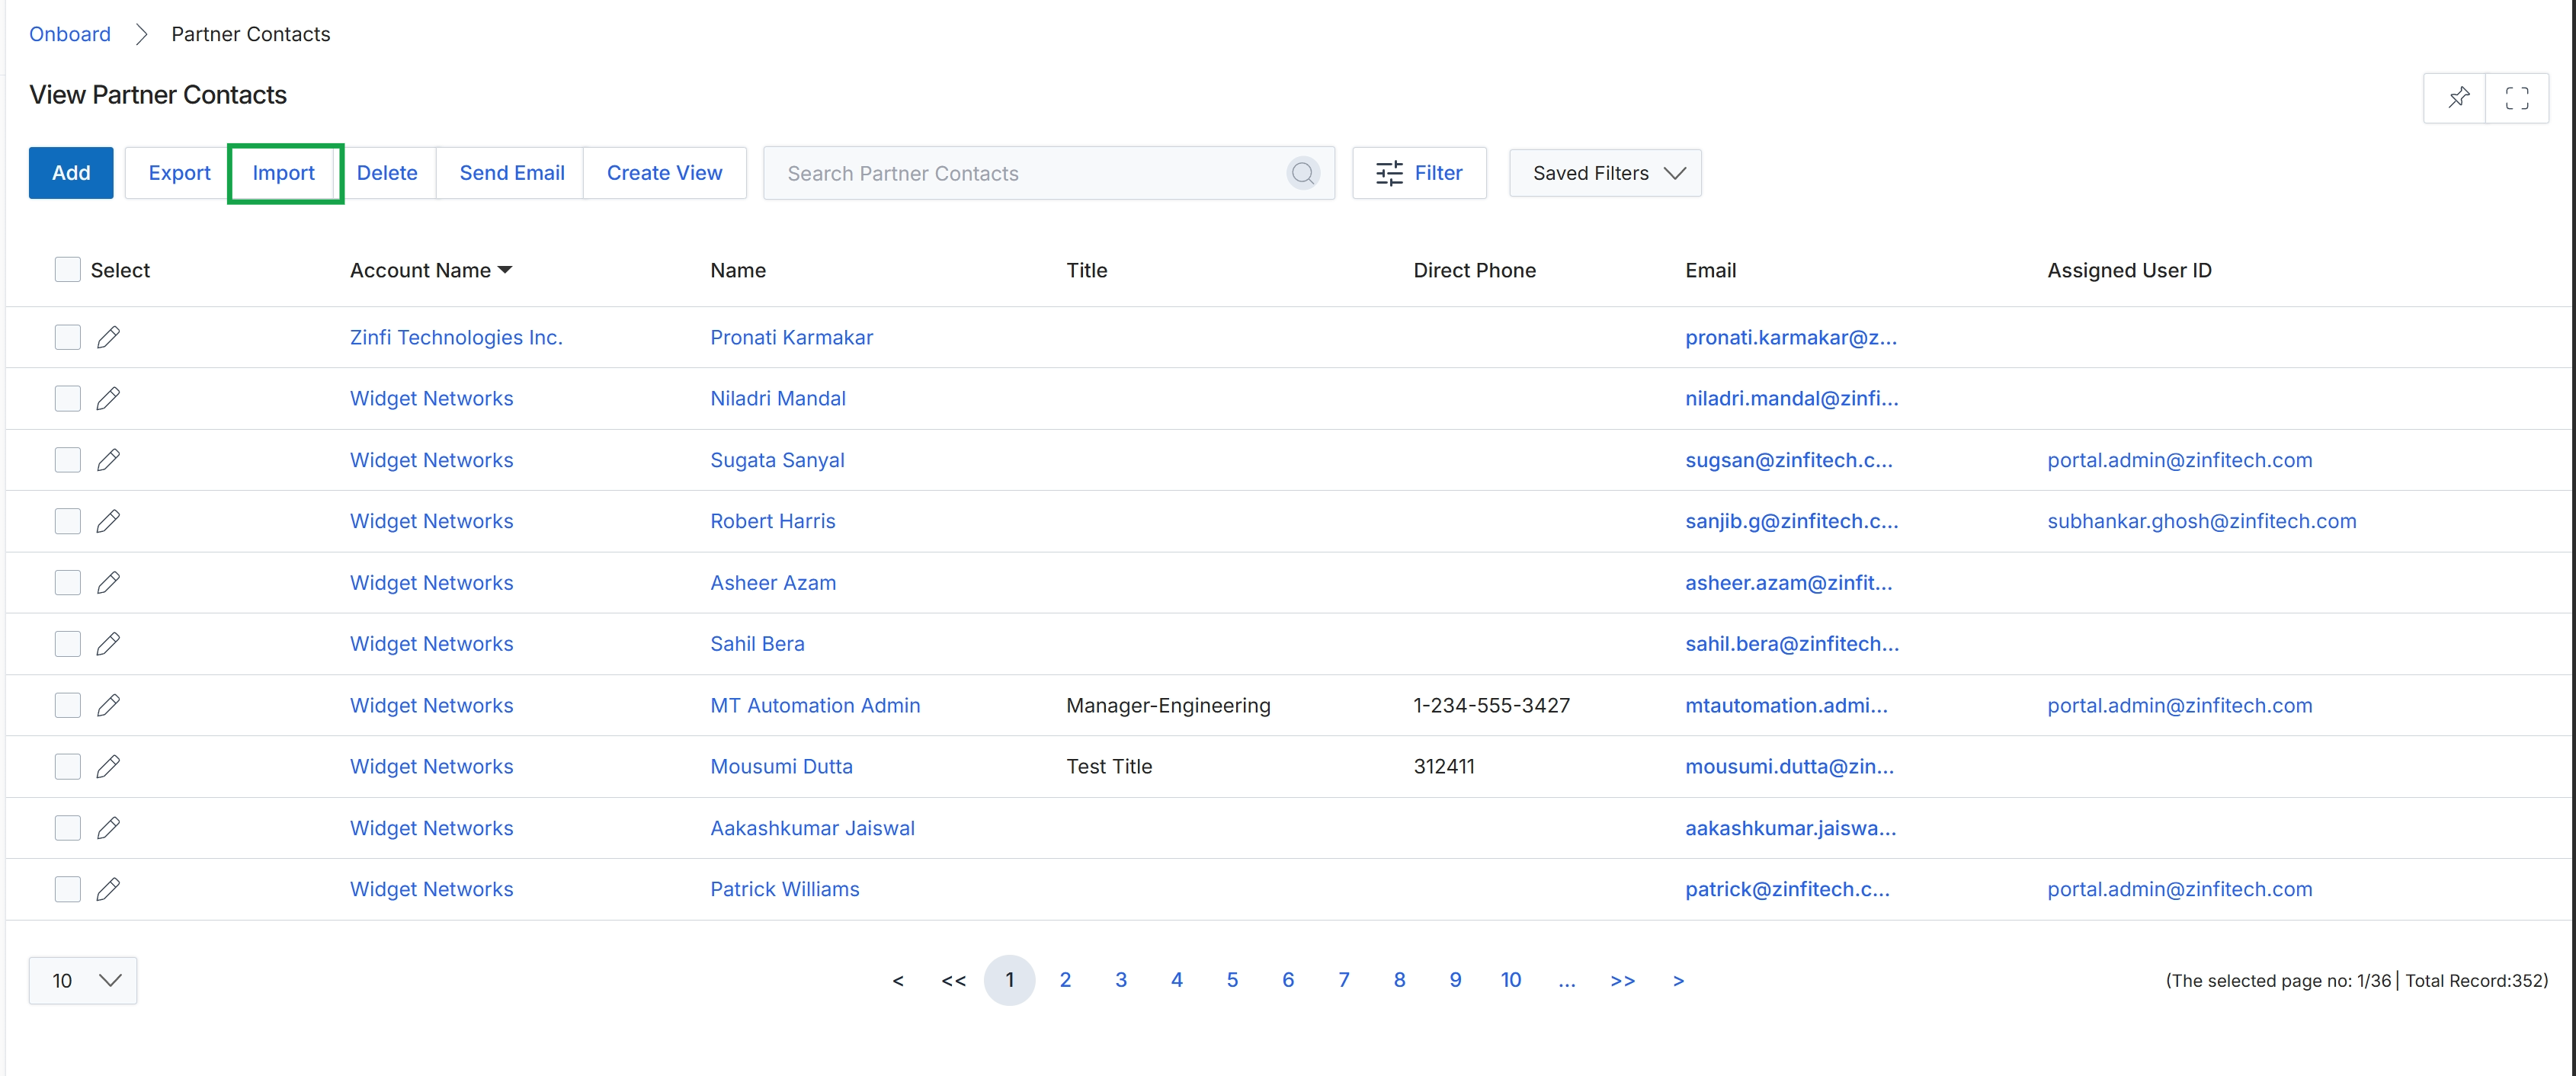
Click the Import button.
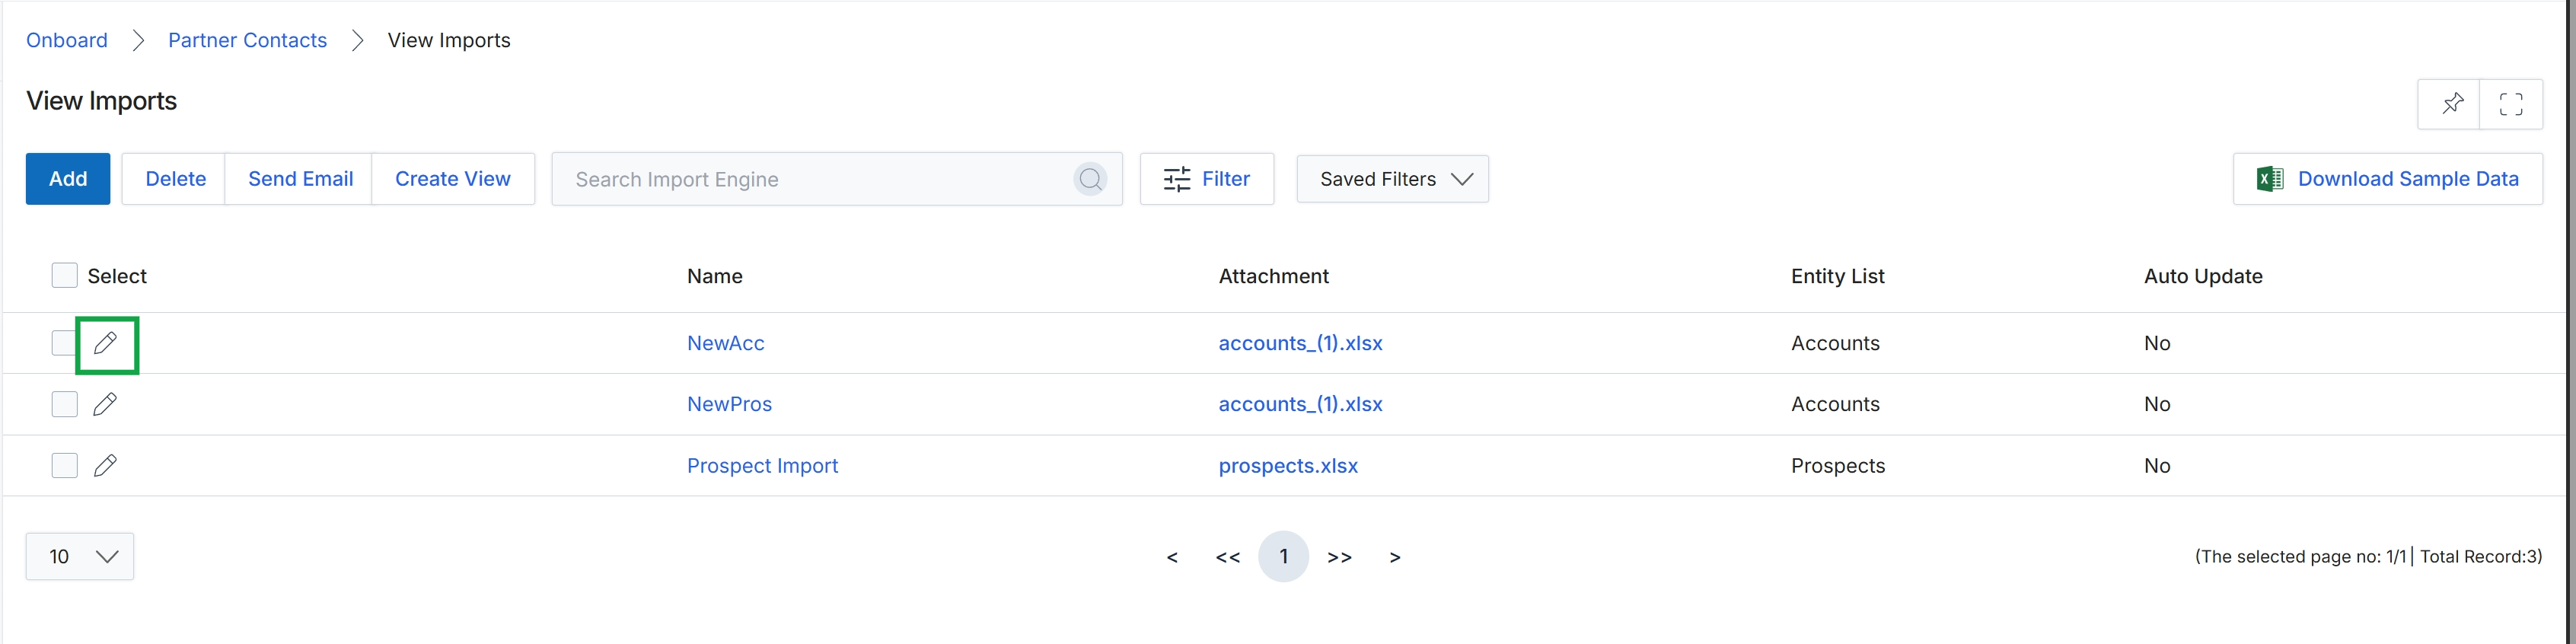
The View Imports screen displays a list of all data import jobs that have been configured within the platform, typically for bringing in partner accounts, contacts, or prospect data from external sources like CSV files or CRM systems. This screen allows administrators to review existing import configurations, identify the source files (attachments), and see which entity type each import targets. It is a critical component for initial data migration and ongoing synchronization, ensuring that partner-related information is accurately reflected and maintained within the UPM. Administrators can manage these imports, including editing their settings, to ensure data integrity and proper functioning of the partner ecosystem.
Click the Edit icon next to the "NewAcc" import to modify its configuration.
Buttons
| Button | Description |
|---|---|
| Add | Initiates the process to add a new data import configuration. |
| Delete | Deletes the selected data import configuration(s). |
| Send Email | Sends an email related to the selected import. |
| Create View | Allows creation of a custom view for the import list. |
| Filter | Opens a panel to apply filters to the list of imports. |
| Saved Filters | Dropdown to select and apply previously saved filter configurations. |
| Download Sample Data | Downloads a sample data file to assist with formatting for new imports. |
| Edit icon | Allows editing the details and configuration of a specific import. |
Fields
| Field | Description |
|---|---|
| Search Import Engine | A search bar to find specific import configurations by name or other criteria. |
Column Headings
| Column | Description |
|---|---|
| Select | Checkbox to select individual import records for bulk actions. |
| Name | The name assigned to the data import configuration. |
| Attachment | The name of the file (e.g., XLSX) used for the data import. |
| Entity List | Indicates the type of entity (e.g., Accounts, Prospects) that the import targets. |
| Auto Update | Indicates whether the import is configured to run automatically. |
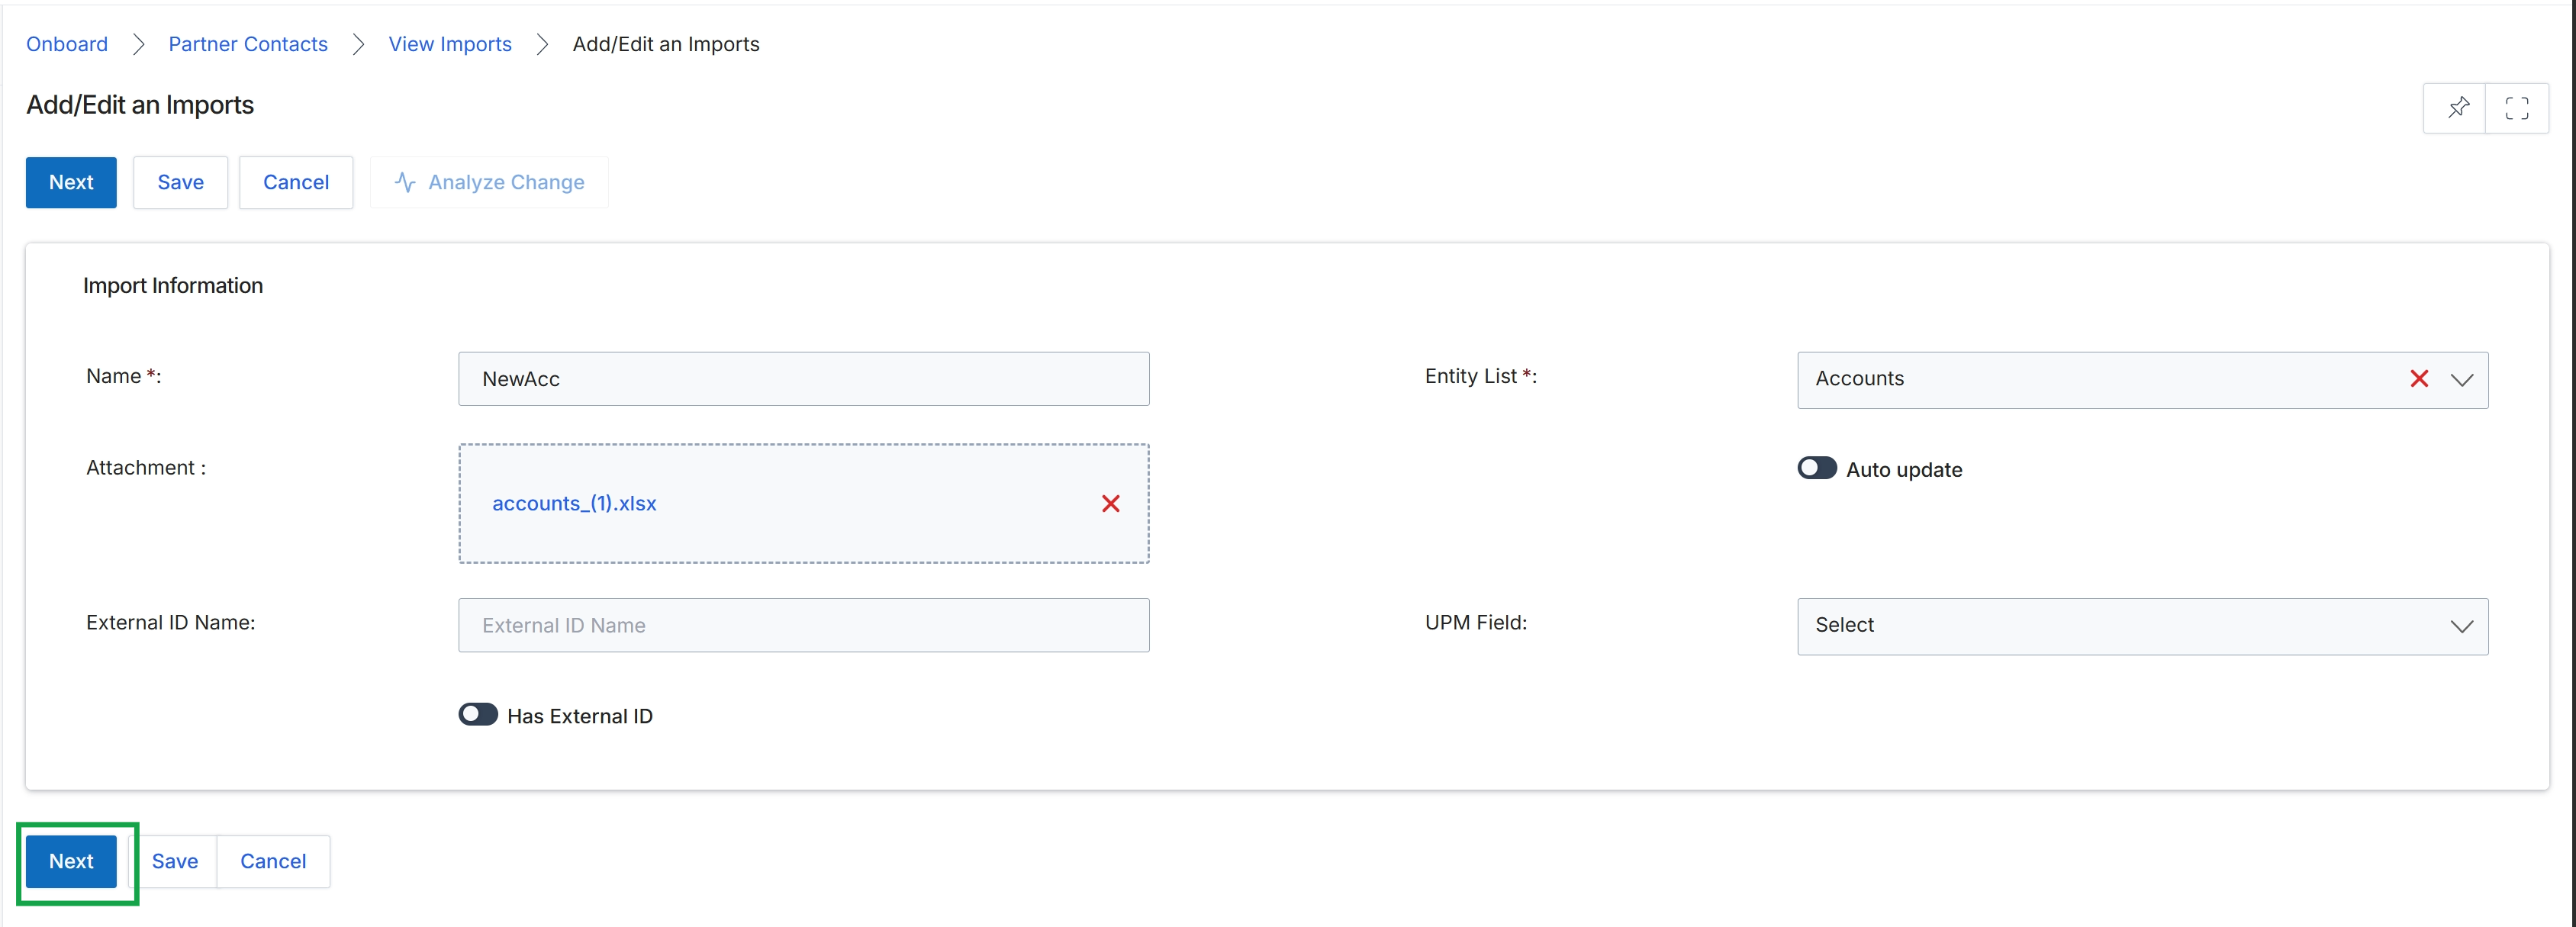
This screen, titled 'Add/Edit an Imports', is part of the data import functionality within the platform, likely used for bulk creation or updates of records such as partner contacts or accounts. It allows administrators to define the parameters for an import operation, including specifying the source file and mapping external identifiers to internal platform fields. The 'Import Information' section captures critical details about the import job, ensuring that data is correctly processed and integrated into the system. This screen is a crucial step in preparing data for ingestion, particularly when integrating with external systems or migrating large datasets.
Click the "Next" button to proceed with the import configuration.
Buttons
| Button | Description |
|---|---|
| Next | Proceeds to the next step in the import process, typically for mapping fields or reviewing data. |
| Save | Saves the current import configuration without executing the import. |
| Cancel | Discards the current import configuration and returns to the previous screen. |
| Analyze Change | Initiates an analysis of the changes that would be applied by the import, without actually performing the import. |
Import Information
| Field | Description |
|---|---|
| Name * | A required field to enter a descriptive name for the import job. |
| Attachment | Displays the name of the file attached for import, in this case, 'accounts_(1).xlsx'. |
| External ID Name | A field to specify the name of the external ID column in the import file, if applicable. |
| Has External ID | A toggle to indicate whether the import file contains an external ID column that needs to be mapped. |
| Entity List * | A required dropdown to select the type of entity being imported, such as 'Accounts' or 'Partner Contacts'. |
| Auto update | A toggle to enable automatic updates for existing records based on the import data. |
| UPM Field | A dropdown to select the platform field that corresponds to an external ID or other mapping requirement. |
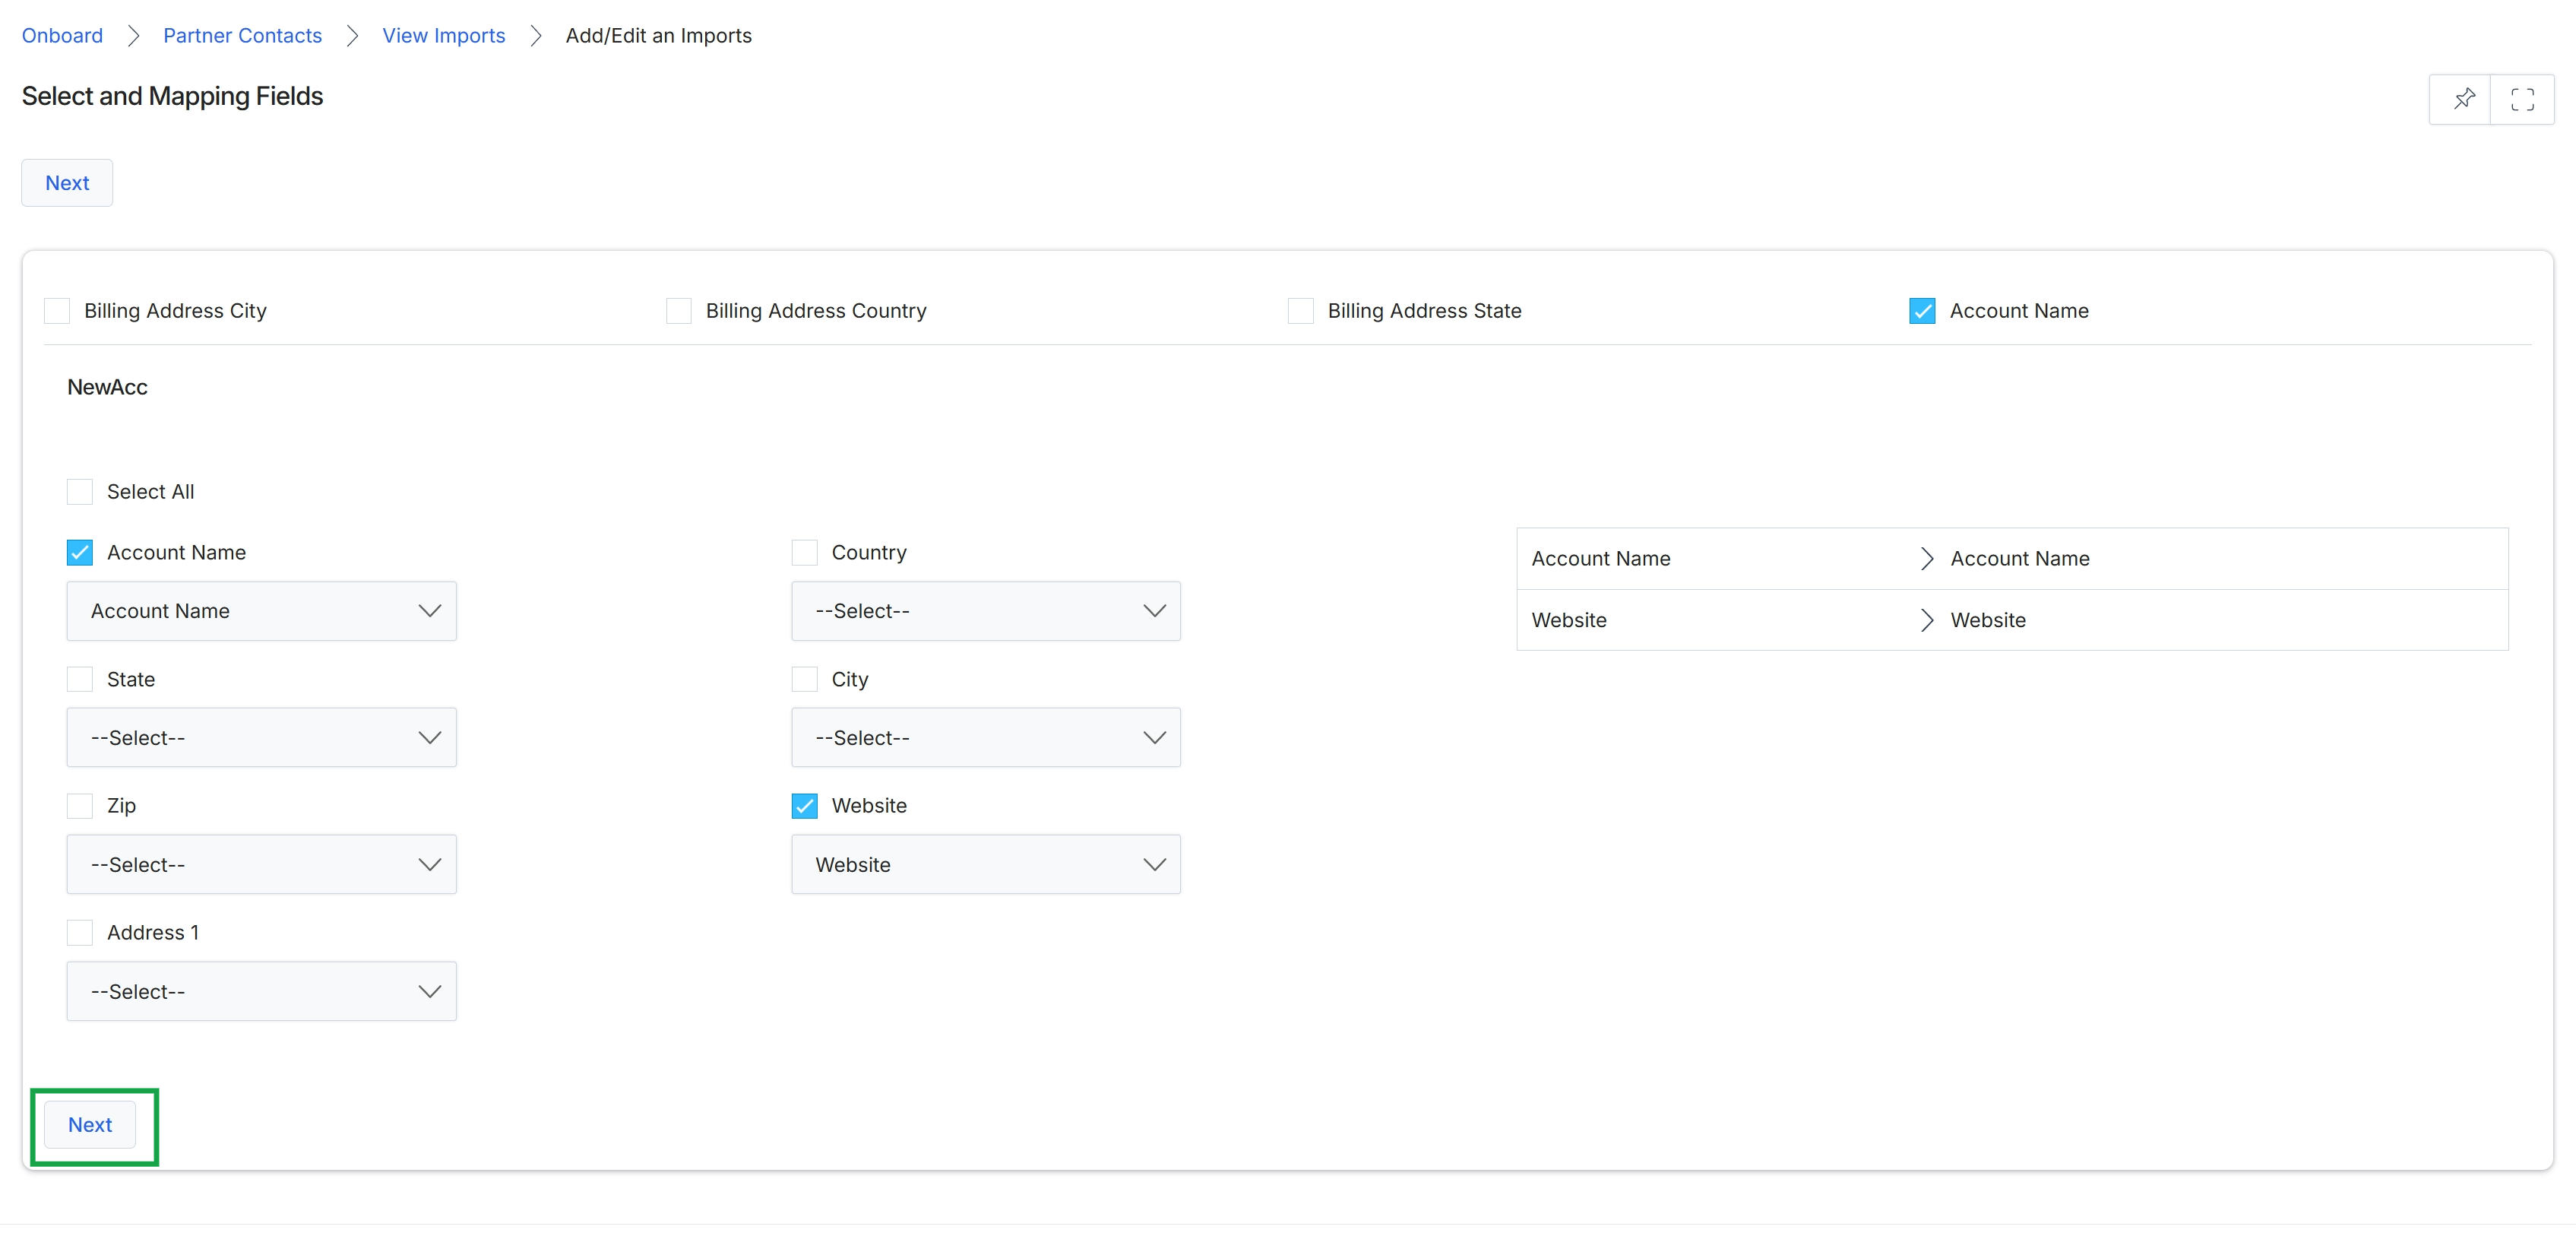
This screen, 'Select and Mapping Fields,' is part of the import process for partner contacts, allowing administrators to map fields from an uploaded file to corresponding fields within the platform. This step is crucial for ensuring that data is correctly parsed and assigned to the appropriate partner contact attributes, facilitating accurate record creation or updates. The interface displays a set of checkboxes for available fields, indicating which fields from the import file are being considered for mapping. For each selected field, a dropdown allows the administrator to specify how the imported data should be mapped to the platform's data model. This mapping ensures data integrity and consistency across the system, supporting the efficient onboarding and management of partner contacts.
Click 'Next' to proceed after selecting and mapping the desired fields for the import.
Buttons
| Button | Description |
|---|---|
| Next | Proceeds to the next step in the import process after field mapping is complete. |
Fields
| Field | Description |
|---|---|
| Billing Address City | Checkbox to include 'Billing Address City' in the field mapping. |
| Billing Address Country | Checkbox to include 'Billing Address Country' in the field mapping. |
| Billing Address State | Checkbox to include 'Billing Address State' in the field mapping. |
| Account Name | Checkbox to include 'Account Name' in the field mapping. |
NewAcc
| Field | Description |
|---|---|
| Select All | Checkbox to select or deselect all available fields for mapping. |
| Account Name | Dropdown to map the imported 'Account Name' field to a platform field. |
| State | Checkbox to include 'State' in the field mapping. |
| --Select-- | Dropdown to map the imported 'State' field to a platform field. |
| Zip | Checkbox to include 'Zip' in the field mapping. |
| --Select-- | Dropdown to map the imported 'Zip' field to a platform field. |
| Address 1 | Checkbox to include 'Address 1' in the field mapping. |
| --Select-- | Dropdown to map the imported 'Address 1' field to a platform field. |
| Country | Checkbox to include 'Country' in the field mapping. |
| --Select-- | Dropdown to map the imported 'Country' field to a platform field. |
| City | Checkbox to include 'City' in the field mapping. |
| --Select-- | Dropdown to map the imported 'City' field to a platform field. |
| Website | Checkbox to include 'Website' in the field mapping. |
| Website | Dropdown to map the imported 'Website' field to a platform field. |
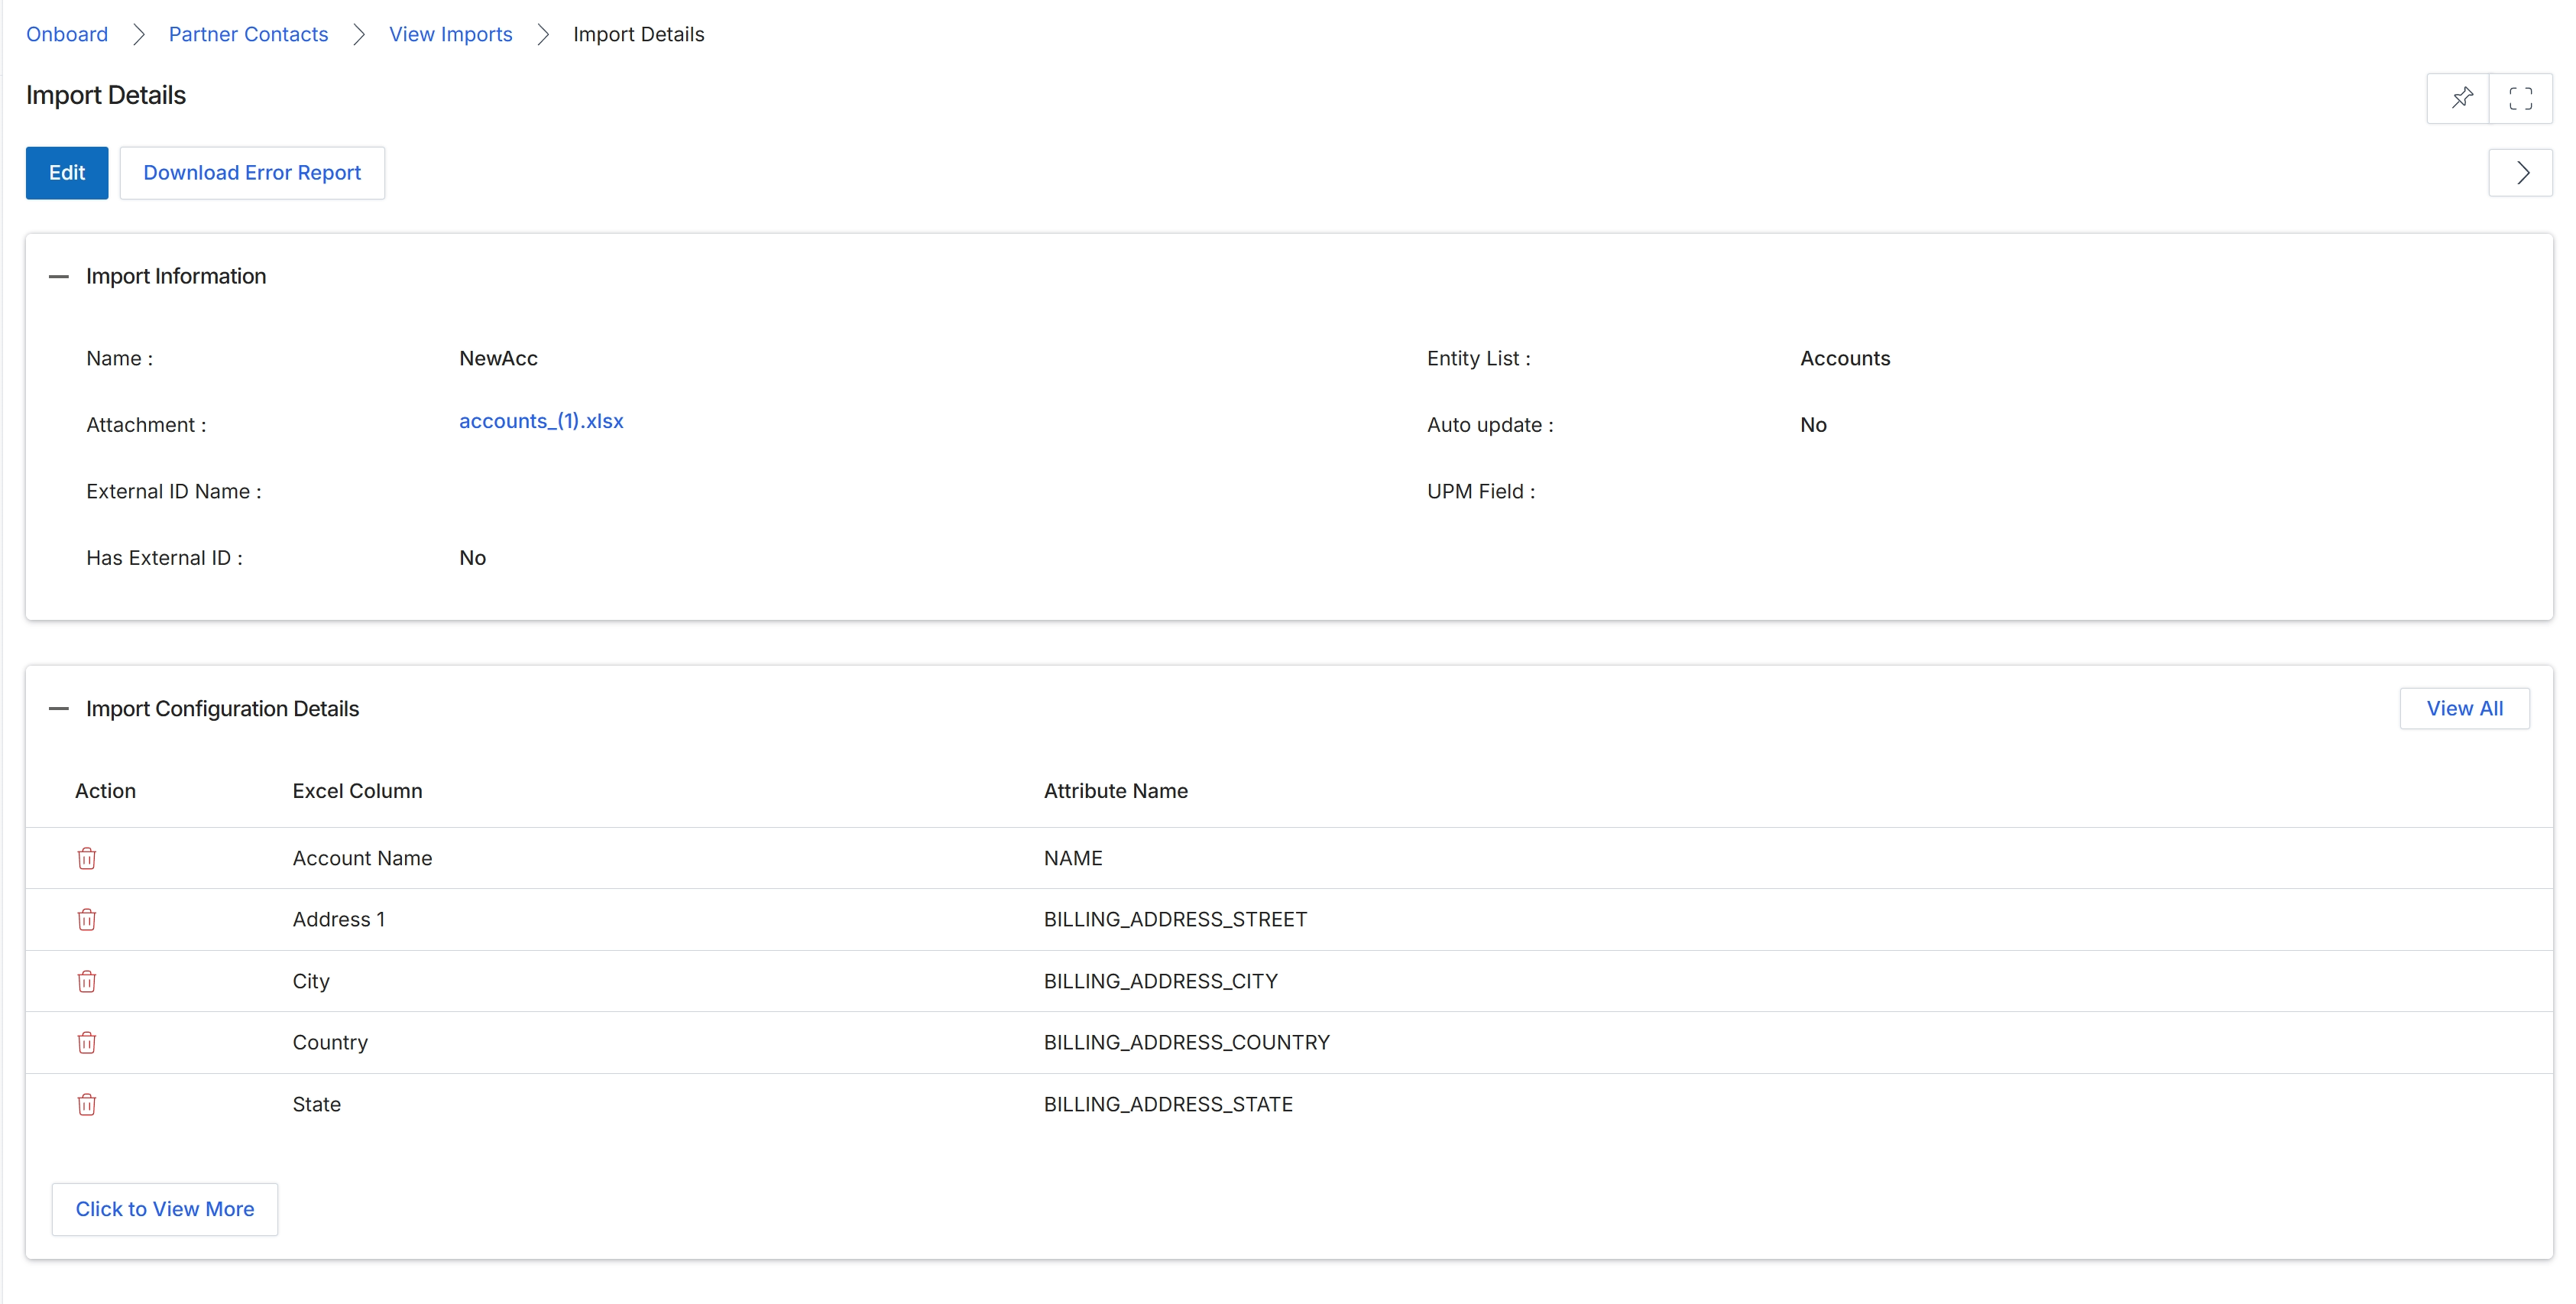
The Import Details screen provides a comprehensive overview of a specific data import operation, displaying both the general import information and the detailed configuration of how the data columns were mapped. This screen is crucial for administrators to verify that data has been imported correctly, troubleshoot any issues by reviewing the error report, and understand the mapping logic applied during the import process. It serves as a record of past import activities, ensuring data integrity and providing an audit trail for changes made to partner-related entities through bulk operations. The 'Import Information' section summarizes key details about the import job, while the 'Import Configuration Details' section shows the mapping between the source file's columns and the platform's internal attributes.
Review the details of the data import, including the import information and the configuration of the column mappings.
Buttons
| Button | Description |
|---|---|
| Edit | Allows editing of the import details. |
| Download Error Report | Downloads a report detailing any errors encountered during the import process. |
| Click to View More | Expands the list to show additional import configuration details. |
| View All | Displays all import configuration details. |
Import Information
| Field | Description |
|---|---|
| Name | The name given to this specific import job. |
| Attachment | The name of the file that was imported. |
| Has External ID | Indicates whether the imported data includes an external identifier. |
| Entity List | The type of entity (e.g., Accounts, Contacts) that was imported. |
| Auto update | Indicates whether the import was configured to automatically update existing records. |
Import Configuration Details
| Column | Description |
|---|---|
| Action | An icon representing an action that can be performed on the row, such as deleting the mapping. |
| Excel Column | The name of the column from the imported Excel file. |
| Attribute Name | The corresponding internal platform attribute name to which the Excel column was mapped. |
Managing Partner Contacts
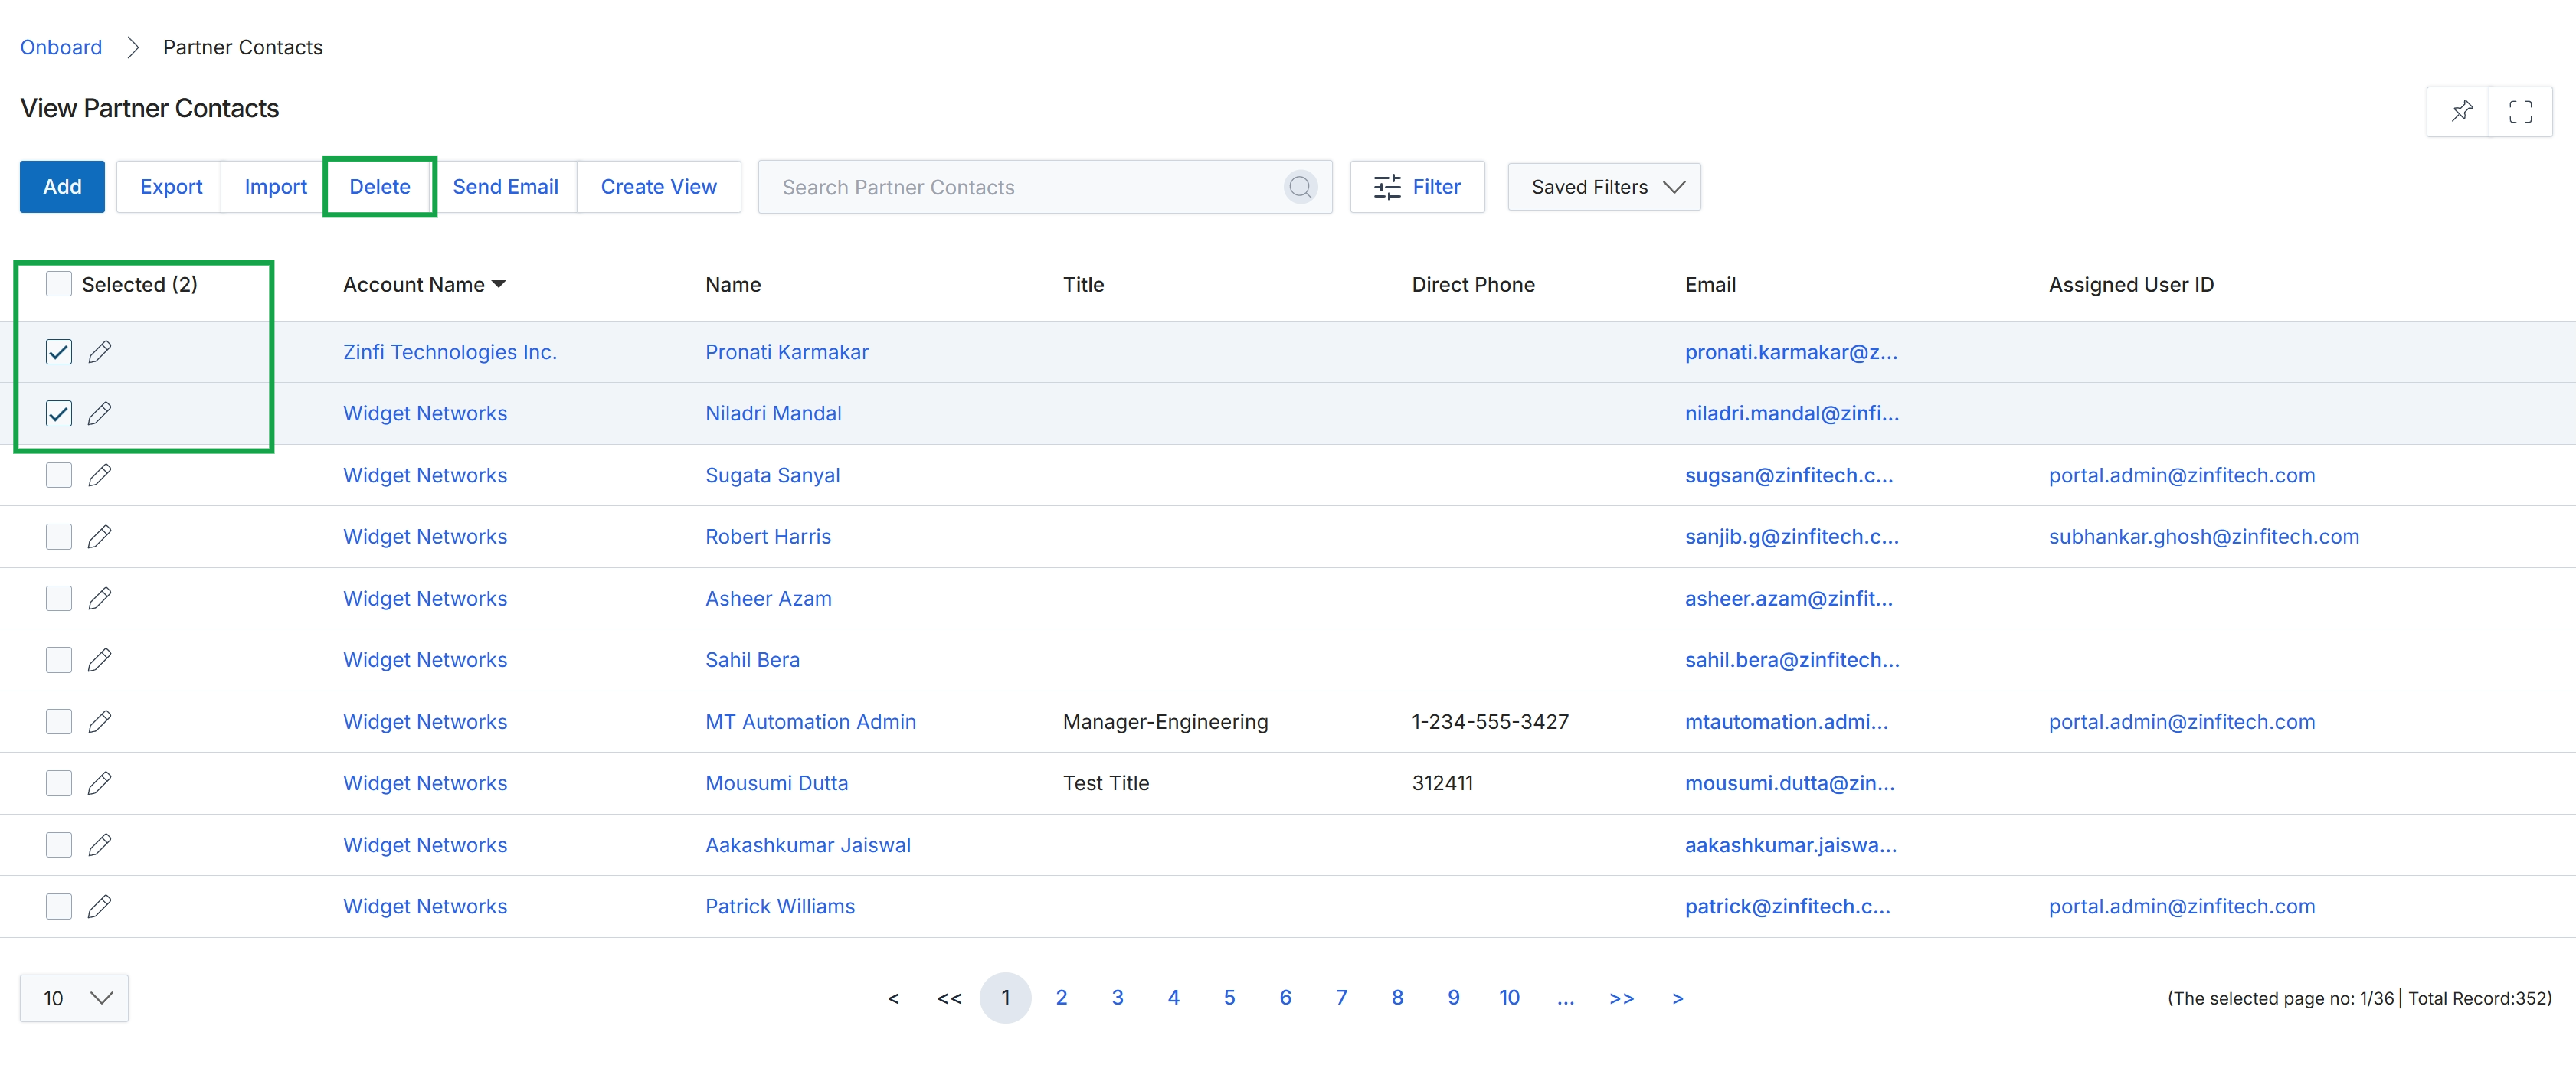
Click the Delete button.
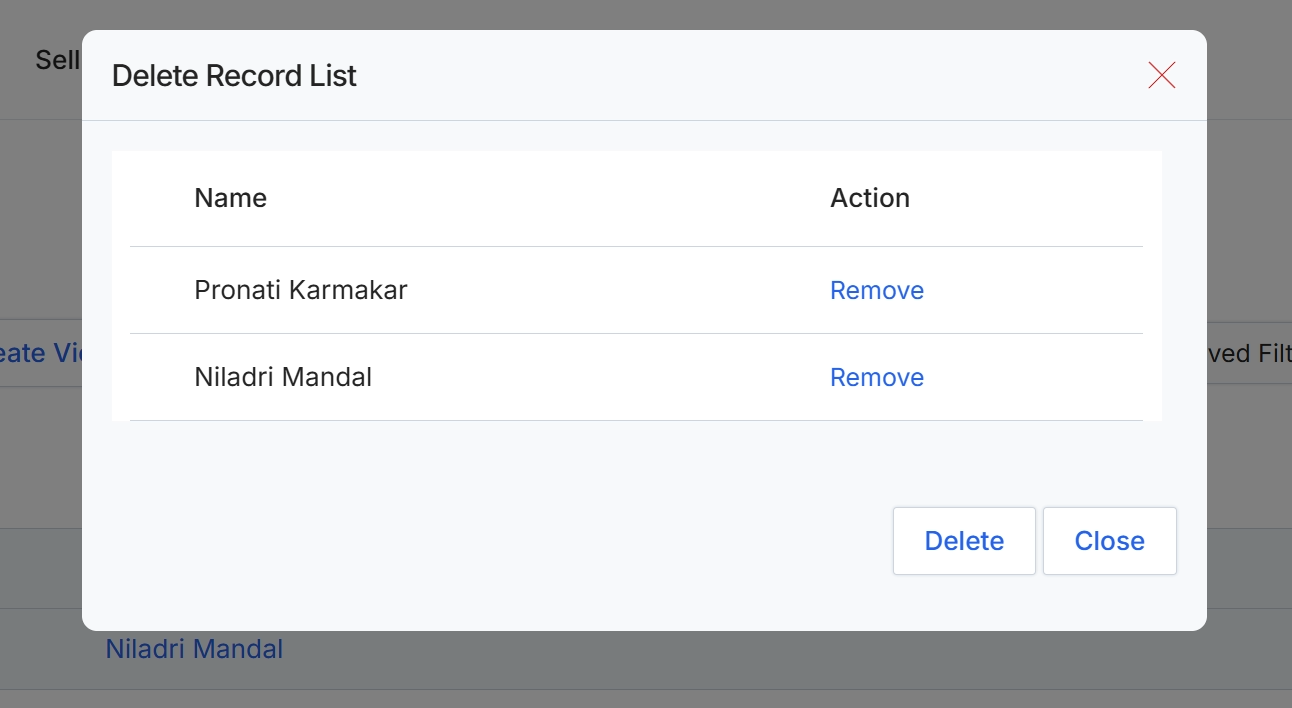
This dialog box displays a list of records that have been selected for deletion. It serves as a confirmation step, allowing administrators to review the items before proceeding with the permanent deletion. Each record is listed with its name and an option to remove it from the deletion queue, providing a final opportunity to deselect items if they were added in error. This prevents accidental data loss by requiring explicit confirmation of the records to be deleted.
Click "Delete" to confirm the deletion of the listed records.
Buttons
| Button | Description |
|---|---|
| Remove | Removes the specific record from the current deletion list, preventing it from being deleted. |
| Delete | Confirms and executes the deletion of all records currently in the list. |
| Close | Closes the dialog without performing any deletion actions. |
Column Headings
| Column | Description |
|---|---|
| Name | The name of the record selected for deletion. |
| Action | Provides an option to remove the individual record from the deletion list before confirming the overall deletion. |
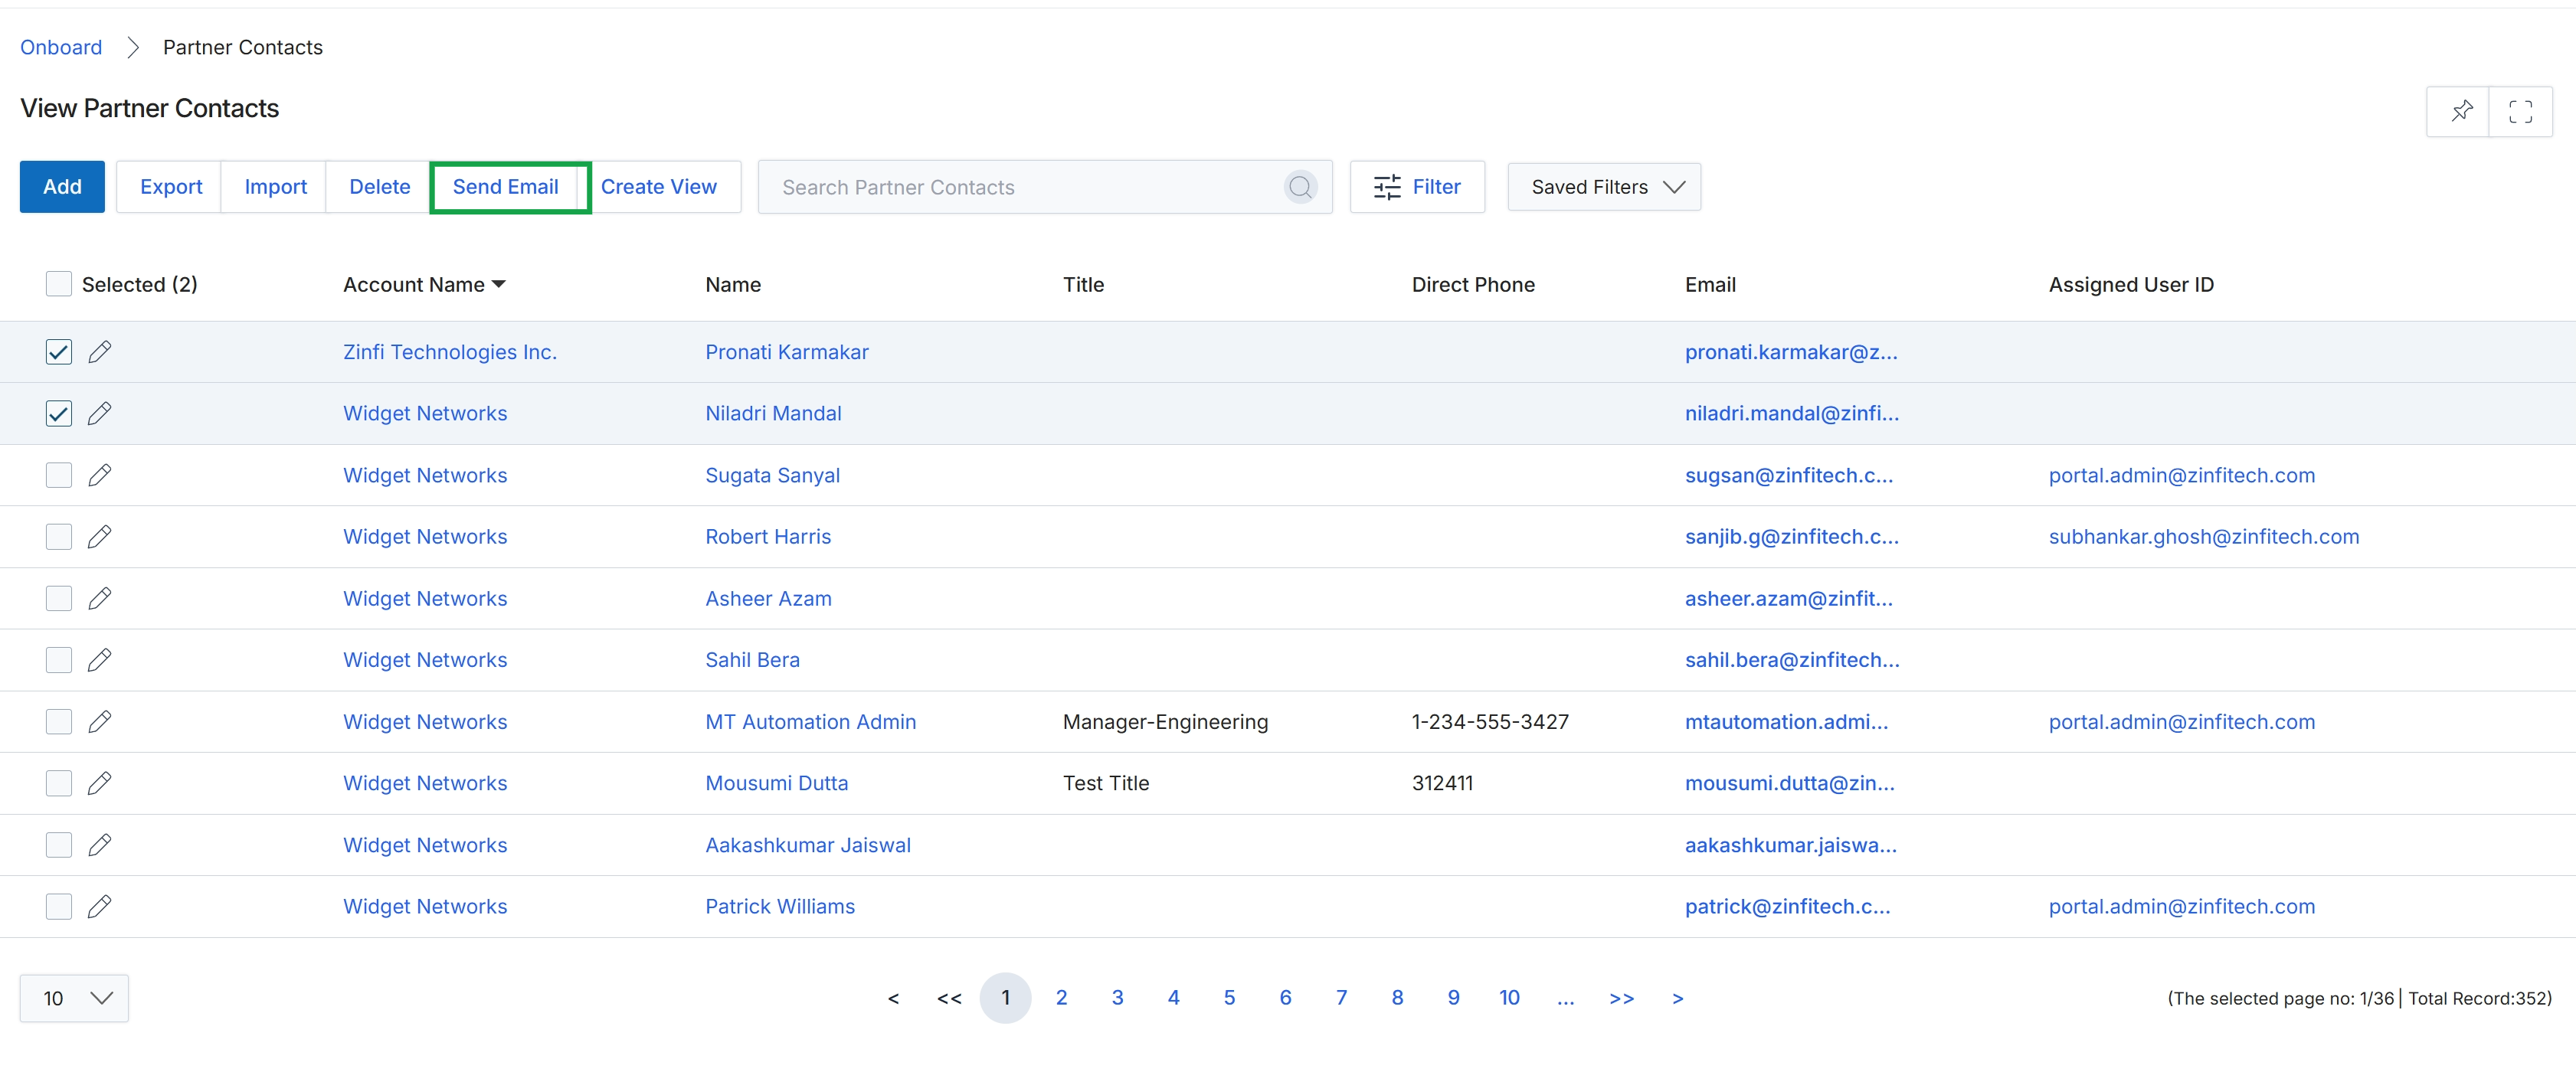
The View Partner Contacts screen provides a comprehensive list of all individual contacts associated with partner accounts within the Onboard module. This list serves as a central repository for managing communication and engagement with partner personnel, allowing administrators to quickly access contact details, filter by various criteria, and initiate actions such as sending emails. Each entry displays key information about the partner contact, including their associated account, name, title, and direct contact information. This screen is crucial for maintaining an organized and accessible record of all individuals involved in the partner ecosystem, facilitating targeted outreach and efficient partner management.
Click the "Send Email" button to initiate an email to the selected partner contacts.
Buttons
| Button | Description |
|---|---|
| Add | Adds a new partner contact record. |
| Export | Exports the current list of partner contacts to a file. |
| Import | Imports partner contact records from a file. |
| Delete | Deletes the selected partner contact records. |
| Send Email | Initiates an email to the selected partner contacts. |
| Create View | Creates a custom view for the partner contacts list. |
| Filter | Applies filters to narrow down the list of partner contacts. |
| Saved Filters | Selects from a list of previously saved filter configurations. |
Fields
| Field | Description |
|---|---|
| Search Partner Contacts | Searches for partner contacts by keyword. |
Column Headings
| Column | Description |
|---|---|
| Selected (2) | Indicates the number of partner contacts currently selected in the list. |
| Account Name | The name of the partner account to which the contact belongs. |
| Name | The full name of the partner contact. |
| Title | The job title of the partner contact. |
| Direct Phone | The direct phone number of the partner contact. |
| The email address of the partner contact. | |
| Assigned User ID | The user ID assigned to the partner contact within the platform. |
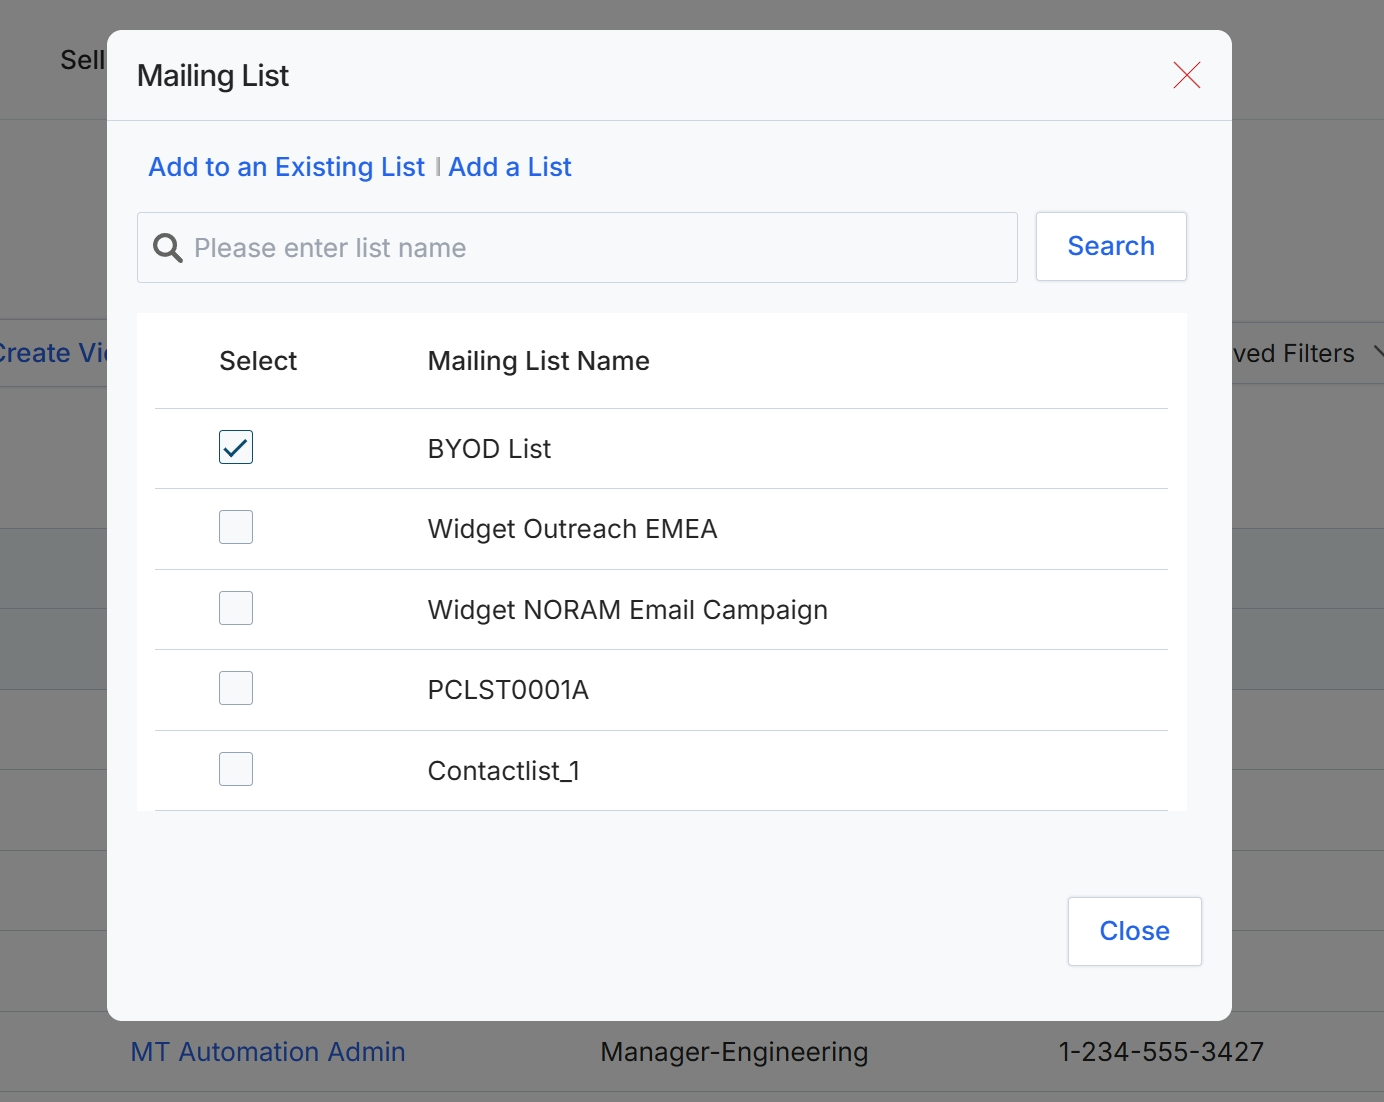
This dialog allows users to manage mailing lists, which are used to group contacts for targeted communication within the platform. Users can either add contacts to an existing list or create a new one directly from this interface. The dialog displays a searchable list of available mailing lists, enabling users to select one or more lists to associate with the current contact selection. This functionality is crucial for segmenting partner contacts for marketing campaigns, announcements, or other specific outreach efforts, ensuring that communications are relevant to the intended recipients.
Select the 'BYOD List' checkbox to add the contact to this mailing list.
Buttons
| Button | Description |
|---|---|
| Add to an Existing List | Click this link to add the current contact(s) to an existing mailing list. |
| Add a List | Click this link to create a new mailing list. |
| Search | Click to filter the mailing list results based on the entered search term. |
| Close | Click to close the Mailing List dialog without saving changes. |
Fields
| Field | Description |
|---|---|
| Please enter list name | Enter text here to search for existing mailing lists by name. |
Column Headings
| Column | Description |
|---|---|
| Select | Column header for checkboxes used to select mailing lists. |
| Mailing List Name | Column header for the names of the available mailing lists. |
Customizing Views and Filtering
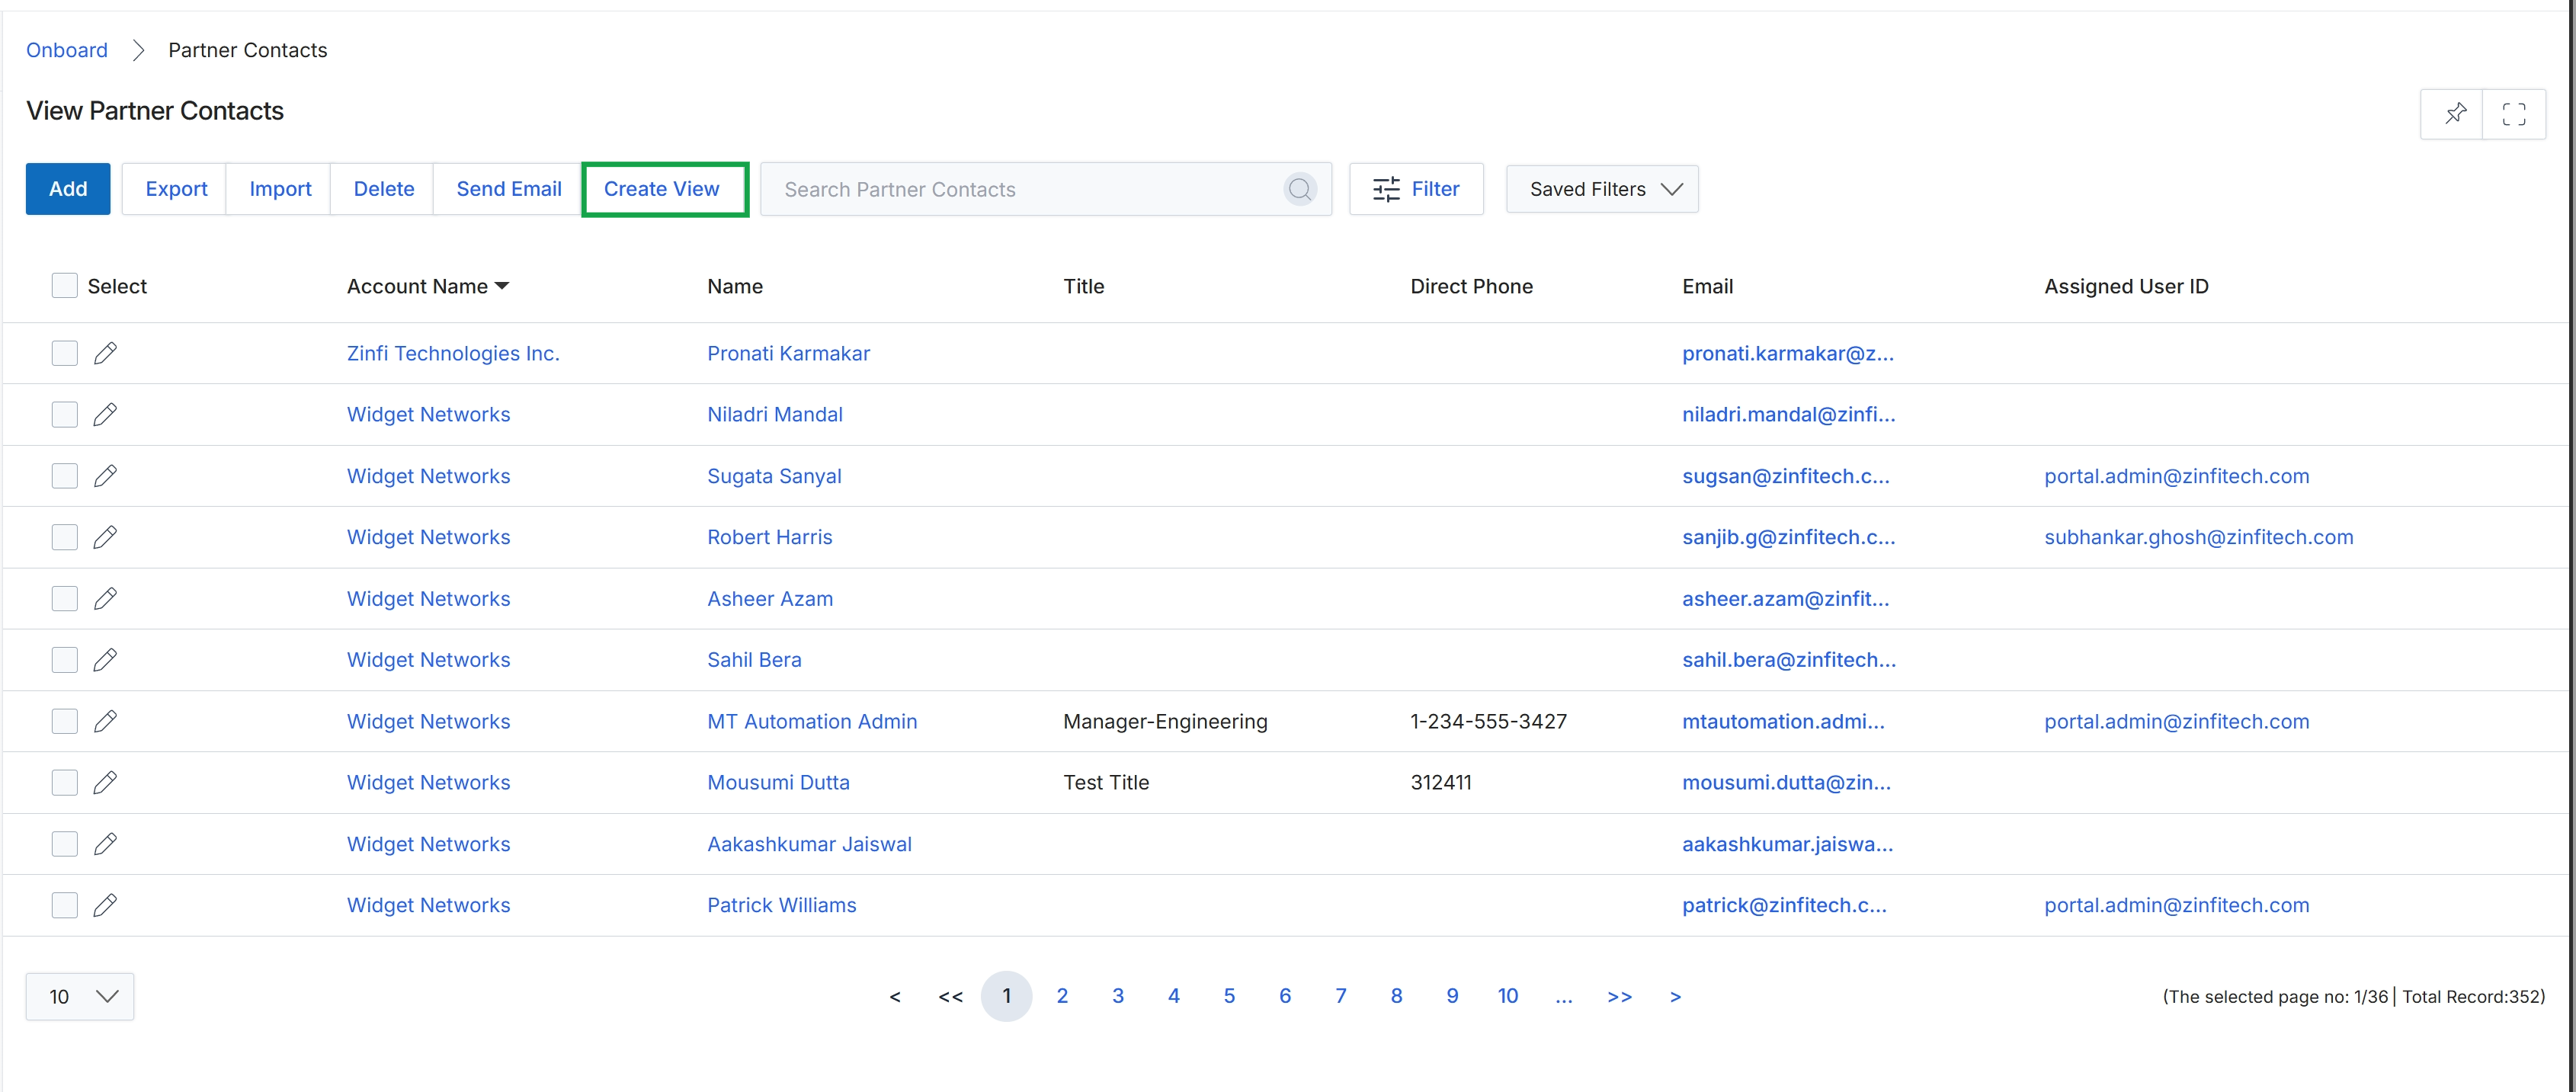
Click the Create View button.
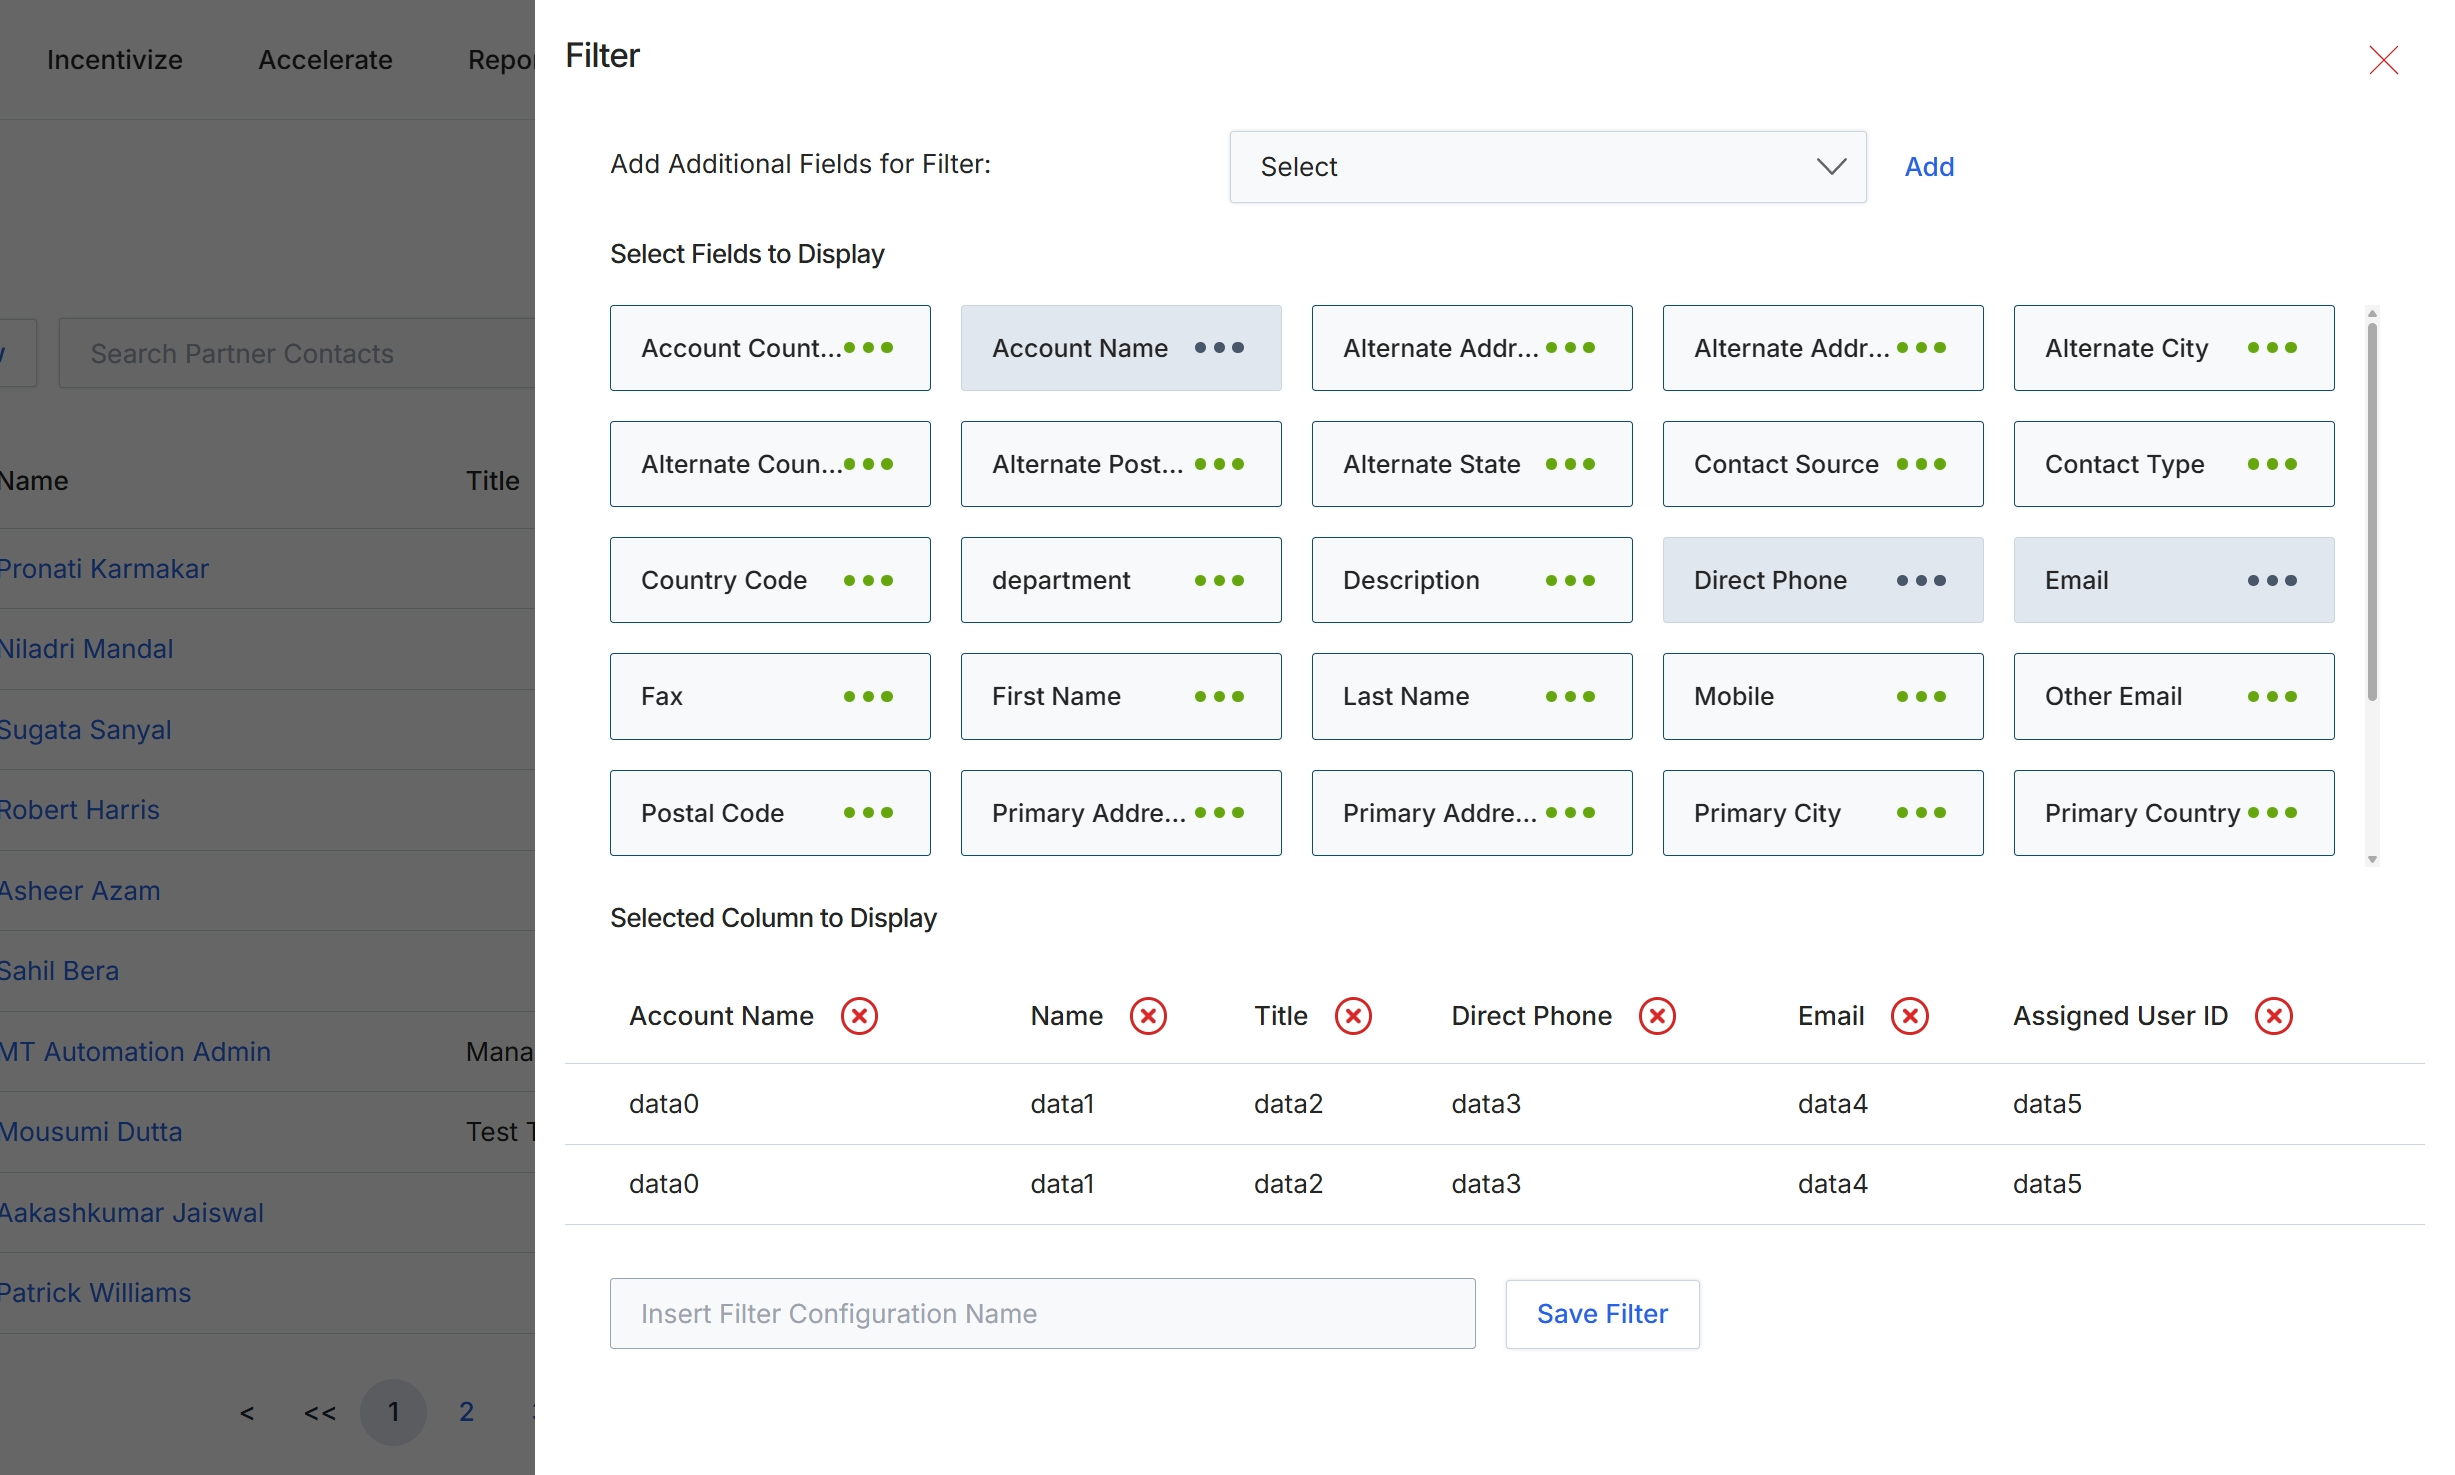
This filter configuration screen allows administrators to customize the display and filtering options for the Partner Contacts list view. It provides granular control over which contact-related fields are visible as columns in the main list and which can be used to refine search results. By selecting and arranging fields, administrators can tailor the contact view to highlight the most relevant information for their operational needs, improving efficiency in managing partner relationships. The ability to save filter configurations enables quick access to frequently used views, streamlining workflows for different administrative tasks related to partner contact management.
Click the 'Select' dropdown to choose additional fields for filtering the Partner Contacts list.
Buttons
| Button | Description |
|---|---|
| Add | A button to add the selected field from the dropdown to the filter criteria. |
| Save Filter | A button to save the current filter configuration with the specified name. |
Fields
| Field | Description |
|---|---|
| Select | A dropdown menu to add more fields that can be used for filtering the Partner Contacts list. |
| Insert Filter Configuration Name | A text input field to enter a name for the current filter configuration to save it for future use. |
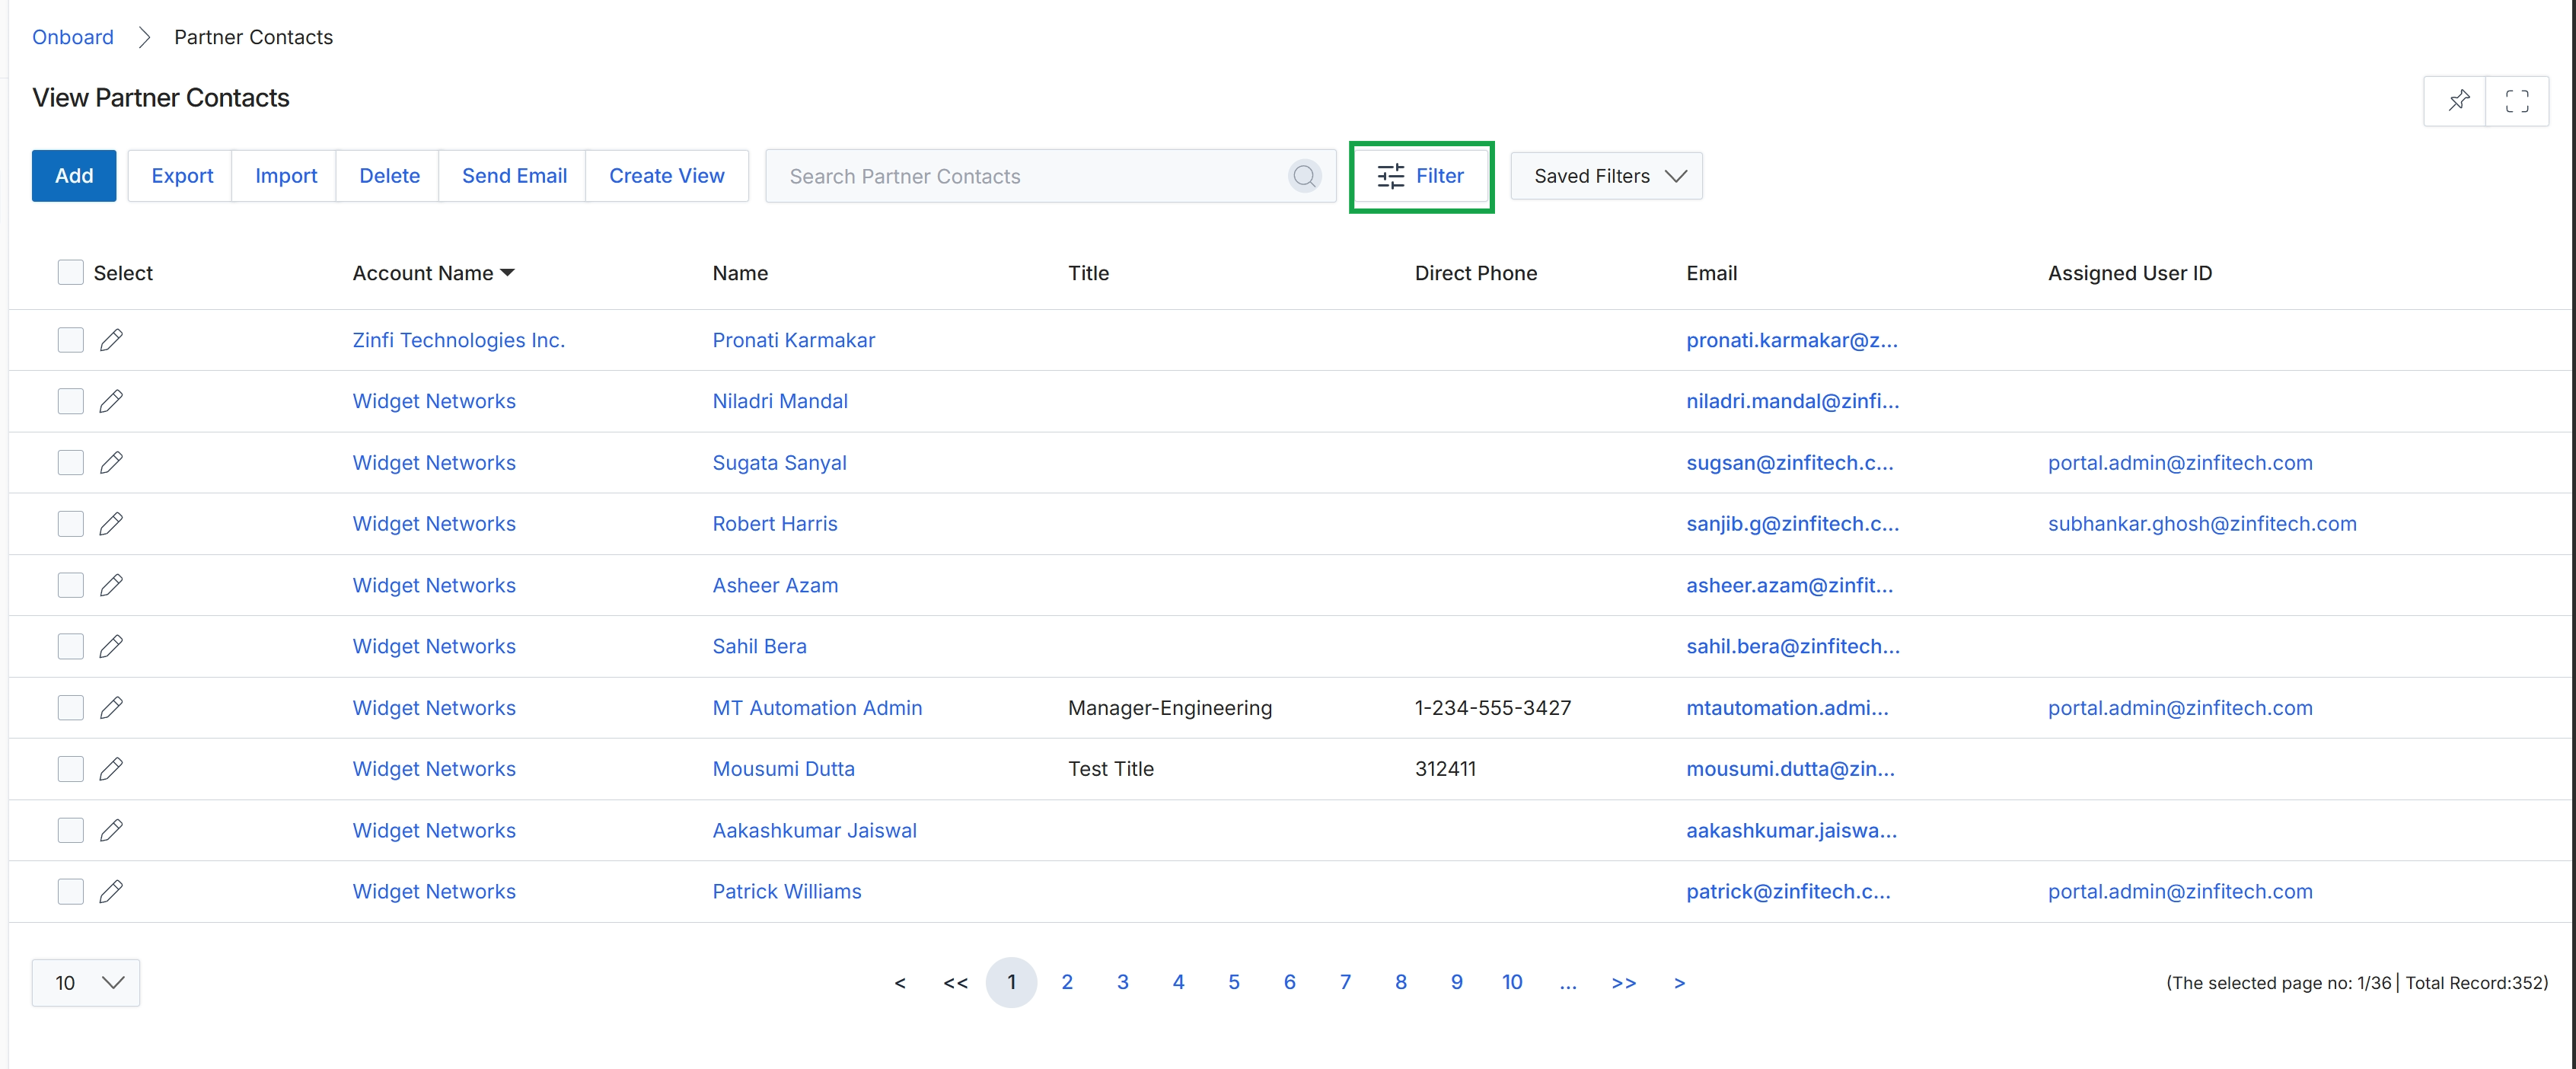
Click Filter.
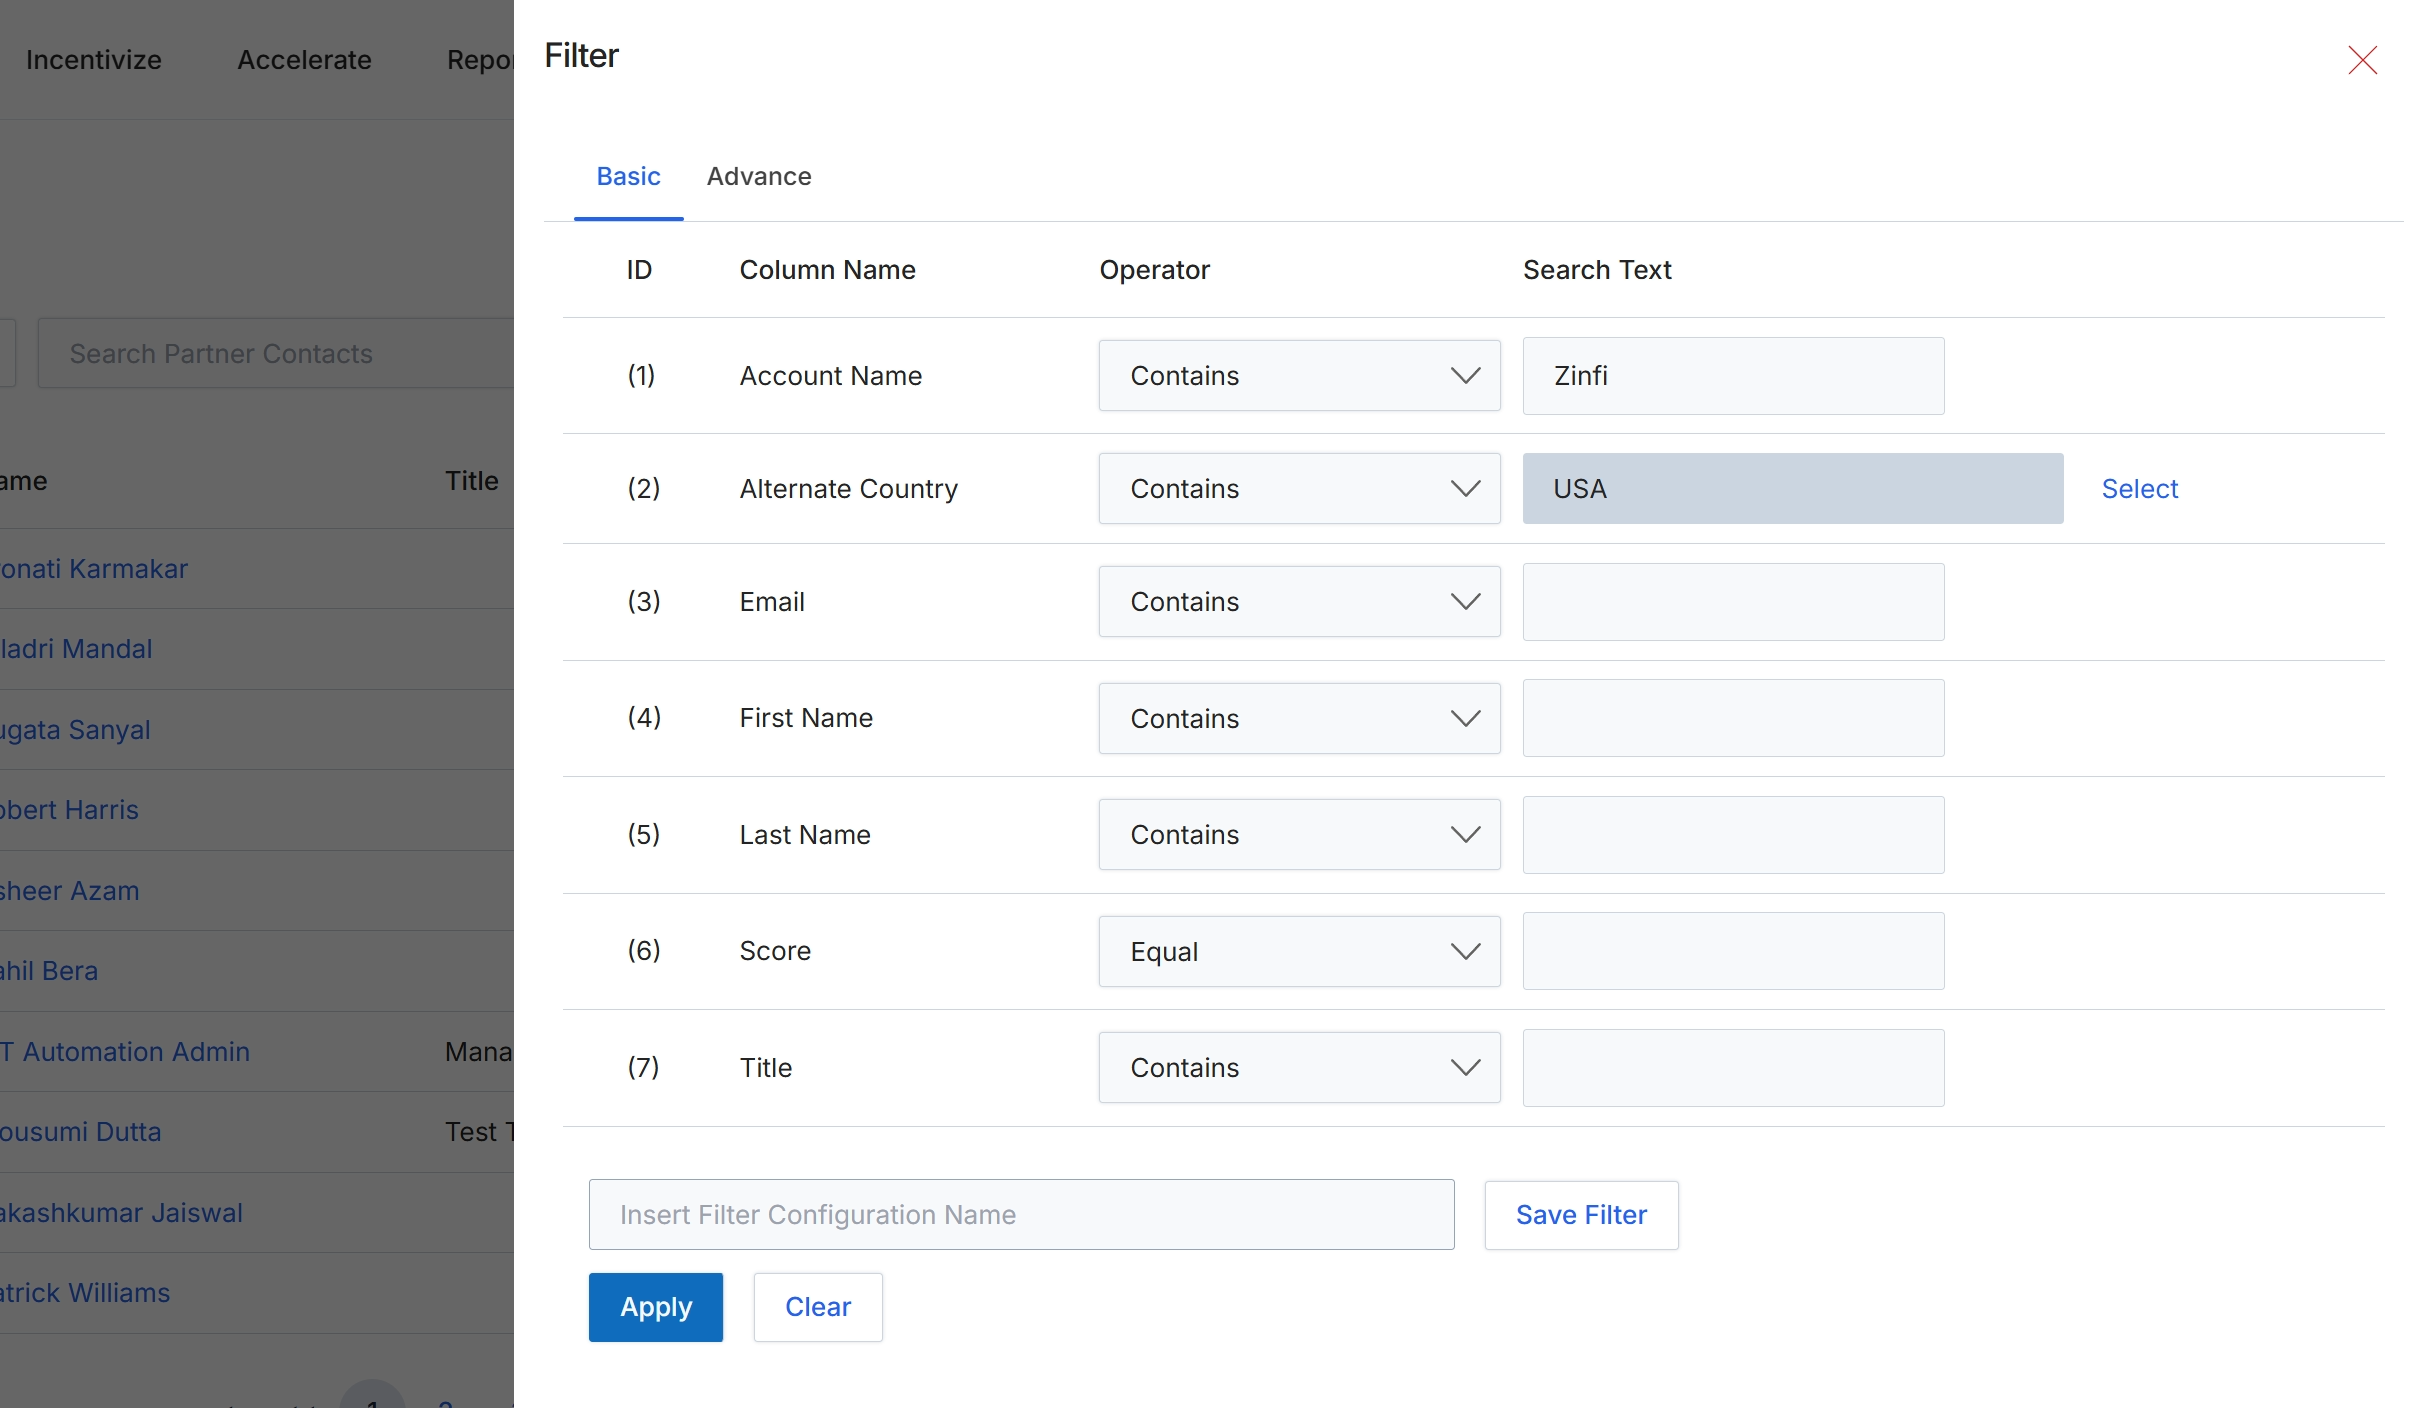
This filter dialog allows users to refine the list of partner contacts displayed in the main view by applying specific criteria. Users can define multiple filter conditions based on various contact attributes such as account name, country, email, name, score, and title. The dialog supports both basic and advanced filtering options, enabling precise data segmentation. Once configured, these filters can be saved for future use, streamlining the process of accessing specific subsets of partner contact data for analysis or action.
Click the "Select" button to choose a specific country for the "Alternate Country" filter.
Buttons
| Button | Description |
|---|---|
| Basic | Tab to configure basic filter conditions. |
| Advance | Tab to configure advanced filter conditions. |
| Select | Button to open a dialog for selecting a country. |
| Save Filter | Button to save the current filter configuration for later use. |
| Apply | Button to apply the configured filters to the partner contacts list. |
| Clear | Button to clear all applied filter conditions. |
Fields
| Field | Description |
|---|---|
| Account Name | Filter condition for the partner account's name. |
| Contains | Dropdown to select the operator for the Account Name filter. |
| Zinfi | Input field for the search text for the Account Name filter. |
| Alternate Country | Filter condition for the alternate country of the partner contact. |
| Contains | Dropdown to select the operator for the Alternate Country filter. |
| USA | Input field displaying the currently selected country for filtering. |
| Filter condition for the partner contact's email address. | |
| Contains | Dropdown to select the operator for the Email filter. |
| First Name | Filter condition for the partner contact's first name. |
| Contains | Dropdown to select the operator for the First Name filter. |
| Last Name | Filter condition for the partner contact's last name. |
| Contains | Dropdown to select the operator for the Last Name filter. |
| Score | Filter condition for the partner contact's score. |
| Equal | Dropdown to select the operator for the Score filter. |
| Title | Filter condition for the partner contact's job title. |
| Contains | Dropdown to select the operator for the Title filter. |
| Insert Filter Configuration Name | Input field to enter a name for saving the current filter configuration. |
Column Headings
| Column | Description |
|---|---|
| ID | Identifier for each filter row. |
| Column Name | The name of the contact attribute to filter by. |
| Operator | The comparison operator for the filter condition (e.g., Contains, Equal). |
| Search Text | The value to search for within the specified column. |
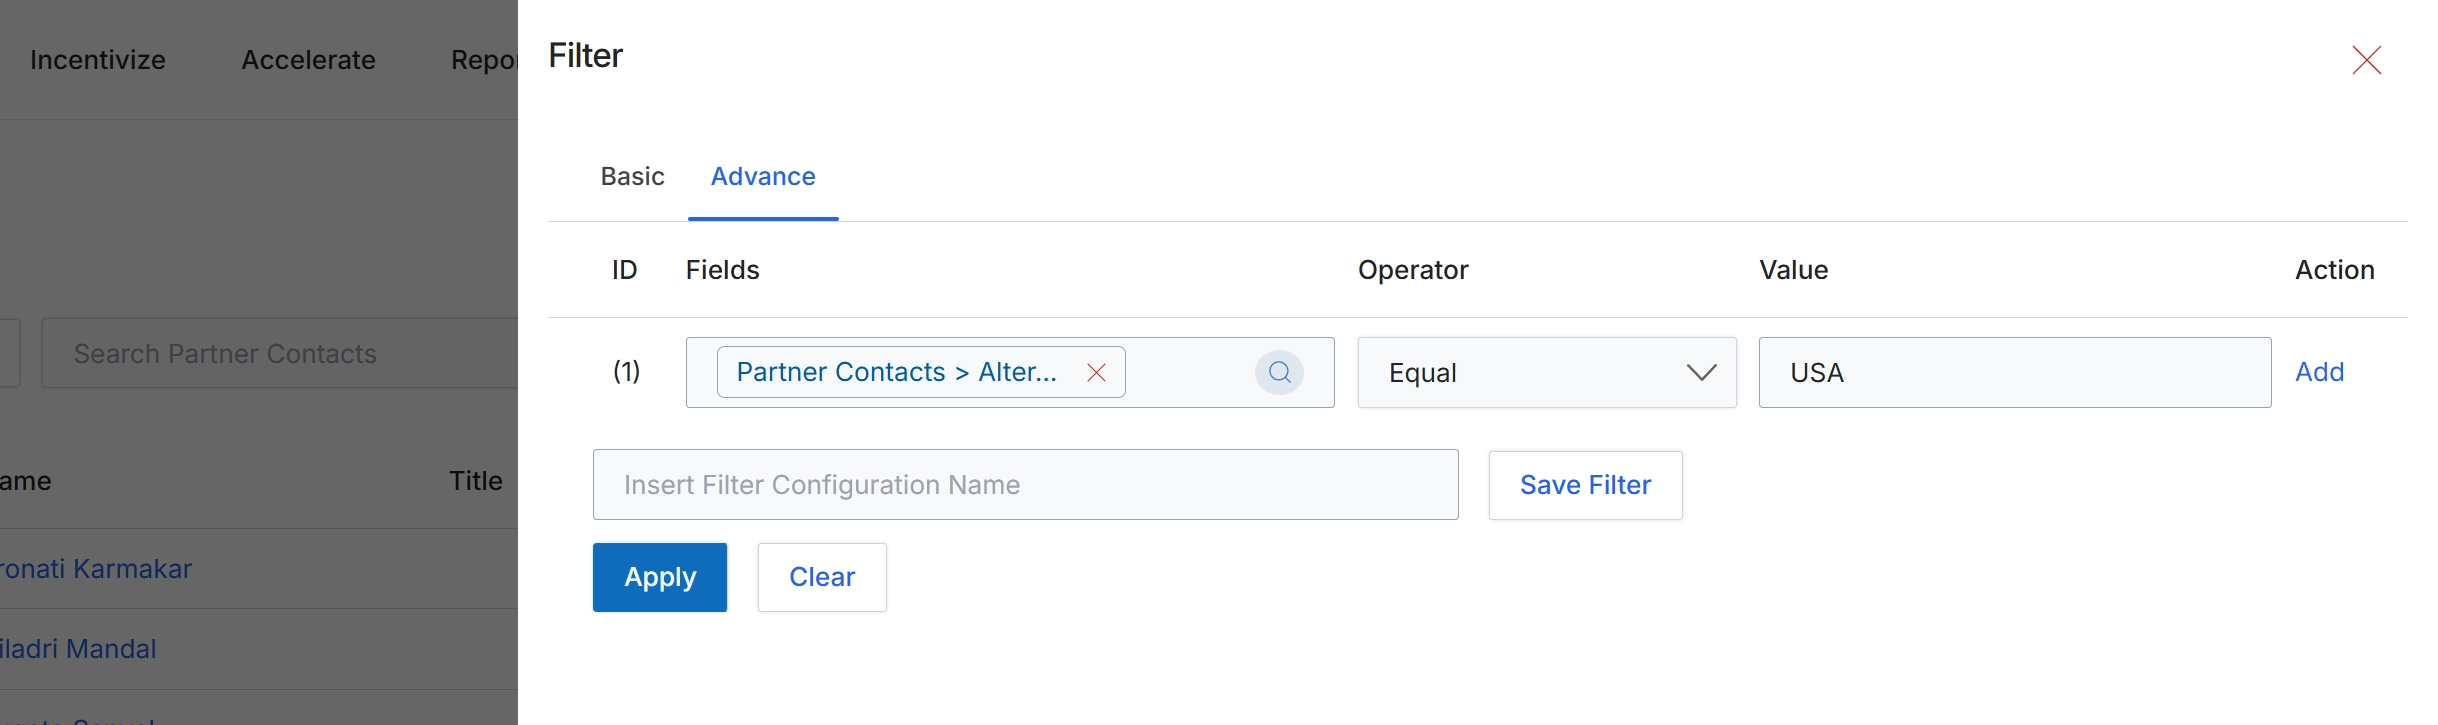
The Filter slide-out panel allows users to refine the displayed list of partner contacts by applying specific criteria. This advanced filtering capability enables users to construct complex queries using multiple conditions, operators, and values, which is crucial for managing large datasets and focusing on relevant contact subsets. Filters can be saved for future use, streamlining repetitive search tasks and ensuring consistency in data analysis. This functionality supports various administrative tasks, such as identifying contacts in specific regions, roles, or with particular attributes, thereby enhancing the efficiency of partner profile management.
Apply the advanced filter to refine the list of partner contacts.
Buttons
| Button | Description |
|---|---|
| Basic | Switches to the basic filter options, typically for simpler, single-criterion filtering. |
| Advance | Activates the advanced filter interface, allowing for multi-criteria and complex logical filtering. |
| Add | Adds a new filter rule row to the advanced filter configuration. |
| Save Filter | Saves the current filter configuration under the specified name. |
| Apply | Applies the configured filter rules to the partner contacts list. |
| Clear | Clears all active filter rules and resets the filter panel. |
Fields
| Field | Description |
|---|---|
| Partner Contacts > Alter... | The selected field for the filter rule, indicating a field within the Partner Contacts module. |
| Equal | The selected operator for the filter rule, specifying an exact match. |
| USA | The value used in the filter rule, indicating that the selected field must be equal to 'USA'. |
| Insert Filter Configuration Name | Input field to enter a name for the current filter configuration, allowing it to be saved for future use. |
Column Headings
| Column | Description |
|---|---|
| ID | Column header for the filter rule identifier. |
| Fields | Column header for the field being filtered. |
| Operator | Column header for the comparison operator used in the filter rule. |
| Value | Column header for the value used in the filter comparison. |
| Action | Column header for actions related to the filter rule, such as adding or removing a rule. |