

Overview
The Onboard module's Partner Prospects feature is crucial for managing the initial phase of the partner lifecycle: recruitment. Before a company becomes an official partner, they exist as a 'Prospect' record within the platform. This allows administrators to systematically identify, track, and engage with potential partners, ensuring a structured approach to expanding the partner ecosystem. The system supports various methods for populating this list, from manual entry to bulk imports, and provides tools for managing these prospects efficiently.
Once prospects are in the system, administrators can perform actions such as sending targeted emails, deleting outdated records, and exporting data for further analysis or use in other systems. The ability to create custom views and apply filters helps segment prospects based on various criteria, enabling more focused recruitment efforts and better pipeline management. This foundational step in the Onboard module ensures that the partner recruitment process is organized and scalable.
Accessing and Managing Partner Prospects
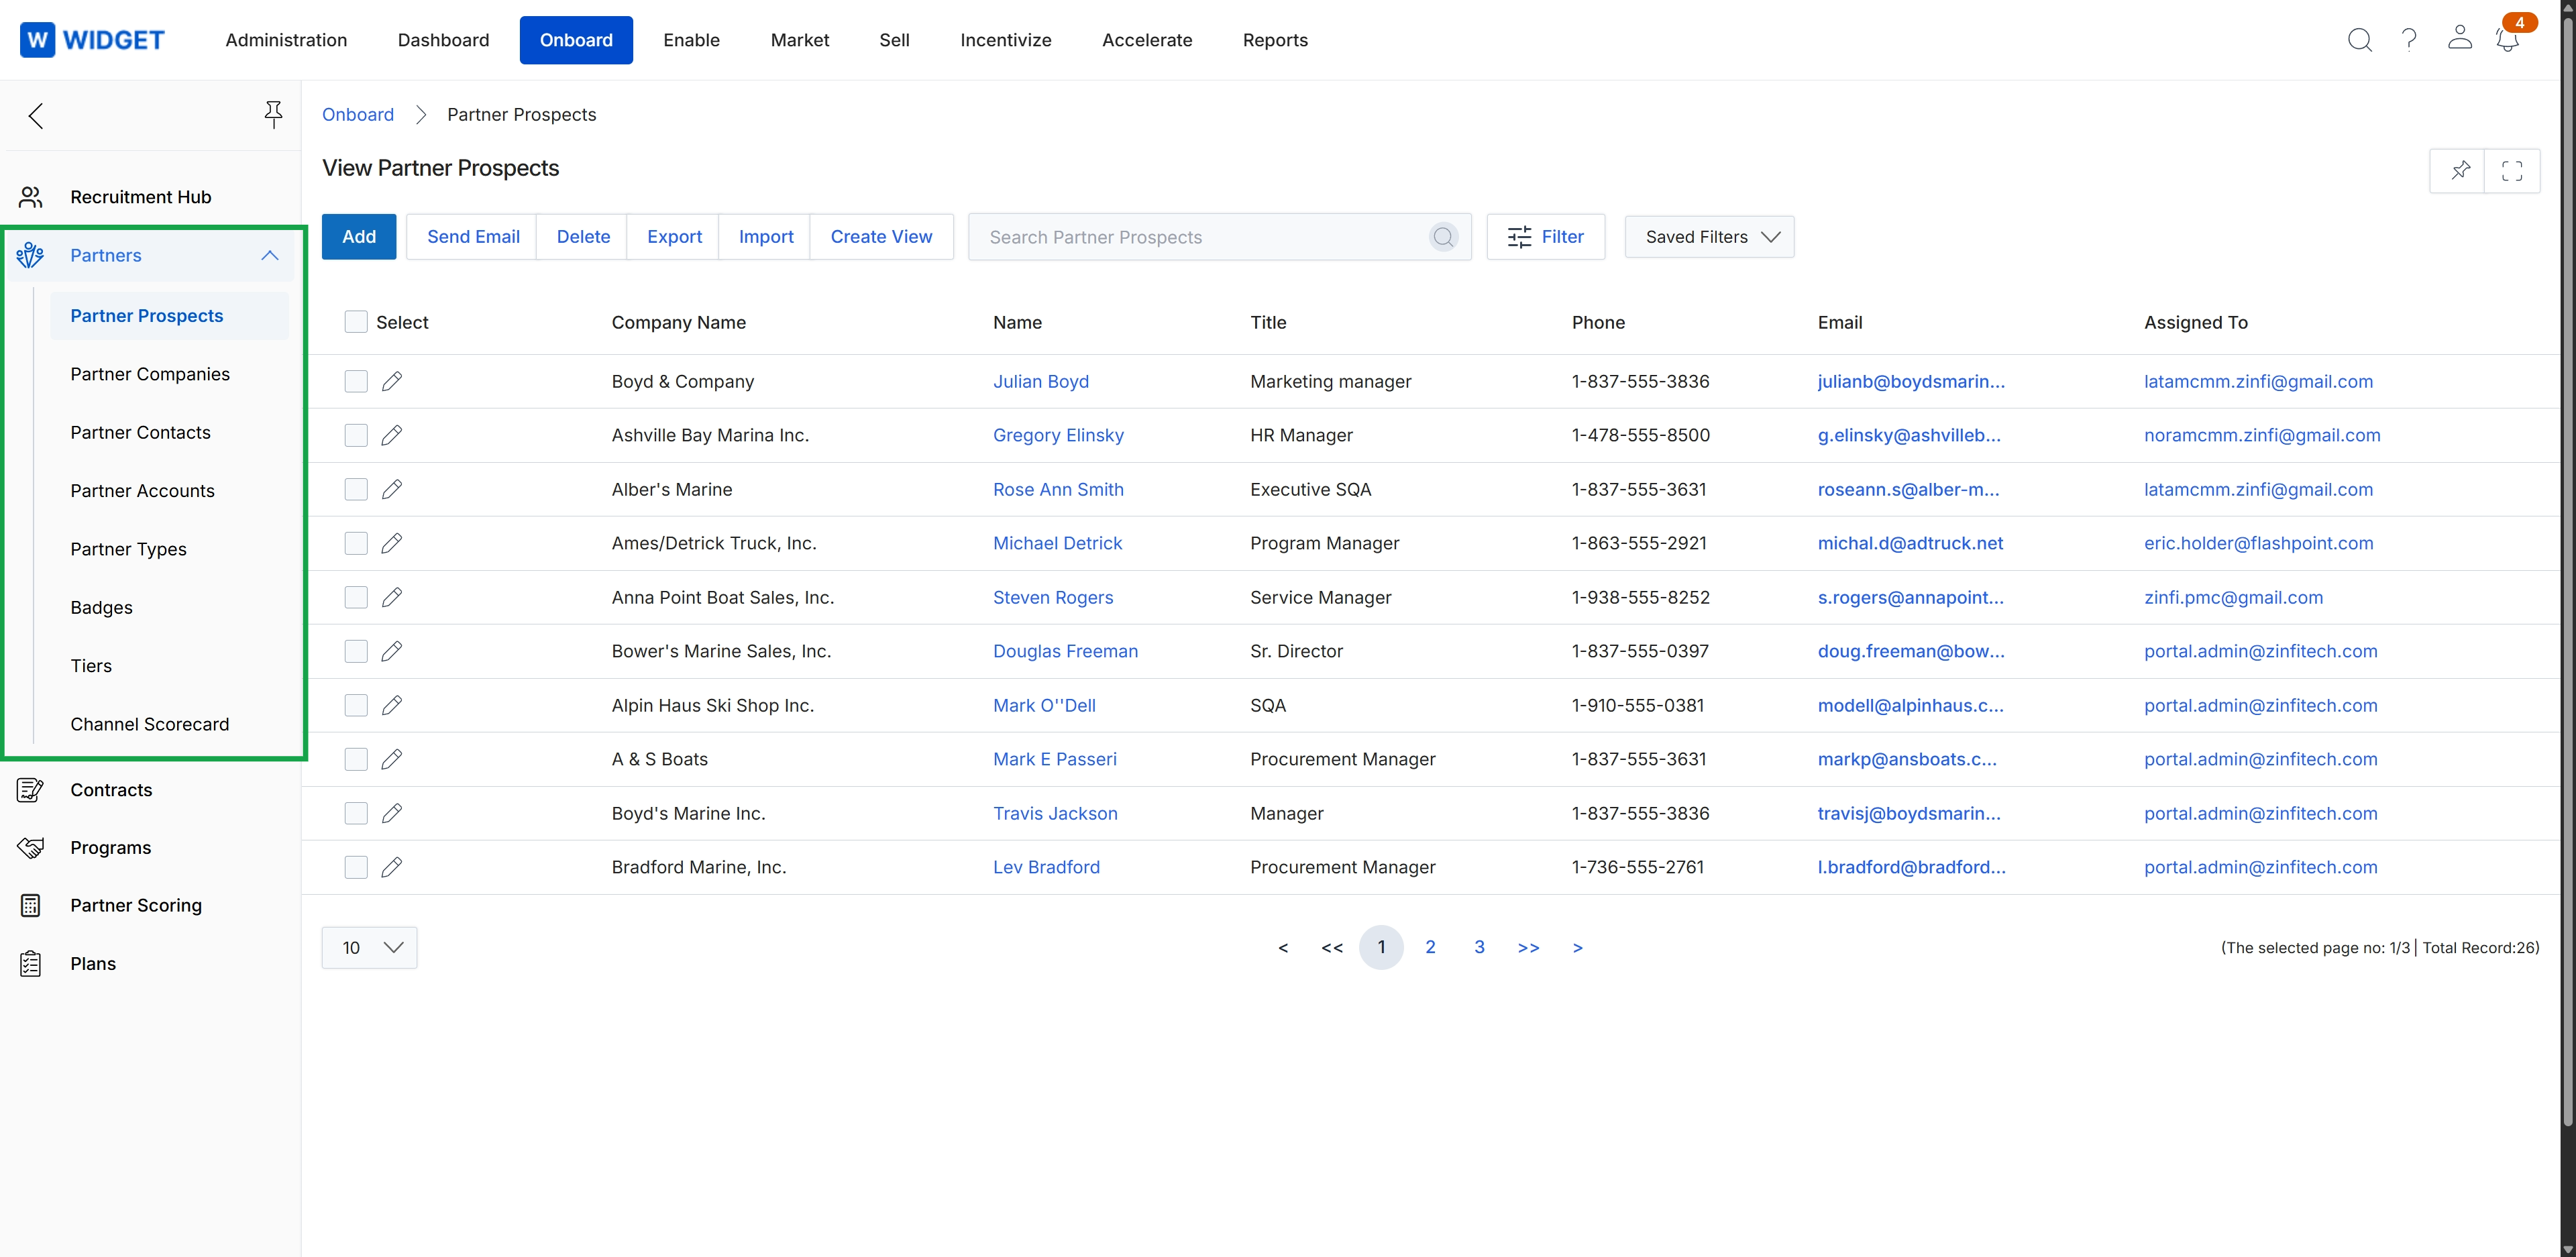
Click Onboard in the top navigation bar, then click Partners in the left navigation menu, and then click Partner Prospects.
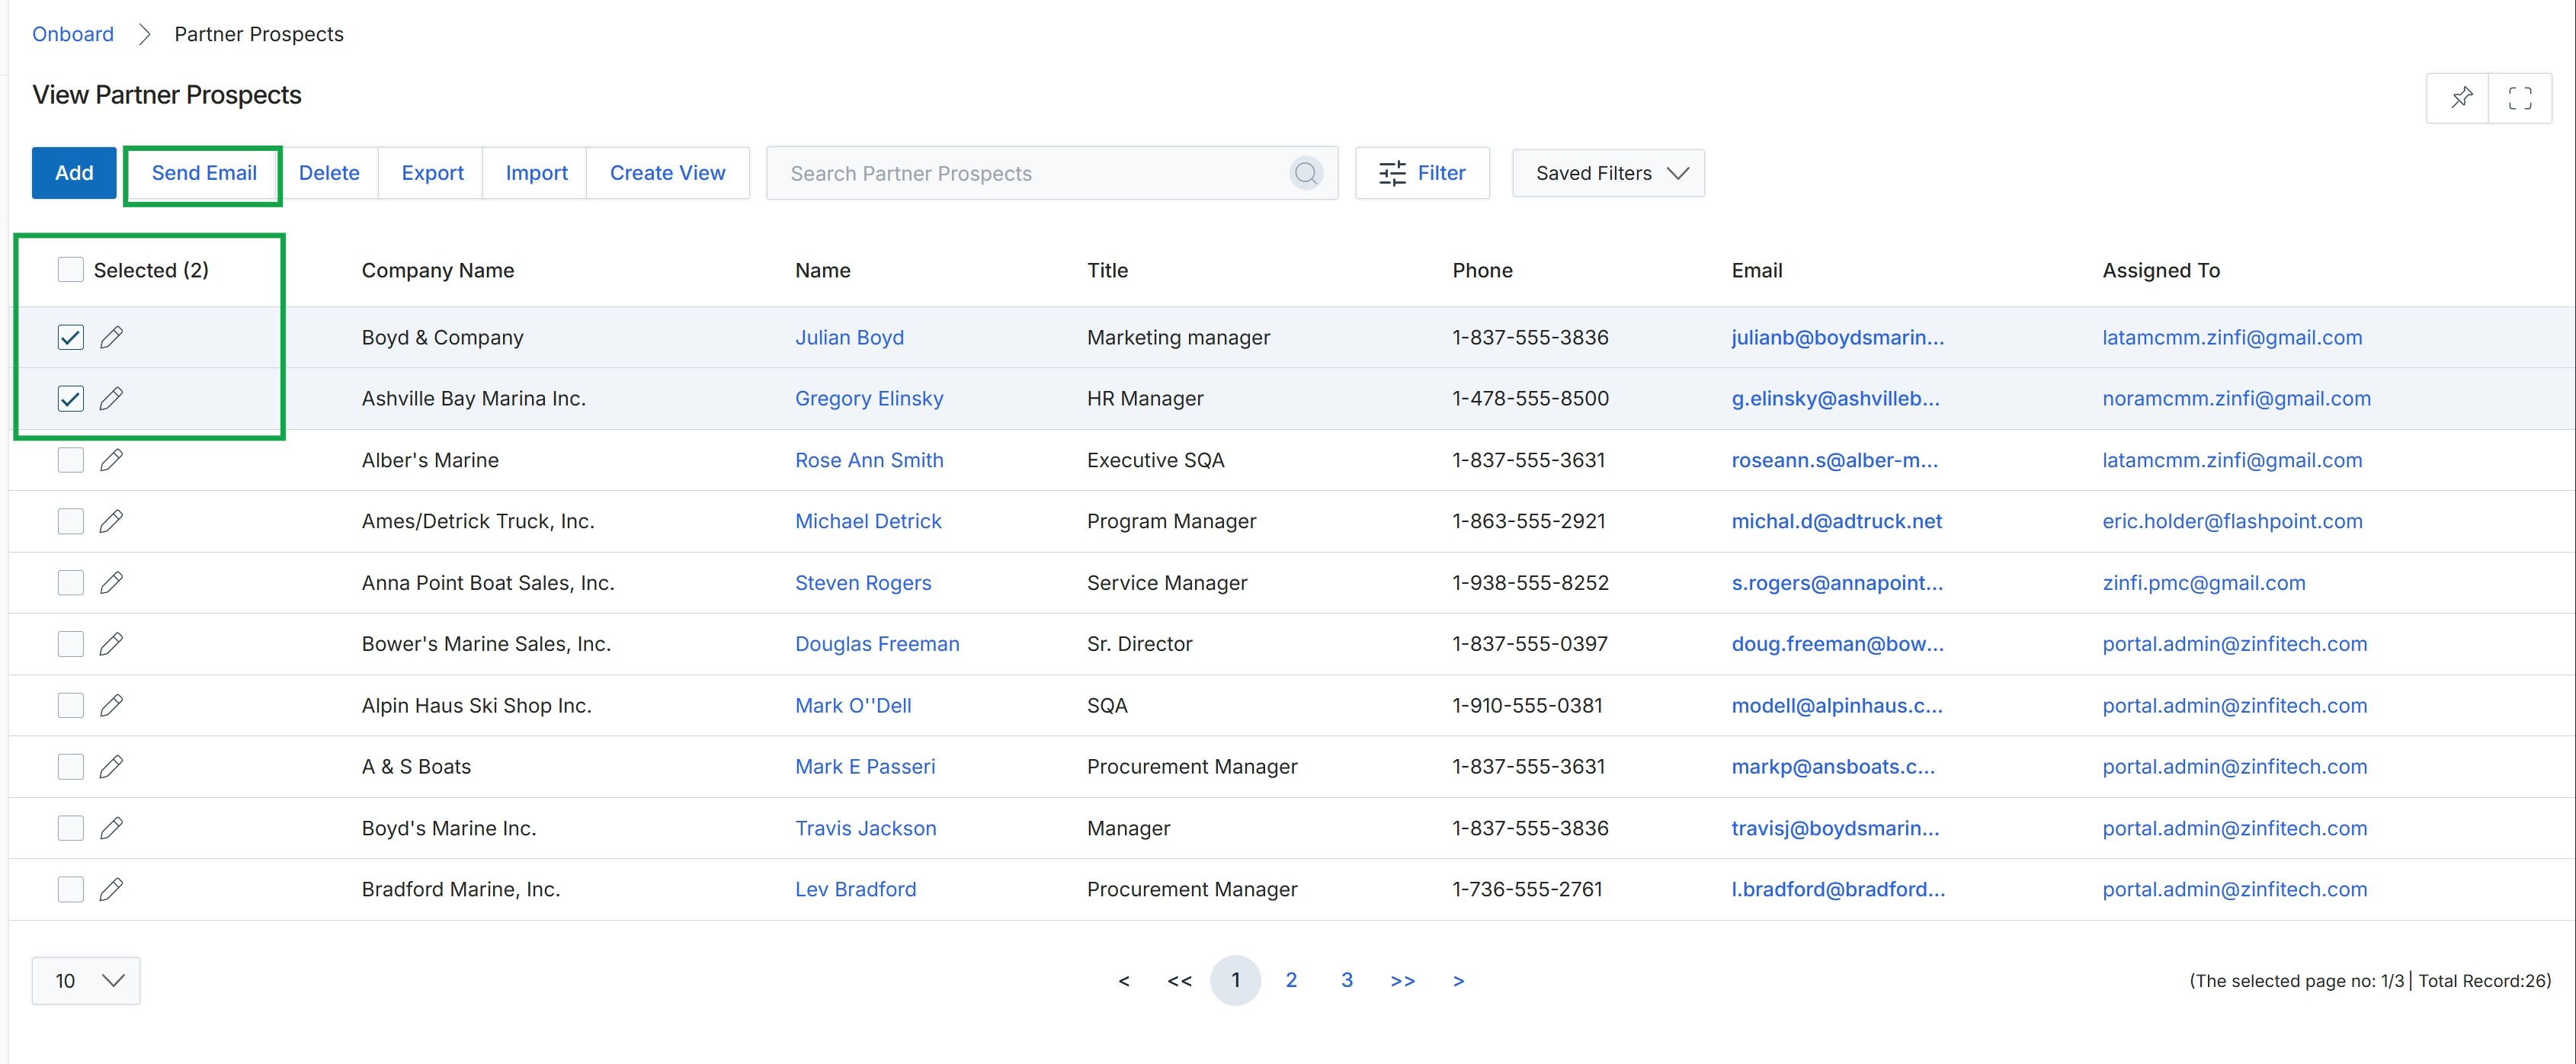
Click the Selected (2) checkbox to select the first two rows.
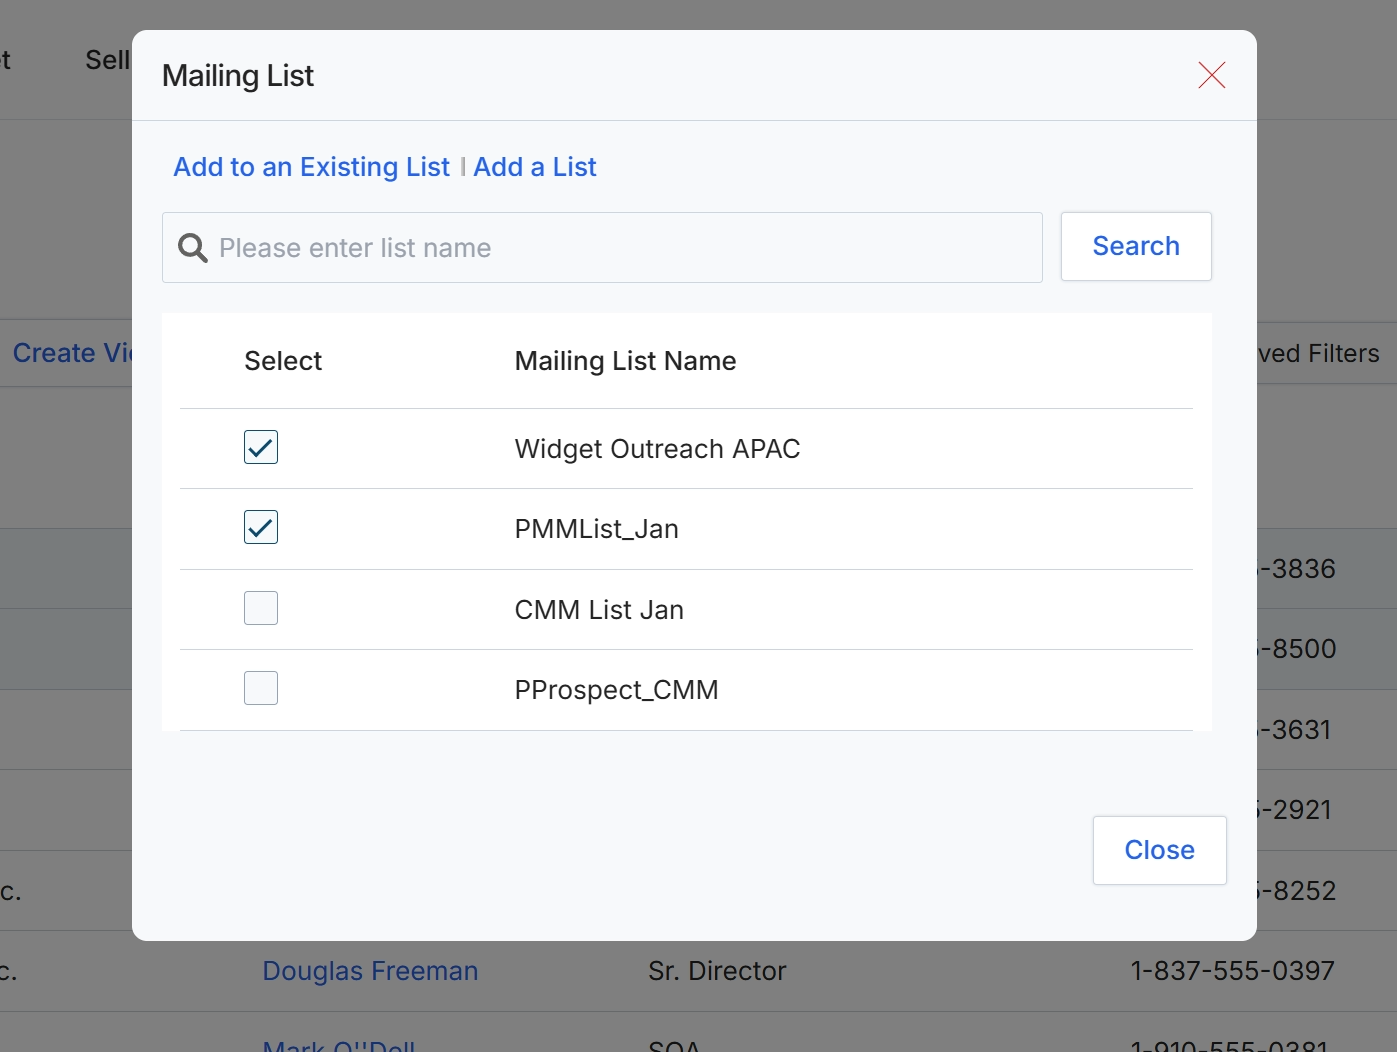
This dialog box allows users to associate selected prospects with existing mailing lists or create new ones. Mailing lists are used within the Market module to segment and target partners or prospects for various marketing activities, such as email campaigns or content syndication. By adding prospects to specific lists, administrators can ensure that relevant marketing communications reach the intended audience, aligning with the overall marketing strategy. This integration between prospect management and marketing campaign tools streamlines the process of nurturing potential partners.
Select the desired mailing lists by checking the corresponding checkboxes.
Buttons
| Button | Description |
|---|---|
| Add to an Existing List | Click this link to add the selected prospects to an existing mailing list. |
| Add a List | Click this link to create a new mailing list for the selected prospects. |
| Search | Click to search for mailing lists based on the entered name. |
| Close | Click to close the mailing list selection dialog. |
Fields
| Field | Description |
|---|---|
| Please enter list name | Enter text here to search for a specific mailing list by name. |
Column Headings
| Column | Description |
|---|---|
| Select | Column header for the checkboxes used to select mailing lists. |
| Mailing List Name | Column header for the names of the available mailing lists. |
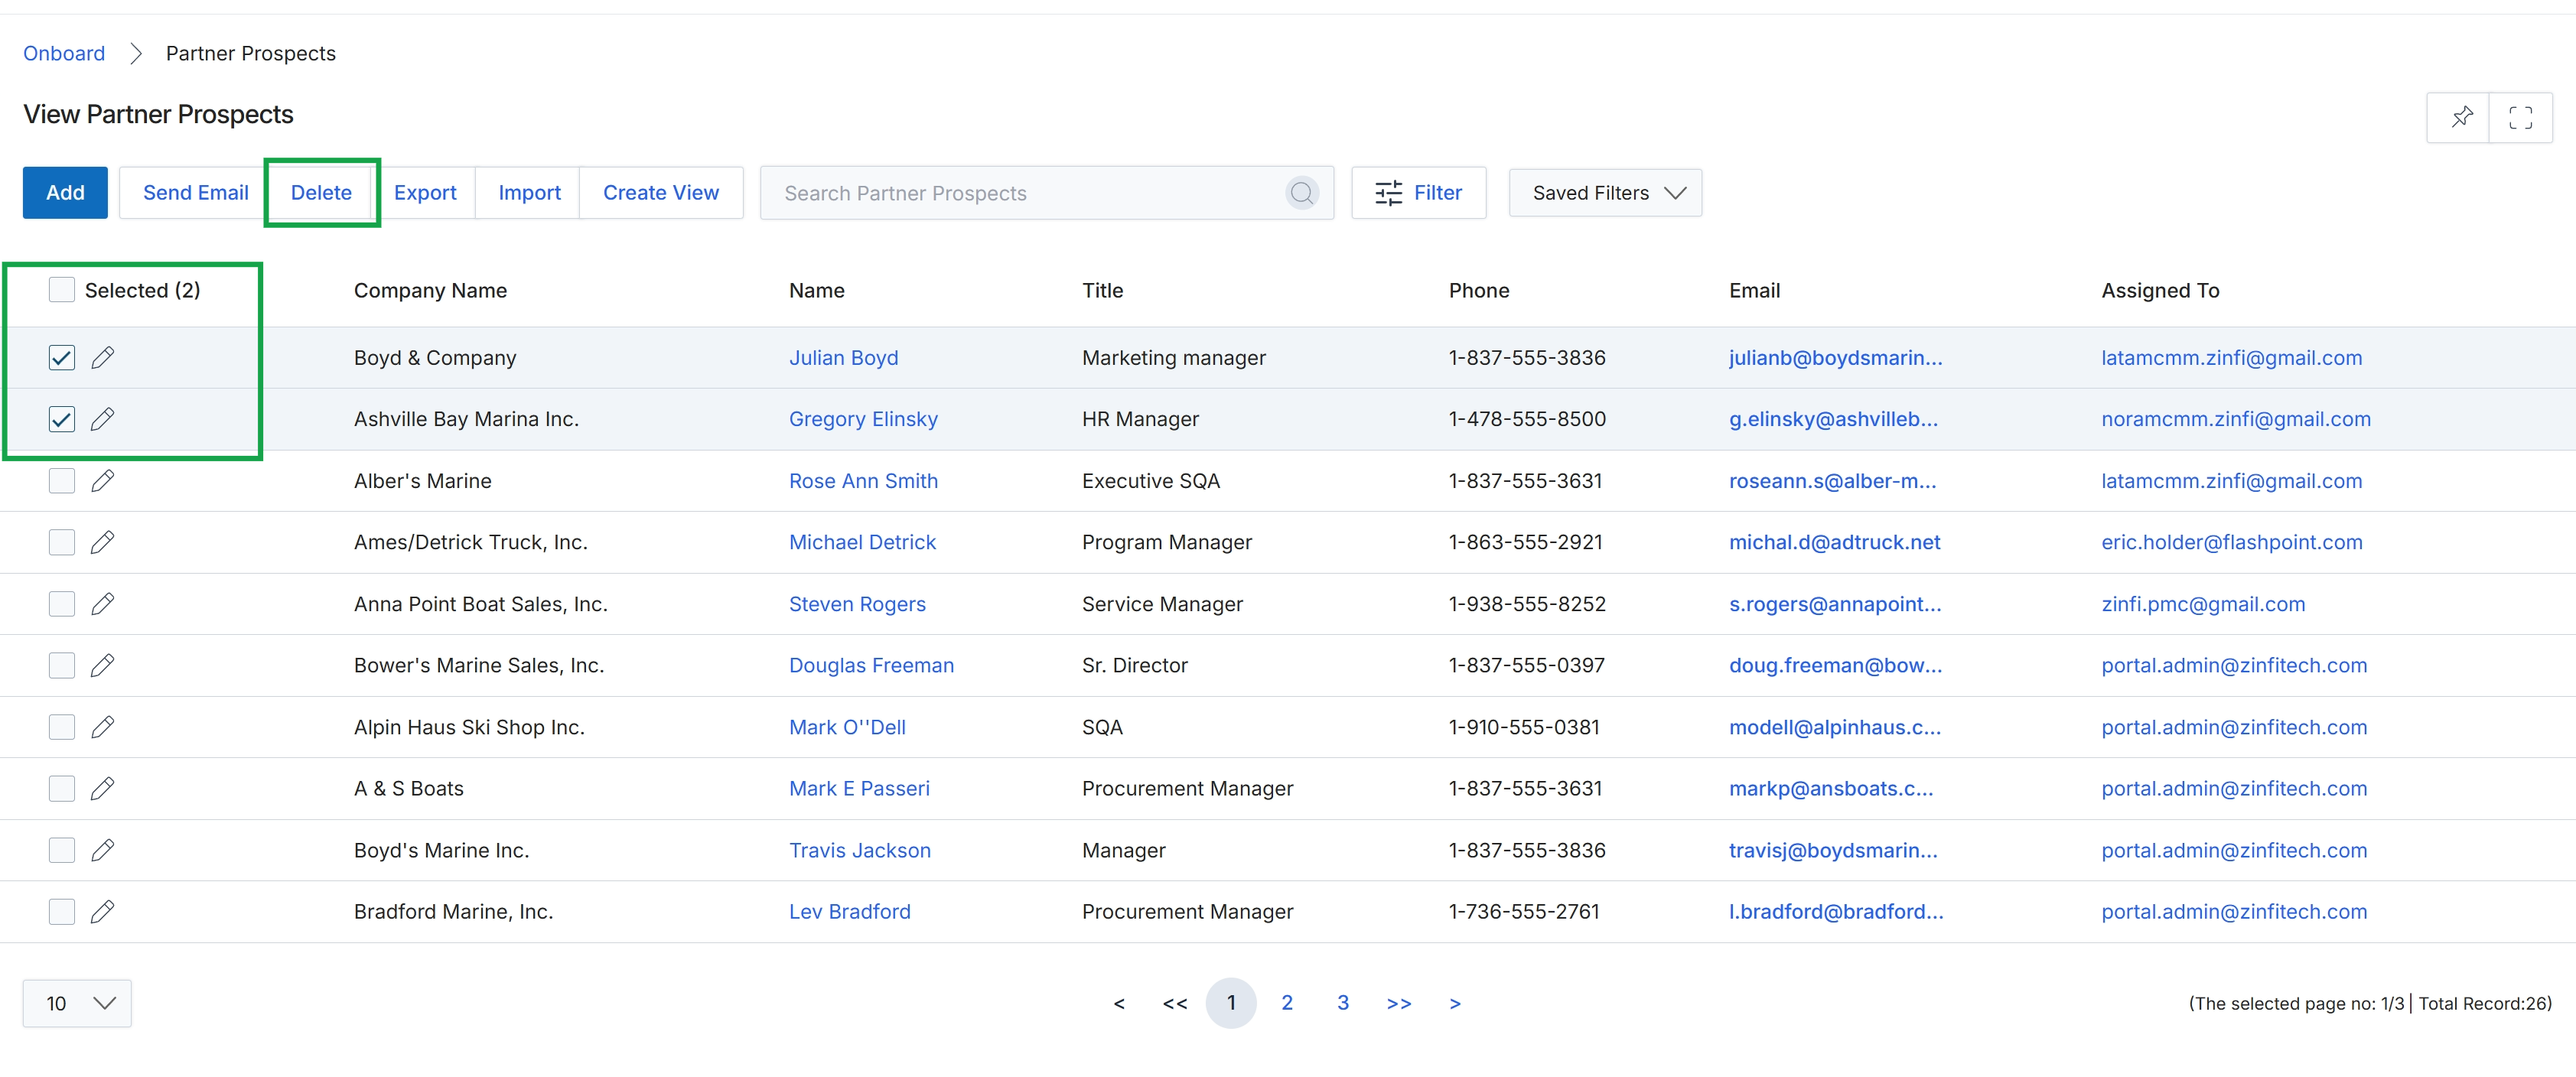
Click the Send Email button.
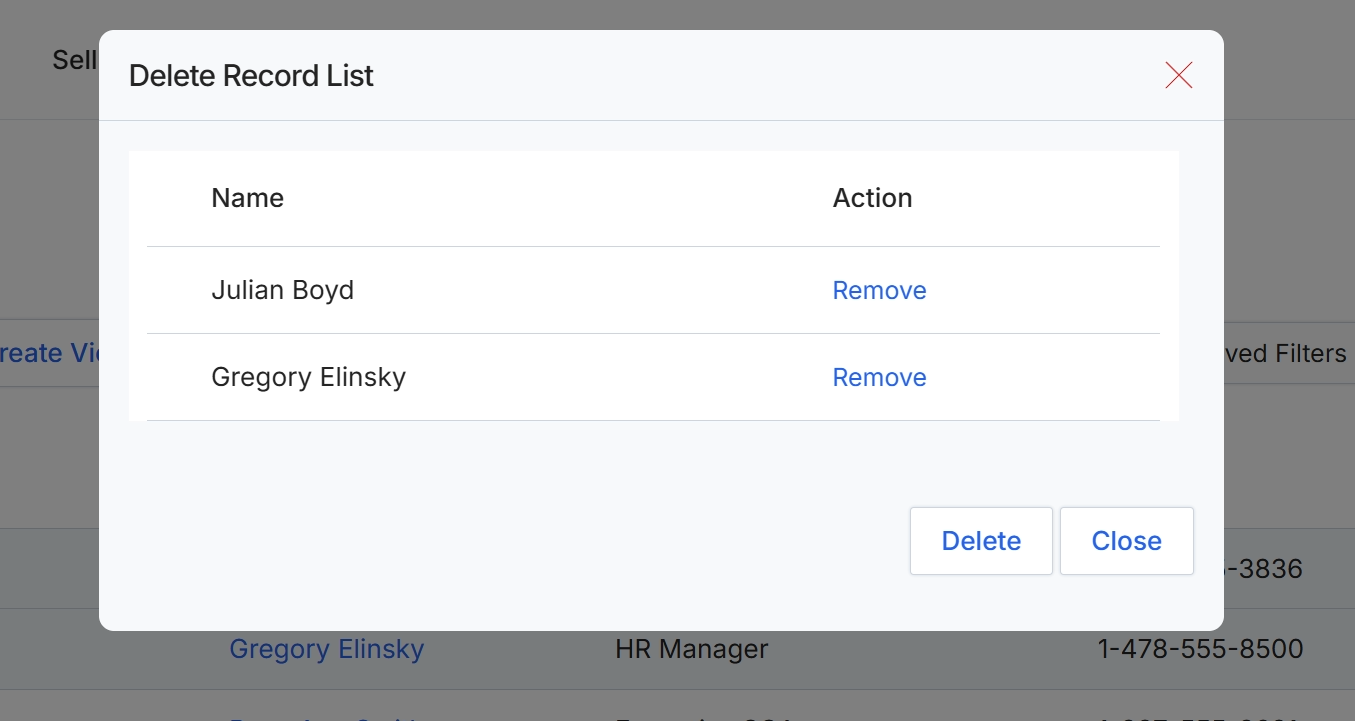
This dialog box displays a list of records selected for deletion, providing a final review before the action is confirmed. It allows administrators to verify which specific items will be removed from the system. For each record, an option is provided to remove it from the deletion list, enabling granular control over the batch deletion process. This serves as a crucial safeguard, preventing accidental or unintended data loss by requiring explicit confirmation of the items to be deleted.
Review the list of records to be deleted and click "Delete" to confirm the action.
Buttons
| Button | Description |
|---|---|
| Remove | Click to remove the corresponding record from the list of items to be deleted. |
| Delete | Confirms the deletion of all listed records. |
| Close | Closes the dialog without performing any deletion. |
Column Headings
| Column | Description |
|---|---|
| Name | The name of the record selected for deletion. |
| Action | Provides an option to remove the individual record from the deletion list. |
Exporting Prospect Data
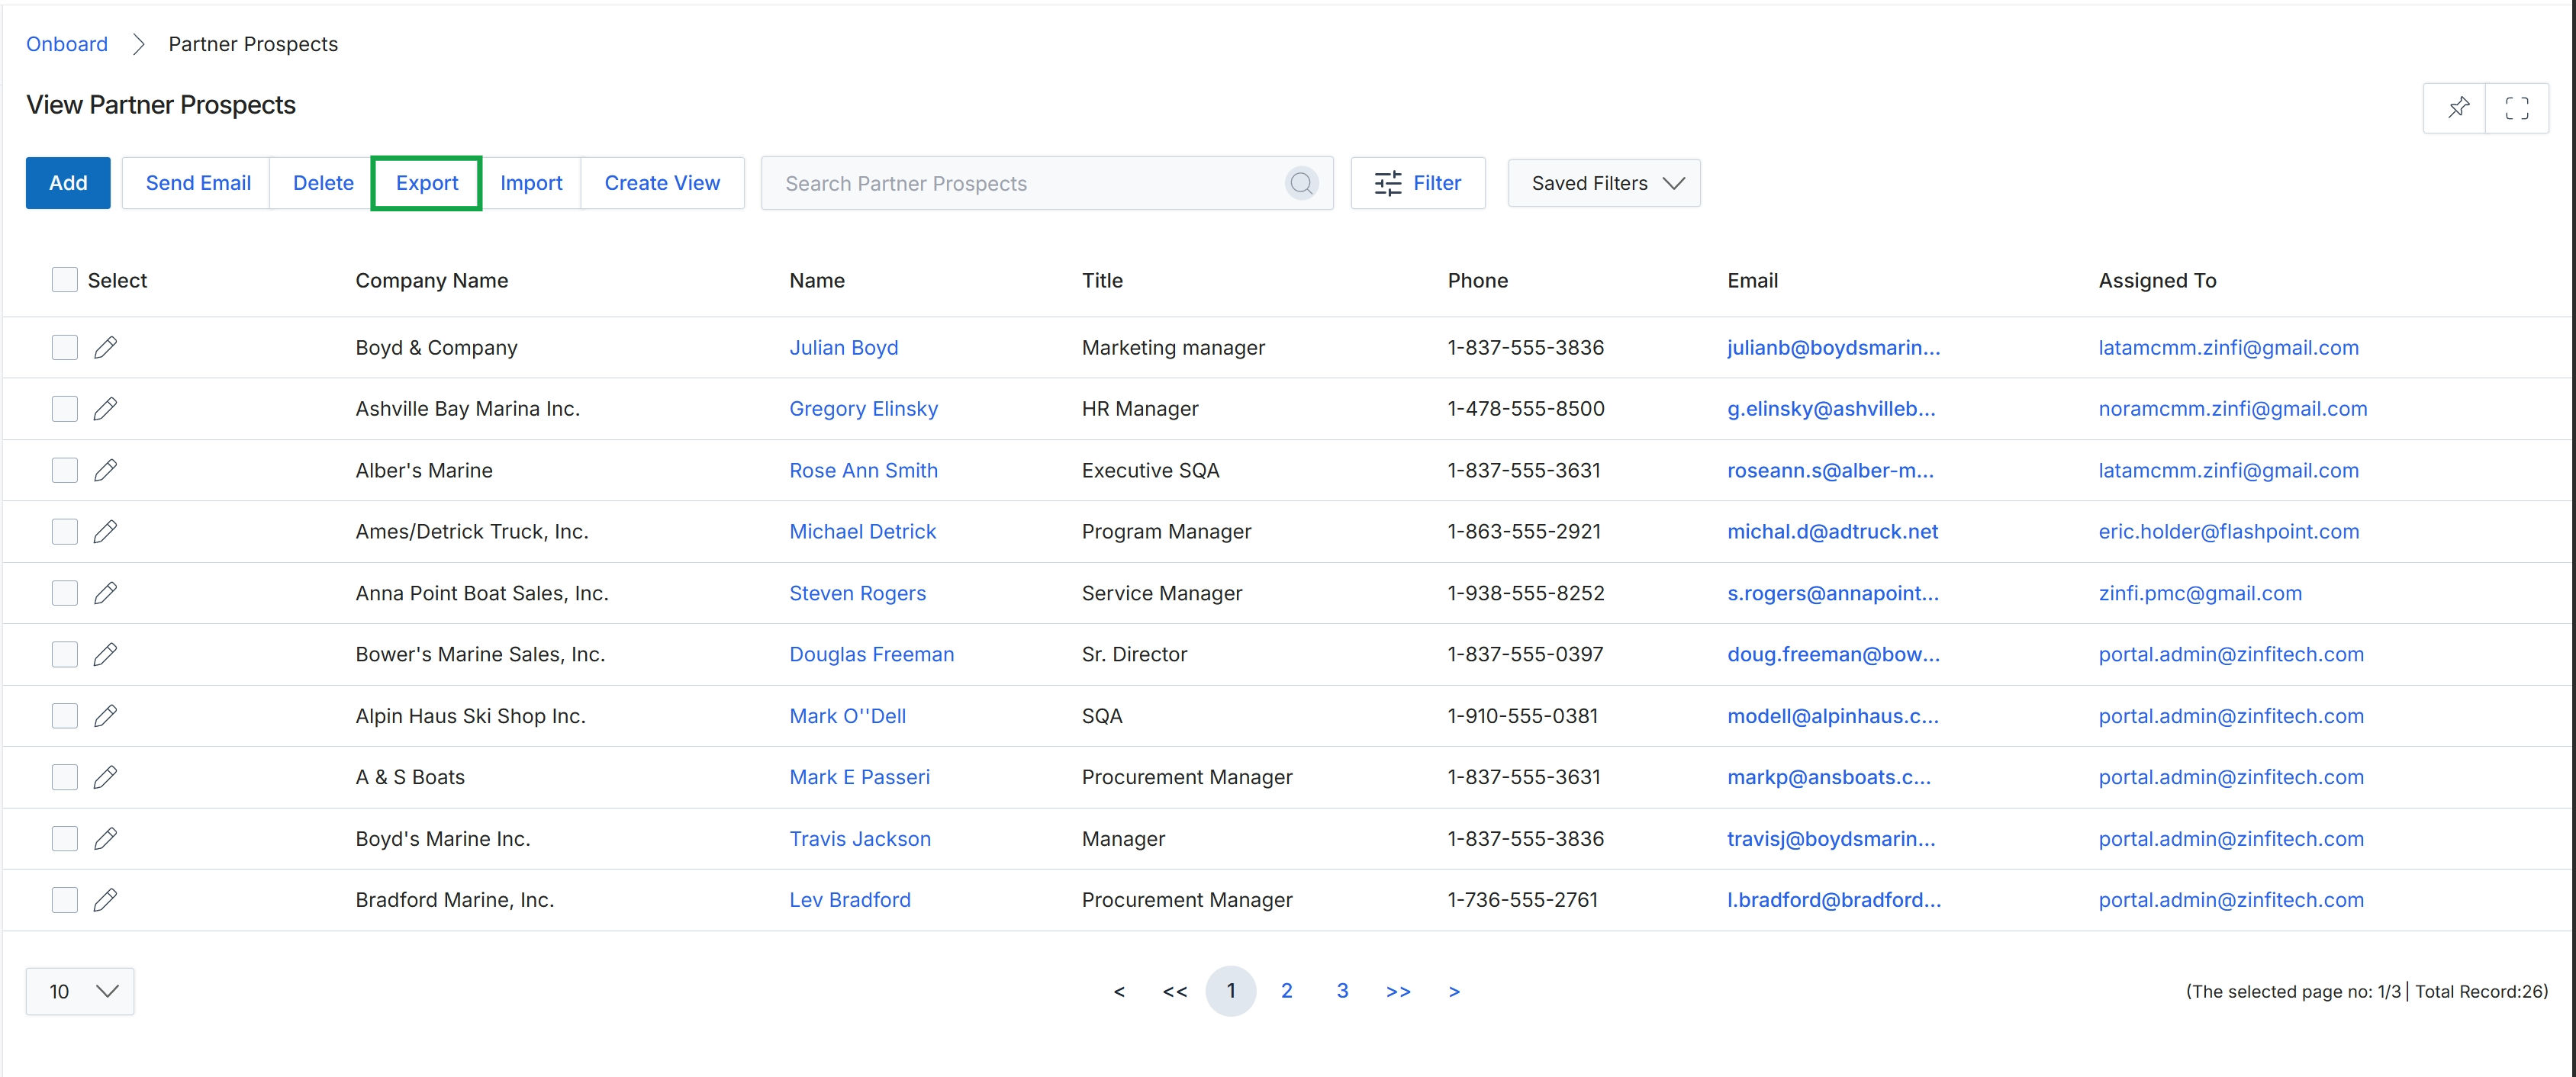
Click Export.
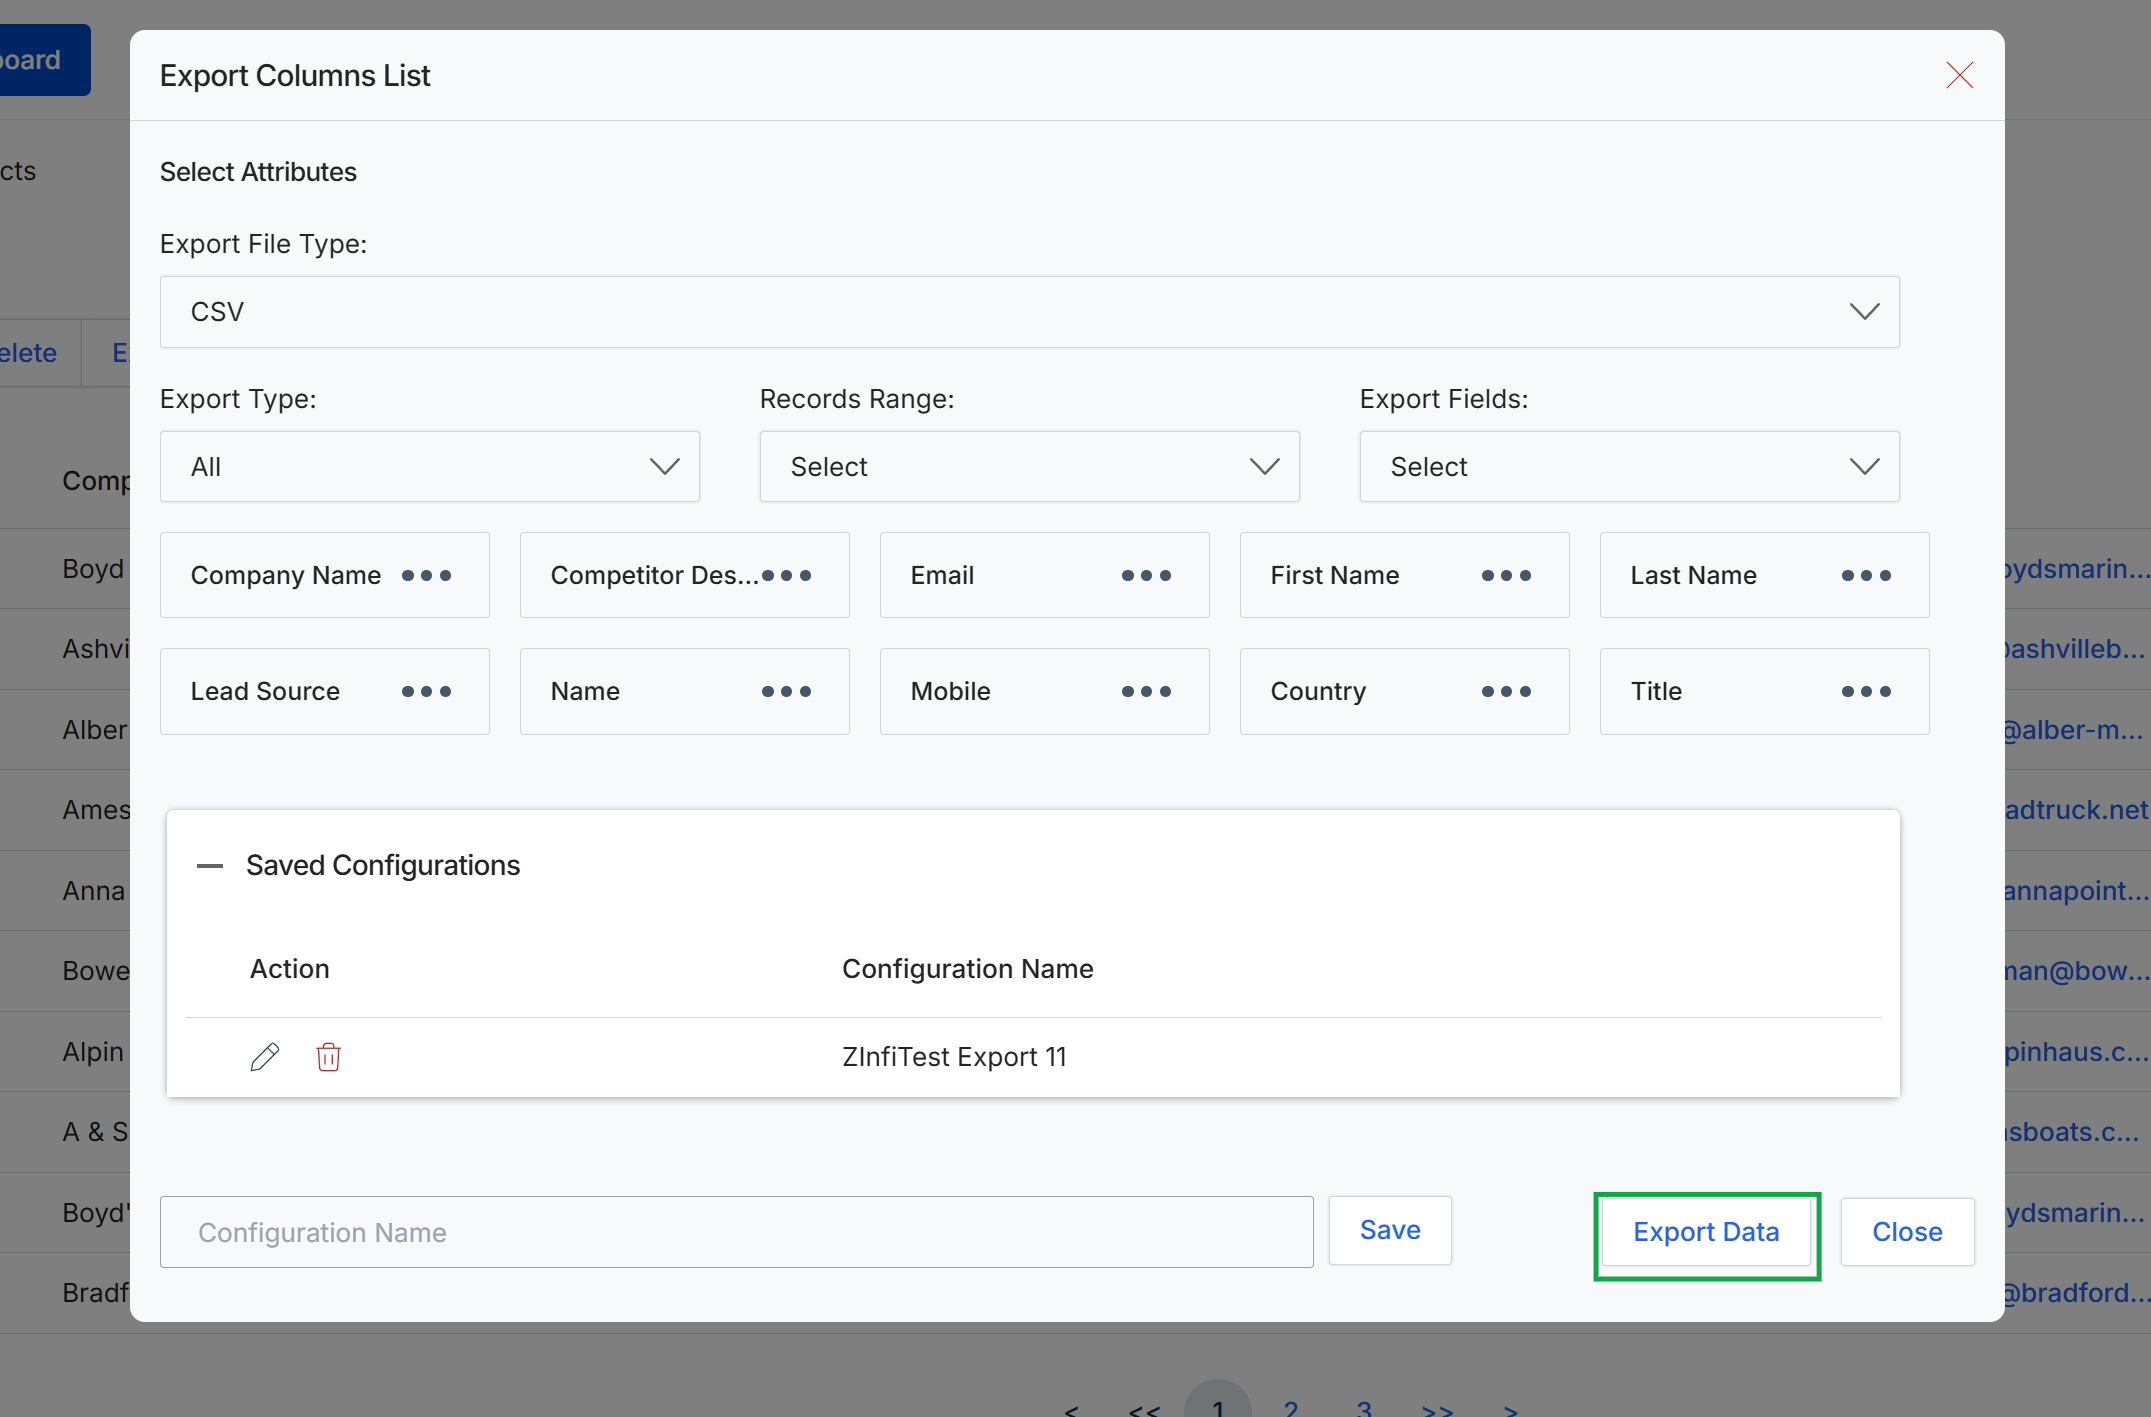
This dialog box, 'Export Columns List', allows administrators to configure and initiate the export of prospect data from the platform. It provides options to select the file type for the export, define the range of records to be included, and specify which data fields (attributes) should be part of the exported file. Users can also save frequently used export configurations for future convenience, streamlining the process for recurring data extraction needs. This functionality is crucial for data analysis, external reporting, or migrating prospect information to other systems, ensuring flexibility in how prospect data is managed and utilized outside the UPM.
Click the "Export Data" button to download the prospect information based on the selected attributes and configuration.
Buttons
| Button | Description |
|---|---|
| Save | A button to save the current export configuration. |
| Export Data | A button to initiate the data export process. |
| Close | A button to close the 'Export Columns List' dialog without performing an export. |
Fields
| Field | Description |
|---|---|
| Select Attributes | This section allows users to select which data fields or columns will be included in the exported file. |
| Export File Type | A dropdown menu to select the desired format for the exported file, such as CSV. |
| CSV | The currently selected file type for the export. |
| Export Type | A dropdown menu to specify the type of export, such as 'All' records. |
| All | The currently selected export type, indicating all records will be exported. |
| Records Range | A dropdown menu to select the range of records to be included in the export. |
| Select | The current selection for the records range. |
| Export Fields | A dropdown menu to select specific fields to be exported. |
| Select | The current selection for the export fields. |
| Configuration Name | An input field to enter a name for a new export configuration to be saved. |
Saved Configurations
| Field | Description |
|---|---|
| Action | Column header for actions that can be performed on saved configurations. |
| Configuration Name | Column header for the name of a saved export configuration. |
Importing Prospect Data
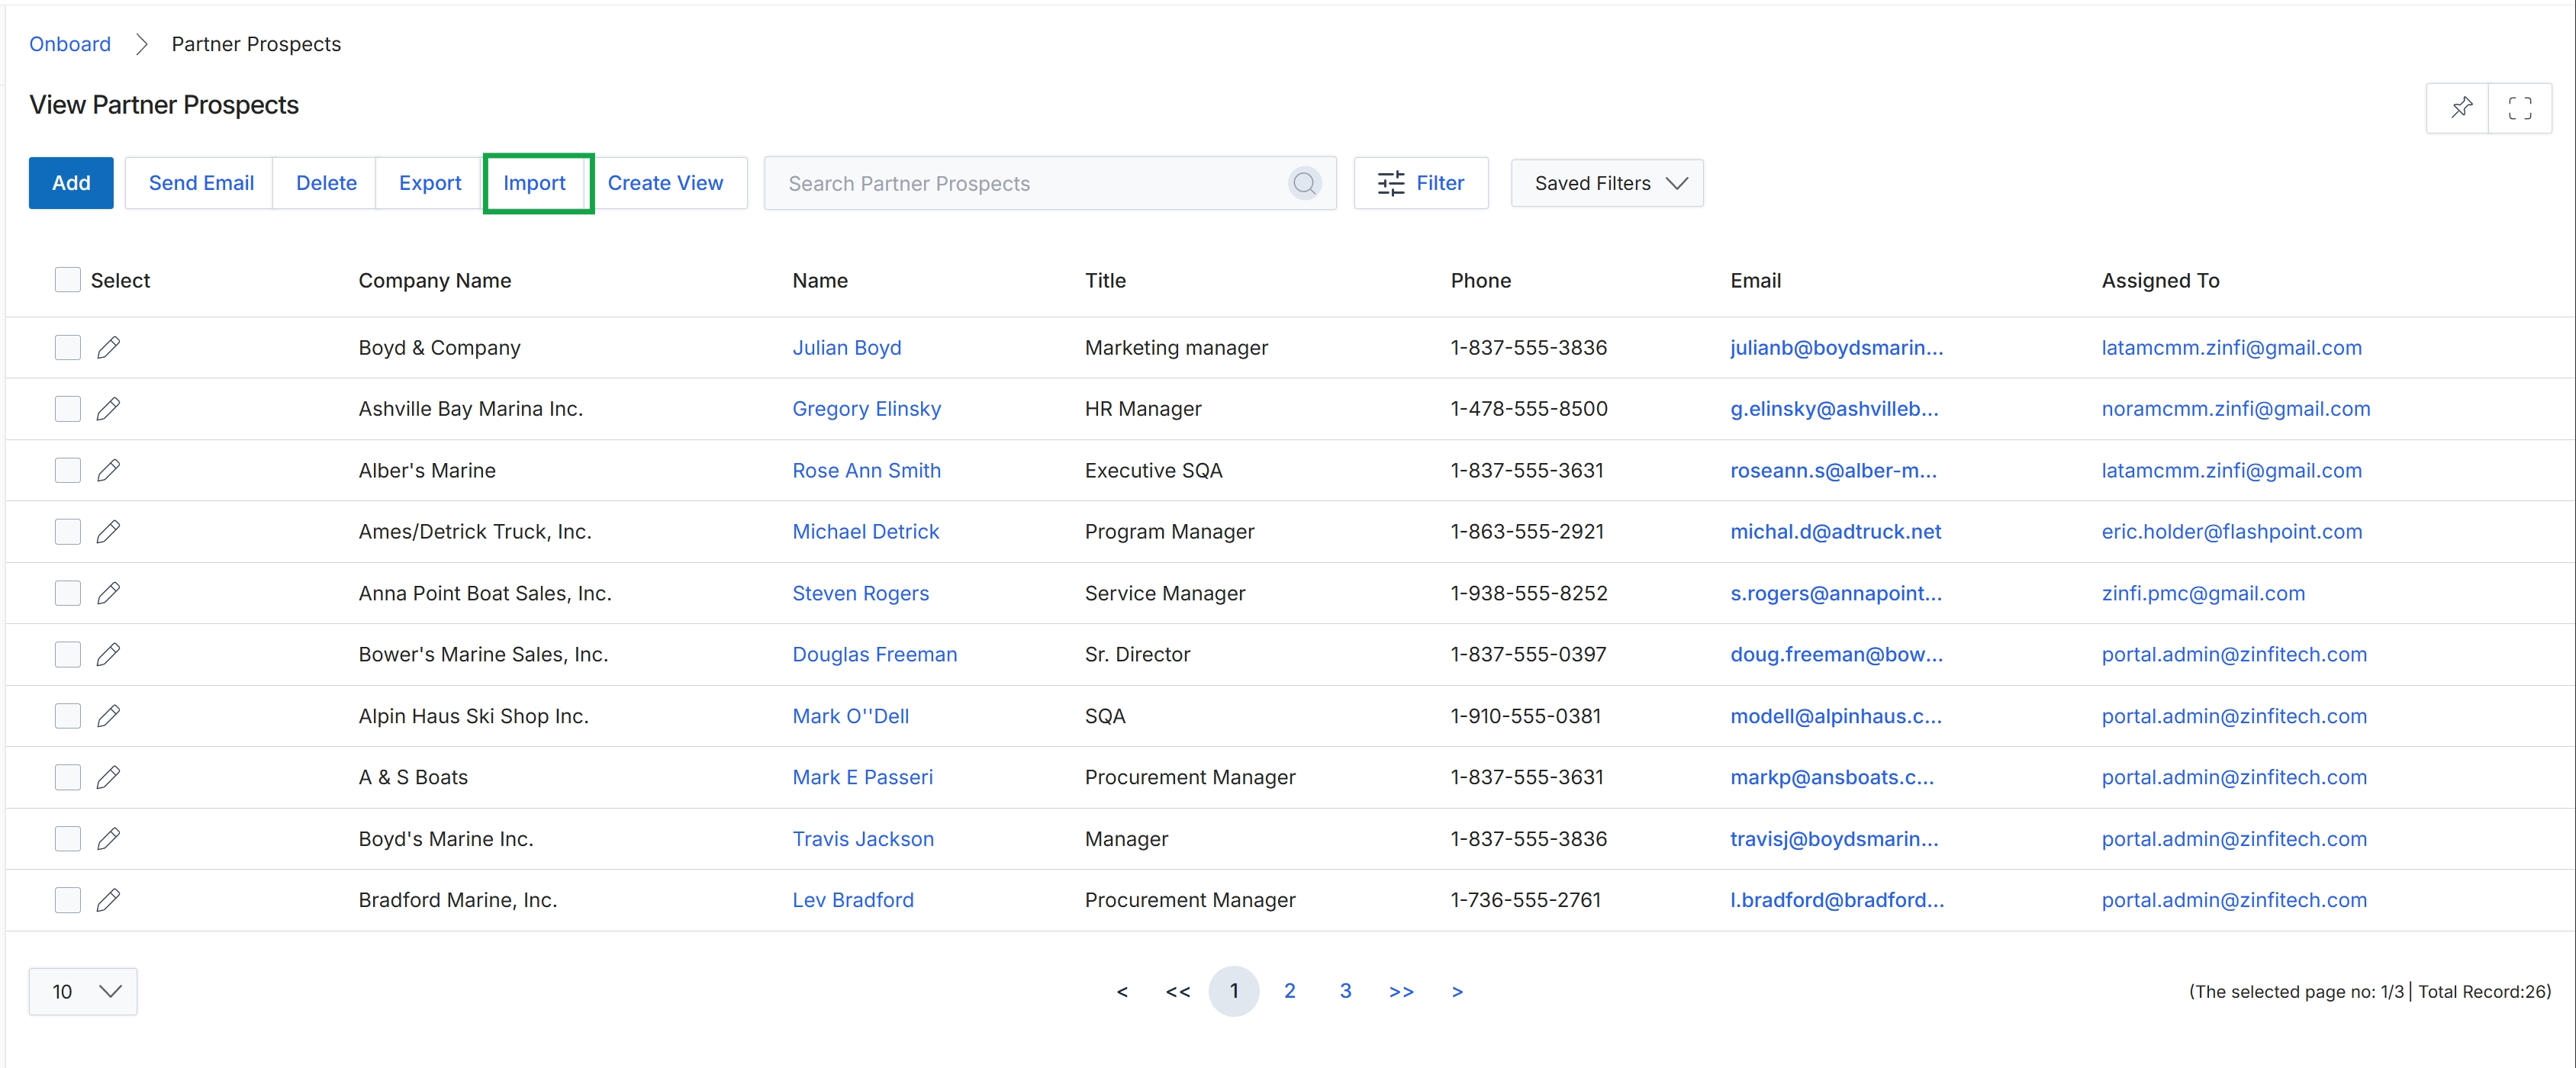
Click the Export Data button.
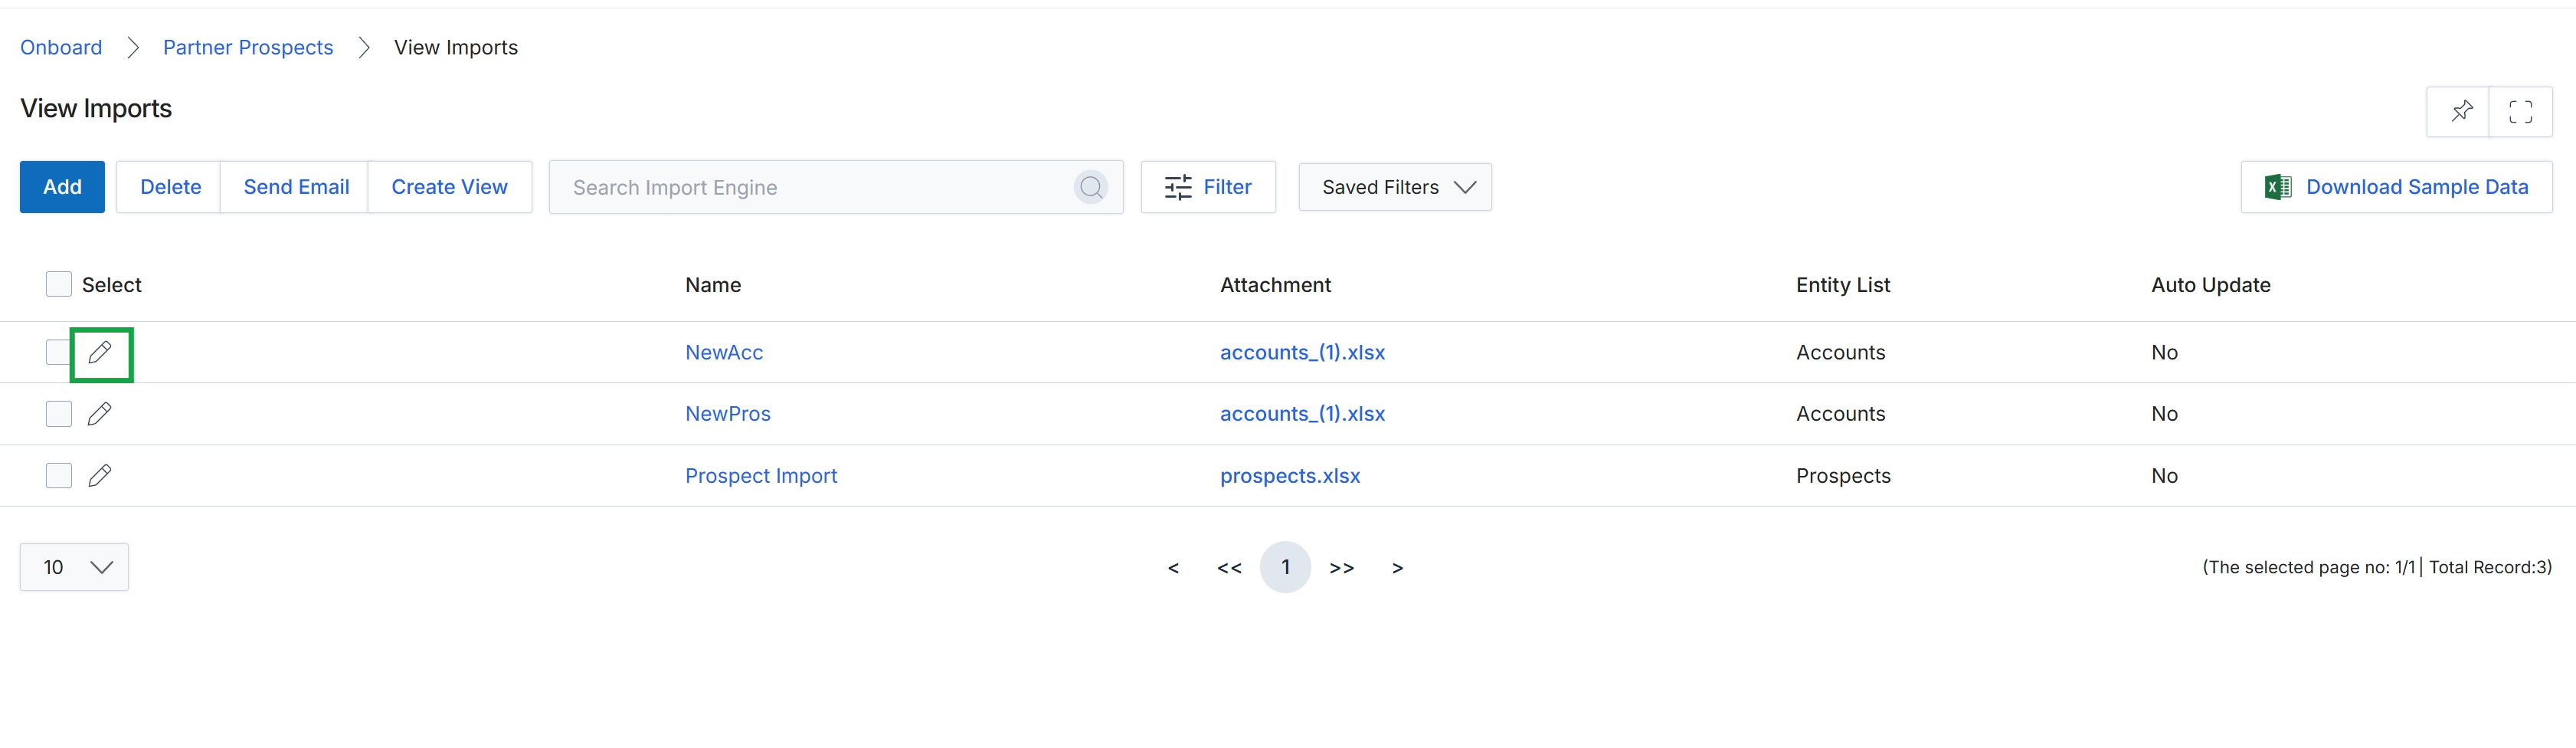
The View Imports screen displays a list of all data import jobs that have been performed within the platform, including those for prospects and accounts. This screen allows administrators to review the status of past imports, identify the files used, and see which entity types were affected. It serves as a central repository for managing and auditing bulk data uploads, ensuring data integrity and providing a historical record of all imported information. Administrators can also initiate new imports, manage existing ones, and download sample data templates directly from this interface to facilitate future data preparation.
Click the 'Add' button to initiate a new data import process.
Buttons
| Button | Description |
|---|---|
| Add | Initiates the process to add a new data import job. |
| Delete | Deletes selected import jobs from the list. |
| Send Email | Sends an email related to the selected import job. |
| Create View | Allows creation of a custom view for the import list. |
| Filter | Opens a panel to apply filters to the list of import jobs. |
| Saved Filters | Allows selection of previously saved filter configurations. |
| Download Sample Data | Downloads a sample data template to assist in preparing import files. |
Fields
| Field | Description |
|---|---|
| Search Import Engine | A search bar to find specific import jobs by keyword. |
Column Headings
| Column | Description |
|---|---|
| Select | A checkbox to select all import jobs displayed on the current page. |
| Name | The name assigned to the import job. |
| Attachment | The name of the file attached to the import job. |
| Entity List | The type of entities that were imported (e.g., Accounts, Prospects). |
| Auto Update | Indicates whether the import job is configured for automatic updates. |
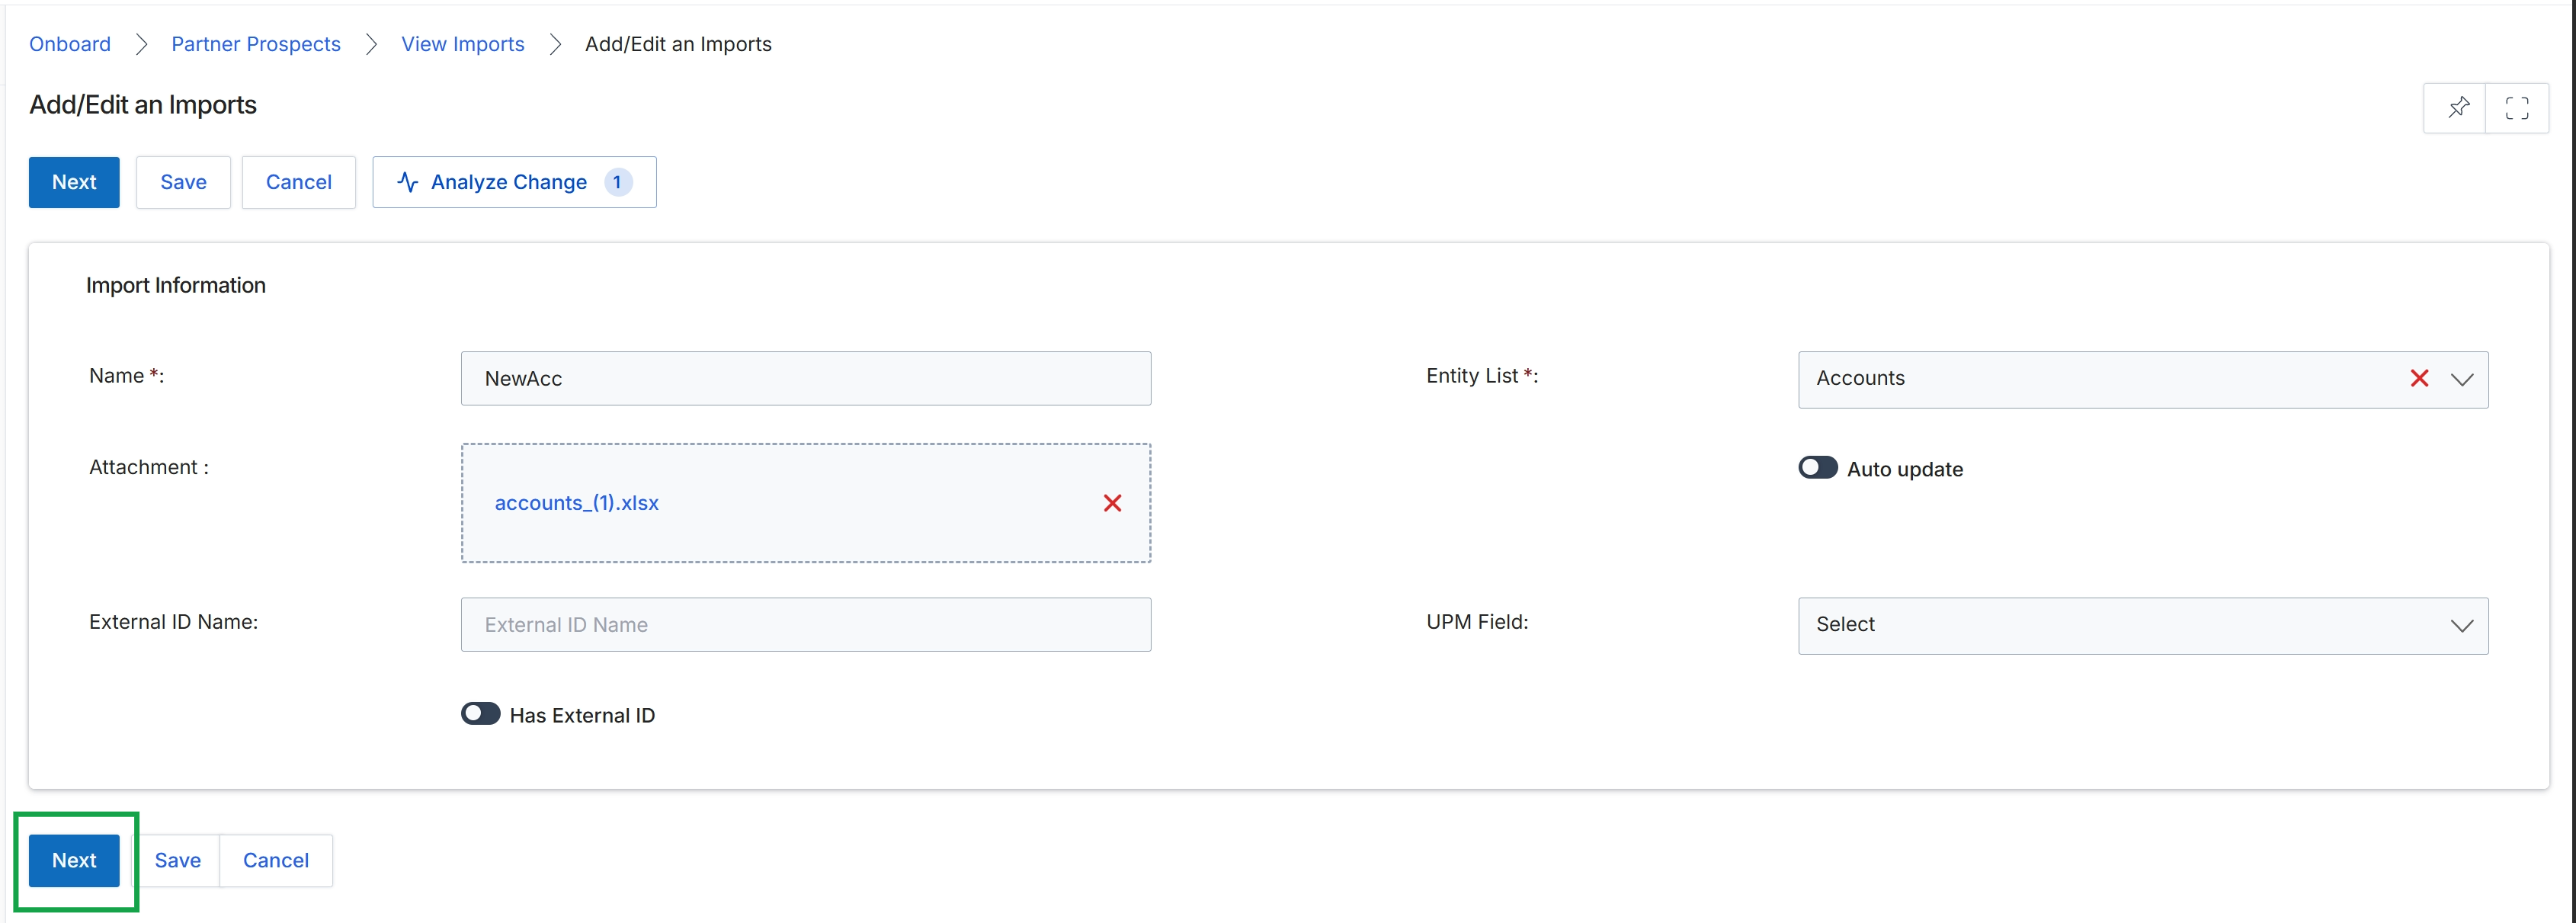
This screen, titled 'Add/Edit an Imports', is part of the data import functionality within the Onboard module, allowing administrators to configure and manage bulk data uploads. It enables the creation or modification of import jobs for various entities, such as partner accounts, by specifying the source file, the target entity, and mapping external identifiers. This process is crucial for efficiently populating the platform with large datasets, especially during initial setup or when integrating with external systems that generate data in bulk. The screen displays the current configuration of an import job, including its name, the attached data file, and settings related to how the imported data should be handled, such as auto-updating existing records or mapping external IDs to platform fields.
Click the "Next" button to proceed with configuring the import job.
Buttons
| Button | Description |
|---|---|
| Next | Proceeds to the next step in the import configuration process. |
| Save | Saves the current import configuration without proceeding to the next step. |
| Cancel | Discards any changes and returns to the previous screen. |
| Analyze Change | Initiates an analysis of changes in the attached file, showing potential impacts before import. |
Import Information
| Field | Description |
|---|---|
| Name * | The name assigned to this import job, which is a required field. |
| Attachment | The data file (e.g., .xlsx) selected for import. |
| External ID Name | A field to specify the name of the external identifier column in the attached file, used for matching records. |
| Has External ID | A toggle to indicate whether the import file contains an external ID column for mapping. |
| Entity List * | The type of entity (e.g., Accounts, Prospects) that the data in the attached file corresponds to, which is a required selection. |
| Auto update | A toggle to enable automatic updating of existing records in the platform based on the imported data. |
| UPM Field | A dropdown to select the platform field that corresponds to an external ID, if 'Has External ID' is enabled. |
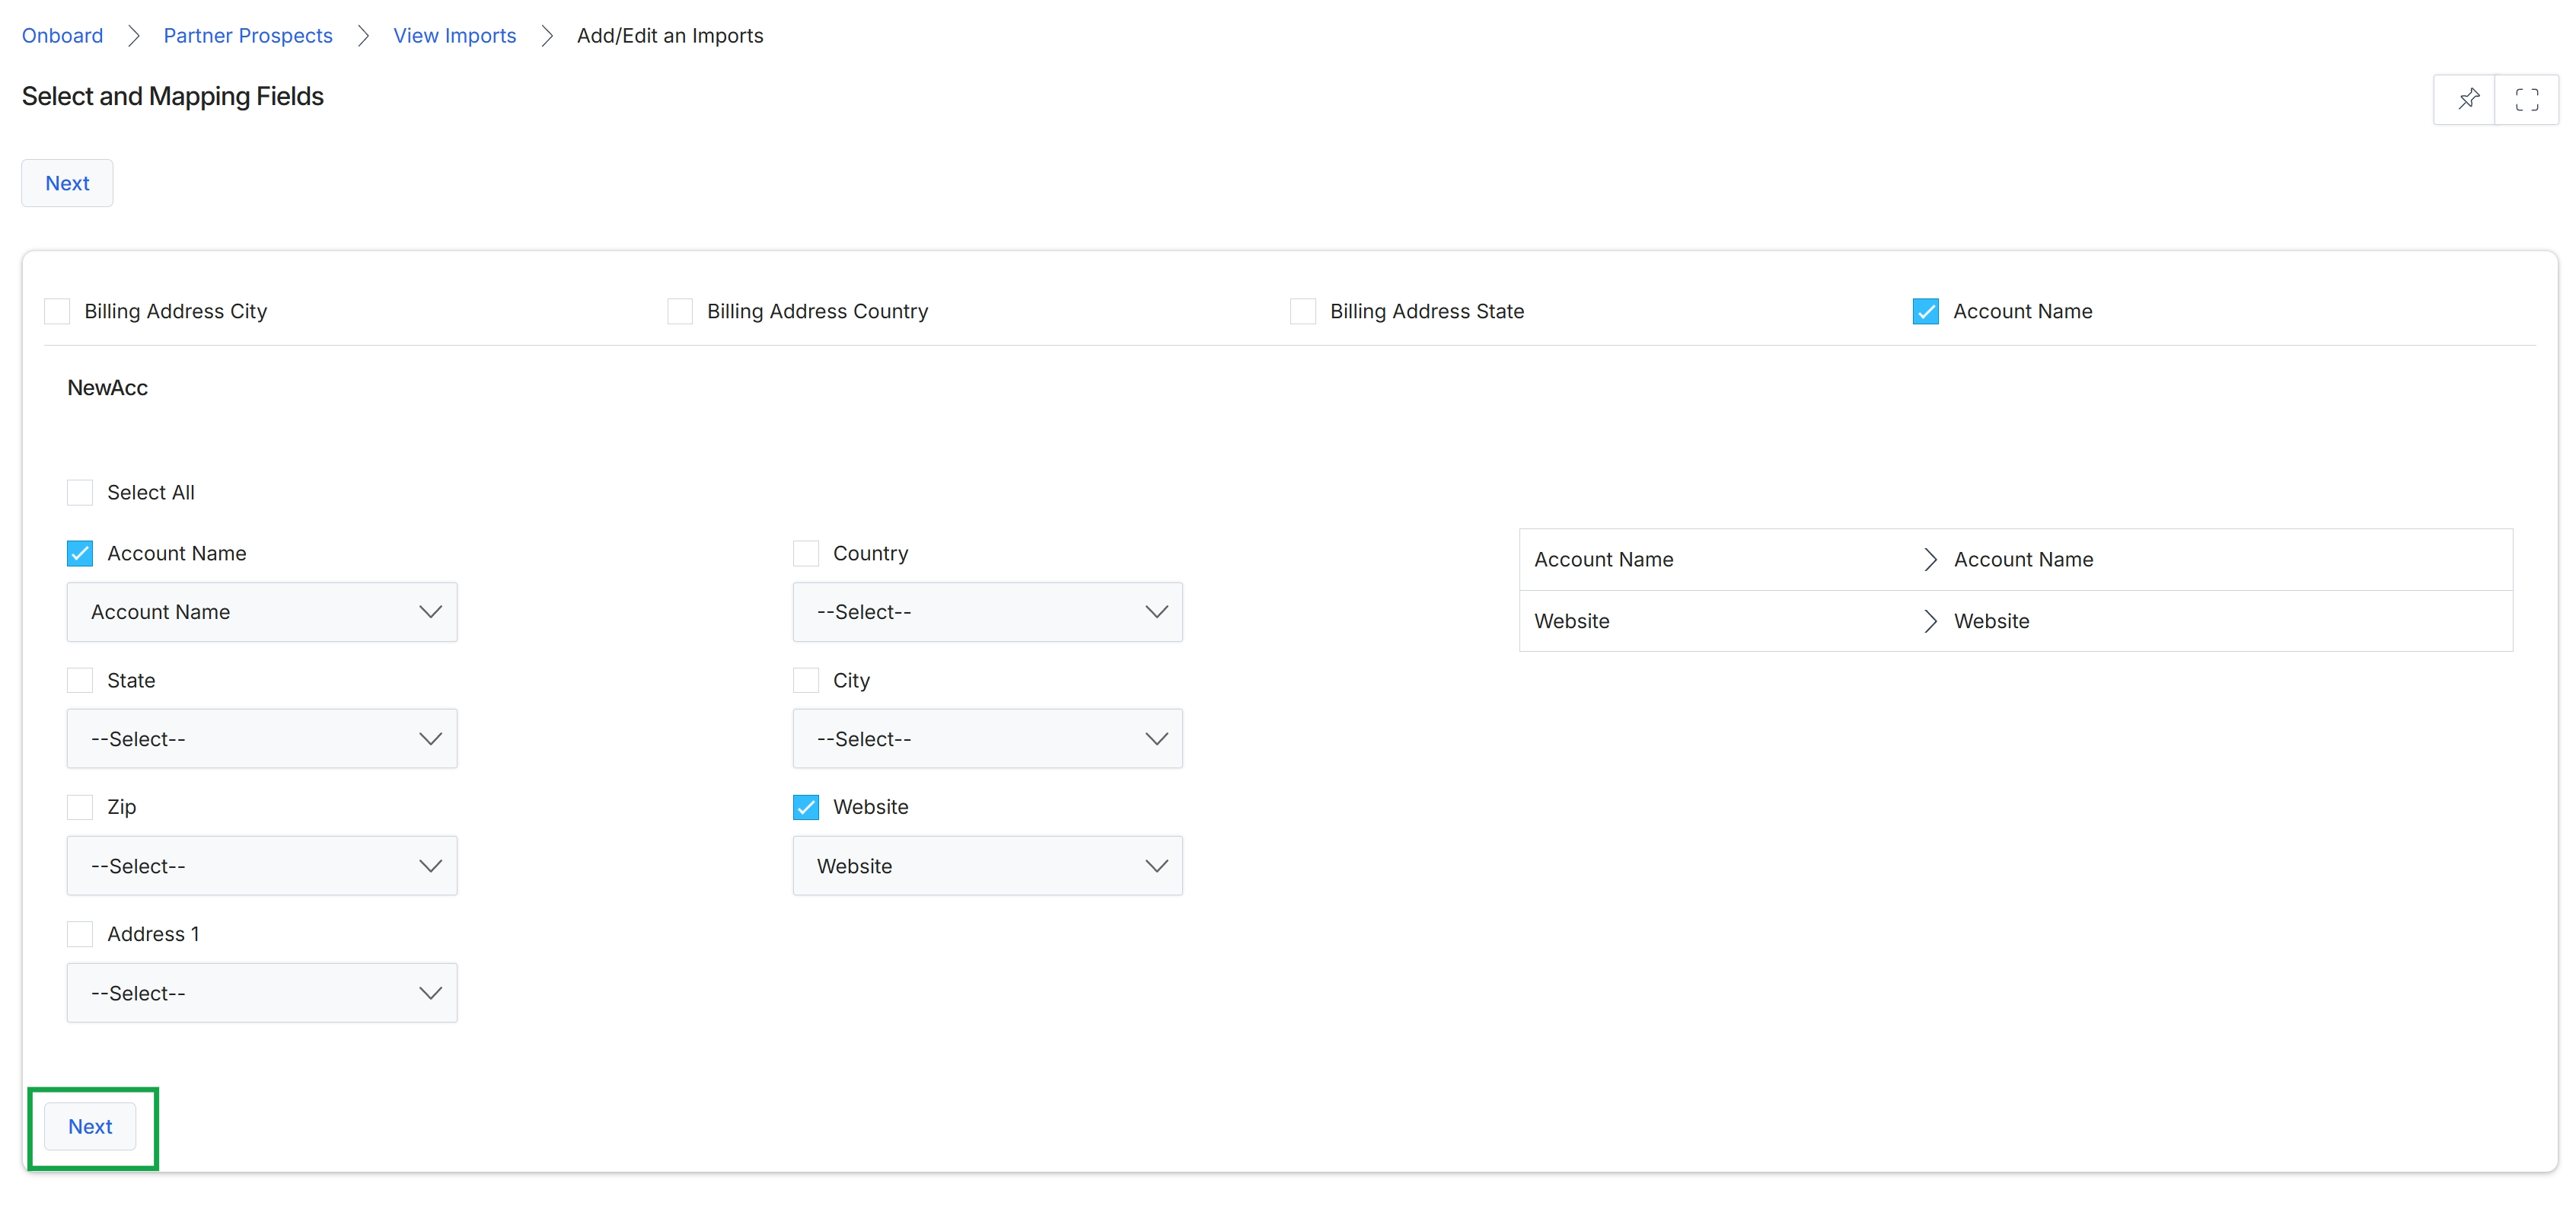
Click the Next button.
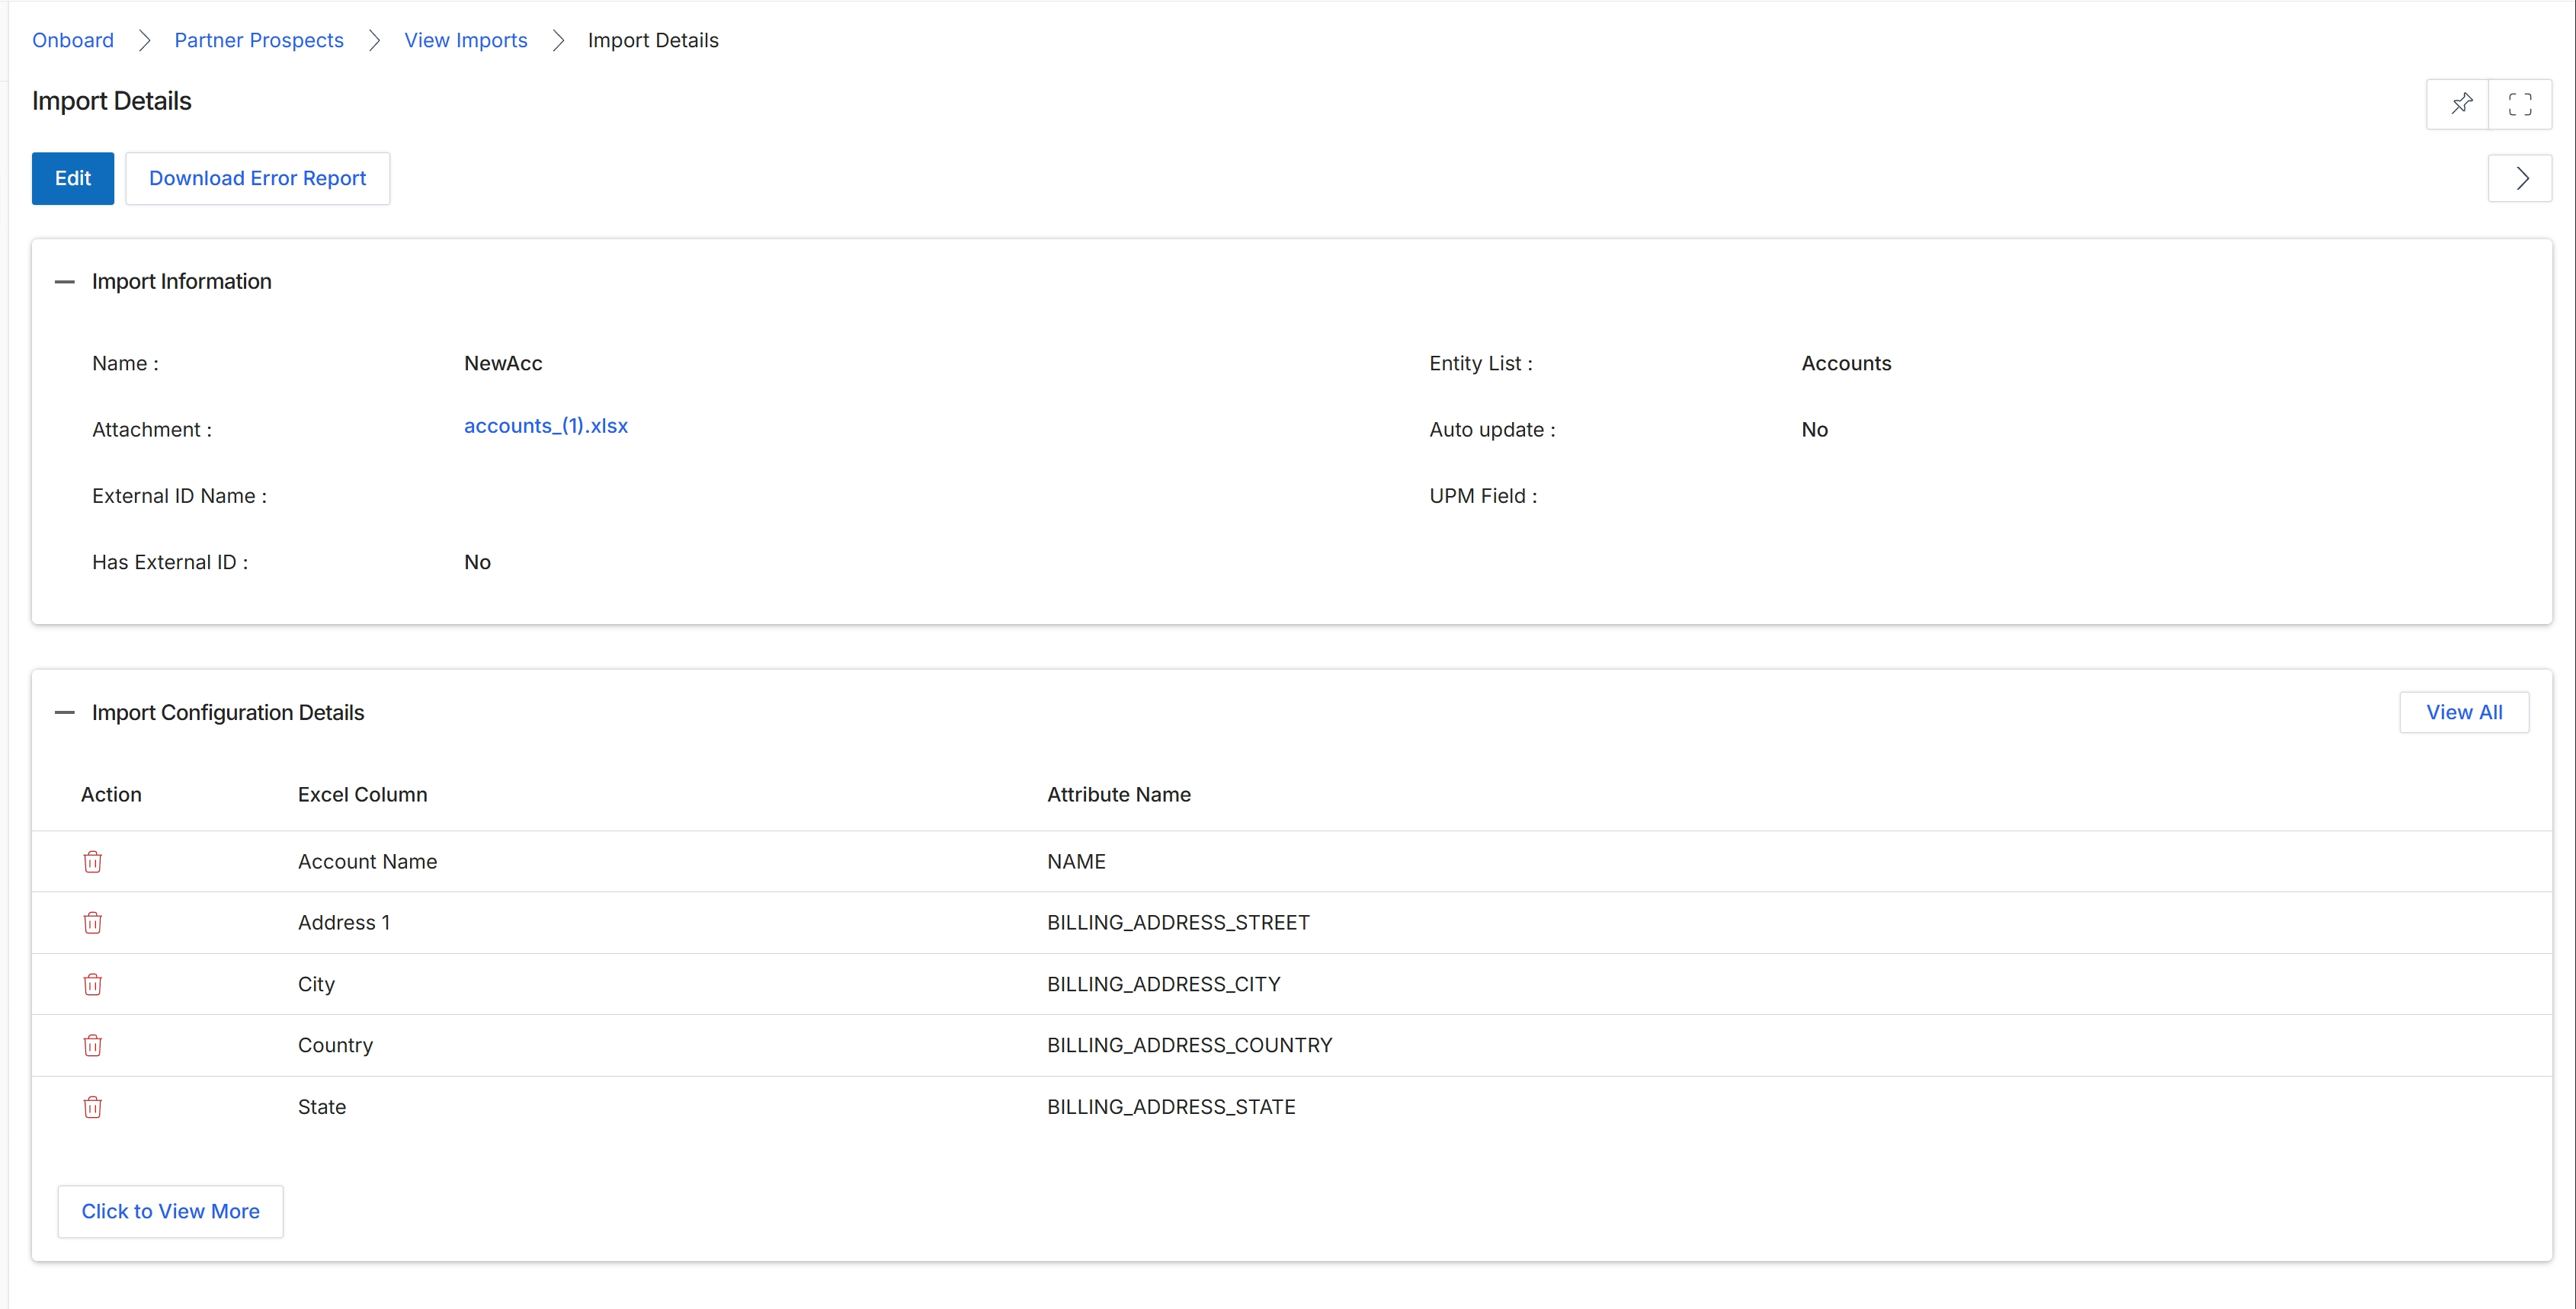
This screen displays the detailed configuration and status of a specific data import job within the platform. It provides administrators with a comprehensive overview of how an external data file, such as a spreadsheet, is mapped to internal system entities and attributes. The 'Import Information' section summarizes key metadata about the import, including its name, the source file, the target entity list (e.g., Accounts), and whether it involves external IDs or auto-updates. The 'Import Configuration Details' section then breaks down the column-level mapping, showing which columns from the imported Excel file correspond to which attributes within the platform's data model. This detail view is crucial for verifying the accuracy of import setups, troubleshooting data discrepancies, and understanding the structure of imported records, especially for bulk operations like creating or updating partner accounts or prospects.
Review the Import Details screen to understand the configuration of the data import job.
Buttons
| Button | Description |
|---|---|
| Edit | Allows modification of the import job's configuration. |
| Download Error Report | Downloads a report detailing any errors encountered during the import process. |
| Click to View More | Expands the list to show additional import configuration details. |
Import Information
| Field | Description |
|---|---|
| Name | The name assigned to this specific import job. |
| Attachment | The name of the external file (e.g., Excel spreadsheet) used for this import. |
| External ID Name | The name of the external identifier used in the import, if applicable. |
| Has External ID | Indicates whether the import uses external IDs for record matching. |
| Entity List | The target entity type in the platform to which the imported data is mapped (e.g., Accounts, Prospects). |
| Auto update | Indicates if the import is configured to automatically update existing records. |
Import Configuration Details
| Column | Description |
|---|---|
| Action | Represents the action that can be performed on the mapped field, such as deleting the mapping. |
| Excel Column | The header name of the column from the imported Excel file. |
| Attribute Name | The corresponding attribute name within the platform's data model that the Excel column is mapped to. |
Creating Custom Views and Filtering Prospects
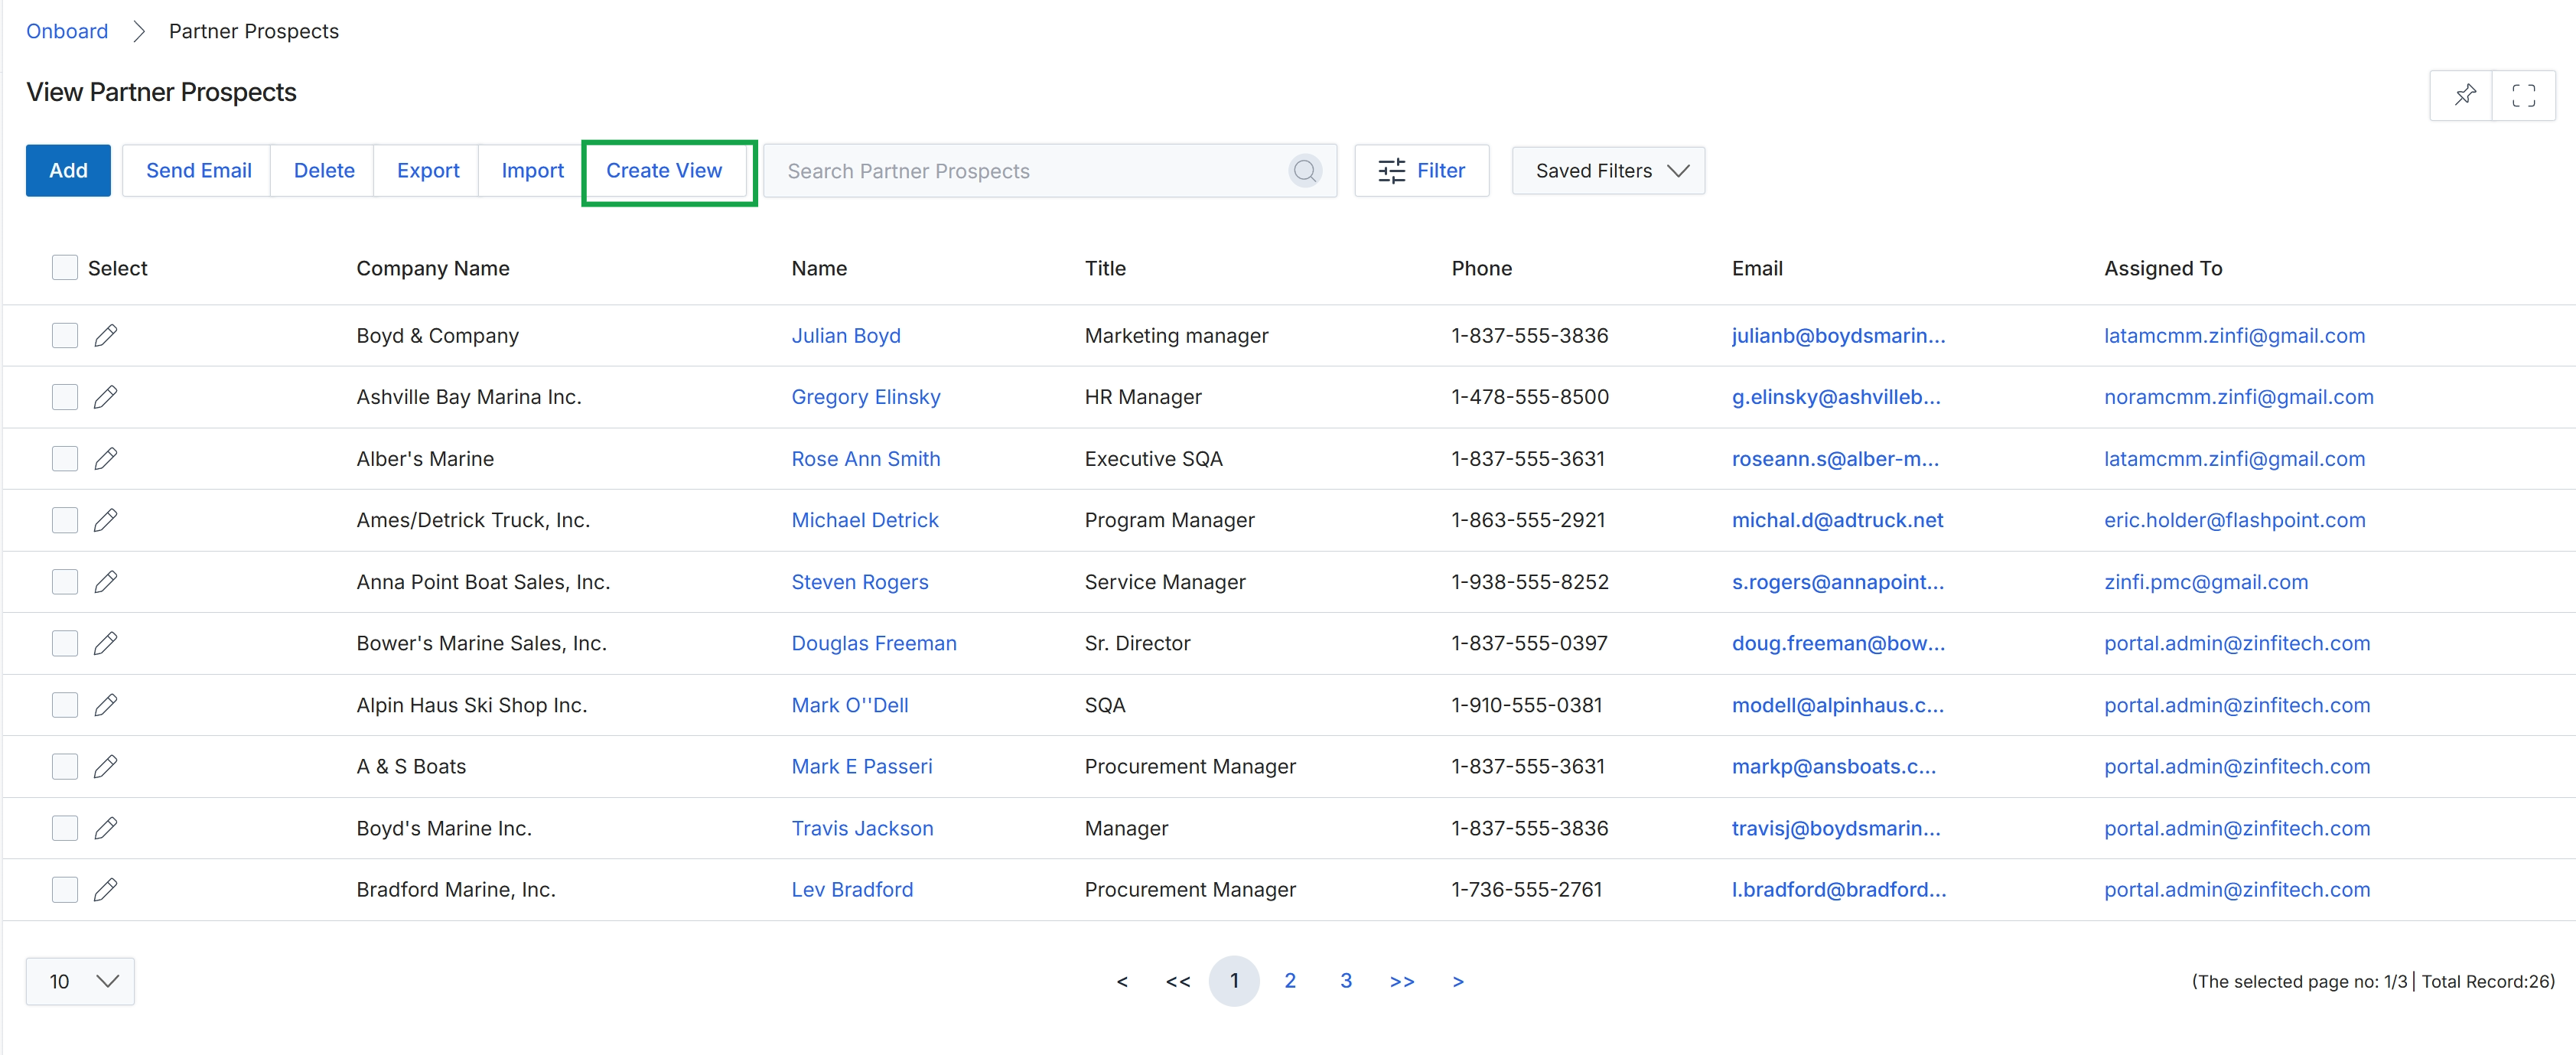
Click Create View.
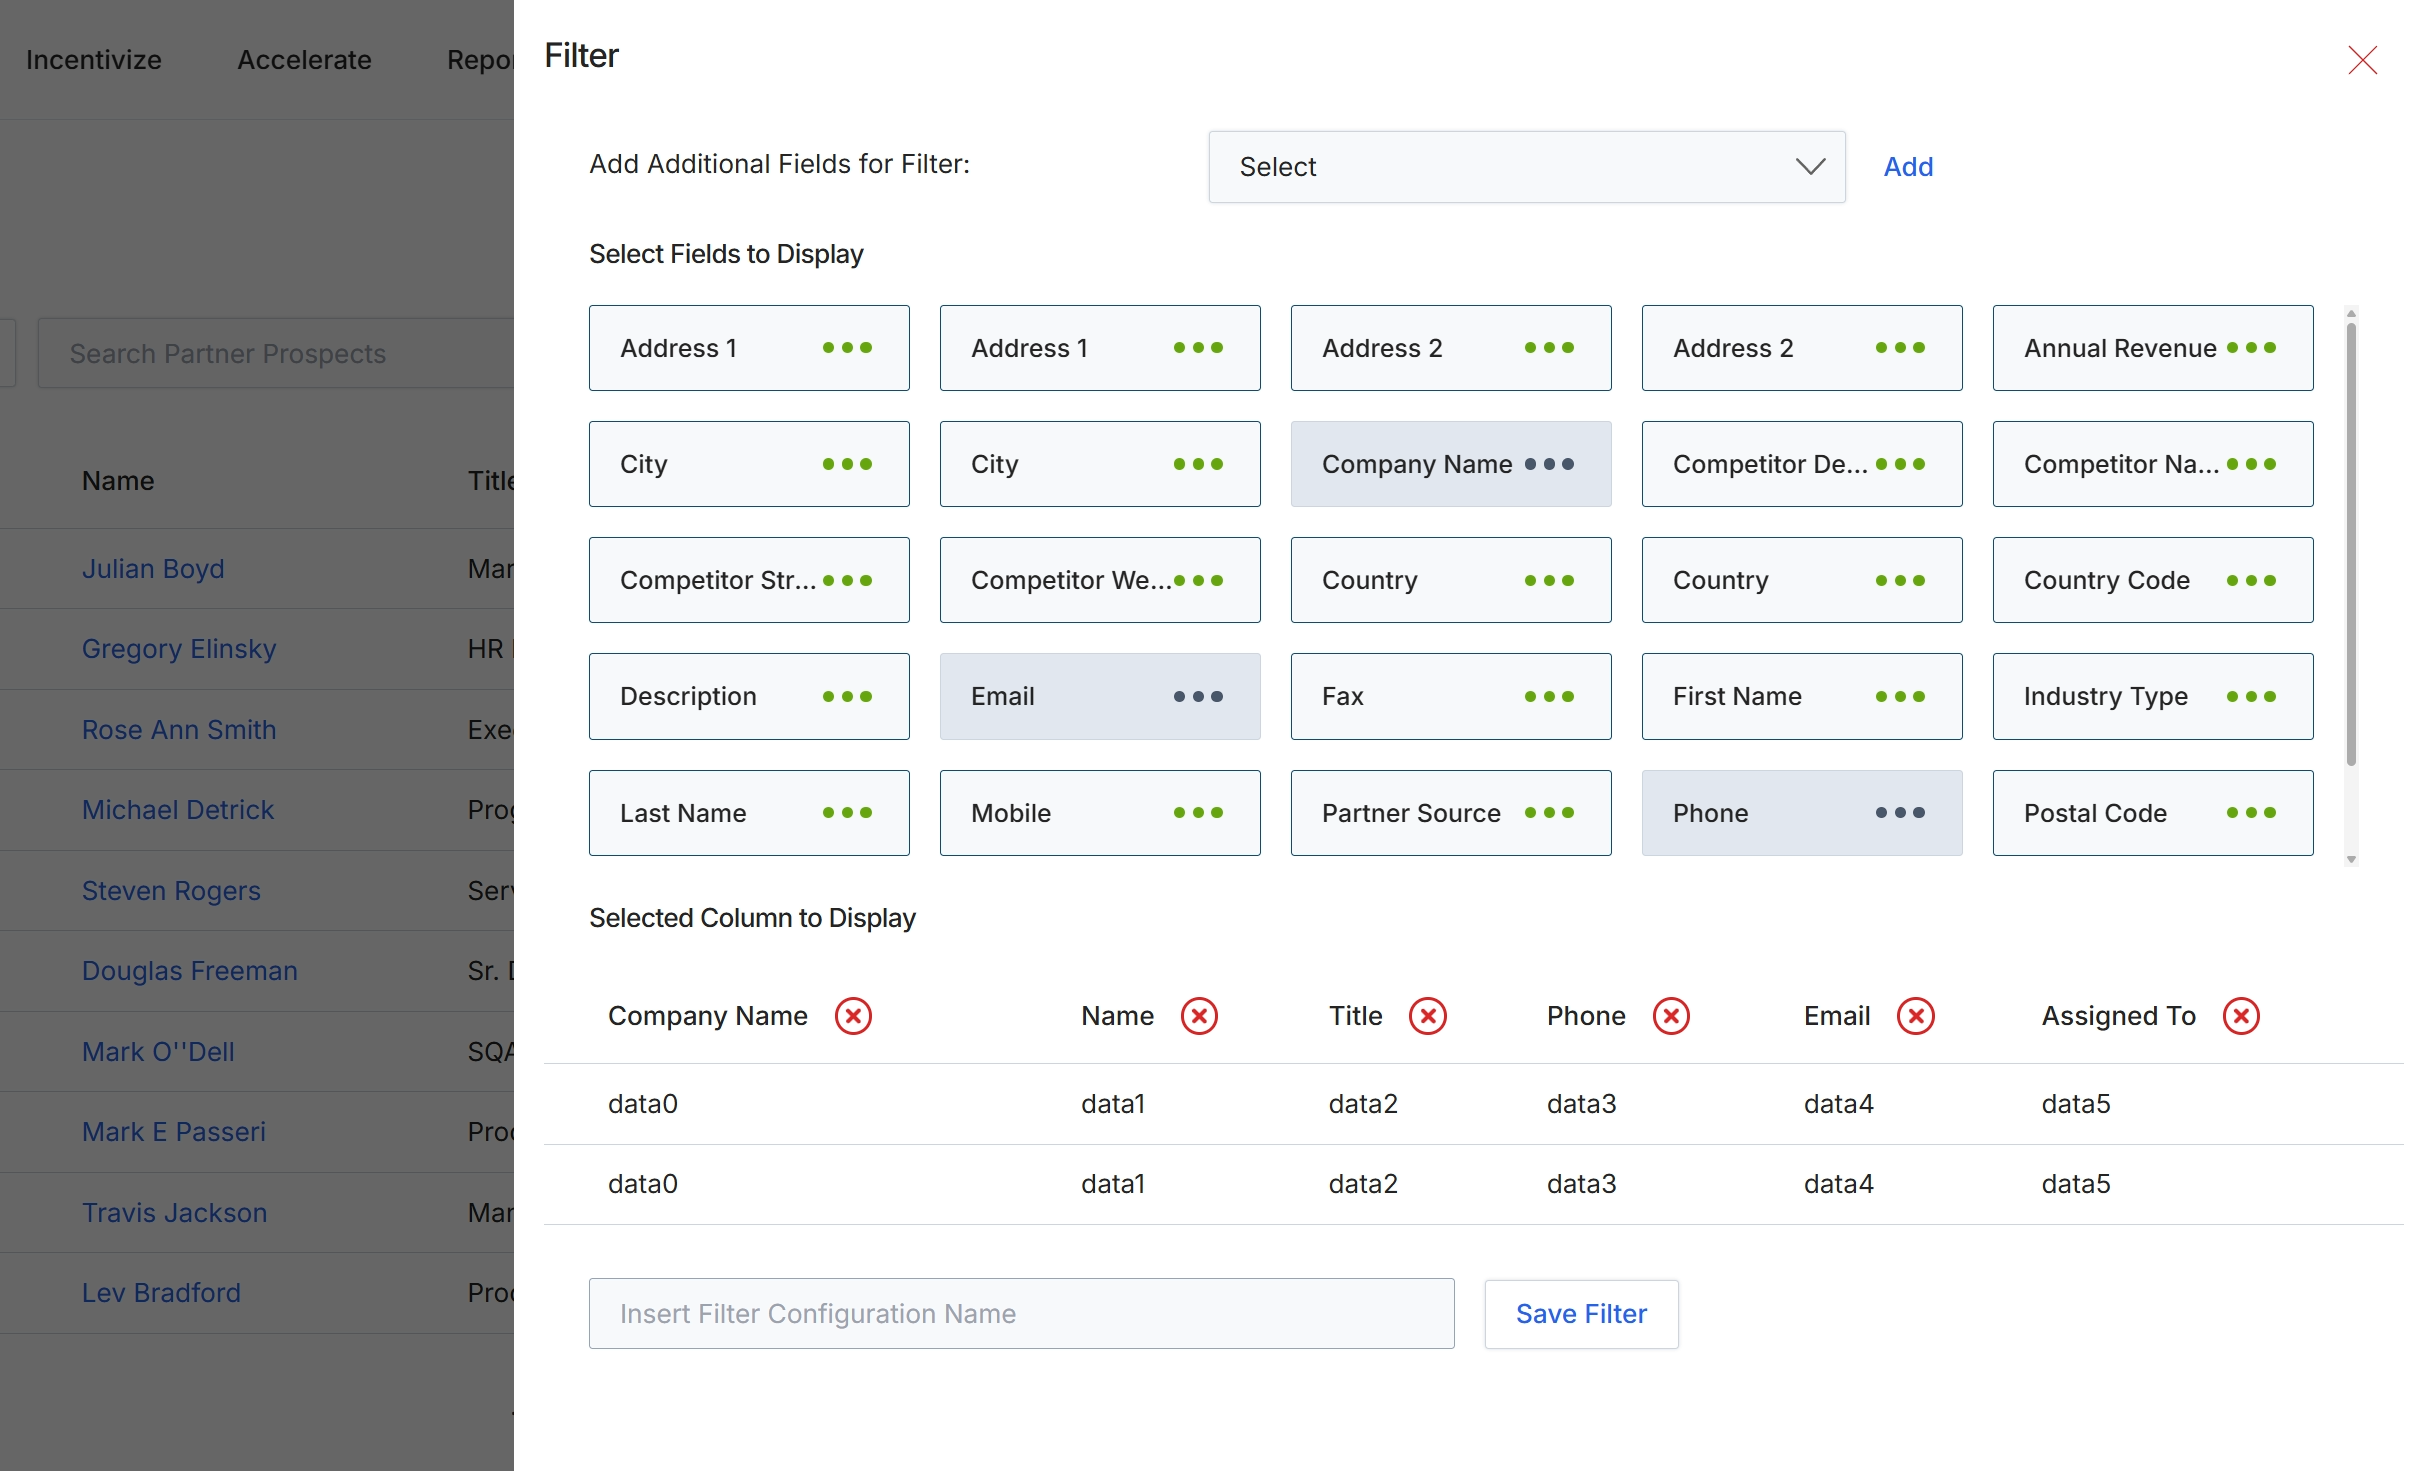
This filter configuration dialog allows administrators to customize the columns displayed in the Partner Prospects list view and to define additional filter criteria. By selecting specific fields, users can tailor the information presented in the main list to focus on relevant data points for prospect management, such as contact details, company information, or assigned managers. This customization enhances the usability of the prospect list by enabling users to quickly view and act upon the most critical information without navigating to individual prospect detail pages. The ability to save filter configurations also streamlines future analysis and reporting tasks, ensuring consistent data presentation for different operational needs.
Enter a name for the current filter configuration to save it for future use.
Buttons
| Button | Description |
|---|---|
| Add | A button to add the selected field to the filter criteria. |
| Save Filter | A button to save the current filter configuration with the provided name. |
Fields
| Field | Description |
|---|---|
| Add Additional Fields for Filter | A dropdown menu to select additional fields that can be used for filtering the prospect list. |
| Select | The dropdown control for selecting additional fields to add to the filter criteria. |
| Insert Filter Configuration Name | An input field to enter a name for the current filter configuration. |
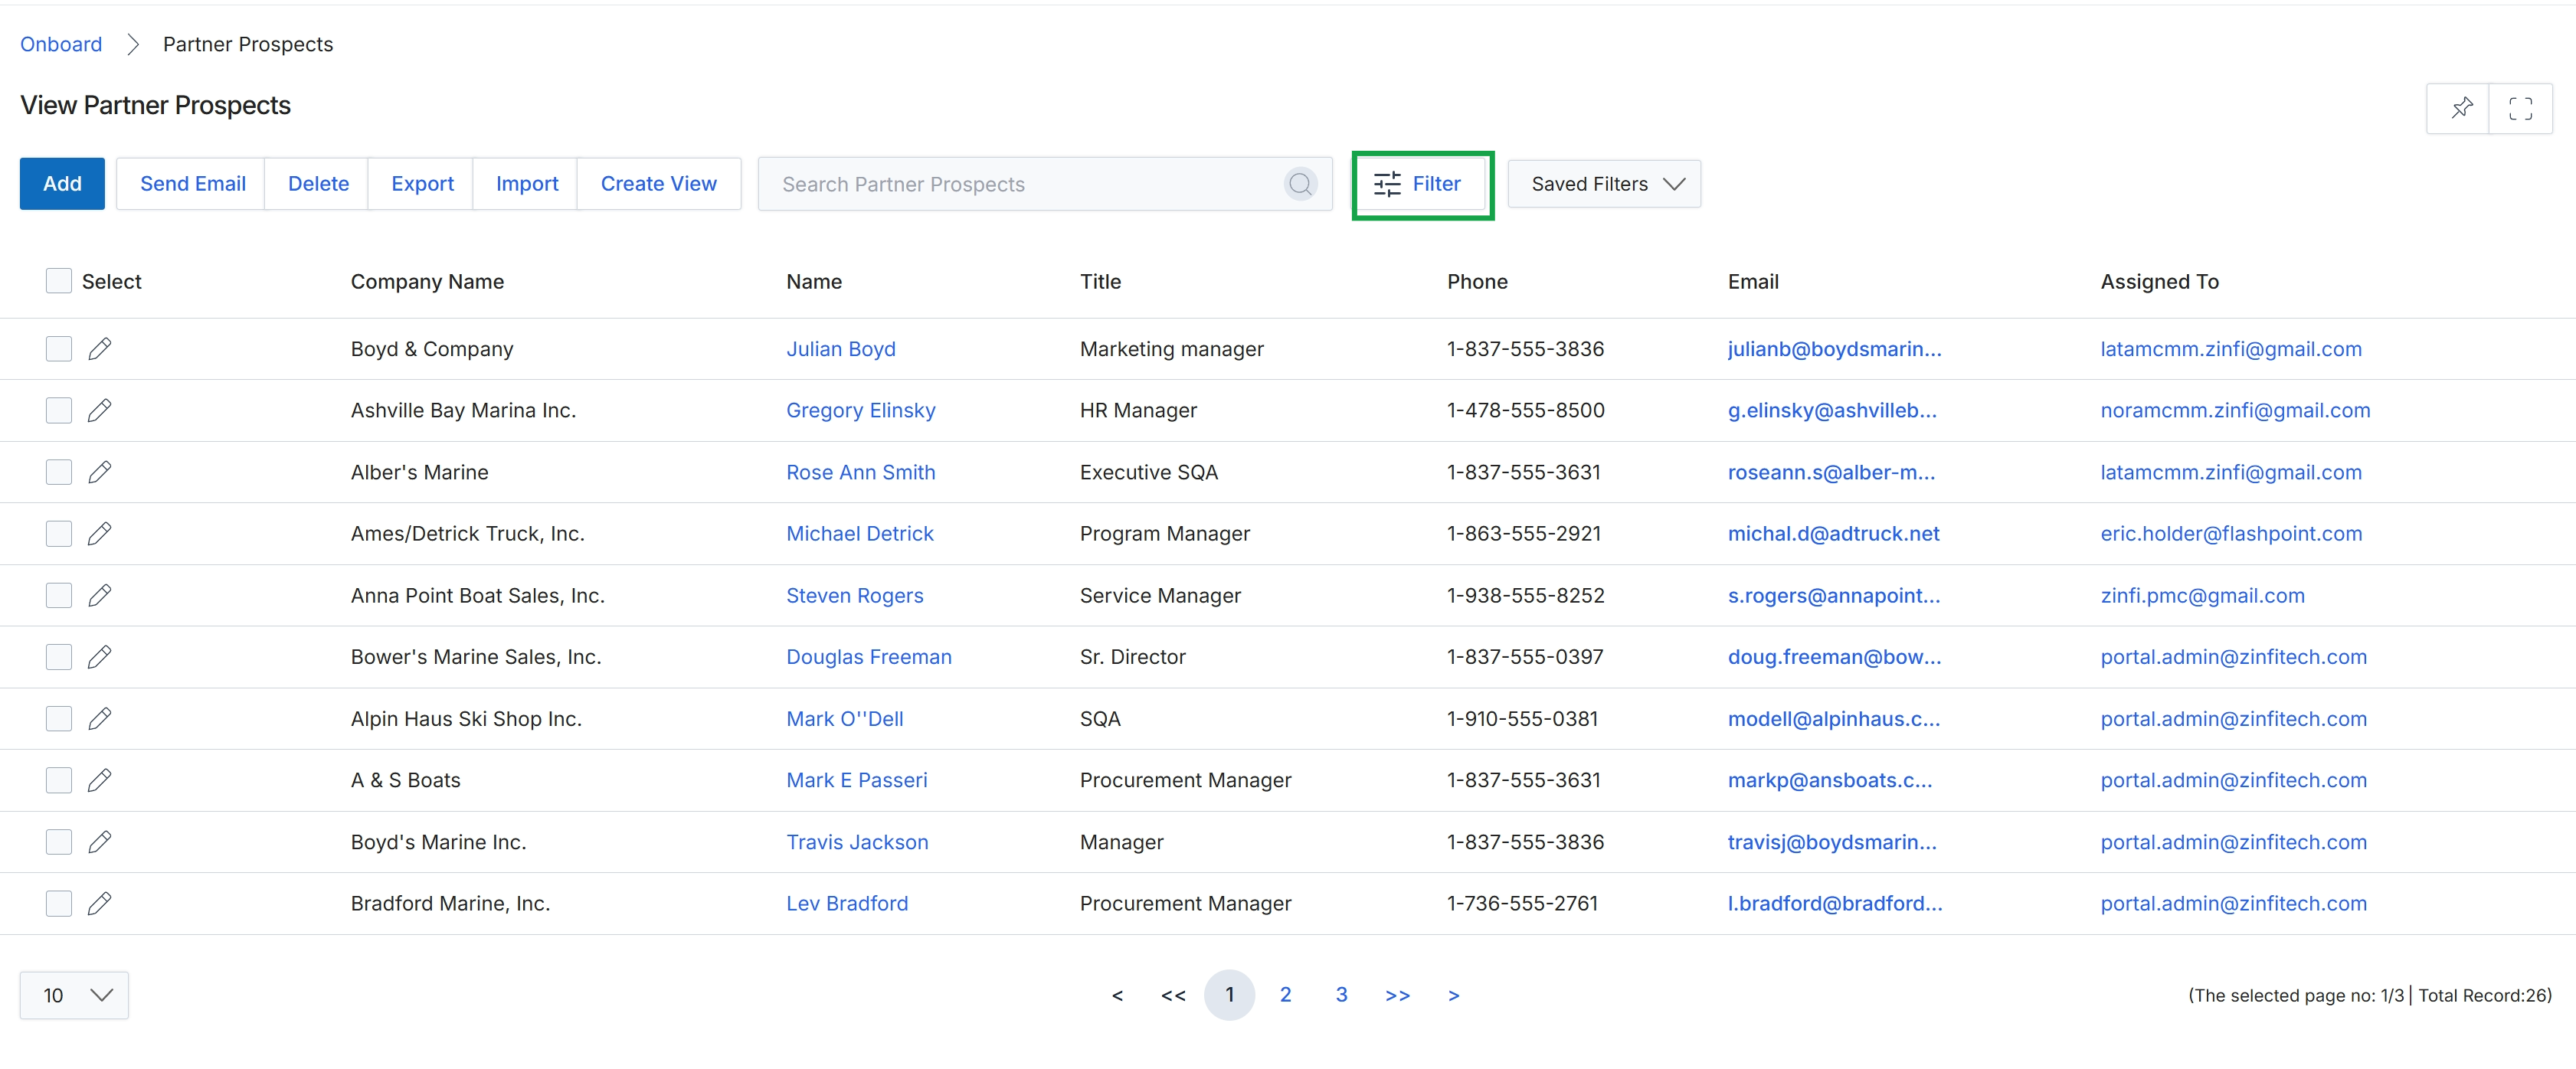
Click the Filter icon.
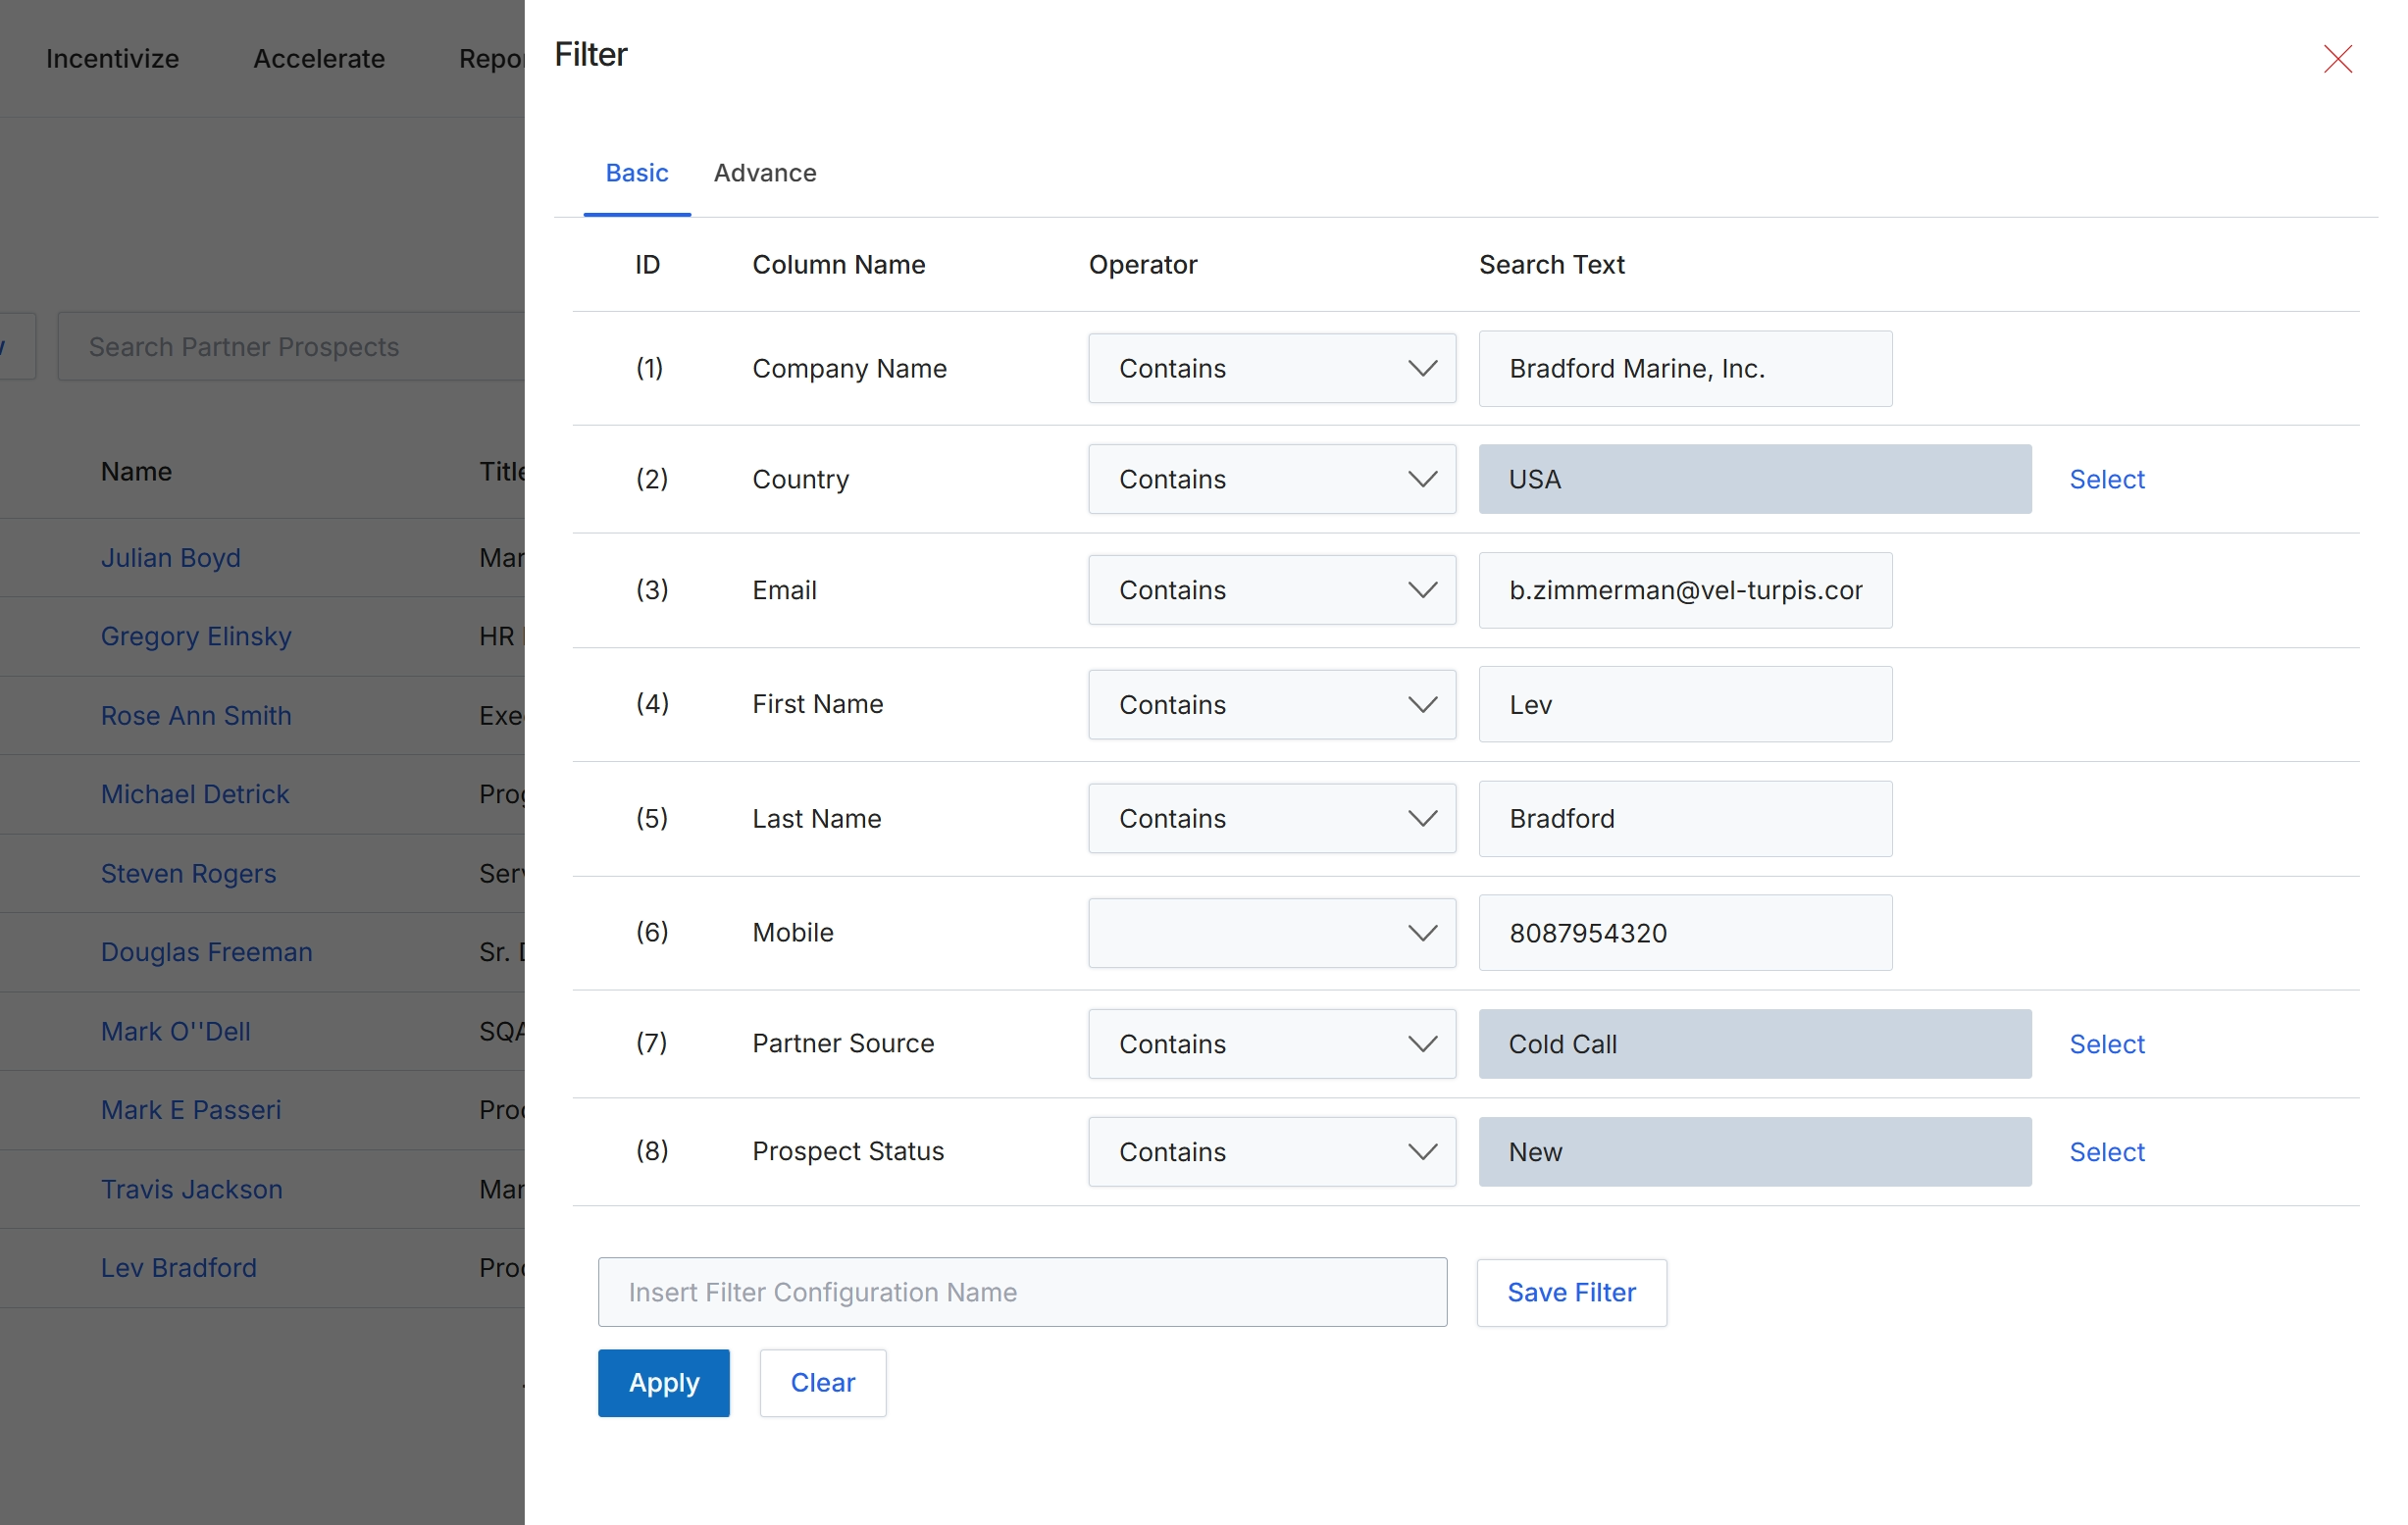
This screen displays the filter configuration panel for the Partner Prospects list view, allowing users to define specific criteria to narrow down the displayed prospect records. Users can apply basic filters based on common prospect attributes such as company name, country, contact information, and prospect status. This filtering capability is crucial for managing large volumes of prospect data, enabling program managers to quickly locate specific prospects, analyze segments, or focus on applications that meet certain conditions. The panel supports both basic and advanced filtering options, providing flexibility in how data is queried and presented, which is essential for effective partner recruitment and pipeline management.
Apply the configured filters to the Partner Prospects list by clicking the "Apply" button.
Buttons
| Button | Description |
|---|---|
| Basic | Tab to configure basic filtering rules. |
| Advance | Tab to configure advanced filtering rules. |
| Save Filter | Button to save the current filter configuration for future use. |
| Apply | Button to apply the configured filters to the prospect list. |
| Clear | Button to clear all applied filter criteria. |
Fields
| Field | Description |
|---|---|
| Company Name | The name of the company associated with the prospect. |
| Contains | Dropdown to select the comparison operator for the 'Company Name' filter. |
| Bradford Marine, Inc. | Input field for the company name search text. |
| Country | The country of the prospect's company. |
| Contains | Dropdown to select the comparison operator for the 'Country' filter. |
| USA | Input field for the country search text. |
| The prospect's email address. | |
| Contains | Dropdown to select the comparison operator for the 'Email' filter. |
| b.zimmerman@vel-turpis.cor | Input field for the email search text. |
| First Name | The prospect's first name. |
| Contains | Dropdown to select the comparison operator for the 'First Name' filter. |
| Lev | Input field for the first name search text. |
| Last Name | The prospect's last name. |
| Contains | Dropdown to select the comparison operator for the 'Last Name' filter. |
| Bradford | Input field for the last name search text. |
| Mobile | The prospect's mobile phone number. |
| Contains | Dropdown to select the comparison operator for the 'Mobile' filter. |
| 8087954320 | Input field for the mobile number search text. |
| Partner Source | The source from which the prospect was acquired. |
| Contains | Dropdown to select the comparison operator for the 'Partner Source' filter. |
| Cold Call | Input field for the partner source search text. |
| Prospect Status | The current status of the prospect. |
| Contains | Dropdown to select the comparison operator for the 'Prospect Status' filter. |
| New | Input field for the prospect status search text. |
| Insert Filter Configuration Name | Input field to enter a name for saving the current filter configuration. |
Column Headings
| Column | Description |
|---|---|
| ID | Column header for the filter rule identifier. |
| Column Name | Column header for the prospect attribute being filtered. |
| Operator | Column header for the comparison operator used in the filter rule. |
| Search Text | Column header for the value to match against the selected column name. |
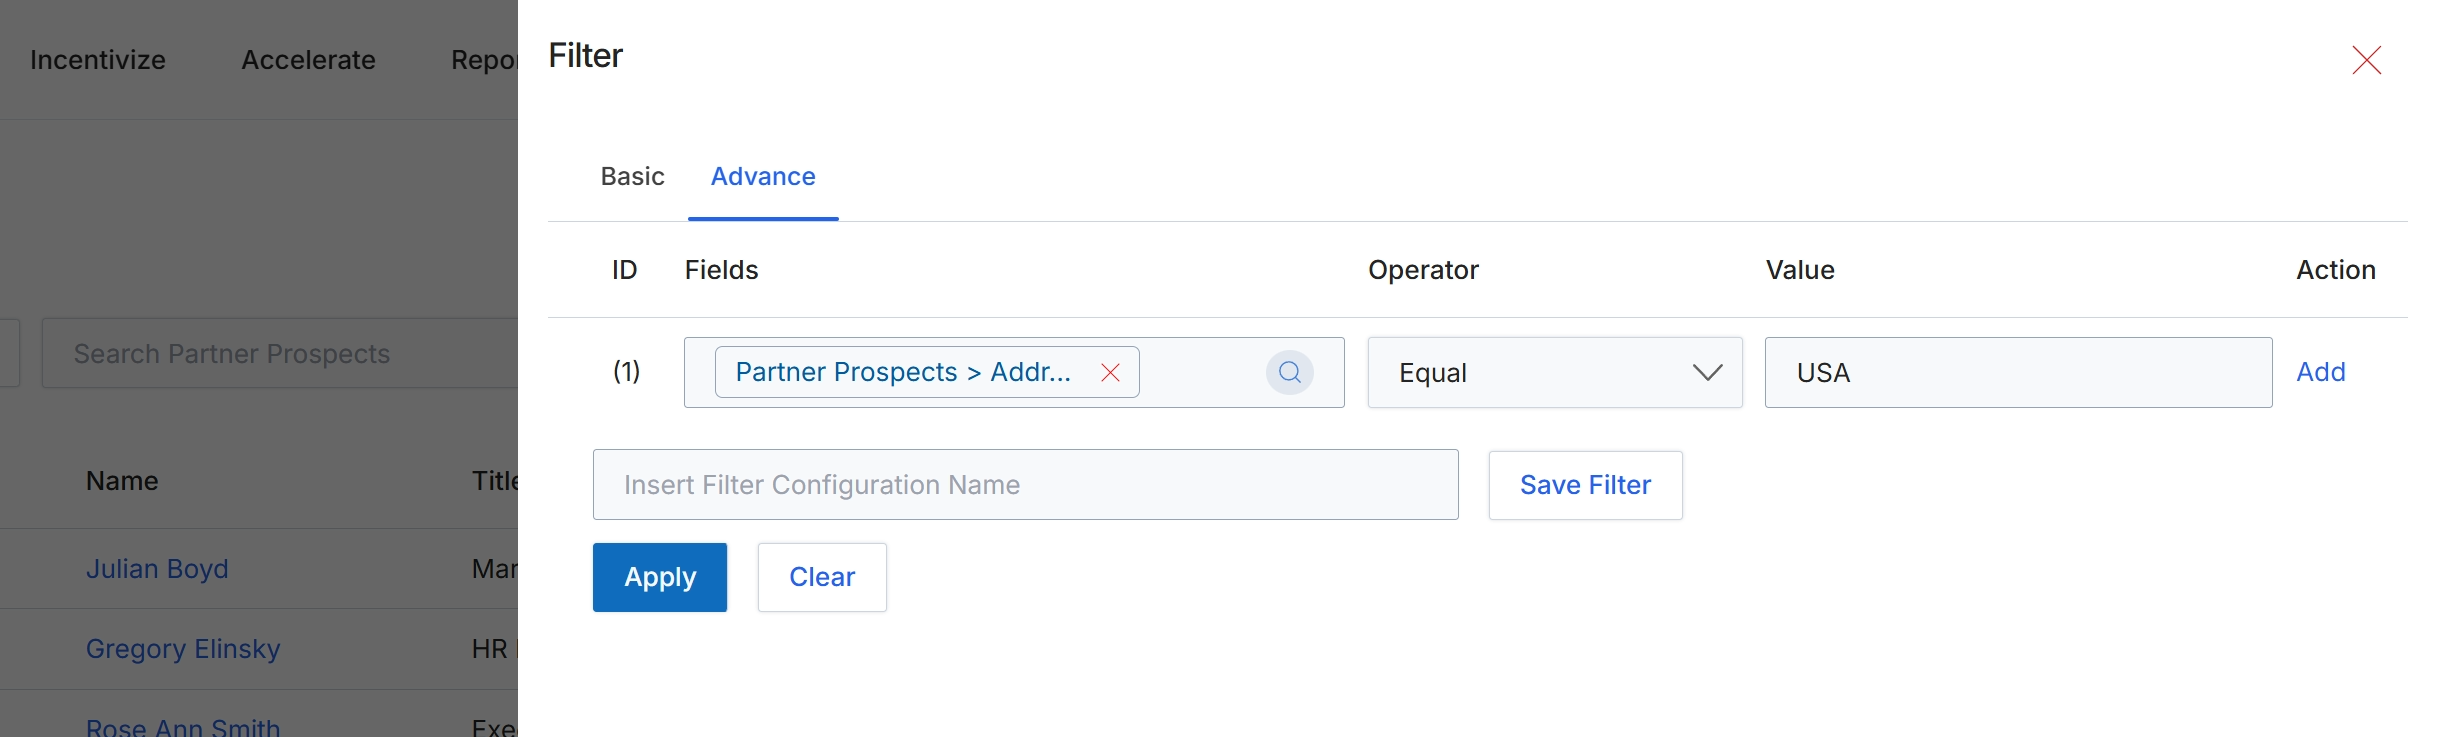
This screen displays the advanced filter configuration for prospect records, allowing administrators to define complex criteria for segmenting and managing their partner prospects. The filter panel enables users to specify conditions based on various prospect attributes, using operators and values to narrow down the displayed list of prospects. This functionality is crucial for targeted outreach, performance analysis, and ensuring that the right partners are engaged at each stage of the recruitment and onboarding process. Filters can be saved for future use, streamlining repetitive filtering tasks and promoting consistency in data analysis.
Configure the advanced filter by selecting the field, operator, and value, then click "Apply" to filter the prospect list.
Buttons
| Button | Description |
|---|---|
| Basic | Tab to switch to basic filter options. |
| Advance | Tab to switch to advanced filter options, allowing for more complex rule creation. |
| Add | Button to add another filter condition row. |
| Save Filter | Button to save the current filter configuration for future use. |
| Apply | Button to apply the configured filters to the prospect list. |
| Clear | Button to clear all applied filter conditions. |
Fields
| Field | Description |
|---|---|
| Partner Prospects > Addr... | Dropdown field to select the specific prospect attribute for filtering. |
| Equal | Dropdown field to select the comparison operator (e.g., Equal, Contains, Greater Than). |
| USA | Input field to enter the value for the filter condition. |
| Insert Filter Configuration Name | Text input field to provide a name for saving the current filter configuration. |
Column Headings
| Column | Description |
|---|---|
| ID | Column header for the filter rule identifier. |
| Fields | Column header for the prospect field being used in the filter condition. |
| Operator | Column header for the comparison operator used in the filter condition. |
| Value | Column header for the value to compare against the selected field. |
| Action | Column header for actions related to the filter rule, such as adding a new rule. |