

Overview
The Prospects module within the Sell zone is crucial for managing the initial stages of the sales pipeline, specifically focusing on pre-lead contacts. These prospects represent potential customers or partners that have not yet been qualified as leads but are part of an ongoing recruitment or outreach effort. Administrators leverage this module to maintain a clean and organized database of potential opportunities, ensuring that sales and marketing efforts are directed efficiently.
Managing Prospect Records
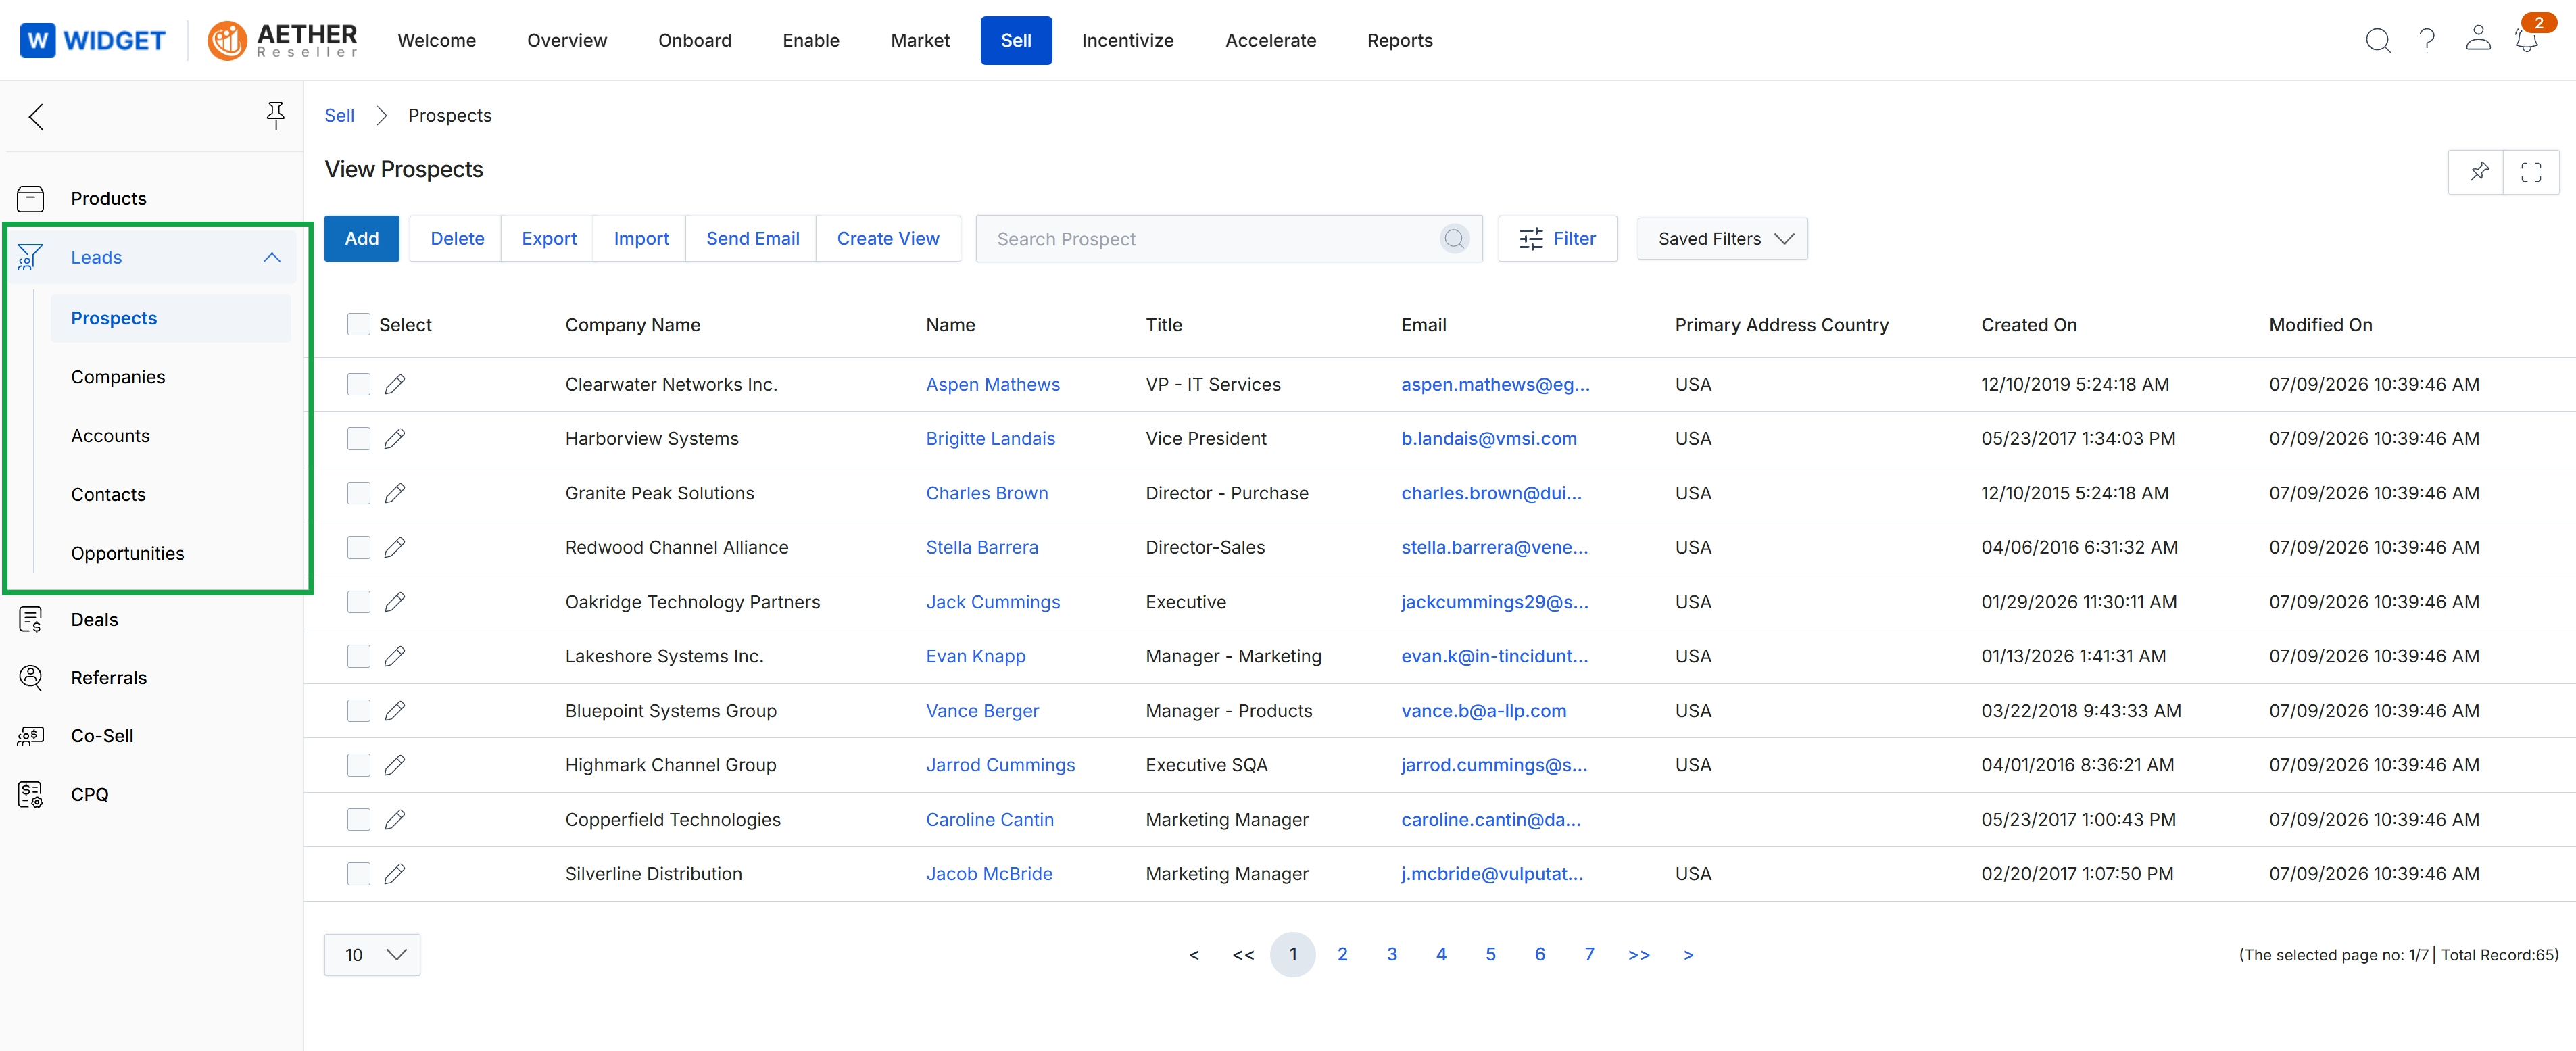
Click Sell in the top navigation bar, then click Leads in the left navigation panel to expand it, and then click Prospects.
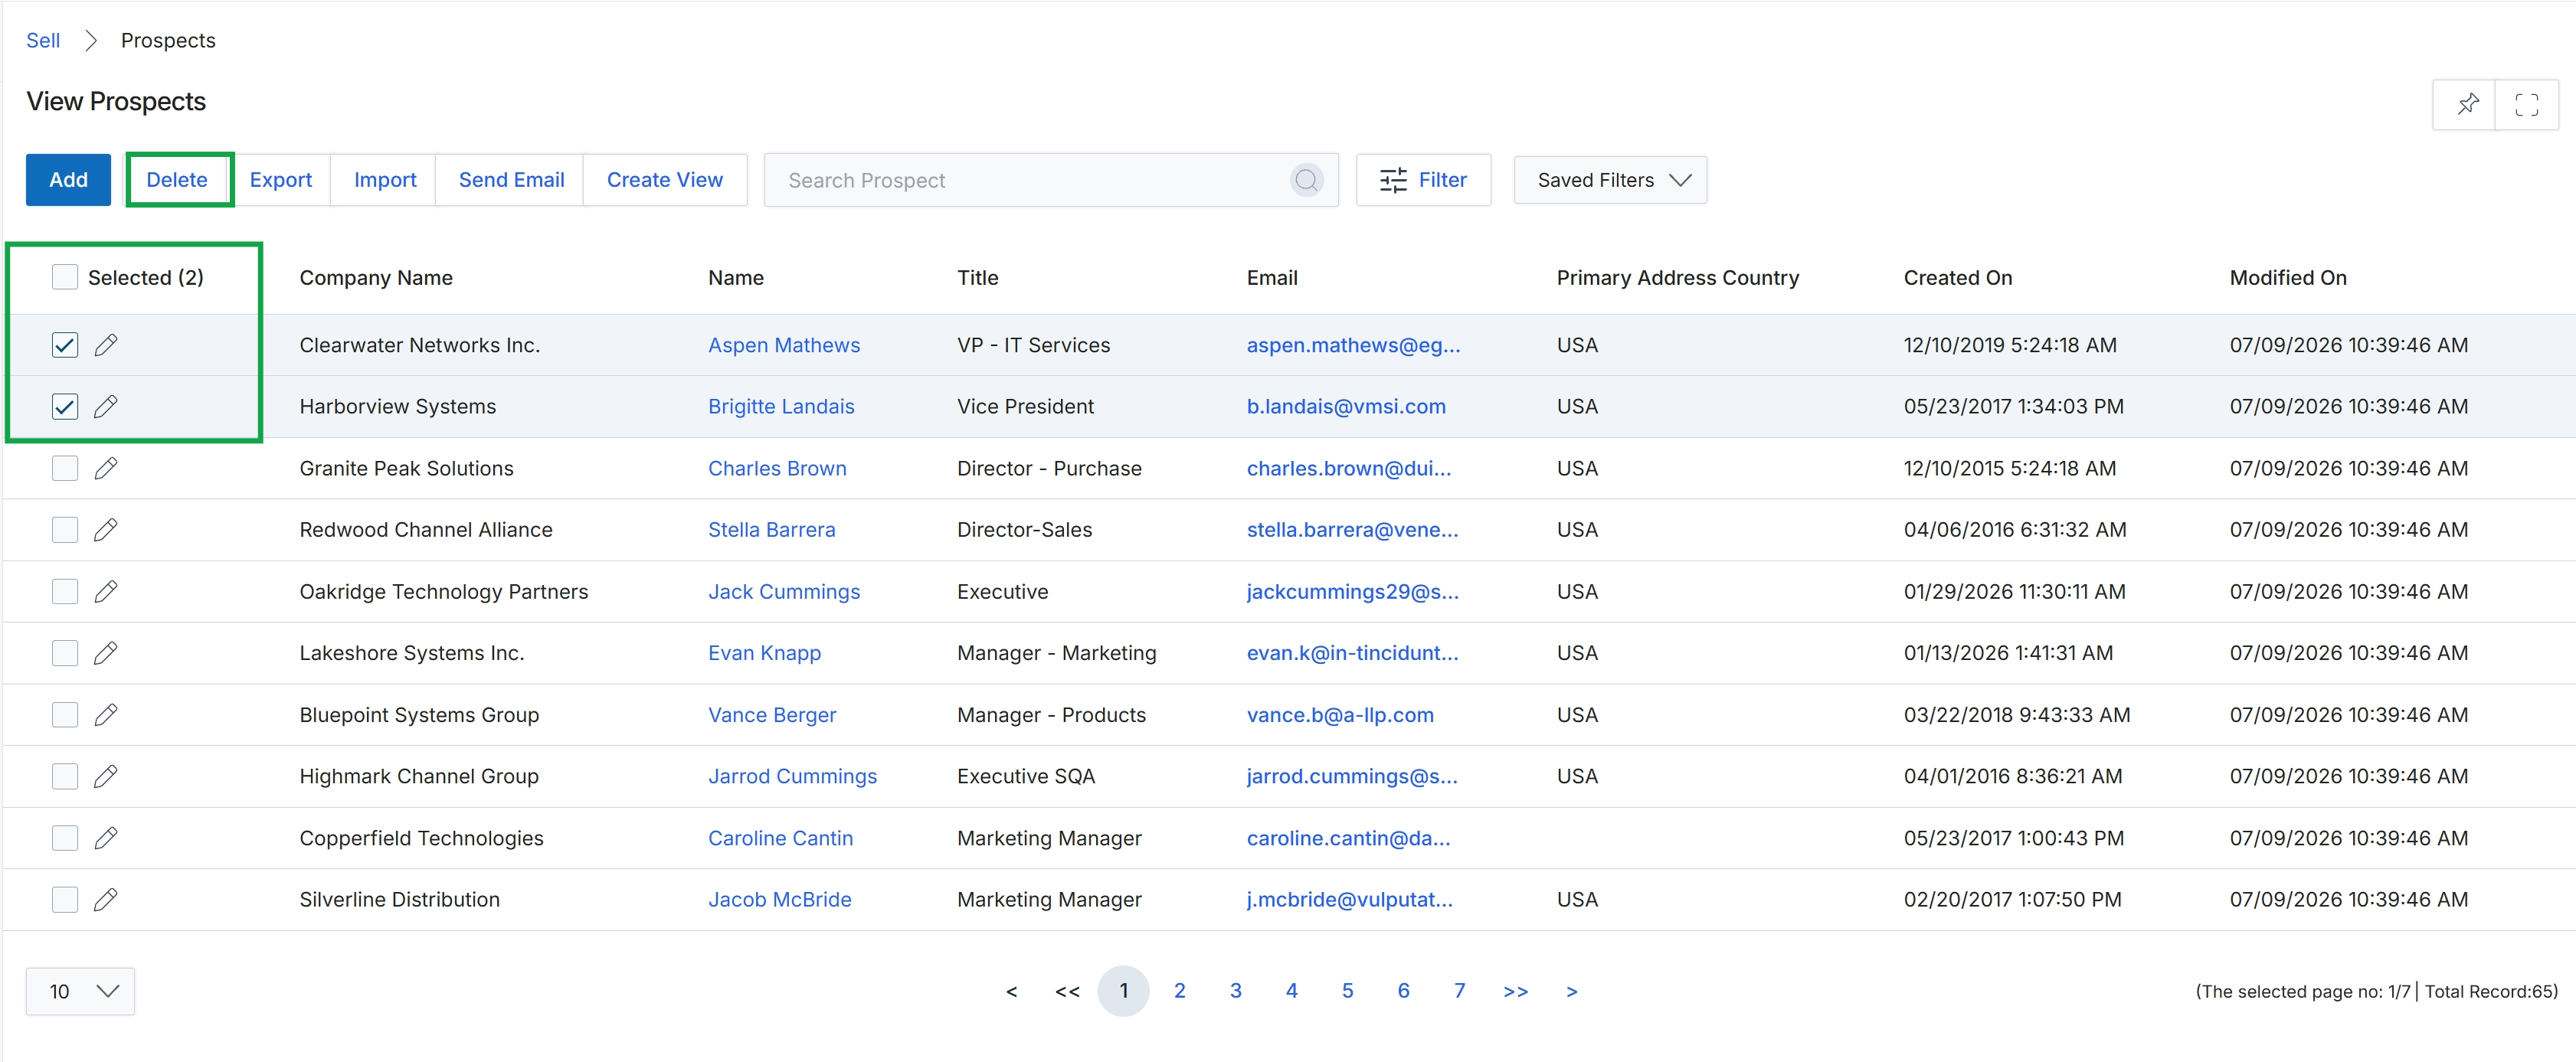
Click Add.
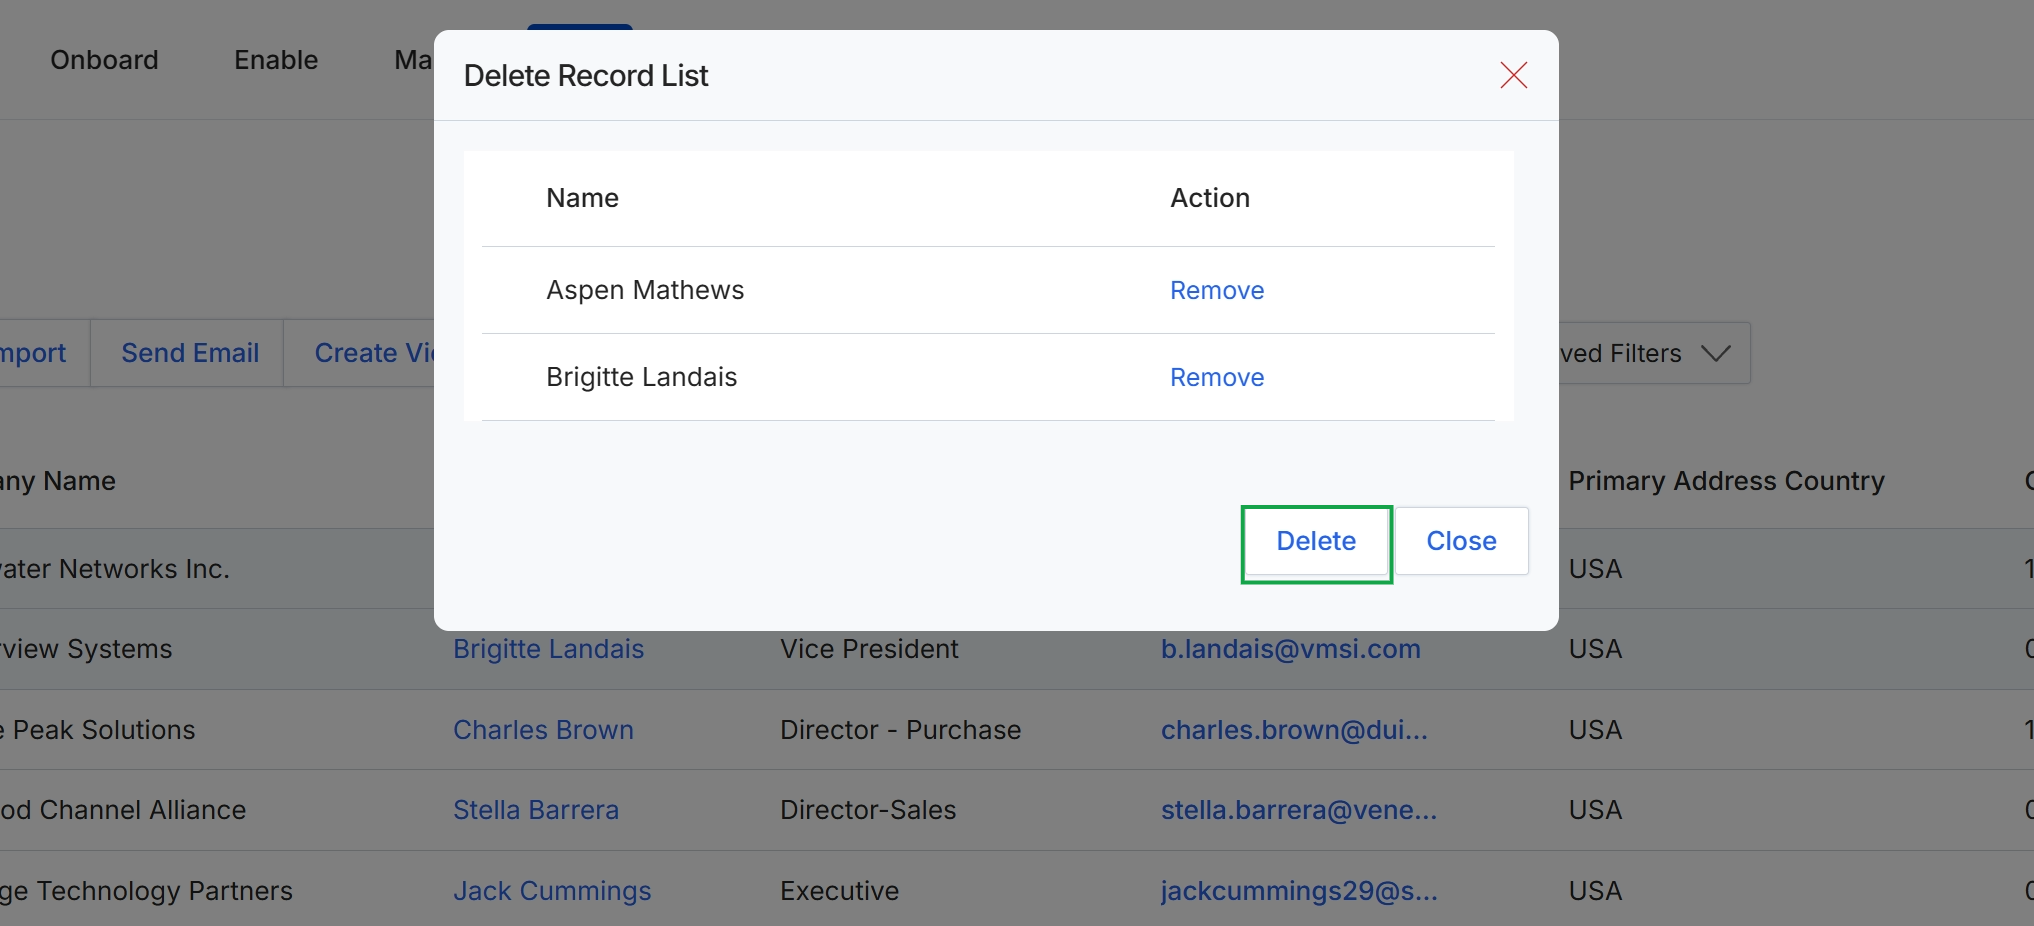
This modal dialog displays a list of selected records that are pending deletion from the module. It provides a final review of the items chosen for removal, allowing administrators to confirm the selection before proceeding with the permanent deletion. Each listed record includes an option to remove it from the current deletion batch, ensuring accuracy before the final action is executed. This step serves as a safeguard in the data management workflow, preventing accidental removal of important information.
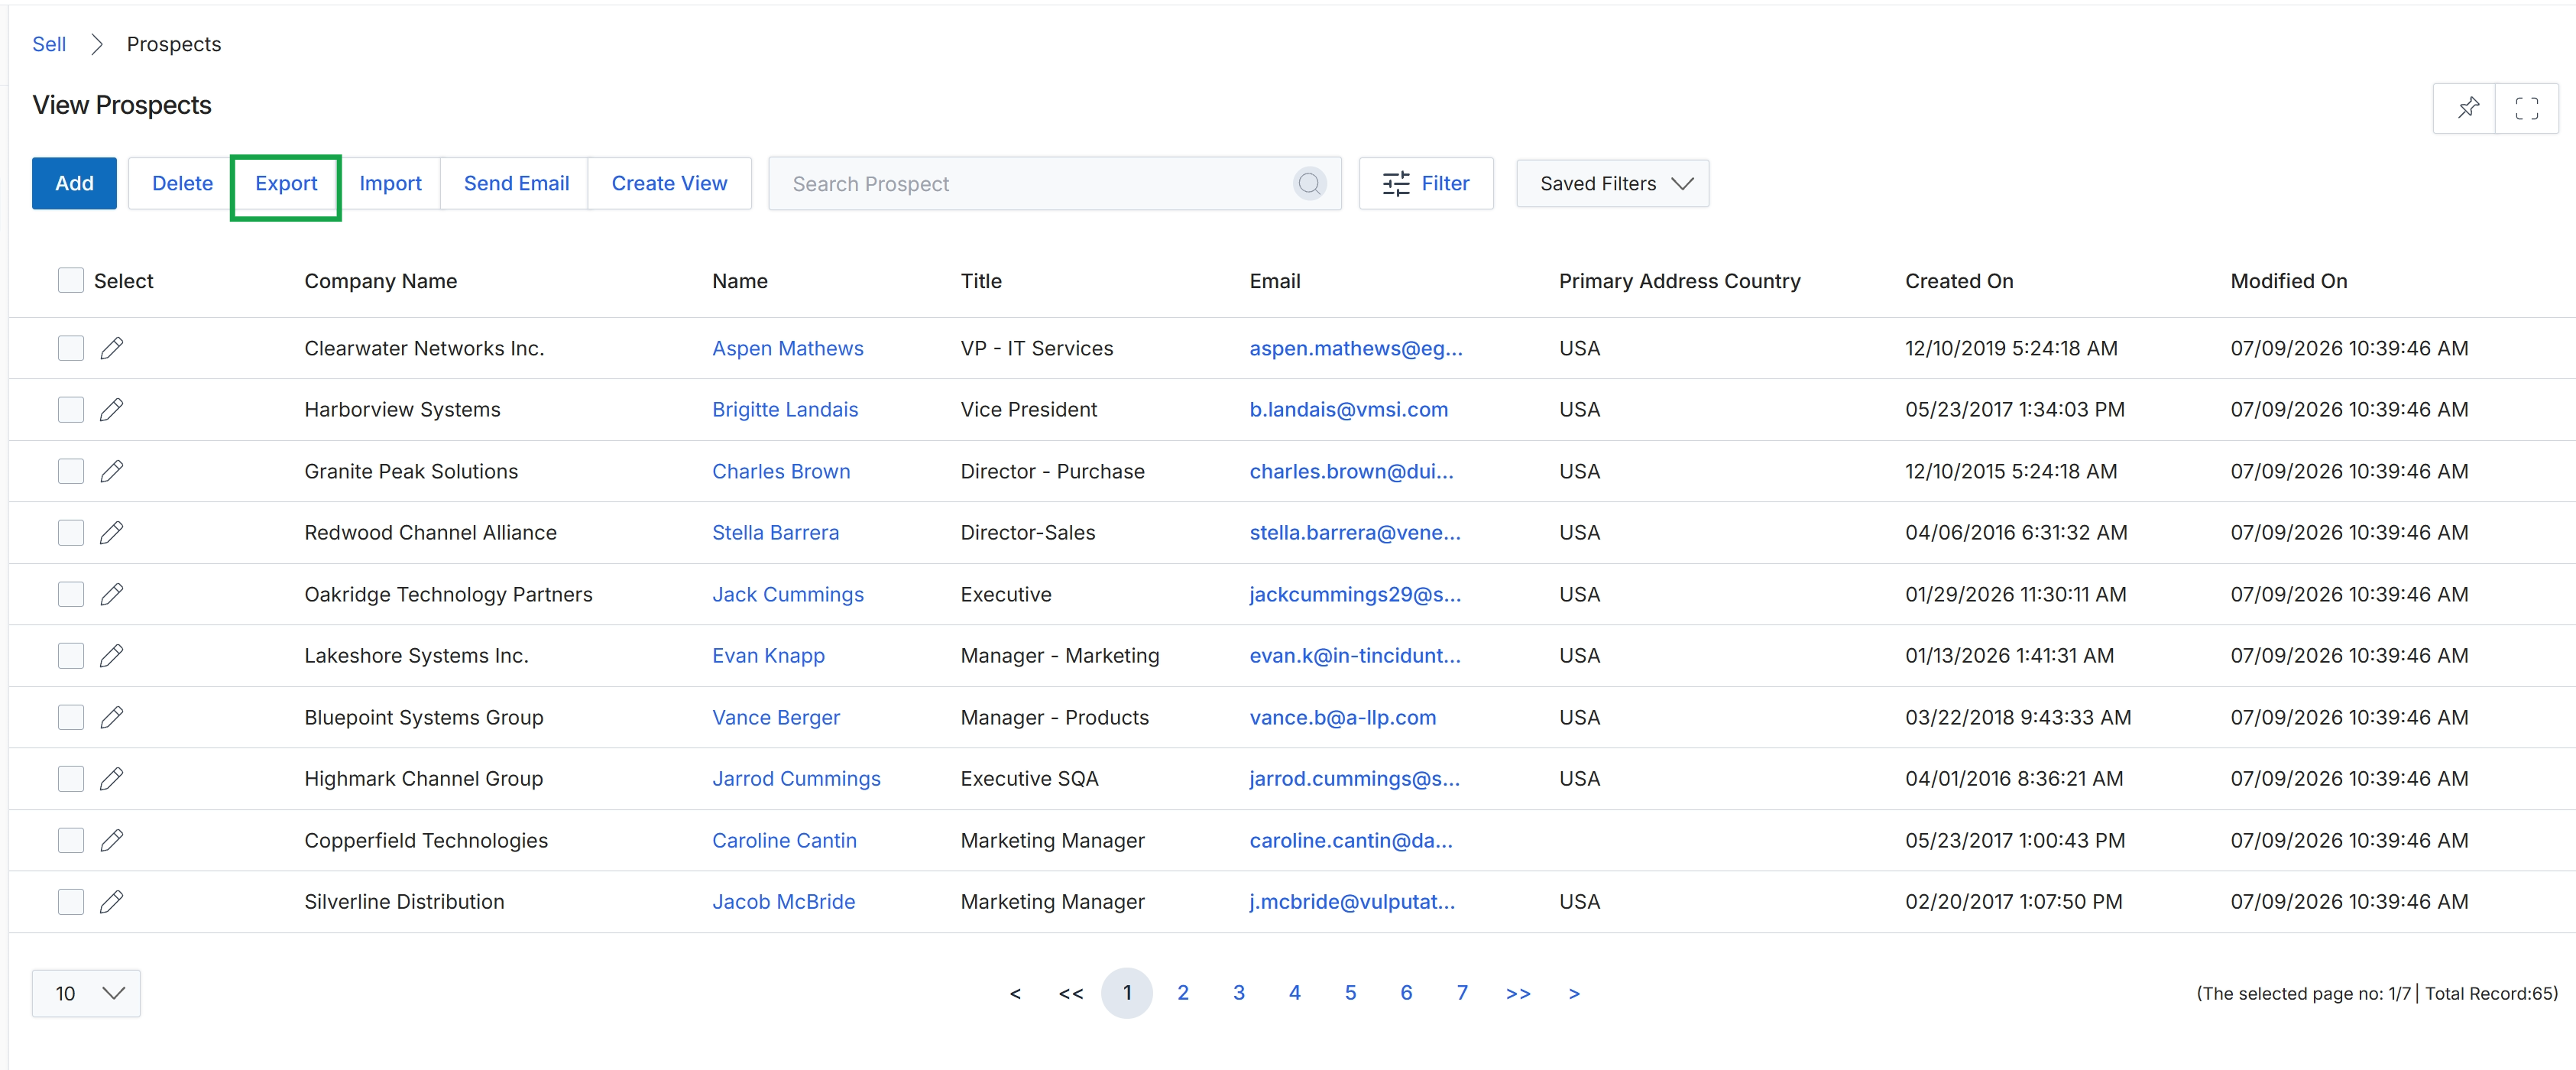
Click the Export button.
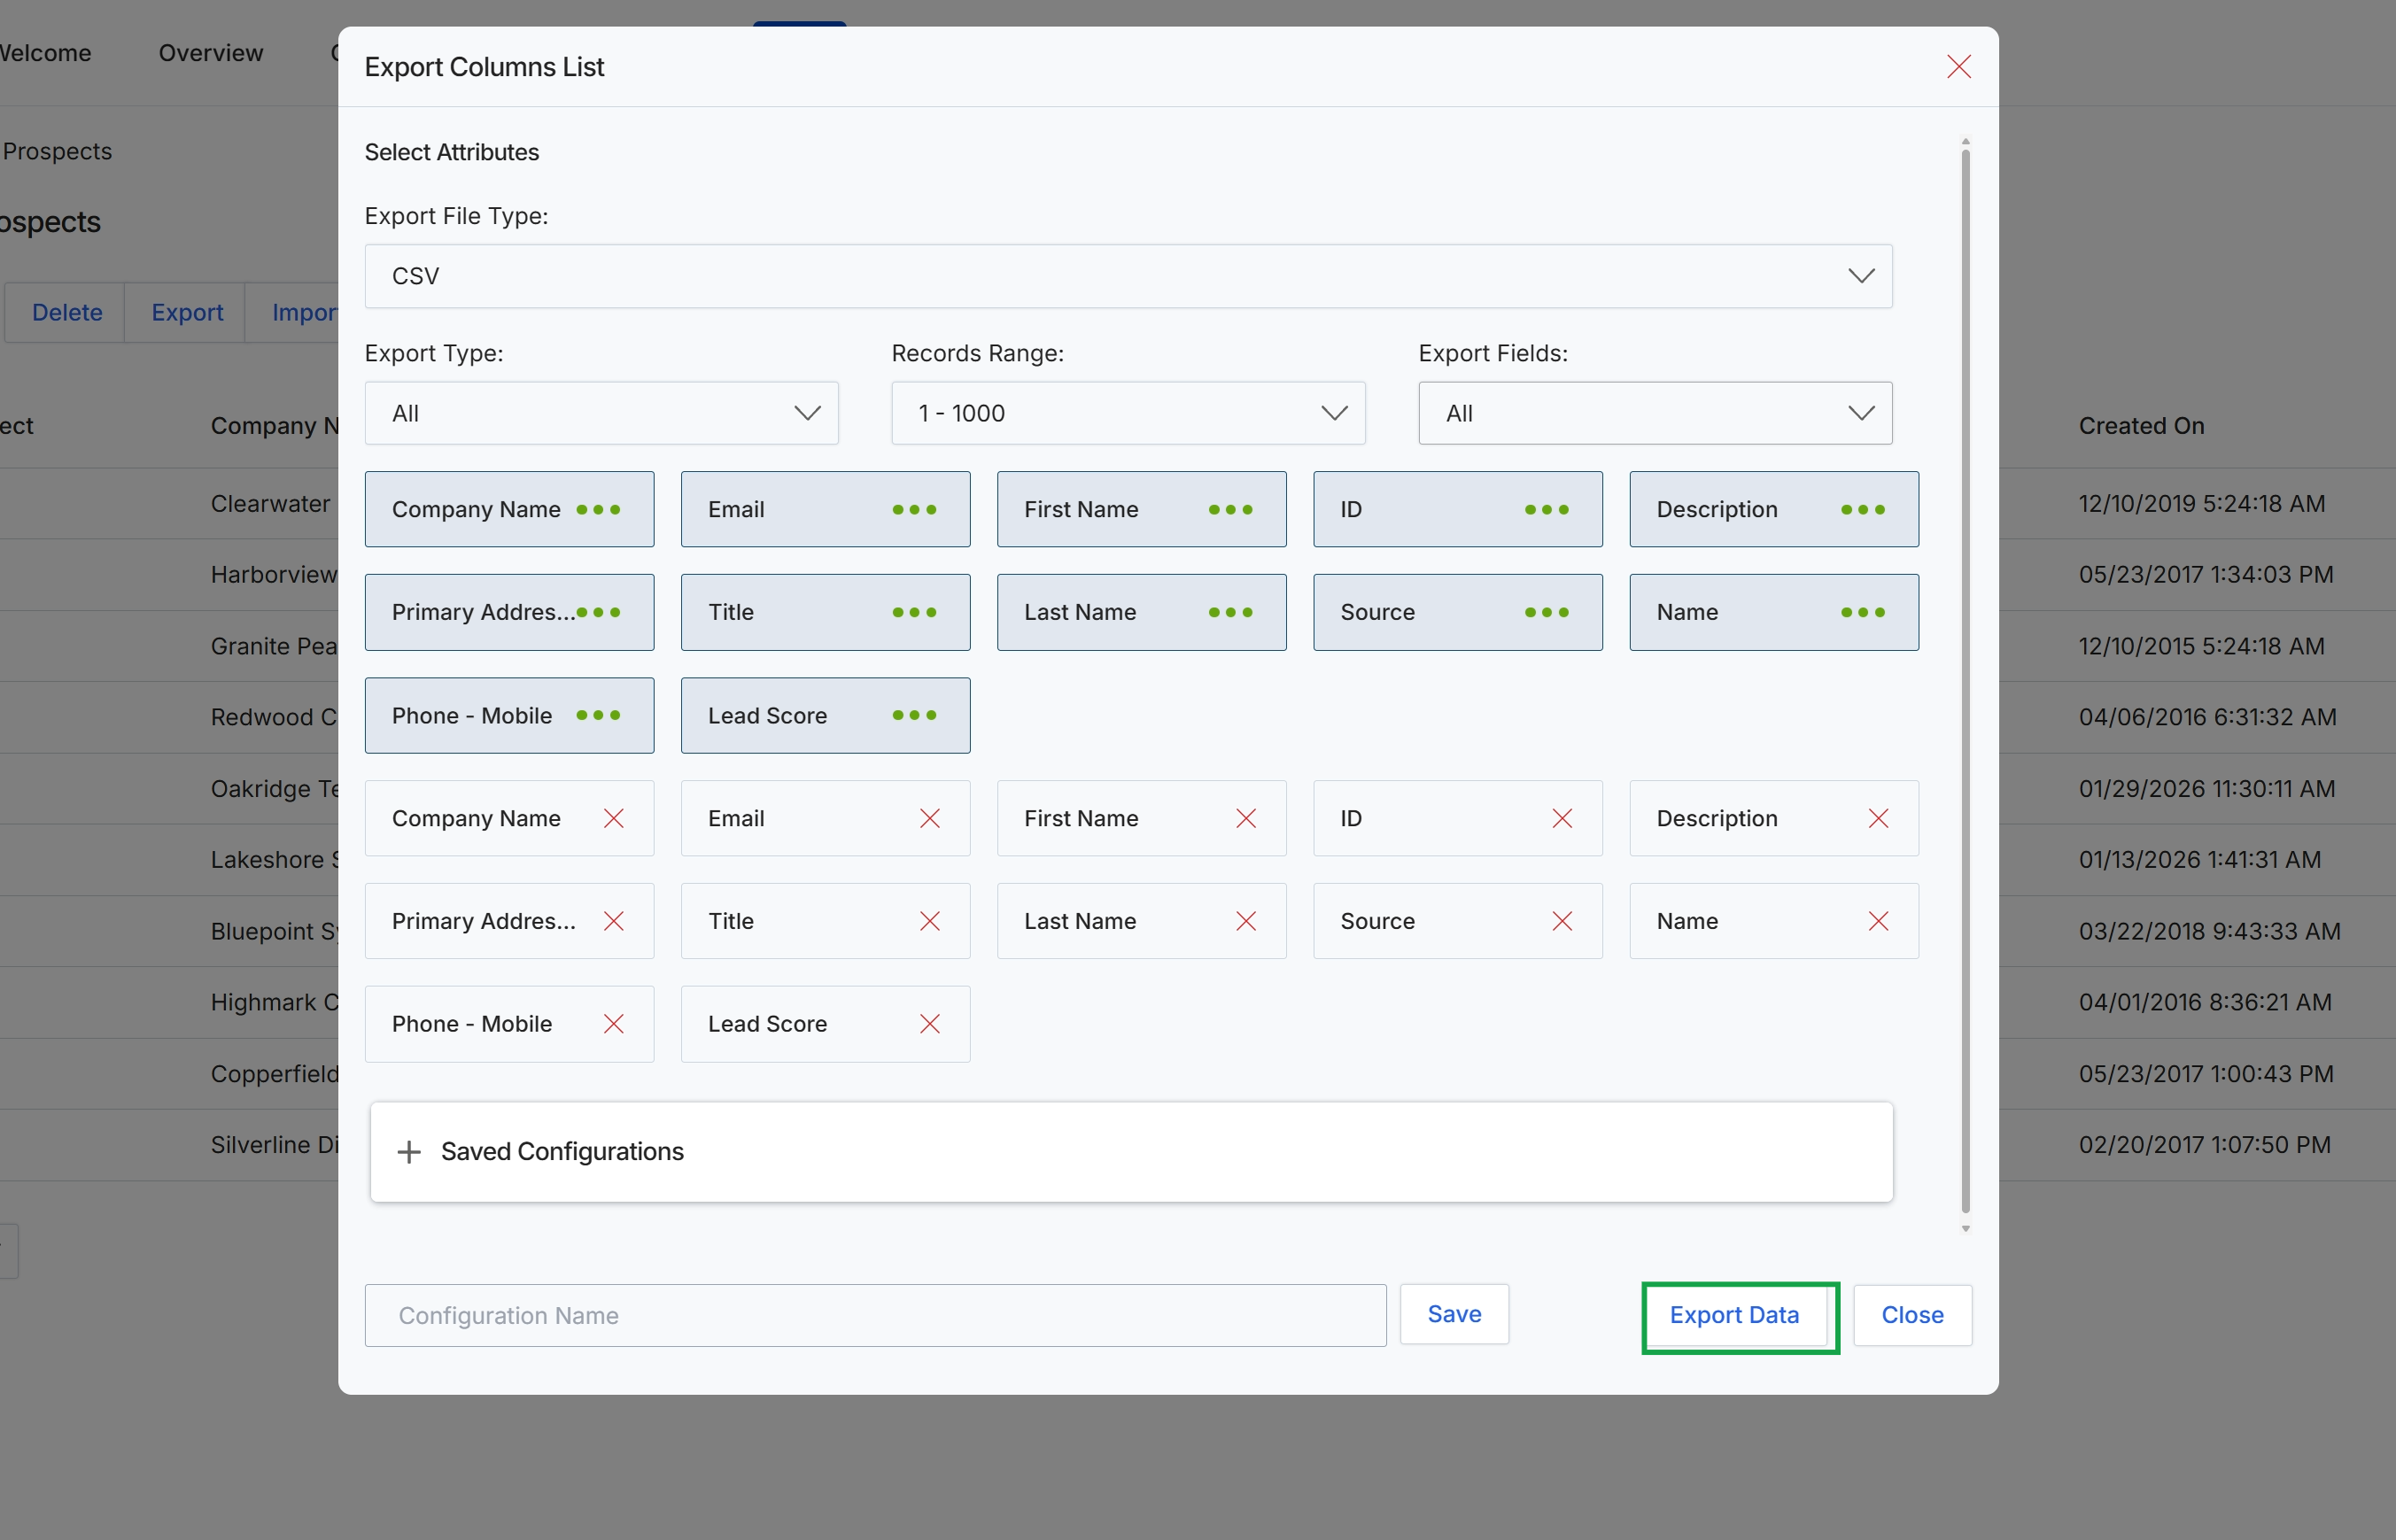
This dialog box, titled 'Export Columns List', provides a mechanism for users to customize and generate data exports from the Prospects list. It allows for the selection of specific prospect attributes (columns) to be included in the export file, configuration of the export file type, and definition of the record range and fields to be exported. This functionality is crucial for data analysis, reporting, or transferring prospect information to external systems, ensuring that only relevant data is extracted in a desired format. Users can also save frequently used export configurations for future convenience.
Click the 'Export Data' button to generate the export file based on the selected attributes and configurations.
Buttons
| Button | Description |
|---|---|
| Save | A button to save the current export configuration for future use. |
| Export Data | A button to initiate the data export process based on the current selections. |
| Close | A button to close the 'Export Columns List' dialog without performing an export. |
Fields
| Field | Description |
|---|---|
| Select Attributes | A section that allows users to choose which prospect attributes (columns) will be included in the export file. The top row displays attributes currently available to be added to the export, while the bottom row shows attributes that have already been selected for export. |
| Export File Type | A dropdown menu to select the desired format for the exported data. 'CSV' is currently selected. |
| Export Type | A dropdown menu to specify the type of export, such as 'All' records or a filtered subset. |
| Records Range | A field indicating the range of records to be included in the export, currently set to '1 - 1000'. |
| Export Fields | A dropdown menu to filter the fields to be exported, currently set to 'All'. |
| Saved Configurations | An expandable section to view or manage previously saved export configurations. |
| Configuration Name | A text input field to enter a name for saving the current export configuration. |
Importing Prospect Data
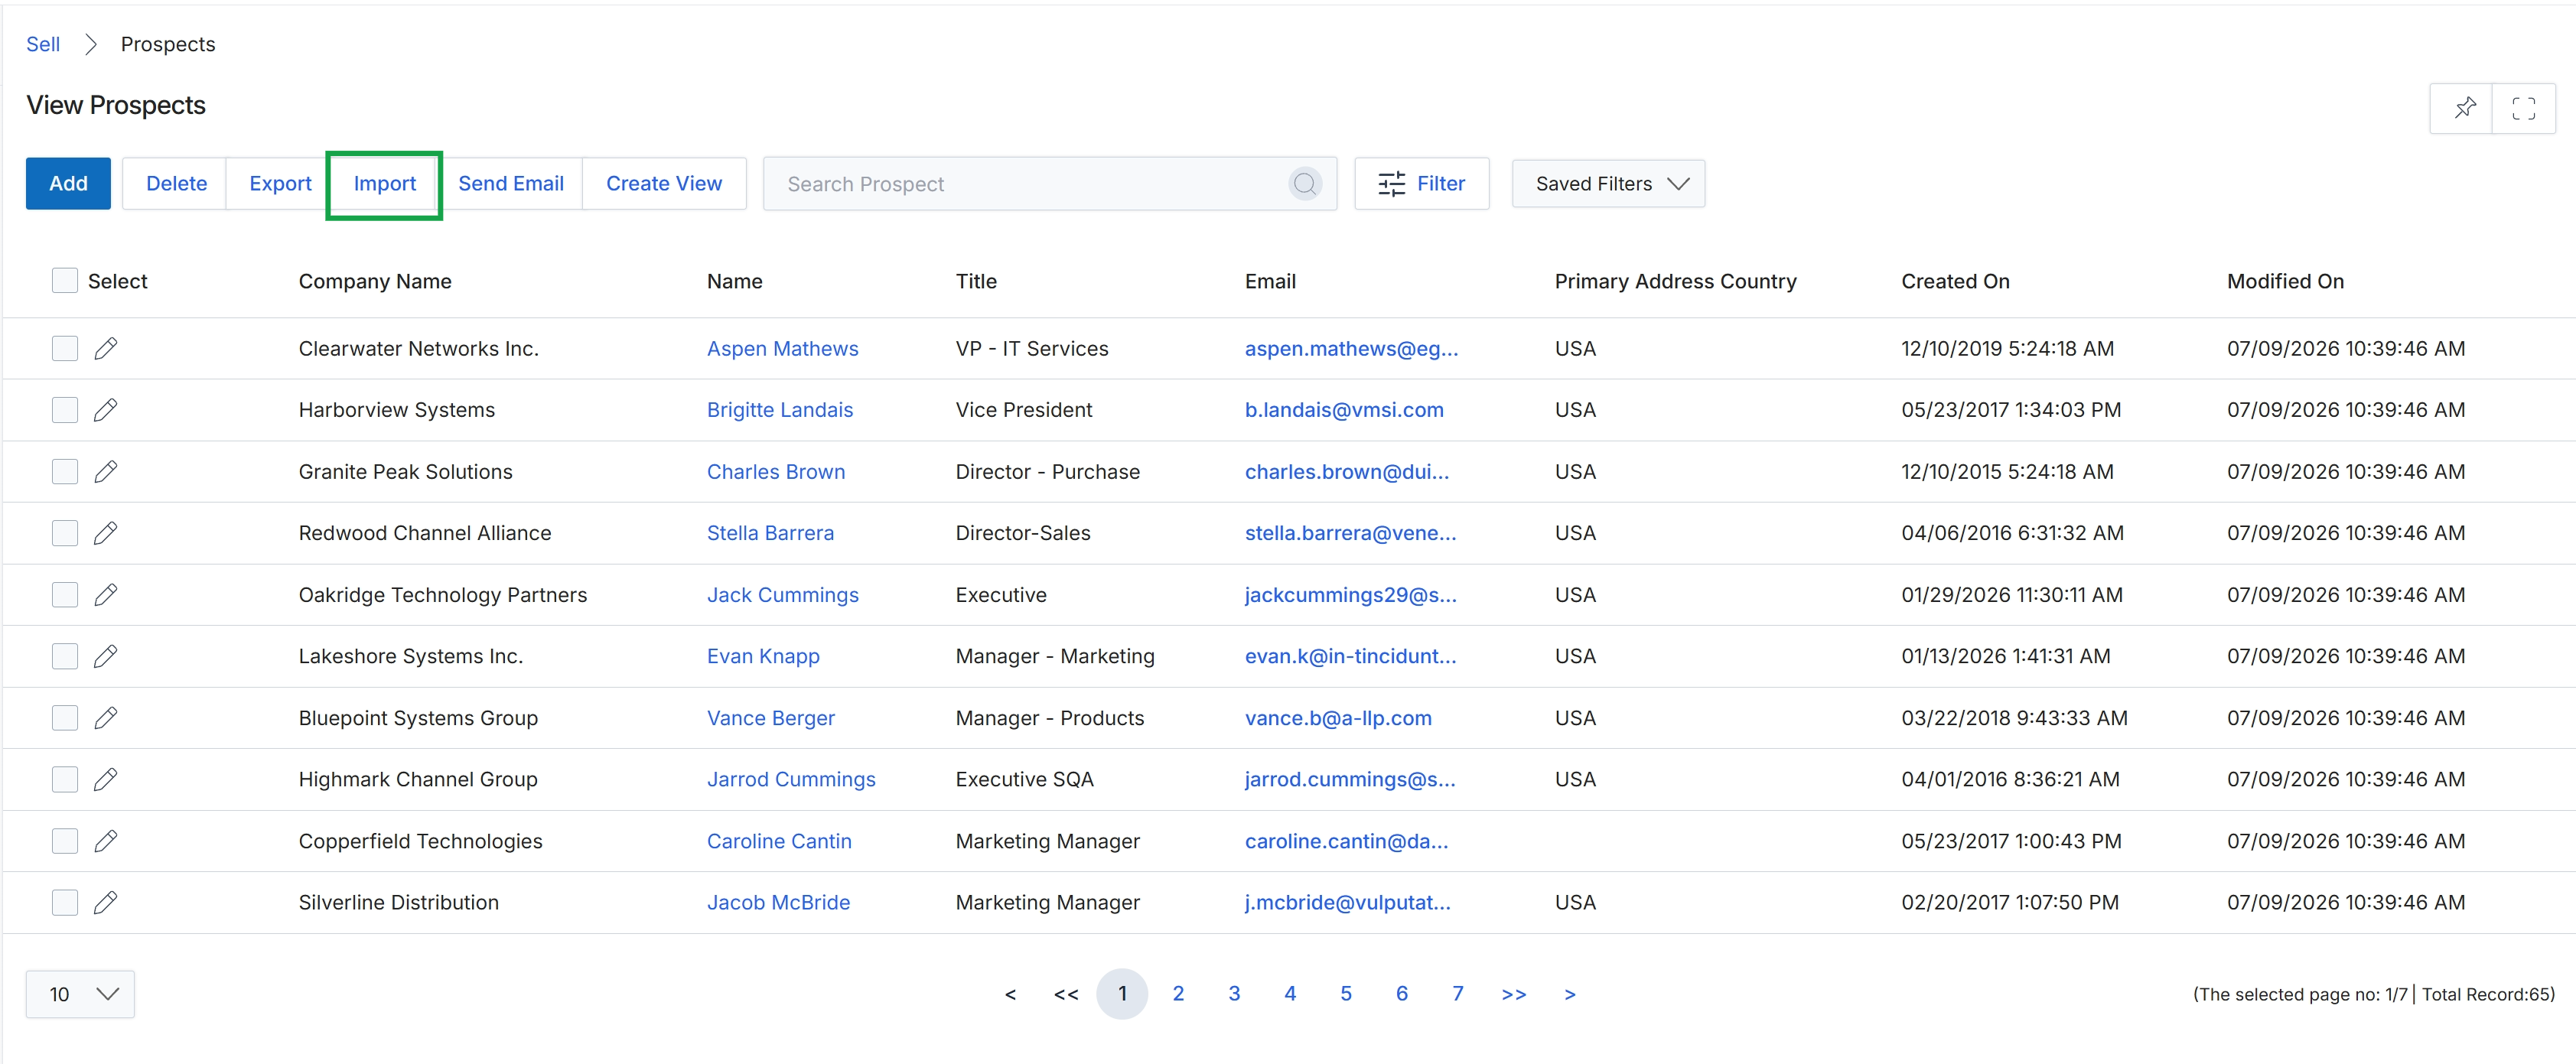
Click Import.
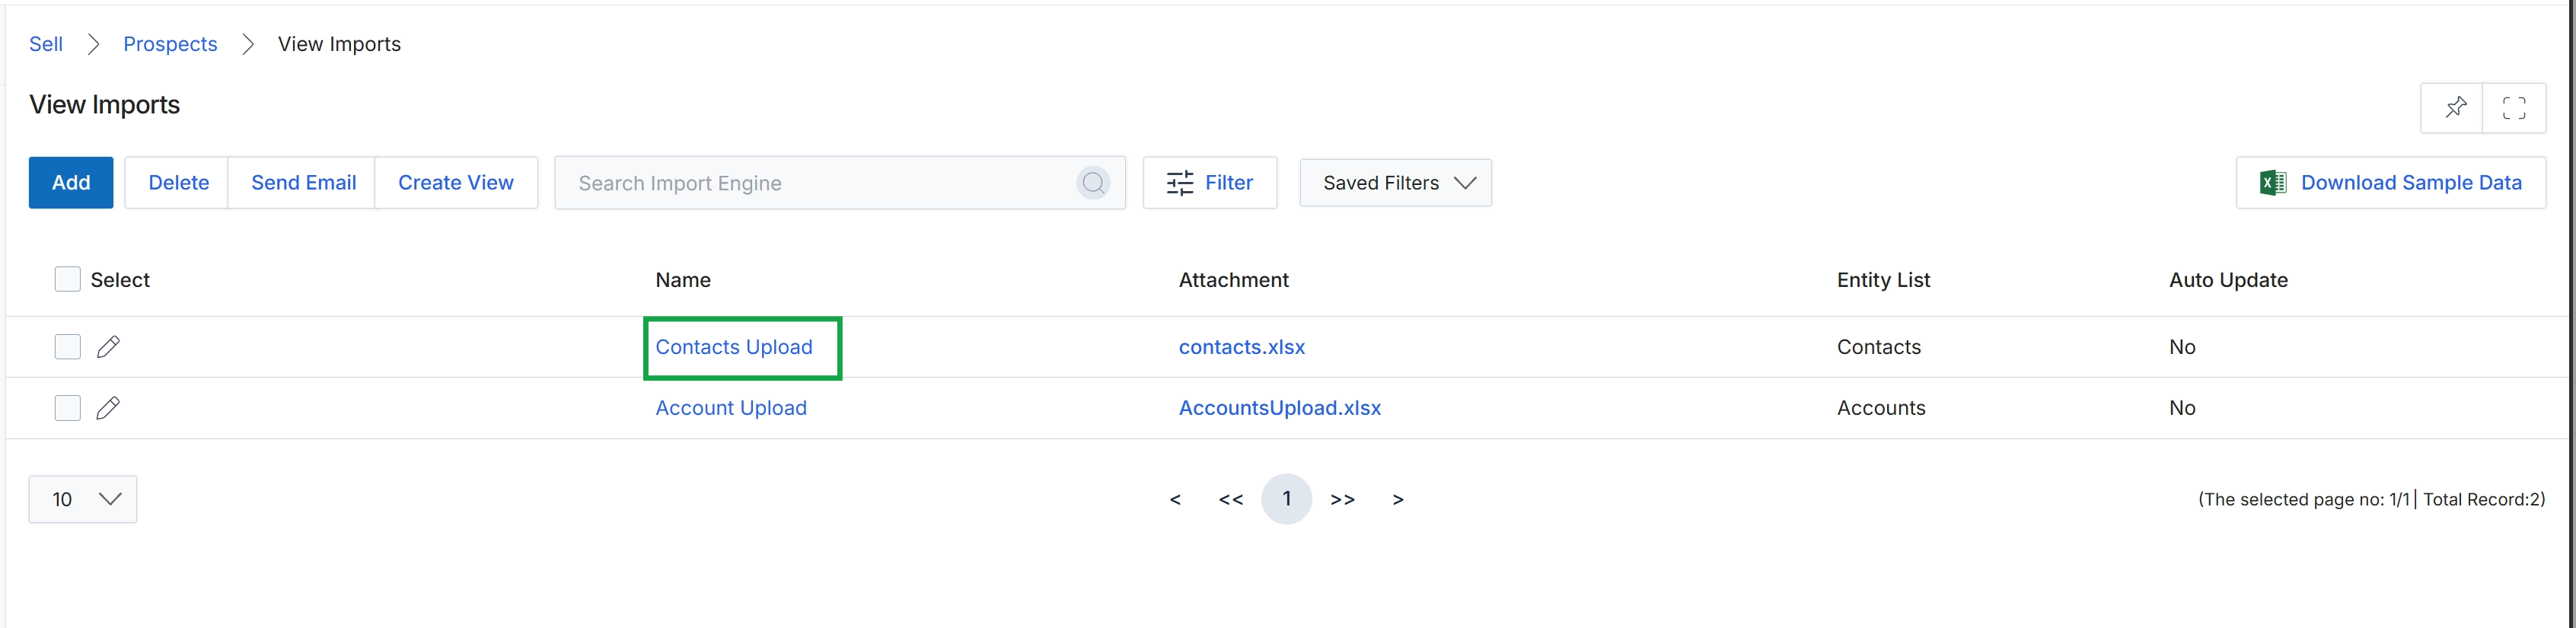
The View Imports screen provides a centralized list of all data import jobs within the UPM, specifically for entities like Prospects, Contacts, or Accounts. This screen allows administrators to monitor the status of past imports, initiate new ones, and manage the associated import files. It serves as a crucial tool for populating the platform with external data, such as prospect lists or account information, which can originate from various sources including CRM systems or spreadsheets. Each entry in the list represents a distinct import operation, detailing its name, the attached file, the entity type being imported, and whether it's set for auto-update.
Click the 'Contacts Upload' link to view the details of that specific import job.
Buttons
| Button | Description |
|---|---|
| Add | Initiates a new data import process, allowing users to upload a file and configure import settings. |
| Delete | Deletes the selected import job(s) from the list. |
| Send Email | Sends an email related to the selected import job, possibly for notification or status updates. |
| Create View | Allows users to create and save custom filtered views of the import list. |
| Filter | Opens a panel to apply advanced filters to the list of import jobs. |
| Download Sample Data | Downloads a sample Excel file template to guide users on the correct format for data imports. |
Fields
| Field | Description |
|---|---|
| Search Import Engine | A search bar to find specific import jobs by keywords. |
| Saved Filters | A dropdown to select and apply previously saved filter configurations. |
Column Headings
| Column | Description |
|---|---|
| Select | Checkbox to select individual import jobs for bulk actions. |
| Name | The name assigned to the import job, which can be clicked to view detailed information about that specific import. |
| Attachment | The filename of the data file that was uploaded for the import. |
| Entity List | Indicates the type of entity (e.g., Contacts, Accounts) that was imported or is targeted by the import job. |
| Auto Update | Indicates whether the import job is configured to automatically update records based on the source data. |
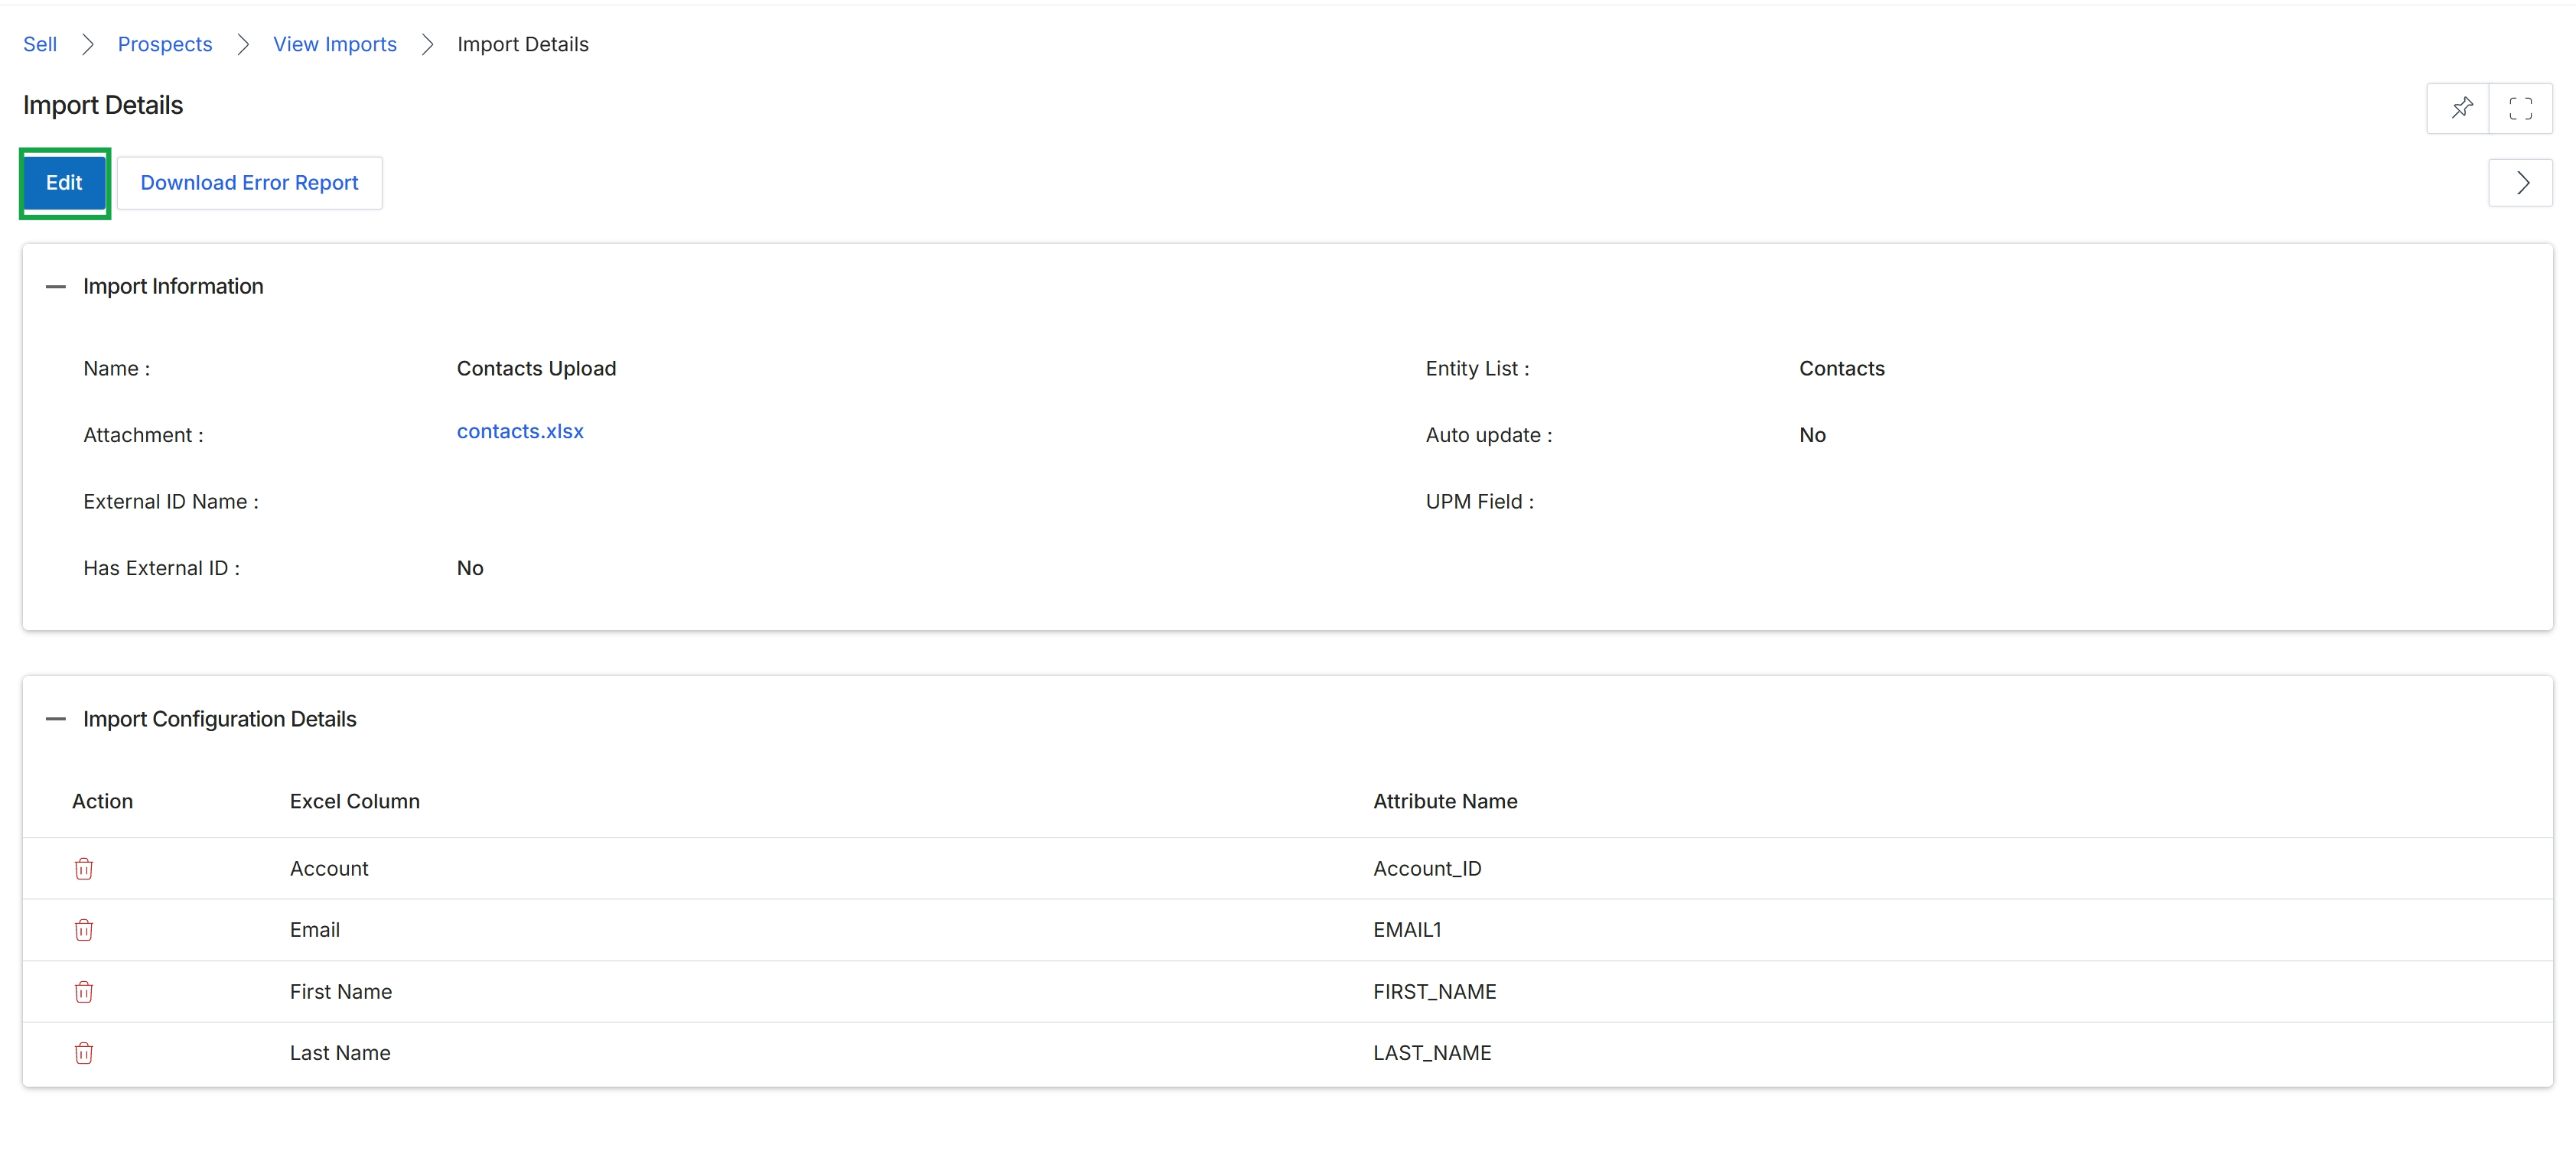
This screen provides a detailed overview of a specific import job, displaying both general import information and the configuration details for how data columns from the source file were mapped to platform attributes. It serves as a record of past import operations, allowing administrators to review the parameters used for data ingestion, such as the source file, the target entity (e.g., Contacts), and whether the import was configured for auto-update. The 'Import Configuration Details' section is crucial for understanding the mapping logic applied during the import, showing which Excel columns corresponded to which platform attributes. This view helps in auditing data imports and troubleshooting any discrepancies by providing a clear reference of the import's setup.
Click the 'Edit' button to modify the details or configuration of this import job.
Buttons
| Button | Description |
|---|---|
| Edit | Initiates the editing process for the import job's details and configuration. |
| Download Error Report | Downloads a report detailing any errors encountered during the import process, which can be used for troubleshooting. |
Import Information
| Field | Description |
|---|---|
| Name | The name assigned to this specific import job. |
| Attachment | The name of the Excel file that was uploaded for this import. |
| External ID Name | The name of the external identifier used for this import, if applicable. |
| Has External ID | Indicates whether the imported data includes an external identifier. |
| Entity List | The type of entity (e.g., Contacts) that was imported. |
| Auto update | Indicates whether this import job is configured to automatically update existing records. |
| UPM Field | The specific platform field associated with the import, if applicable. |
Import Configuration Details
| Column | Description |
|---|---|
| Action | Allows removal of a specific field mapping from the import configuration. |
| Excel Column | The name of the column from the uploaded Excel file. |
| Attribute Name | The corresponding attribute name in the platform to which the Excel column was mapped. |
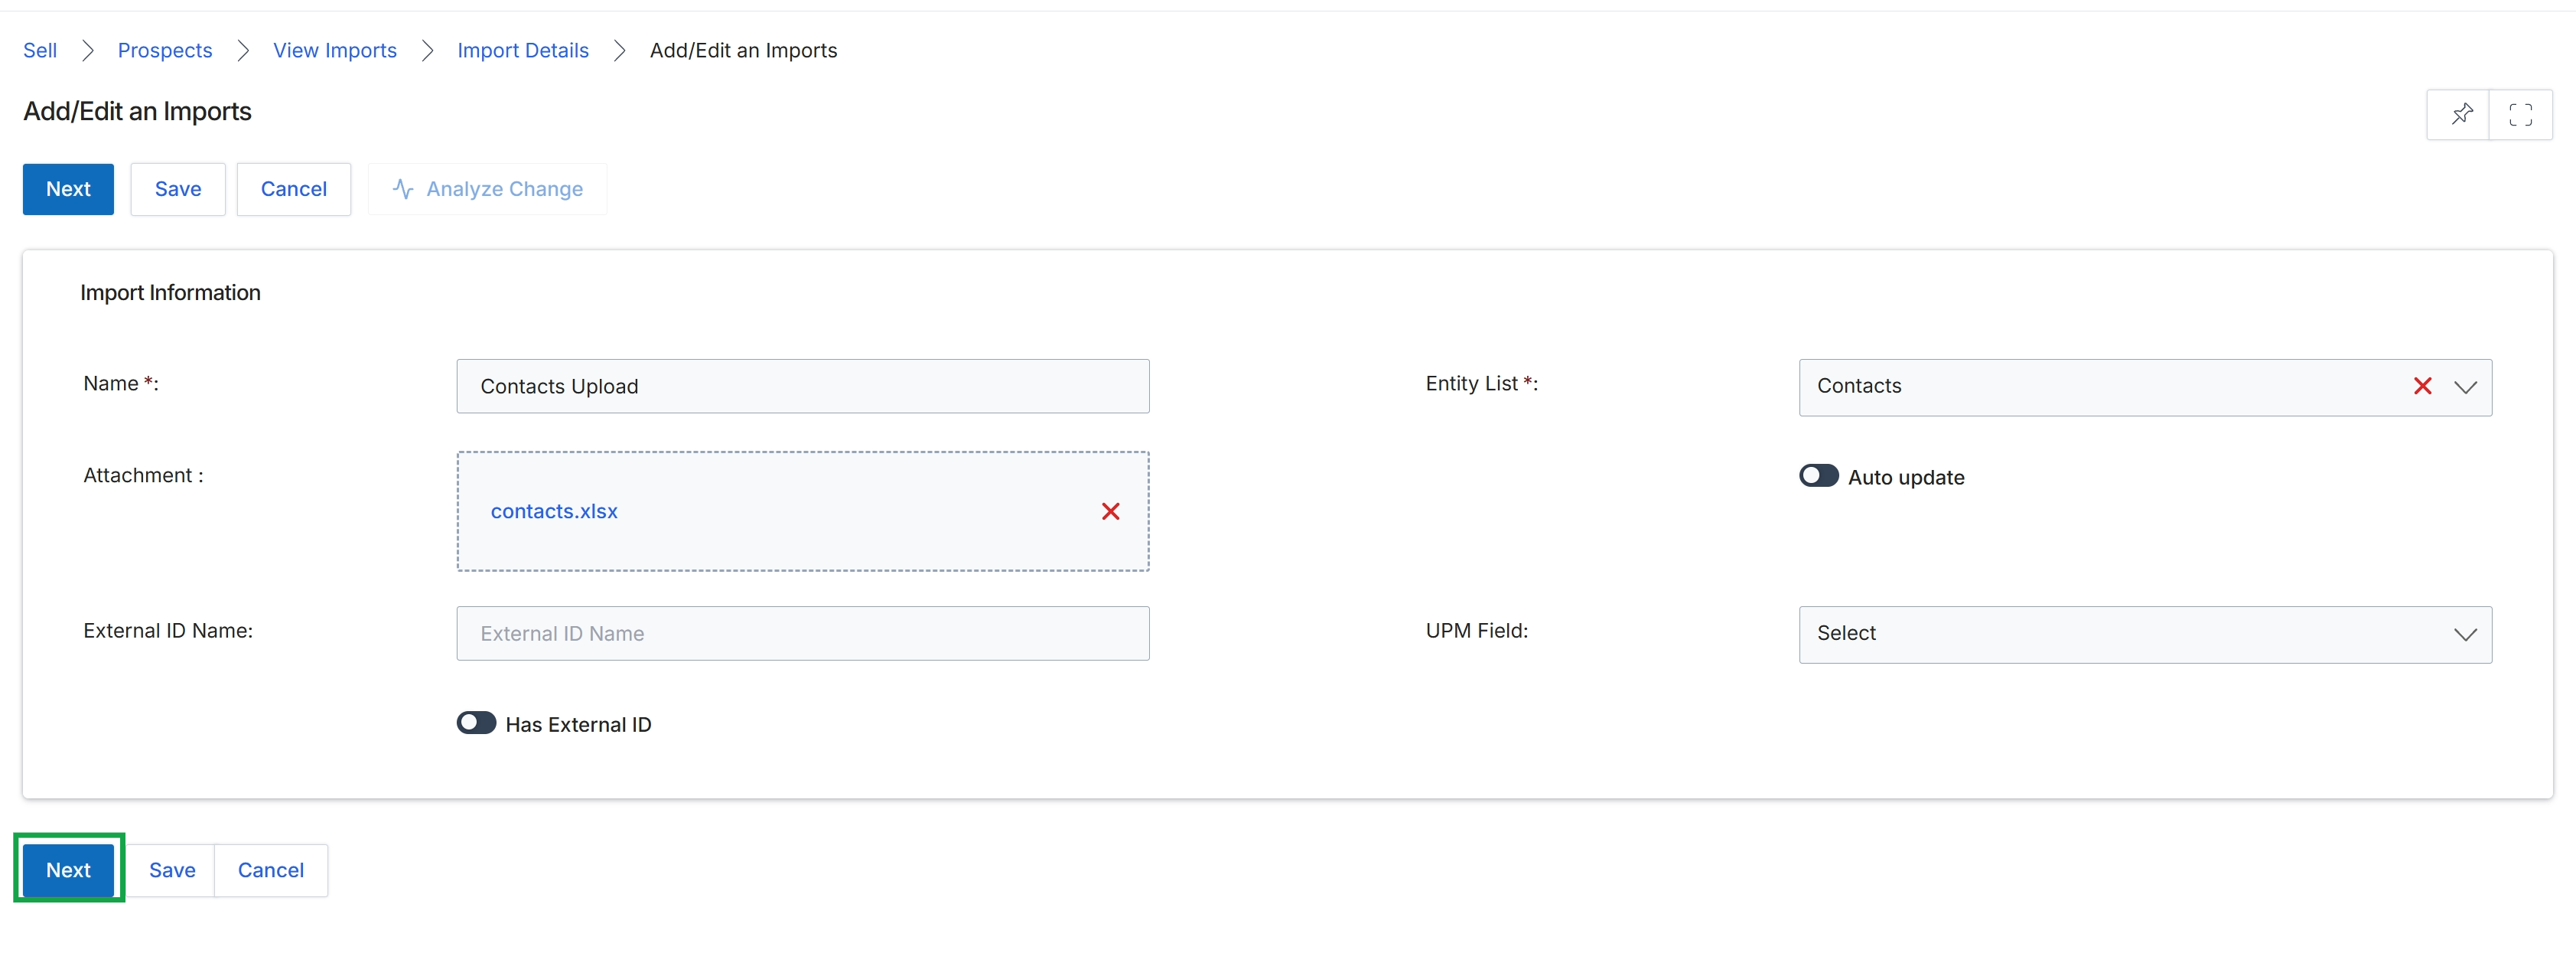
Click the Next button.
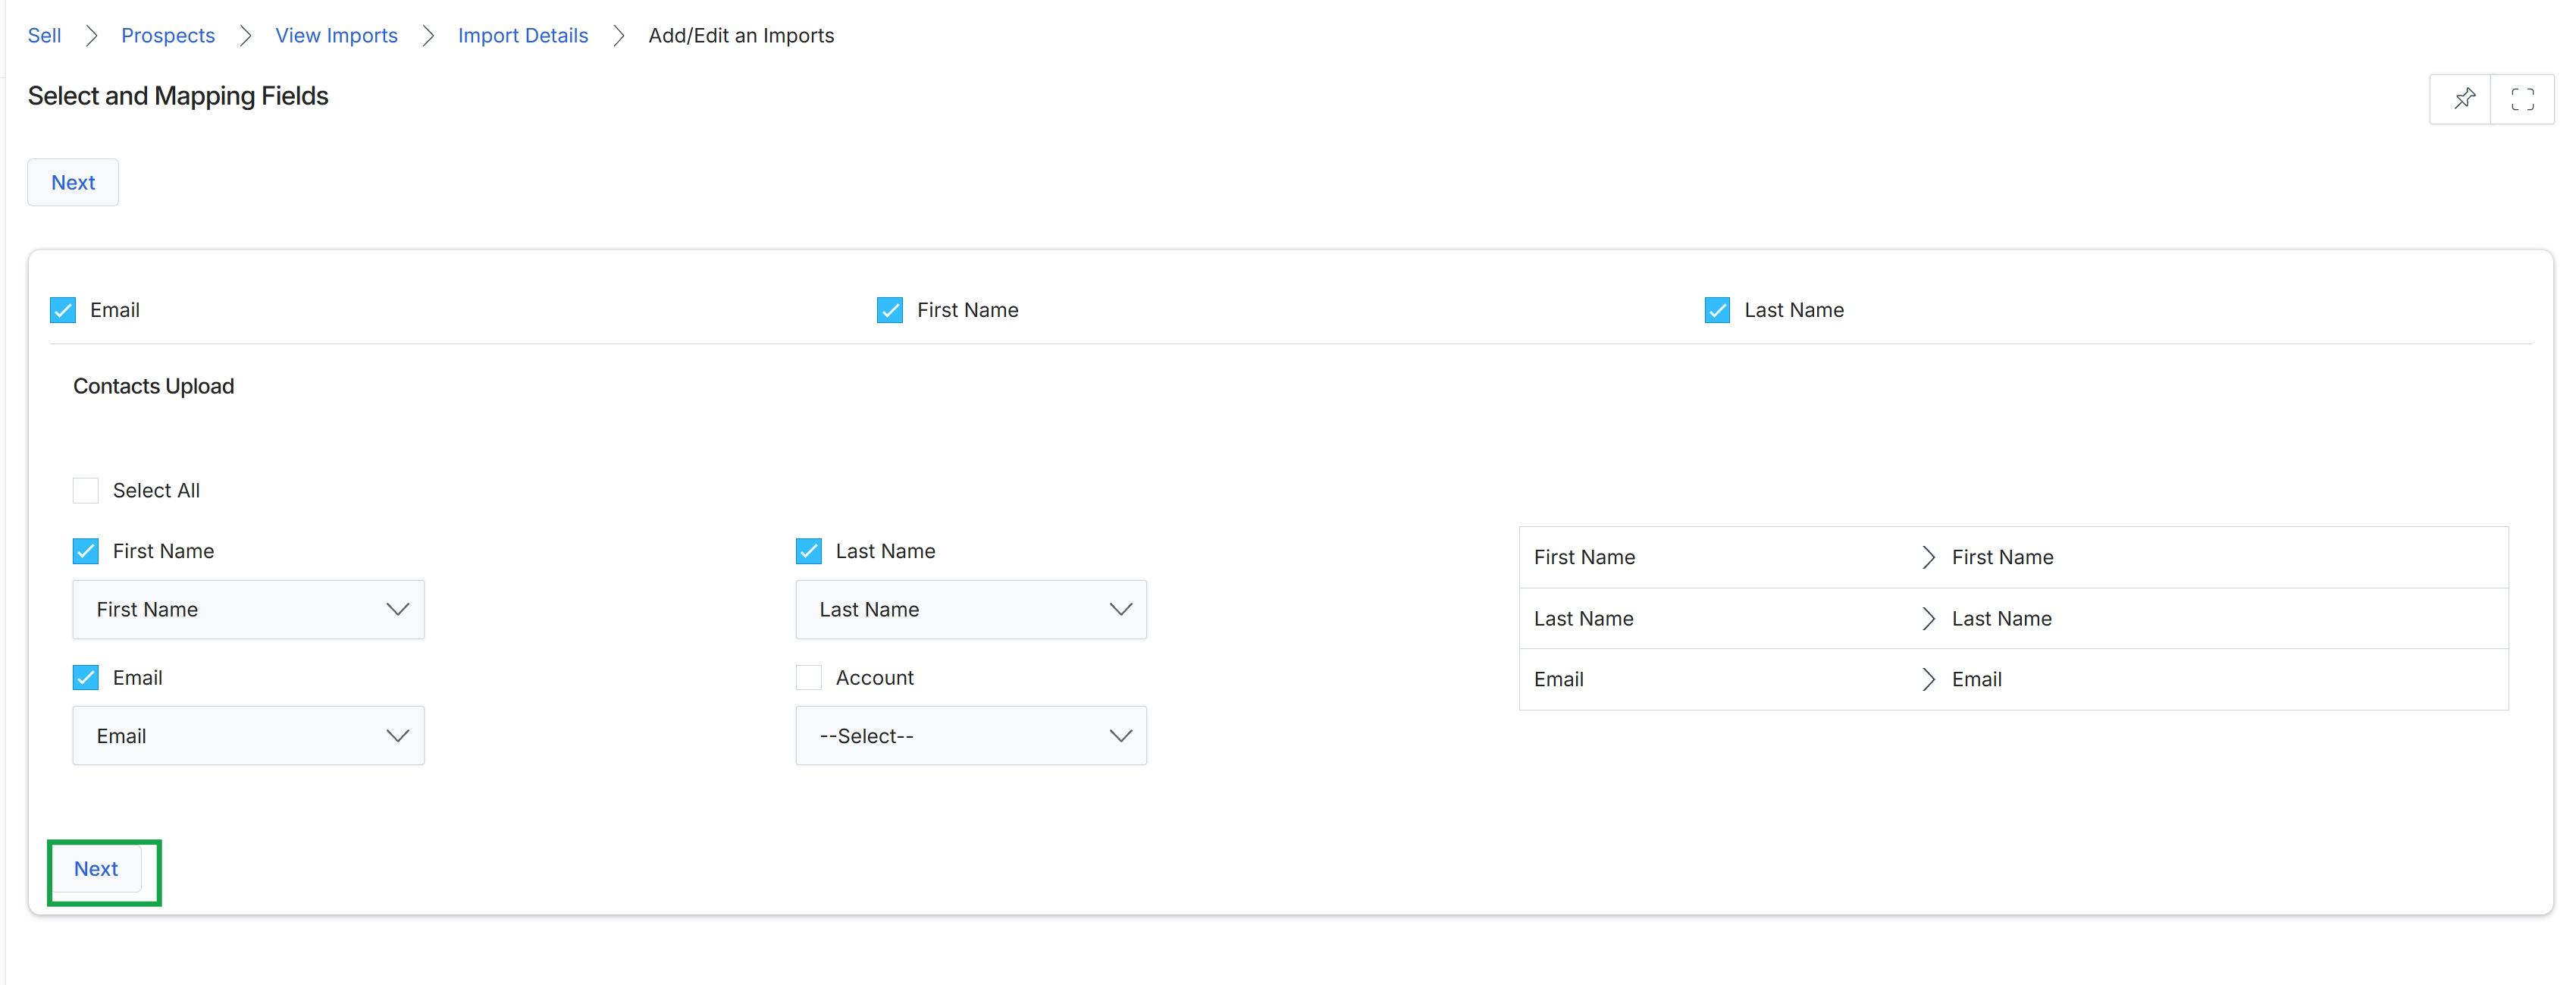
This screen displays the interface for mapping fields during a prospect import process within the Sell module. It allows administrators to align the columns from an uploaded contact file with the corresponding data fields in the platform, ensuring that imported prospect information such as first name, last name, and email is correctly categorized and stored. This step is crucial for accurately populating the prospect database and maintaining data integrity after an import operation.
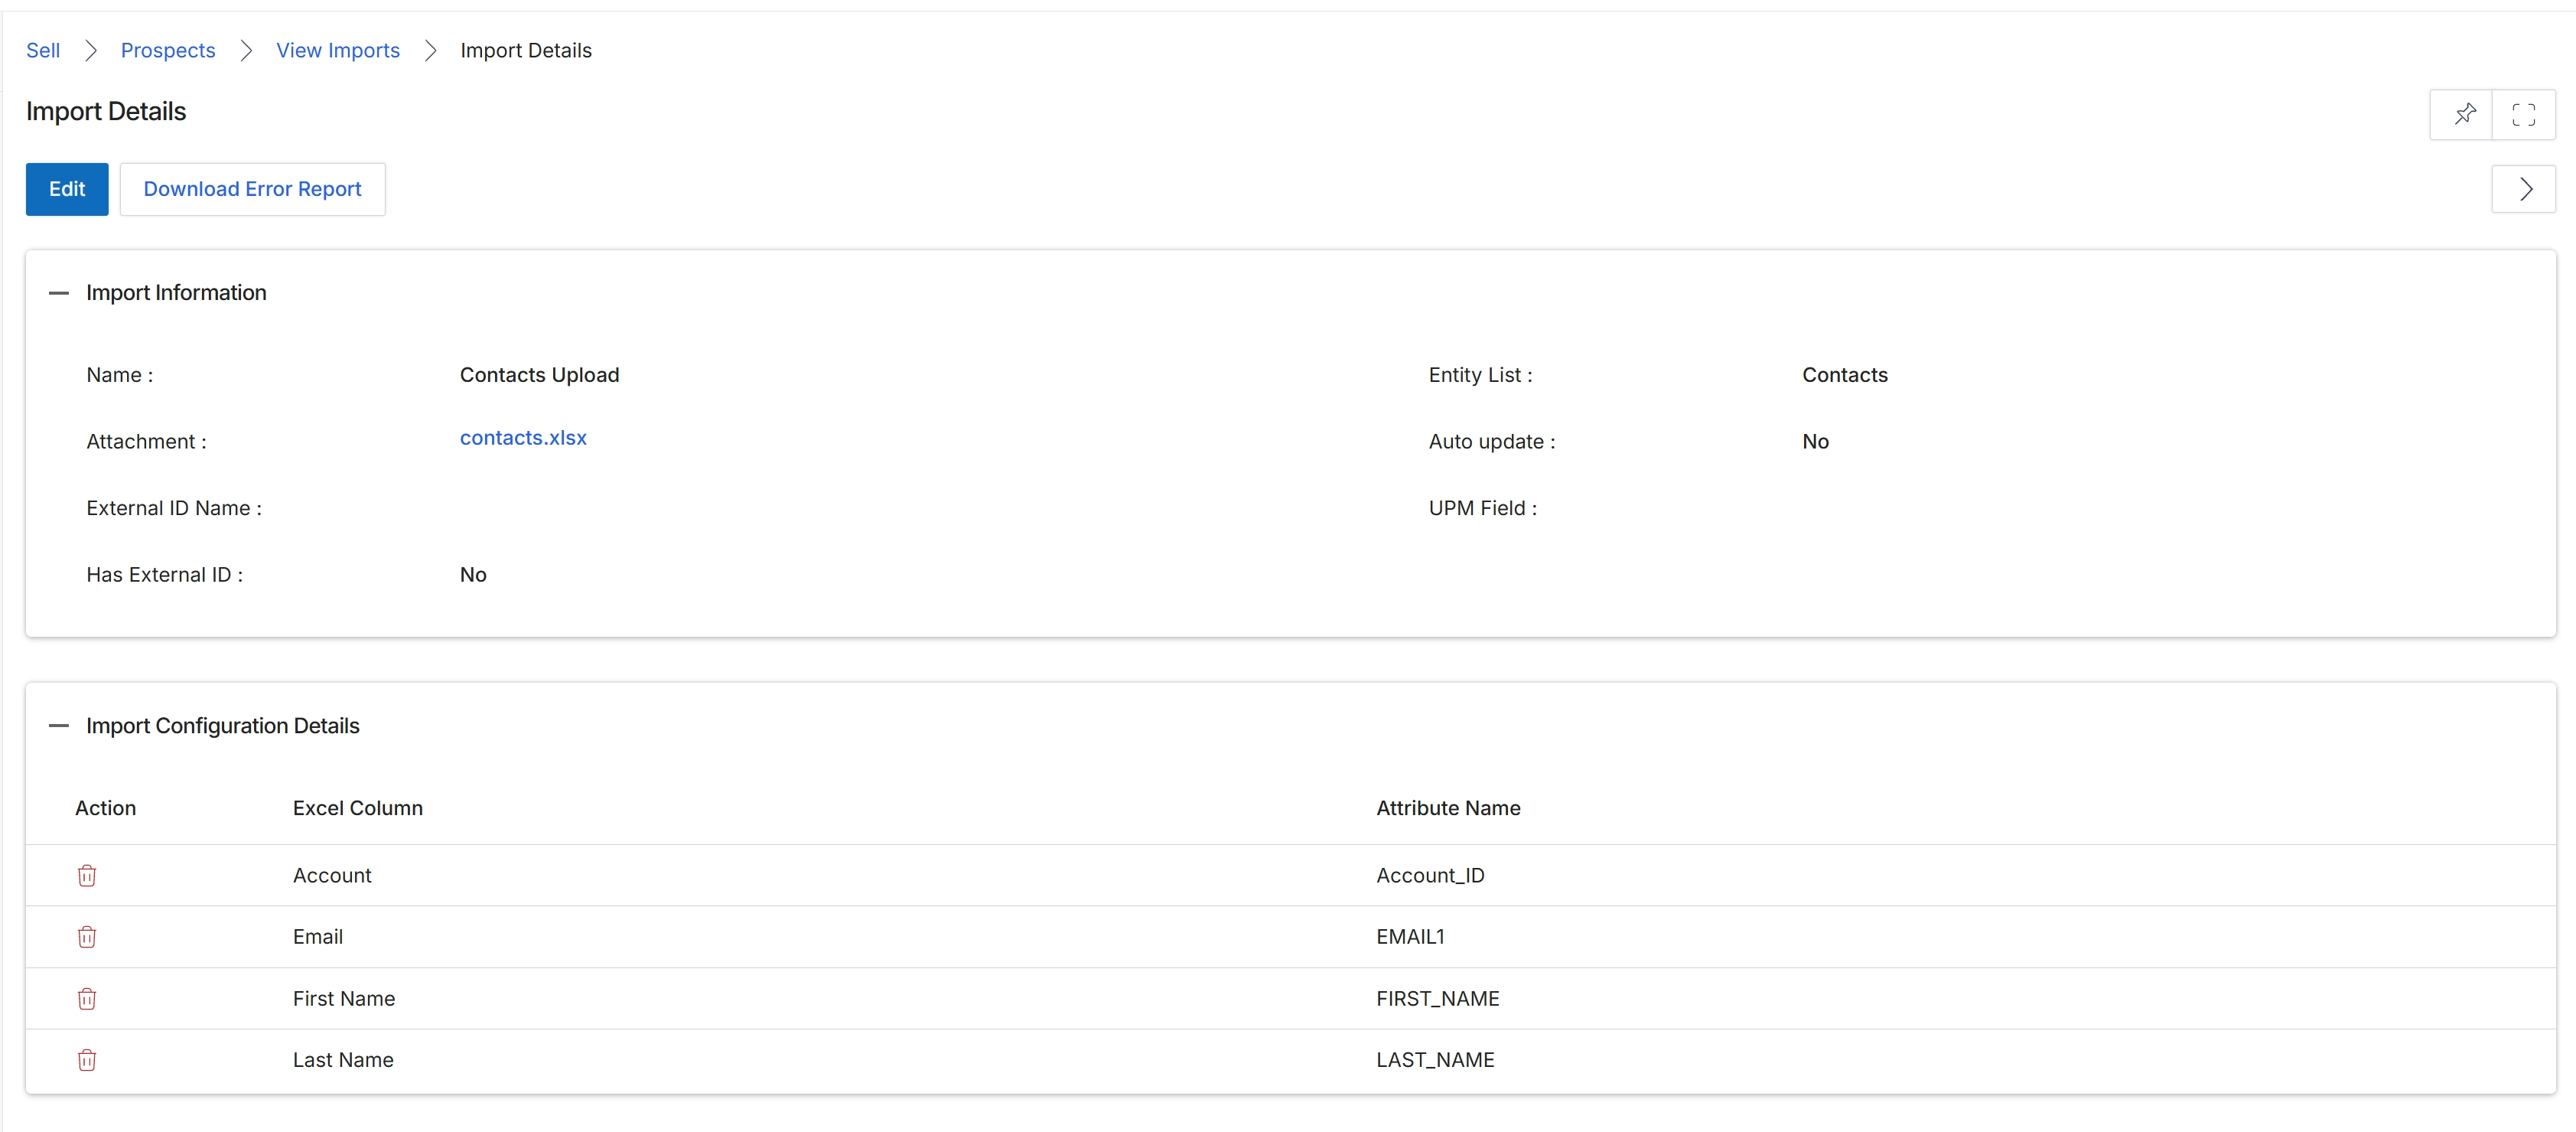
This screen displays the detailed configuration and status of a specific data import operation within the Prospects section of the Sell module. It provides an overview of the import's general information, such as its name, the attached file, and the target entity list, which in this case is 'Contacts'. The screen also details the import configuration, showing how columns from the imported Excel file are mapped to specific attributes within the platform, ensuring data integrity during the upload process.
Communicating with Prospects
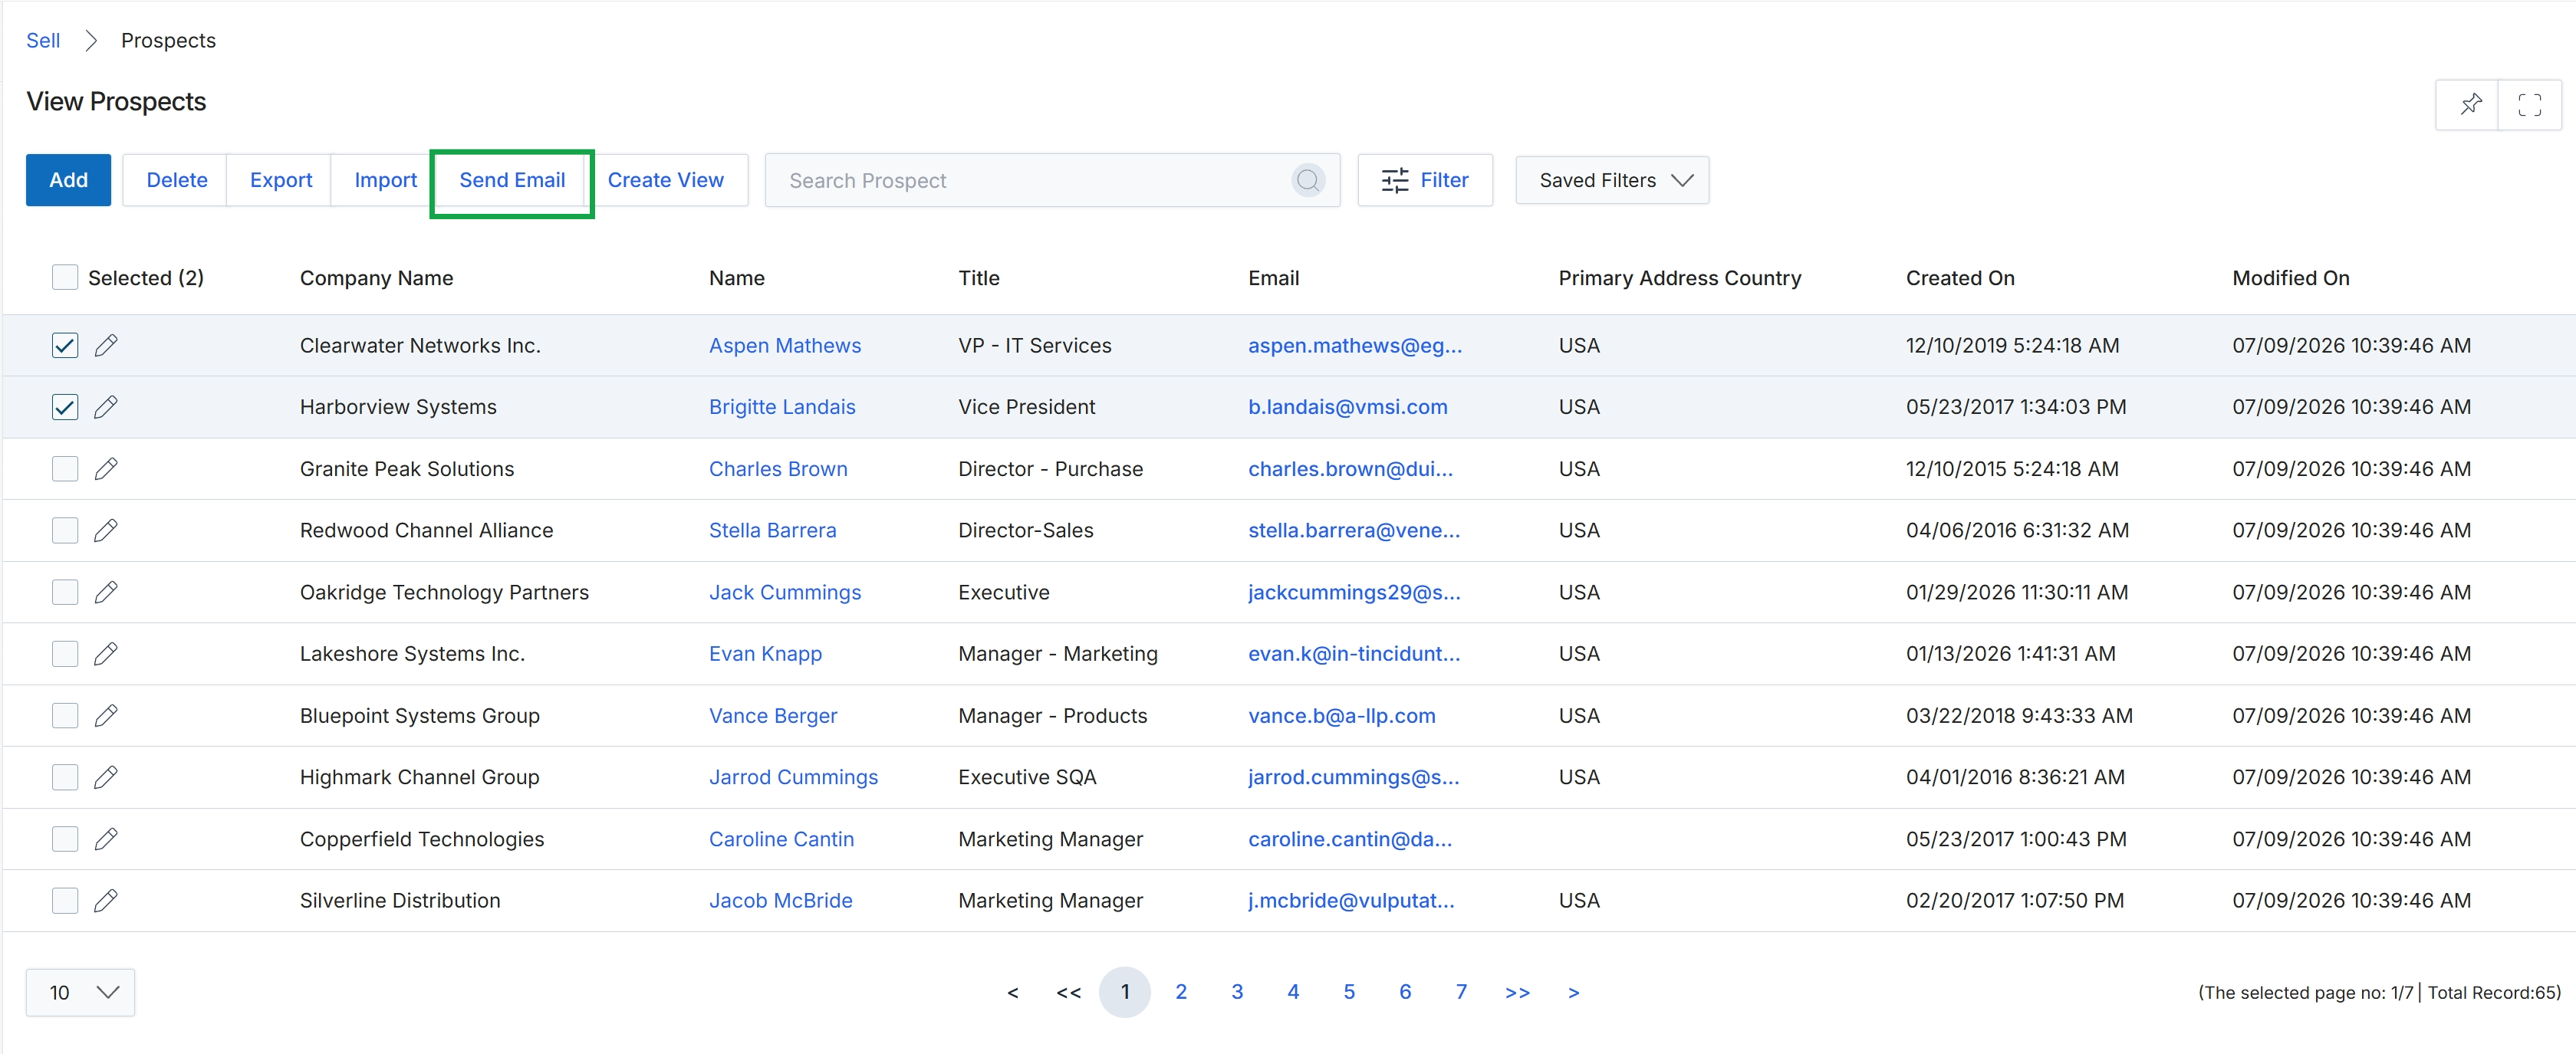
Click Prospects in the breadcrumb navigation to return to the Prospects list view.
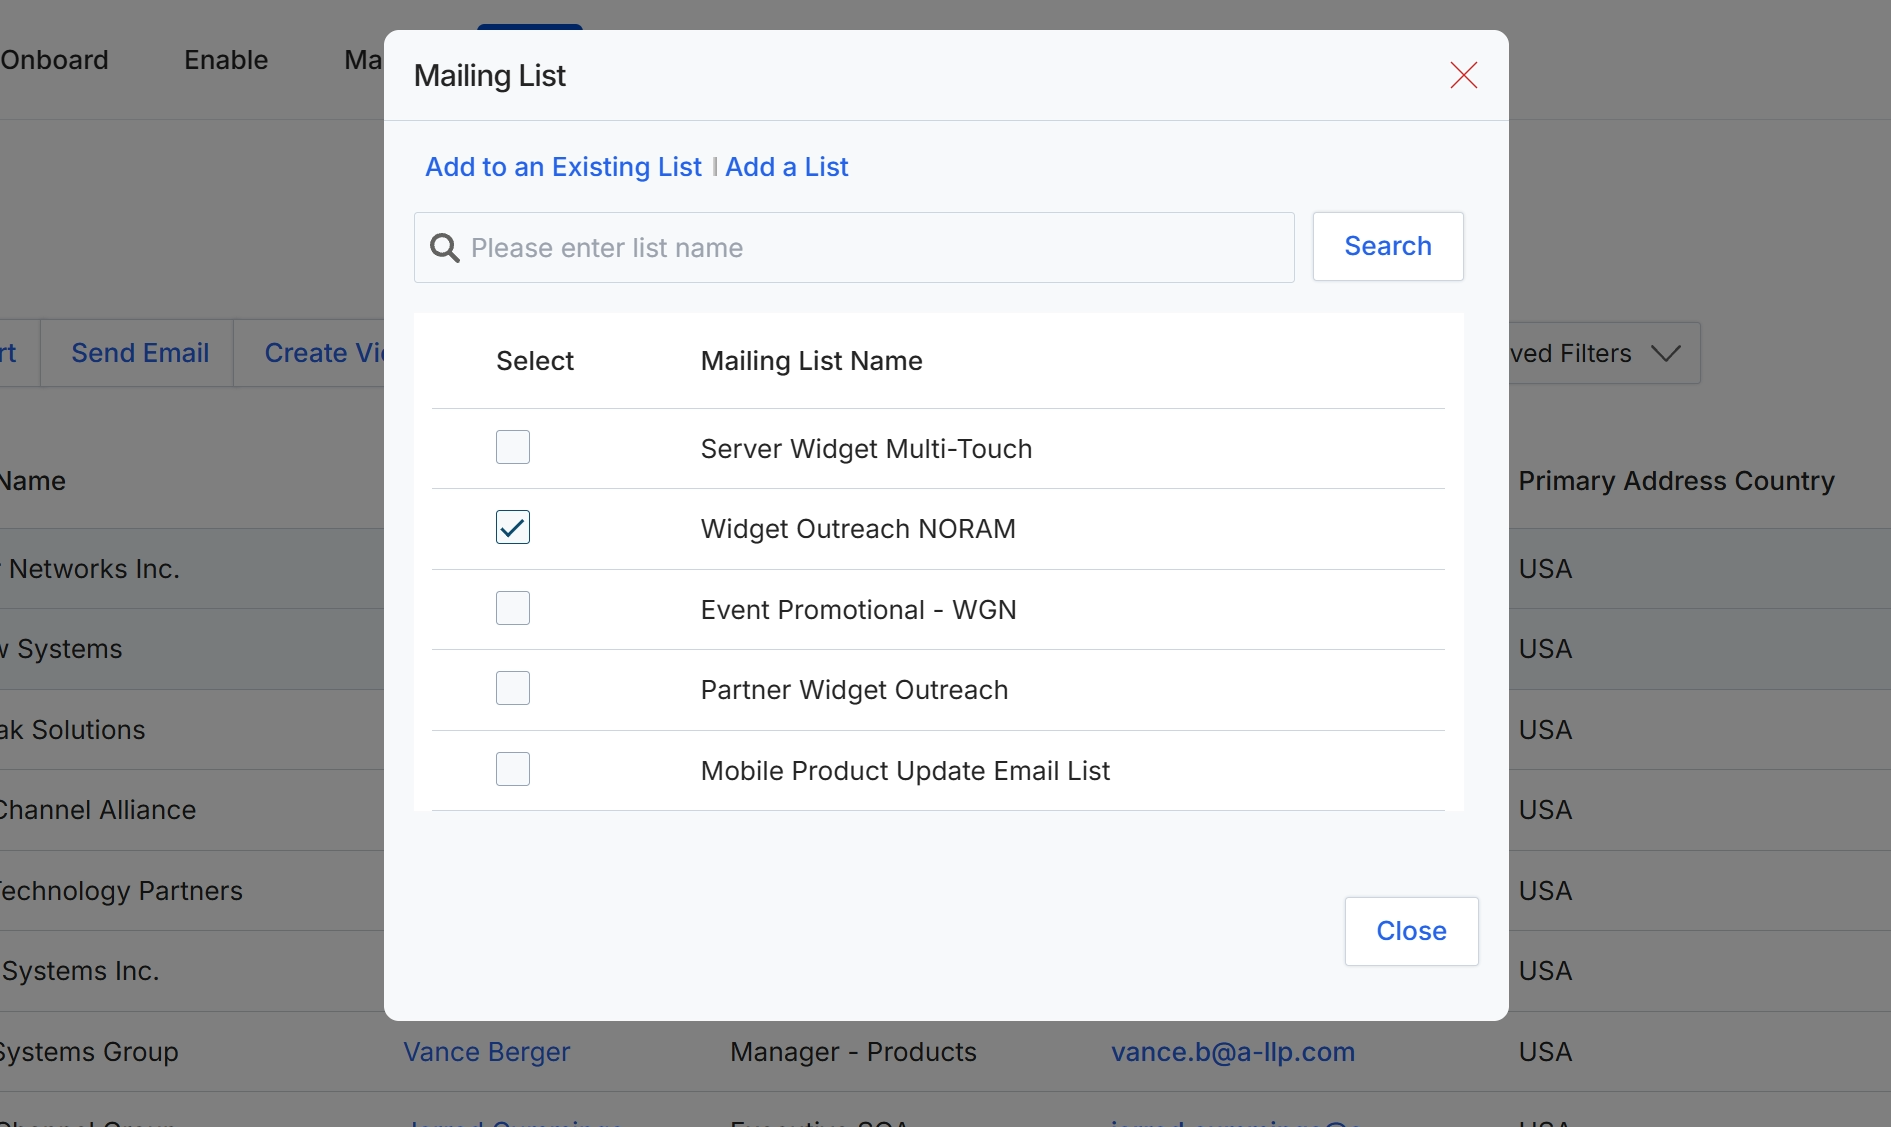
This modal dialog, titled 'Mailing List', enables users to manage the association of selected prospects with various mailing lists. It provides options to either add prospects to an existing list or create a new one, facilitating targeted communication and marketing efforts within the platform's prospect management capabilities. Users can search for specific lists and select multiple entries from the displayed options. This feature supports the workflow of nurturing prospects by categorizing them for future outreach campaigns.
Select the desired mailing list(s) to associate with the prospects.
Buttons
| Button | Description |
|---|---|
| Add to an Existing List | A link to add selected prospects to an existing mailing list. |
| Add a List | A link to create a new mailing list to associate with the selected prospects. |
| Search | Initiates a search for mailing lists based on the entered name. |
| Close | Closes the mailing list selection dialog and applies the selected associations. |
Fields
| Field | Description |
|---|---|
| Please enter list name | An input field to search for existing mailing lists by name. |
| Server Widget Multi-Touch | Checkbox to select the 'Server Widget Multi-Touch' mailing list. |
| Widget Outreach NORAM | Checkbox to select the 'Widget Outreach NORAM' mailing list. |
| Event Promotional - WGN | Checkbox to select the 'Event Promotional - WGN' mailing list. |
| Partner Widget Outreach | Checkbox to select the 'Partner Widget Outreach' mailing list. |
| Mobile Product Update Email List | Checkbox to select the 'Mobile Product Update Email List' mailing list. |
Column Headings
| Column | Description |
|---|---|
| Select | Column header for checkboxes used to select individual mailing lists. |
| Mailing List Name | Column header displaying the names of available mailing lists. |
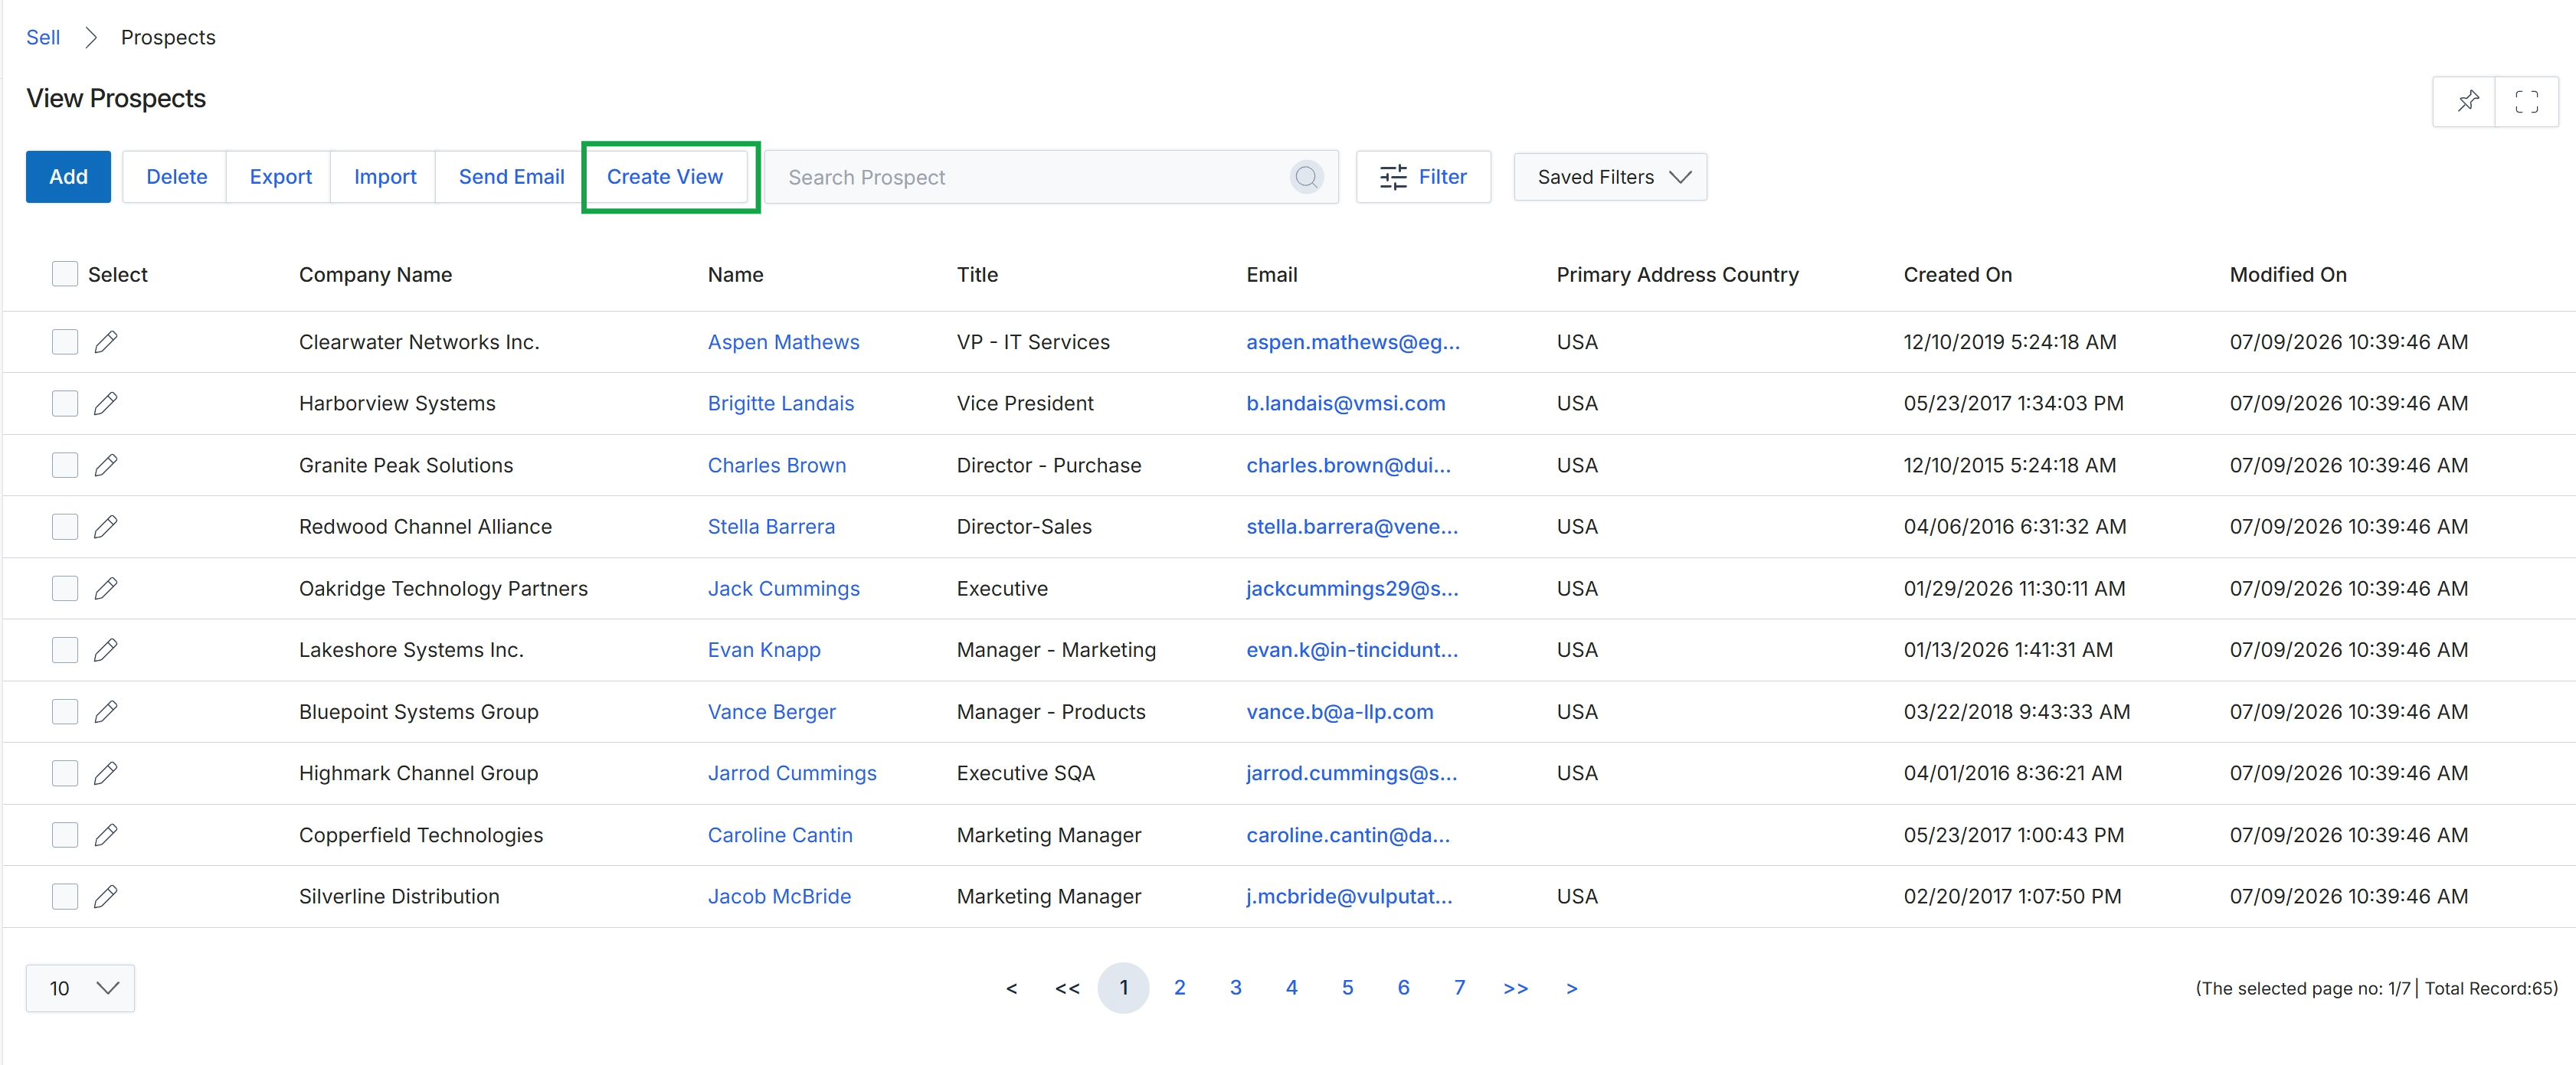
Click Create View.
Customizing Prospect Views and Filters
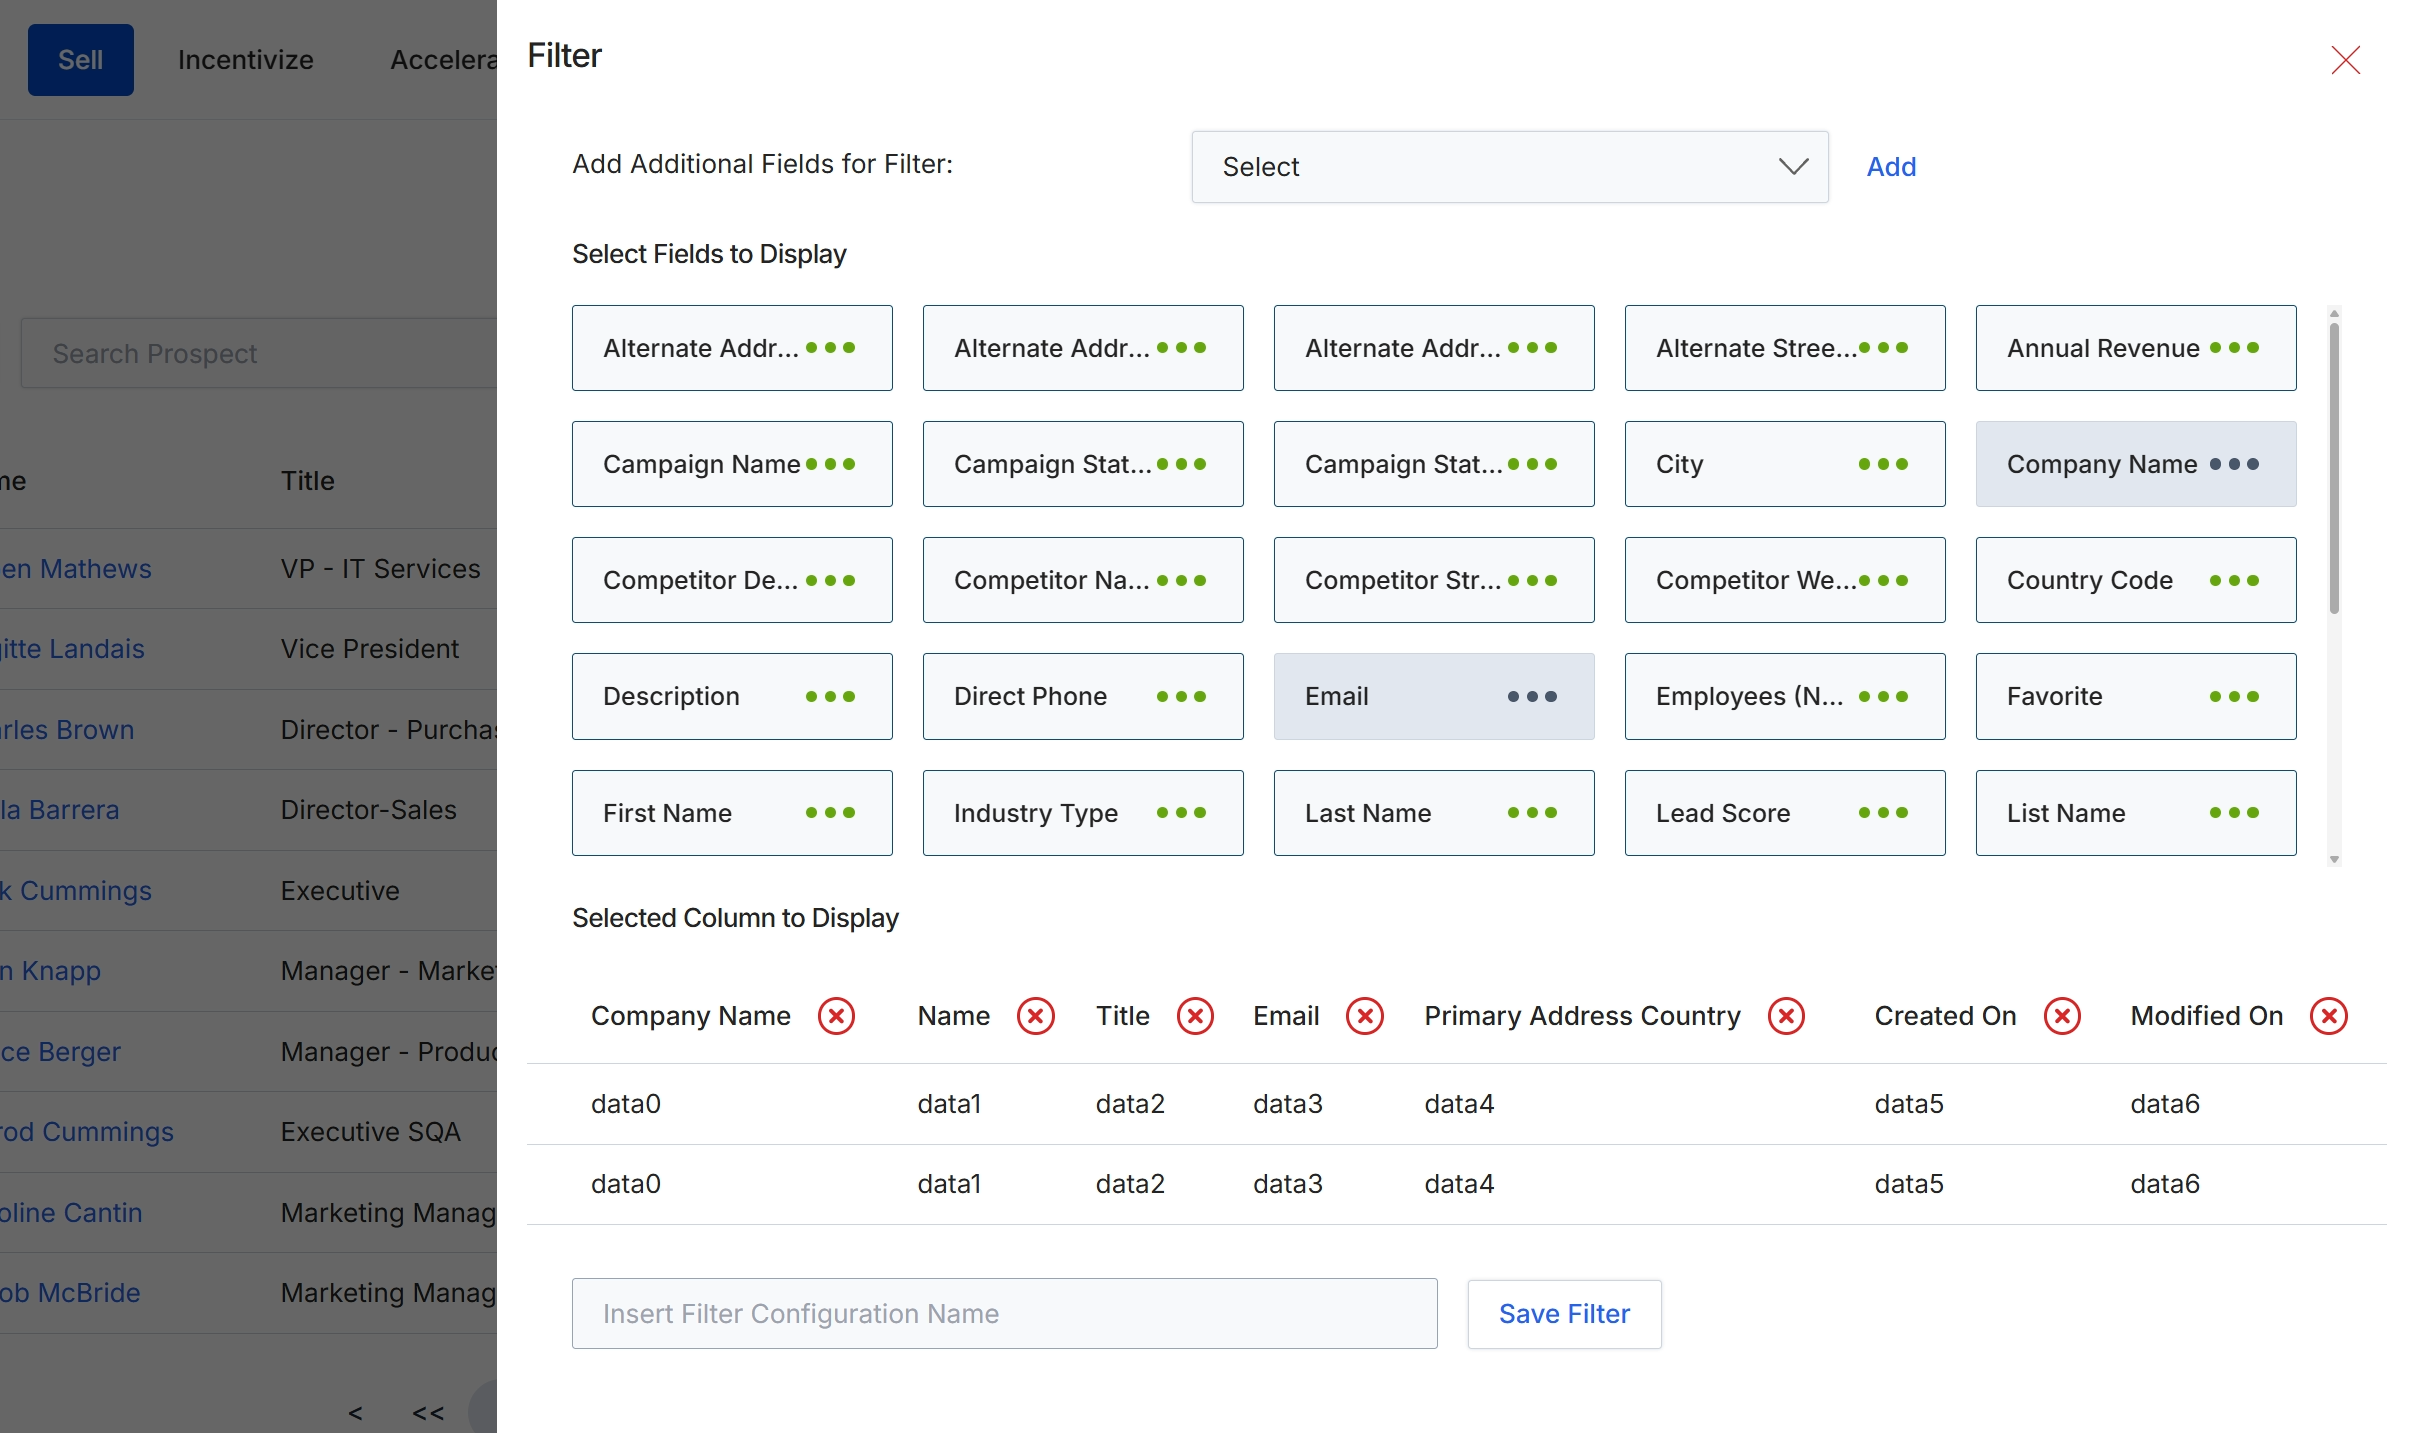
This filter configuration dialog allows UPM administrators to customize the display and filtering of prospect data within the Leads Management module. Users can select specific fields to be shown as columns in the prospect list view, enabling them to tailor the information presented to their analytical or operational needs. Additionally, the dialog supports defining filter criteria based on various prospect attributes, which helps in segmenting and analyzing the prospect pipeline. This customization capability enhances the usability of the prospect list by providing relevant data at a glance and facilitating targeted data analysis, which is crucial for managing early-stage sales contacts before they are qualified into leads or opportunities.
Select additional fields to display as columns in the prospect list view by clicking on them.
Buttons
| Button | Description |
|---|---|
| Add | Adds the selected field from the dropdown to the filter criteria. |
| Save Filter | A button to save the current filter configuration with the specified name. |
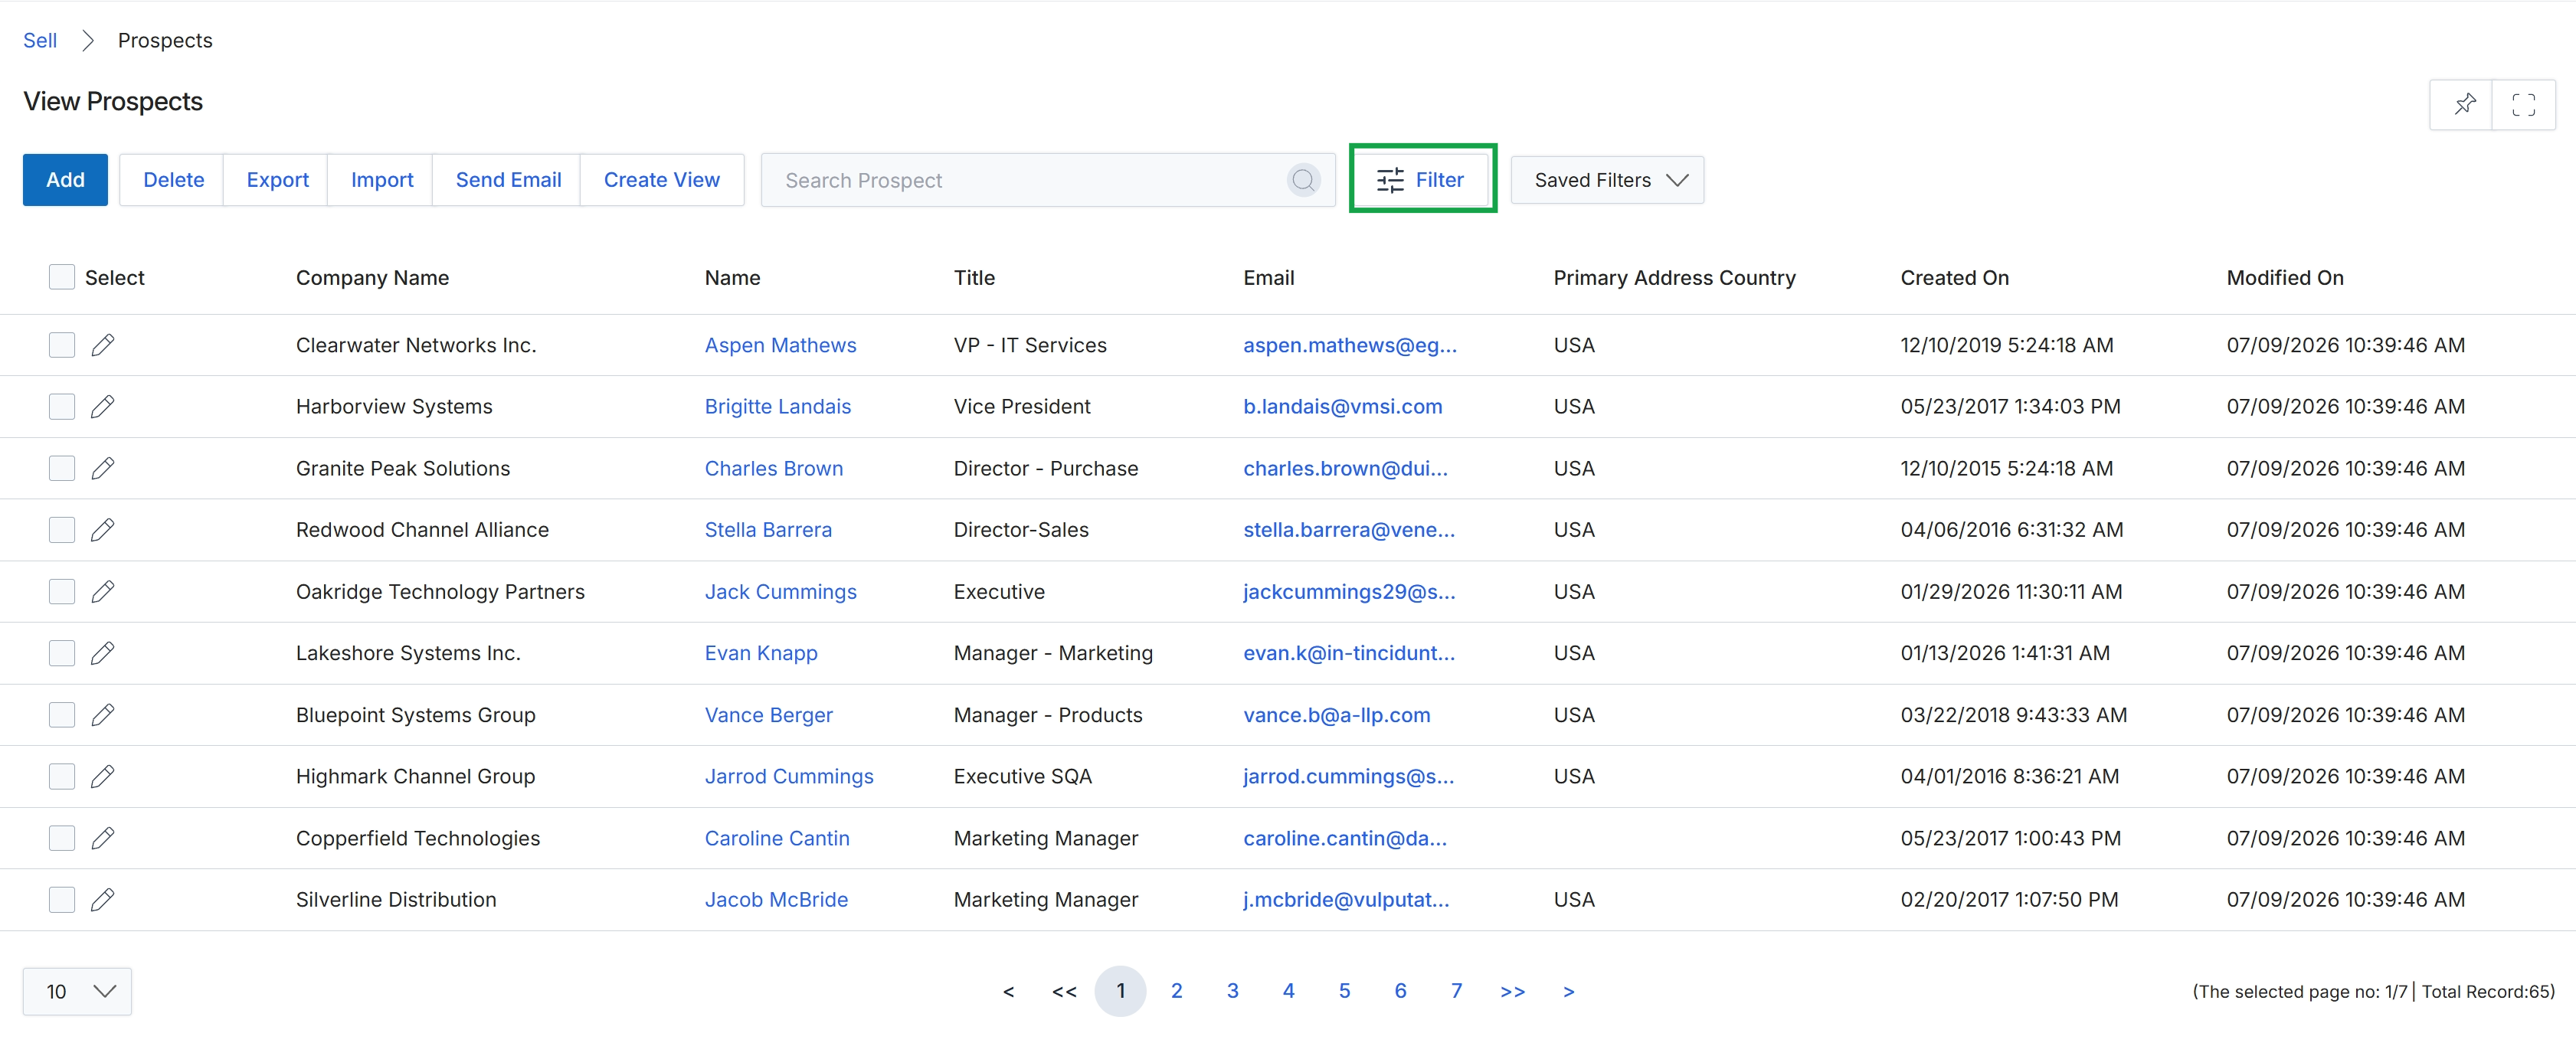
Click the Filter button to close the filter configuration panel.
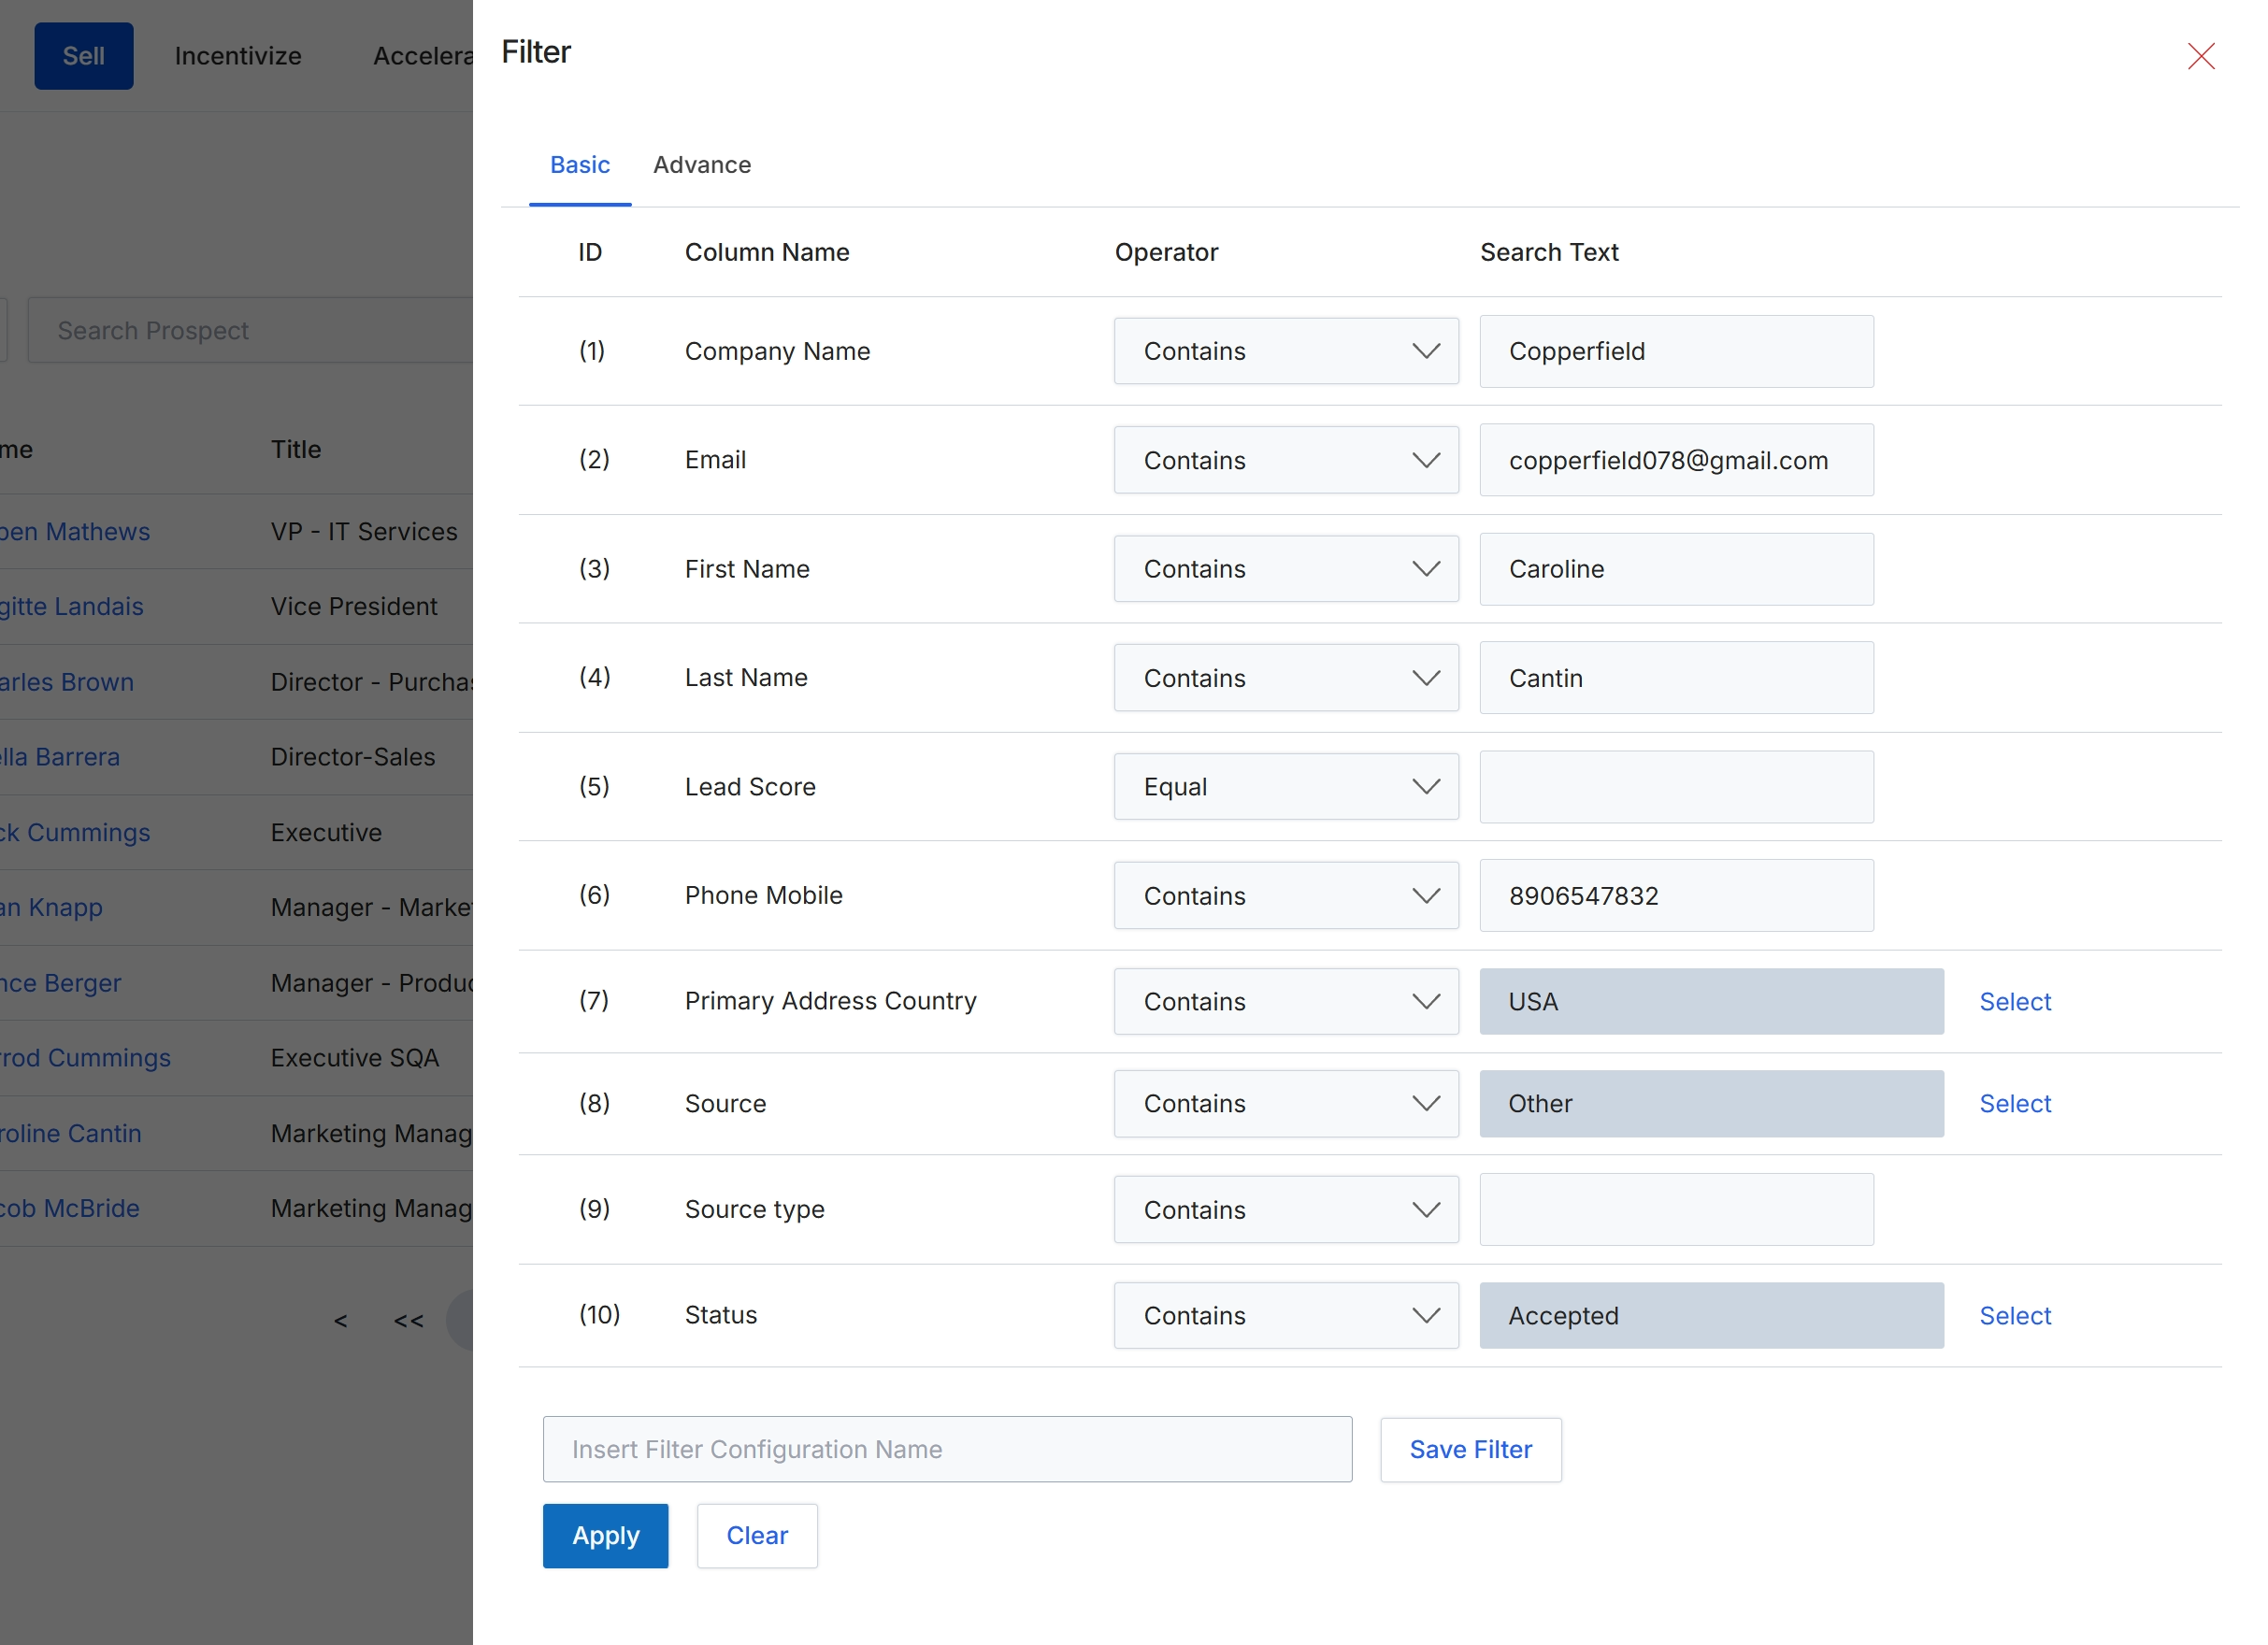
This slide-out panel provides filtering capabilities for the Prospect list view, allowing users to refine the displayed records based on specific criteria. It enables administrators to construct custom queries by combining multiple conditions, making it easier to locate specific prospects or narrow down the list for review. The panel supports both basic and advanced filtering options, and users can define conditions using various prospect attributes, operators, and search values. This focused filtering helps manage the potentially large volume of prospect data by presenting only the most relevant records for the user's current task.
Configure the filter conditions by selecting the desired column names, operators, and search text values.
Buttons
| Button | Description |
|---|---|
| Basic | Activates the basic filter configuration mode, allowing users to define filter conditions in a structured table format. |
| Advance | Switches to the advanced filter configuration mode, which typically offers more complex rule-building options (e.g., nested conditions, logical operators). |
| Save Filter | Saves the currently defined filter configuration under the name provided in the 'Insert Filter Configuration Name' field. |
| Apply | Applies the configured filter conditions to the Prospect list view, updating the displayed records. |
| Clear | Removes all active filter conditions and resets the filter panel. |
Fields
| Field | Description |
|---|---|
| Insert Filter Configuration Name | A text input field to enter a name for the current filter configuration, enabling it to be saved for future use. |
Column Headings
| Column | Description |
|---|---|
| ID | A numerical identifier for each filter condition row. |
| Column Name | The name of the prospect attribute to filter by, such as Company Name, Email, First Name, Last Name, Lead Score, Phone Mobile, Primary Address Country, Source, Source type, or Status. |
| Operator | The comparison operator to use for the filter condition (e.g., Contains, Equal, Greater Than, Less Than). |
| Search Text | The value or text to match against the selected column name using the specified operator. |
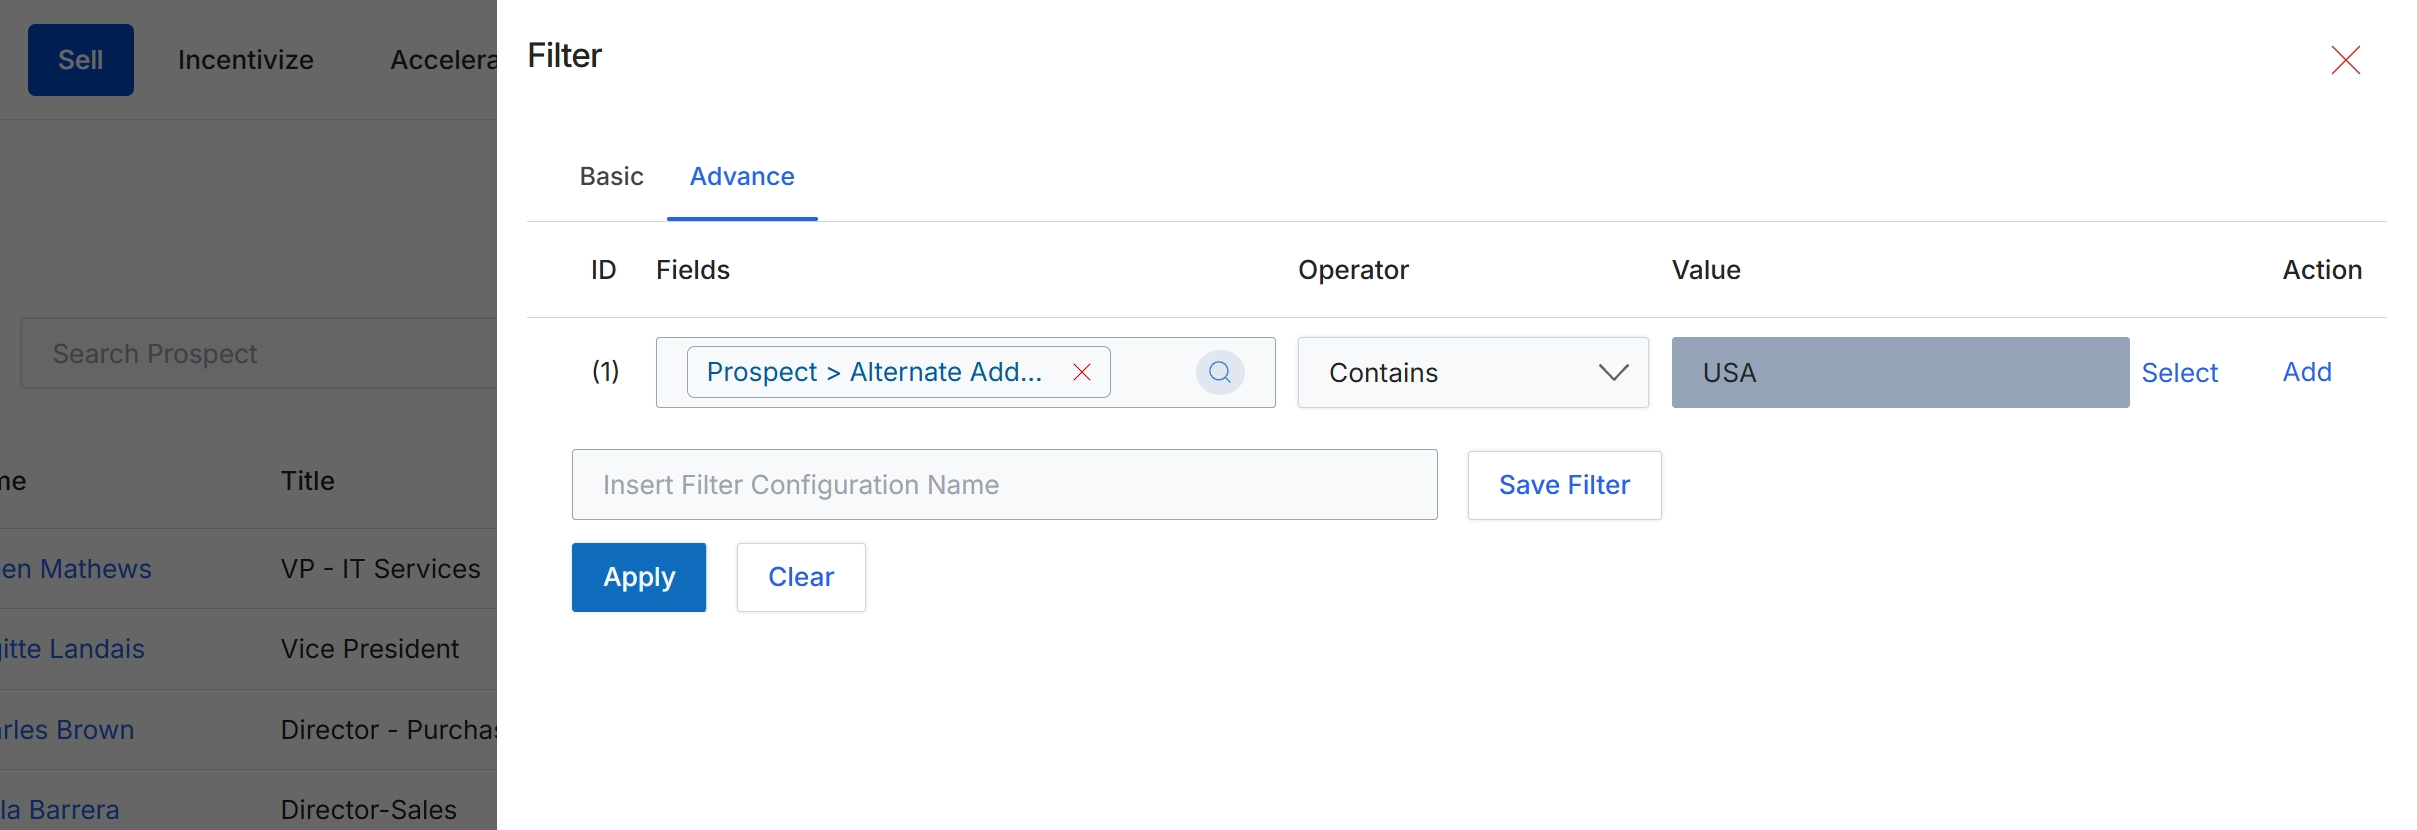
This modal provides advanced filtering capabilities for list views, allowing users to define complex search criteria using a combination of fields, operators, and values. It enables precise data segmentation beyond basic keyword searches, which is crucial for managing large datasets of prospects, leads, or deals. Users can construct multiple filter rules, combine them logically, and save frequently used configurations for future application. This functionality helps administrators and partners quickly locate specific records that match detailed business requirements, such as prospects from a particular region or with specific attributes, thereby streamlining workflow and improving data analysis.
Configure the advanced filter by specifying the fields, operators, and values for your search criteria, then click 'Apply' to filter the prospect list.
Buttons
| Button | Description |
|---|---|
| Basic | Switches to the basic filter configuration interface. |
| Advance | Switches to the advanced filter configuration interface, allowing for more complex rule-based filtering. |
| Select | Allows selection of a different field for the filter rule. |
| Add | Adds a new filter rule row to the advanced filter configuration. |
| Save Filter | Saves the current advanced filter configuration under the specified name. |
| Apply | Applies the configured filter rules to the current list view. |
| Clear | Clears all configured filter rules and resets the filter settings. |
Fields
| Field | Description |
|---|---|
| Prospect > Alternate Add... | The selected field for the current filter rule, indicating an alternate address field for a prospect. |
| Contains | The selected operator for the current filter rule, specifying that the field value should contain the specified text. |
| USA | The value entered for the current filter rule, indicating that the 'Alternate Address' field should contain 'USA'. |
| Insert Filter Configuration Name | Text input field to provide a name for the current filter configuration, allowing it to be saved for future use. |
Column Headings
| Column | Description |
|---|---|
| ID | Column header for the unique identifier of each filter rule. |
| Fields | Column header for the data field to which the filter rule applies. The current rule applies to 'Prospect > Alternate Add...'. |
| Operator | Column header for the logical operator used in the filter rule (e.g., 'Contains', 'Equals', 'Starts With'). The current rule uses 'Contains'. |
| Value | Column header for the specific value or criteria used in the filter rule. The current rule uses 'USA'. |
| Action | Column header for actions related to each filter rule, such as 'Select' or 'Add'. |